Insert and edit header and footer in Excel
What is very simple and self-evident in Word is unfortunately a Microsoft-made problem in Excel. It is about inserting and adjusting headers and footers in Excel. This is similar to moving pages in Word. In PowerPoint it is very easy to remove pages, and in other in-house software it is made complicated and can only be solved with workarounds. It also doesn’t matter whether you work with Office 365 or with Office 2019 or currently Office 2021. It’s the same problem everywhere.
This short article is only about how to insert and customize headers and footers in Excel. There are a few little pitfalls and limitations in Excel here and there, but I’ll try to give tips for them as best I can. And how it turns out good in the end.
Insert and customize header in Excel
Insert and customize header in Excel
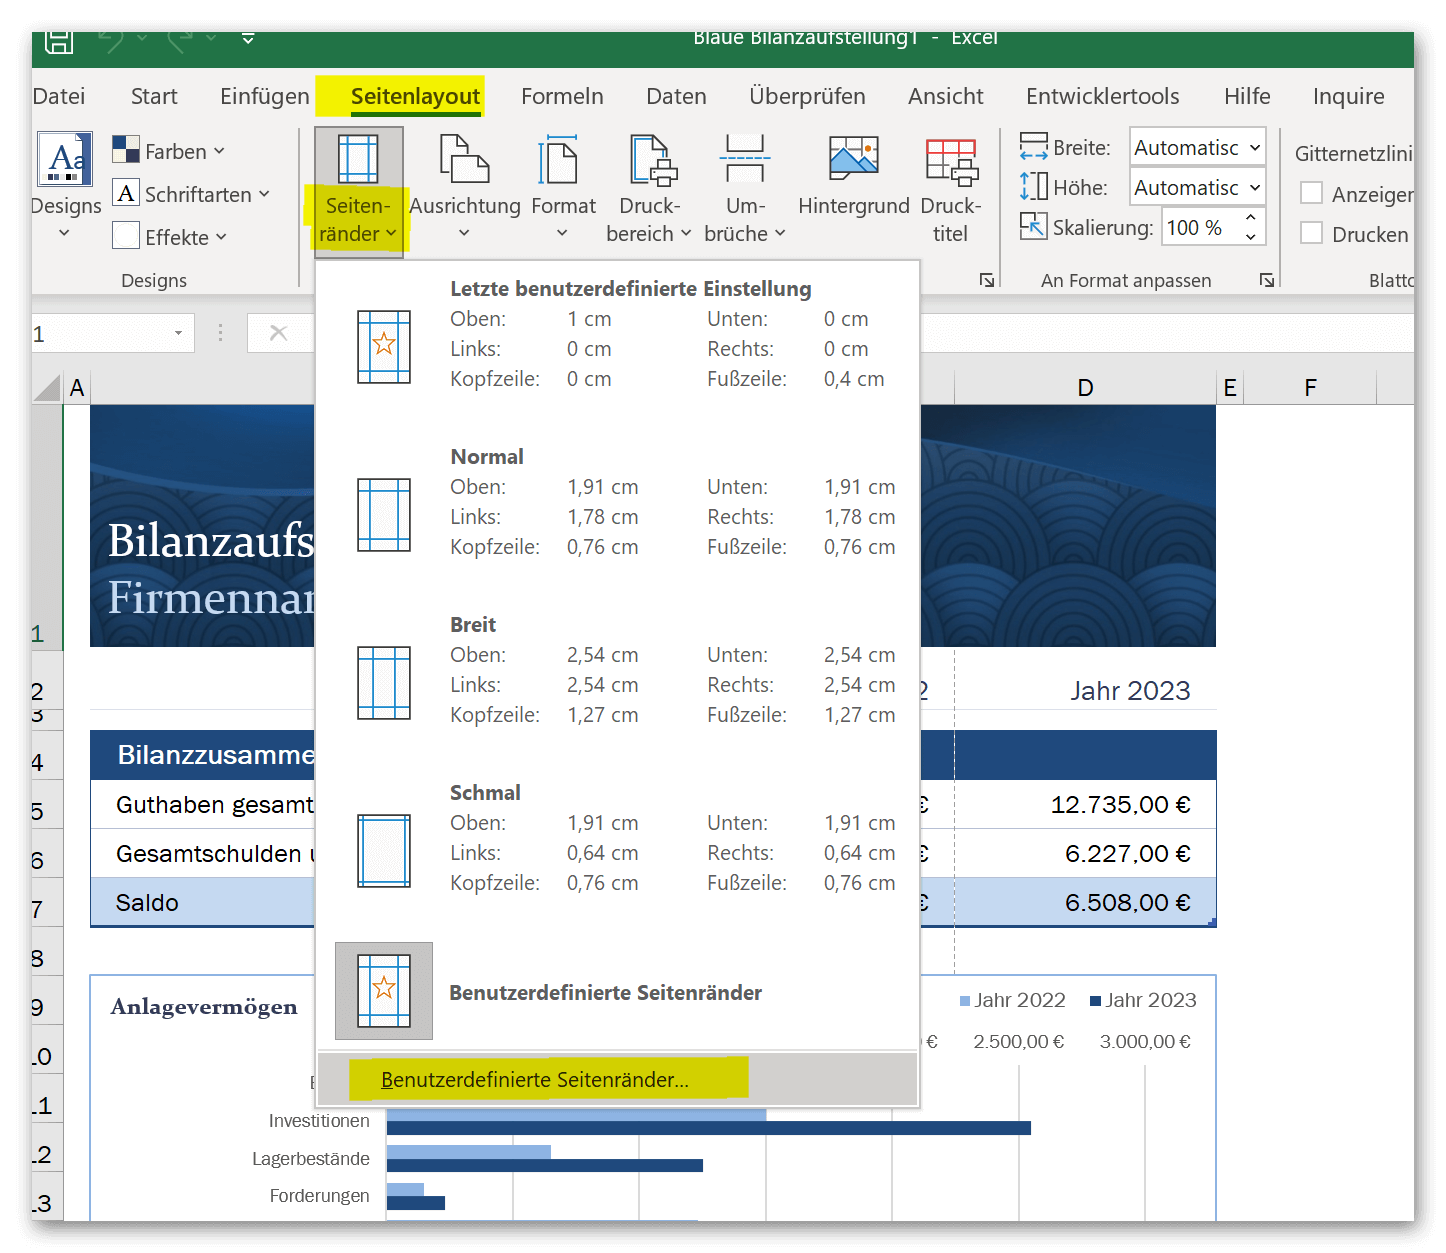
As usual, there are several ways of inserting headers in Excel. The first way is the easier one and is to go to the „Page Layout – Custom Margins“ tab and then select the Header/Footer tab in the dialog box. Here you can not only define the layout settings with margins etc., but also adjust the headers and footers.
see fig. (click to enlarge)
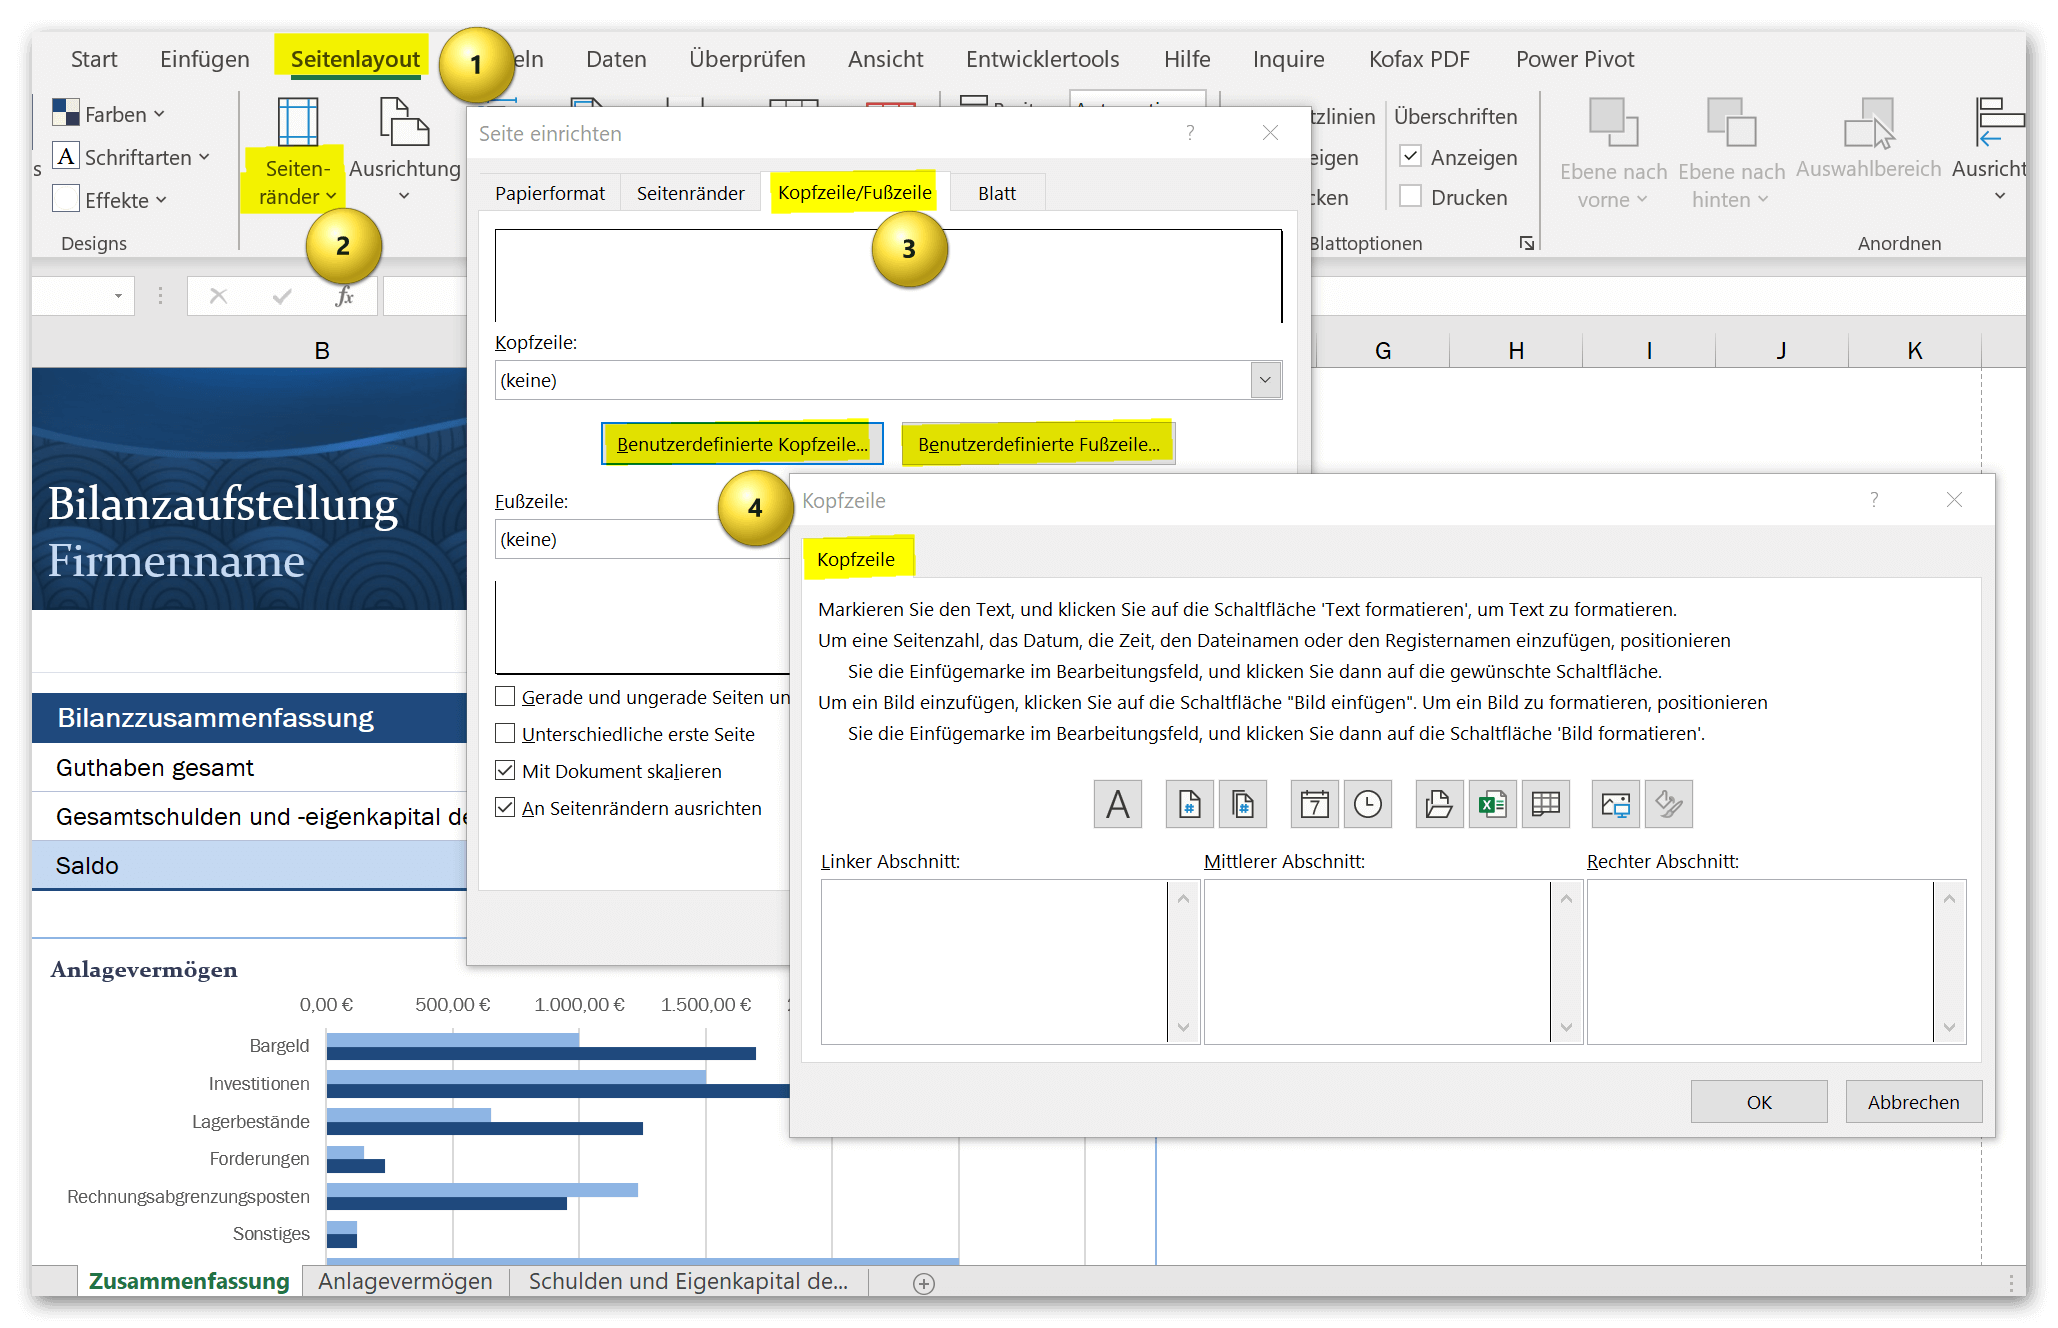
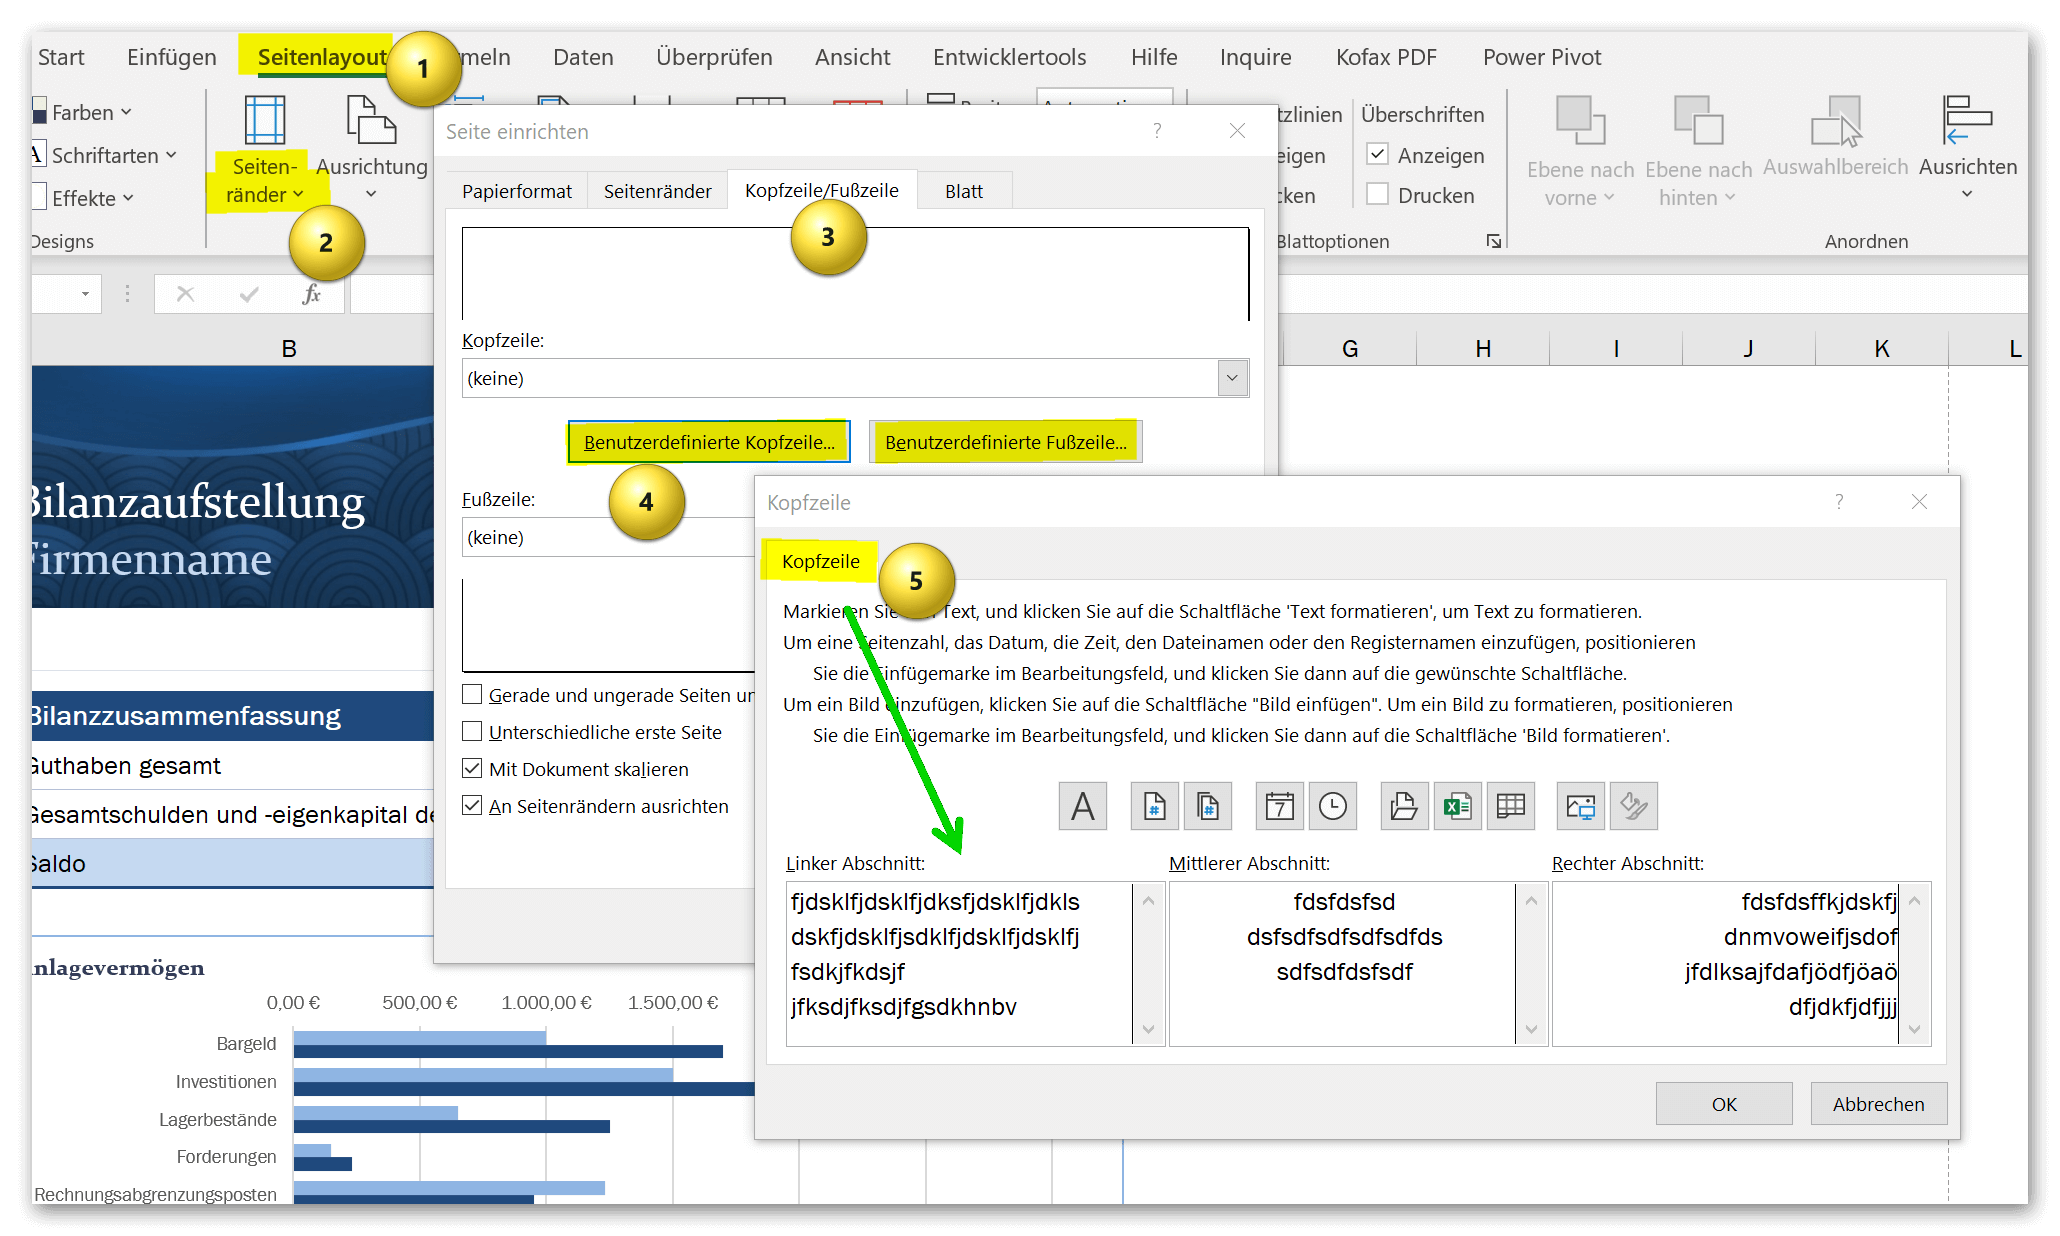
Here you have the option of inserting common content such as the page number, date, document title, etc. for the header and footer. As in Word, you can also provide the first page with a different header than the following pages. Something like this is of course ideal for invoice documents, for example, where the company logo should only appear on the first but not on the following pages. I would keep the „Align to margin“ and „Scale with document“ checked so that the header and footer are flush with the rest of the content in the document.
If you select the custom header and footer options in the dialog box, you will quickly notice how limited Excel is in contrast to Word. The fact that you only have the option of jumping between three content windows to add content would be something you could live with, but that’s not all, unfortunately, the orientation of the content is also fixed. The content in the left content window is left-aligned, the text is centered in the middle window and right-aligned in the right window.
Unfortunately, this has always been the case, and Microsoft doesn’t bother with it either, because there is probably too little interest and pressure from users.
see fig. (click to enlarge)
By the way, it’s the same problem with both the header and the footer that you have to deal with here. In the case of the header, where perhaps there is only a logo, you can possibly get used to it, and since such an element is usually aligned to the right, left or center anyway. But that doesn’t work with the footer. At least not in the middle content section.
The only viable way I see at this point is to use the option that Excel also offers. You can also include graphics in the header and footer. I therefore recommend the following:
- Create a footer in Word of your choice.
- Take a screenshot (shortcut for Windows: Windows logo key + SHIFT + S) of the area that will later be used as a footer in Excel.
- Paste the graphic into the middle section with the center alignment.
You may have to adjust the page spacing and the print area a bit (easiest to check in the print preview in Excel) so that it looks good. But unfortunately you don’t have many more options in Excel. Another Wordaround would be to create a Word document with sensible headers and footers and then insert your Excel spreadsheet into Word.
By the way: At the beginning I wrote that there are several ways to get to the header and footer settings in Excel. I have already described the easy way. But for the sake of completeness I wanted to briefly describe the other way:
- Go to Header and Footer from the Insert tab
- At the top left (under File) you can then jump between the header and footer and insert content directly.
A small advantage of this way is that you get the header and footer displayed directly in the document, but the disadvantage is that many users often do not know how to get out of the view to continue working on the document. This only works via the „View“ tab and then „Normal“. But I won’t go into it any further at this point, because I’m actually trying to explain things as simply as possible.
As usual, there are several ways of inserting headers in Excel. The first way is the easier one and is to go to the „Page Layout – Custom Margins“ tab and then select the Header/Footer tab in the dialog box. Here you can not only define the layout settings with margins etc., but also adjust the headers and footers.
see fig. (click to enlarge)
Here you have the option of inserting common content such as the page number, date, document title, etc. for the header and footer. As in Word, you can also provide the first page with a different header than the following pages. Something like this is of course ideal for invoice documents, for example, where the company logo should only appear on the first but not on the following pages. I would keep the „Align to margin“ and „Scale with document“ checked so that the header and footer are flush with the rest of the content in the document.
If you select the custom header and footer options in the dialog box, you will quickly notice how limited Excel is in contrast to Word. The fact that you only have the option of jumping between three content windows to add content would be something you could live with, but that’s not all, unfortunately, the orientation of the content is also fixed. The content in the left content window is left-aligned, the text is centered in the middle window and right-aligned in the right window.
Unfortunately, this has always been the case, and Microsoft doesn’t bother with it either, because there is probably too little interest and pressure from users.
see fig. (click to enlarge)
By the way, it’s the same problem with both the header and the footer that you have to deal with here. In the case of the header, where perhaps there is only a logo, you can possibly get used to it, and since such an element is usually aligned to the right, left or center anyway. But that doesn’t work with the footer. At least not in the middle content section.
The only viable way I see at this point is to use the option that Excel also offers. You can also include graphics in the header and footer. I therefore recommend the following:
- Create a footer in Word of your choice.
- Take a screenshot (shortcut for Windows: Windows logo key + SHIFT + S) of the area that will later be used as a footer in Excel.
- Paste the graphic into the middle section with the center alignment.
You may have to adjust the page spacing and the print area a bit (easiest to check in the print preview in Excel) so that it looks good. But unfortunately you don’t have many more options in Excel. Another Wordaround would be to create a Word document with sensible headers and footers and then insert your Excel spreadsheet into Word.
By the way: At the beginning I wrote that there are several ways to get to the header and footer settings in Excel. I have already described the easy way. But for the sake of completeness I wanted to briefly describe the other way:
- Go to Header and Footer from the Insert tab
- At the top left (under File) you can then jump between the header and footer and insert content directly.
A small advantage of this way is that you get the header and footer displayed directly in the document, but the disadvantage is that many users often do not know how to get out of the view to continue working on the document. This only works via the „View“ tab and then „Normal“. But I won’t go into it any further at this point, because I’m actually trying to explain things as simply as possible.
Popular Posts:

Outlook fragt ständig nach dem Passwort? So stoppen Sie die Dauerschleife
Wenn Outlook trotz gespeichertem Passwort ständig nach den Anmeldedaten fragt, blockiert das den E-Mail-Verkehr. Meist helfen das Löschen defekter Windows-Anmeldedaten oder neue App-Passwörter. Erfahren Sie hier, wie Sie das Problem mit wenigen Klicks dauerhaft lösen.

Mikrofon geht nicht in Teams, Zoom oder Meet?
Ein stummes Mikrofon im Meeting ist frustrierend. Oft sind kleine Hardware-Fehler, fehlende System-Rechte oder falsche App-Einstellungen schuld. Dieser Ratgeber liefert Ihnen systematische Schritt-für-Schritt-Lösungen, damit Sie in Teams, Zoom und Meet wieder gehört werden.

Der Drucker druckt nicht: Ursachen, Fehlerquellen und schnelle Lösungen
Ein streikender Drucker kostet Nerven, lässt sich aber meist schnell reparieren. In diesem Ratgeber zeigen wir dir Schritt für Schritt, wie du Papierstaus, WLAN-Abbrüche, Treiberfehler und leere Patronen erkennst und behebst, damit dein Gerät sofort wieder druckt.

Was tun, wenn Outlook nicht mehr startet oder abstürzt?
Wenn Microsoft Outlook plötzlich einfriert oder sich nicht öffnen lässt, ist schnelle Hilfe gefragt. In diesem Artikel zeigen wir Ihnen die effektivsten Lösungswege – vom abgesicherten Modus über die Office-Reparatur bis hin zum Reparieren beschädigter Datendateien.

Erste Hilfe: Wenn das Windows-Update hängt
Ein eingefrorenes Windows-Update ist ärgerlich, lässt sich aber meist schnell lösen. Dieser Ratgeber zeigt Ihnen, wie Sie mit Geduld, einem sicheren Neustart und Windows-Bordmitteln wie der Problembehandlung oder dem Leeren des Caches das System wieder zum Laufen bringen.

Reibungsloser Wechsel: Passwörter und Lesezeichen sicher umziehen
Der Wechsel auf einen neuen PC oder Browser ist schnell erledigt. Mit unserer Anleitung exportieren und importieren Sie Lesezeichen und Passwörter absolut sicher. Erfahren Sie, worauf Sie bei Chrome, Firefox und Edge achten müssen und warum ein Passwortmanager lohnt.
Angebote 2025/2026 in: Vorlagen


Popular Posts:
Outlook fragt ständig nach dem Passwort? So stoppen Sie die Dauerschleife
Wenn Outlook trotz gespeichertem Passwort ständig nach den Anmeldedaten fragt, blockiert das den E-Mail-Verkehr. Meist helfen das Löschen defekter Windows-Anmeldedaten oder neue App-Passwörter. Erfahren Sie hier, wie Sie das Problem mit wenigen Klicks dauerhaft lösen.
Mikrofon geht nicht in Teams, Zoom oder Meet?
Ein stummes Mikrofon im Meeting ist frustrierend. Oft sind kleine Hardware-Fehler, fehlende System-Rechte oder falsche App-Einstellungen schuld. Dieser Ratgeber liefert Ihnen systematische Schritt-für-Schritt-Lösungen, damit Sie in Teams, Zoom und Meet wieder gehört werden.
Der Drucker druckt nicht: Ursachen, Fehlerquellen und schnelle Lösungen
Ein streikender Drucker kostet Nerven, lässt sich aber meist schnell reparieren. In diesem Ratgeber zeigen wir dir Schritt für Schritt, wie du Papierstaus, WLAN-Abbrüche, Treiberfehler und leere Patronen erkennst und behebst, damit dein Gerät sofort wieder druckt.
Was tun, wenn Outlook nicht mehr startet oder abstürzt?
Wenn Microsoft Outlook plötzlich einfriert oder sich nicht öffnen lässt, ist schnelle Hilfe gefragt. In diesem Artikel zeigen wir Ihnen die effektivsten Lösungswege – vom abgesicherten Modus über die Office-Reparatur bis hin zum Reparieren beschädigter Datendateien.
Erste Hilfe: Wenn das Windows-Update hängt
Ein eingefrorenes Windows-Update ist ärgerlich, lässt sich aber meist schnell lösen. Dieser Ratgeber zeigt Ihnen, wie Sie mit Geduld, einem sicheren Neustart und Windows-Bordmitteln wie der Problembehandlung oder dem Leeren des Caches das System wieder zum Laufen bringen.
Reibungsloser Wechsel: Passwörter und Lesezeichen sicher umziehen
Der Wechsel auf einen neuen PC oder Browser ist schnell erledigt. Mit unserer Anleitung exportieren und importieren Sie Lesezeichen und Passwörter absolut sicher. Erfahren Sie, worauf Sie bei Chrome, Firefox und Edge achten müssen und warum ein Passwortmanager lohnt.
Angebote 2025/2026 in: Vorlagen