Create Out of Office Notice in Outlook
When the vacation time starts, and the desk does not want to let you go, because the stream of e-mails that you want to be answered does not tear off, that can be annoying.
But there is the absence assistant in Outlook, which informs the sender not only that you finally enjoy your deserved break, but also ensures that important e-mails are still processed by forwarding to a colleague.
You can find out how to activate the Out of Office Assistant in Outlook in our article.
1. What do I need for the Out of Office Assistant?
1. What do I need for the Out of Office Assistant?
In order for the Out of Office Assistant to work as you would expect, you need an Exchange-compatible email account in addition to Outlook as Exchange Client software, as well as a Mail Exchange Server which – in contrast to normal email accounts – simply receive your emails Provide retrieval – the task is not only to receive emails, but also to set rules for them.
Large companies usually maintain their own mail servers on which the Microsoft Exchange software (or alternatives) are installed. Such a thing is worthwhile for individuals, freelancers, and single self-employed but usually not.
But there are also solutions for the private sector and small businesses:
Check if your provider offers the possibility to convert your existing email account into an Exchange compatible one, or hire a Small Business Hosted Exchange solution from a professional company.
These are already available from about 2, – € per month, and also offer many other benefits such as:
- reliable virus protection
- regular backups
2. Create Out of Office Notice with Exchange Account
2. Create Out of Office Notice with Exchange Account
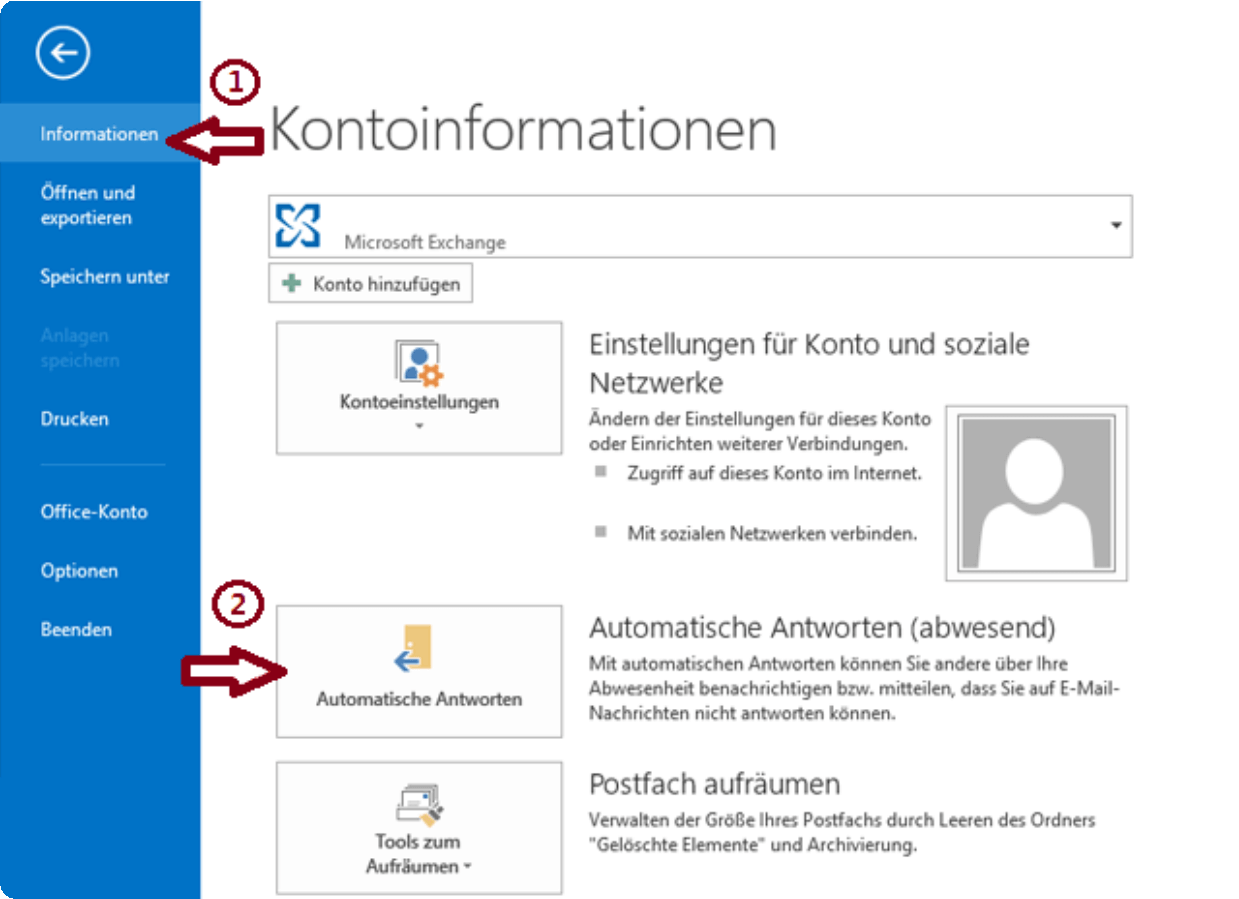
If you have set up a corresponding e-mail account in Outlook, a new button named “Automatic answers” will now be visible under the “File” – “Information” tab.
Note: This button is only displayed if you have registered an Exchange compatible email account in Outlook.
See picture: (click to enlarge)
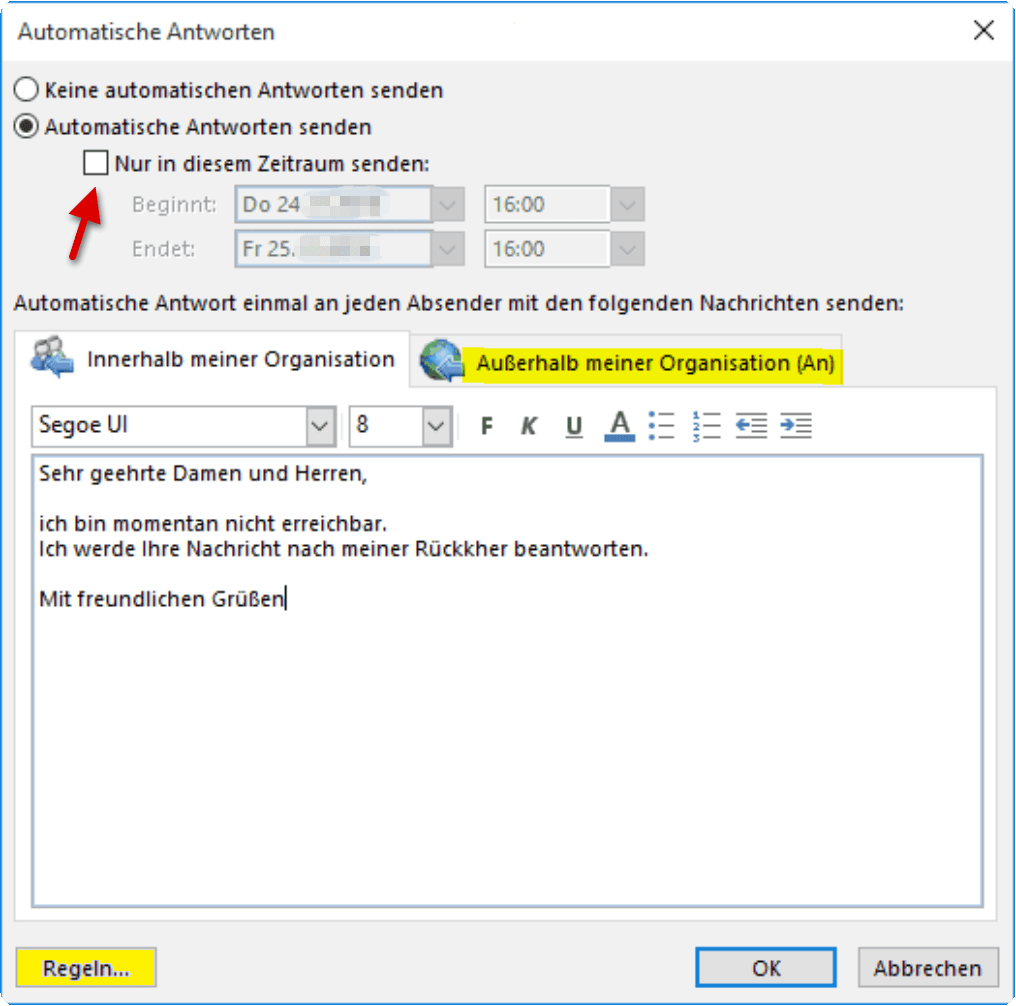
In the next dialog box, you can then specify the desired standardized message to be displayed to everyone, as well as the desired period in which you yourself will not answer any messages.
In any case, make sure under which tab you enter which settings and automatic messages. There is a distinction between:
- Within my organization
- Outside my organization
The first point concerns only e-mail accounts that are in your in-house network, while the second point concerns all e-mail accounts coming in from outside.
You can further specify your absence notice under the heading “Rules” below and there among other things:
- For certain senders have their own automated messages output
- In addition to the automatic answer, set up a forwarding (eg to a work colleague) and much more.
After activating the Out of Office Assistant, you will see this again every time you open Outlook. In this way, do not forget to disable it when it is available again.
See picture: (click to enlarge)
3. Create Out of Office Notice without Exchange Account
3. Create Out of Office Notice without Exchange Account
Now you might think:
“If there is no charge for an Exchange Server, why hire one?”
It is true that only a mail exchange server can offer you the possibility to organize the email traffic in your absence in a way that makes sense. Therefore, the method described here is really just a stopgap that is not actually recommended permanently.
As previously described, the Auto Reply button will only be displayed if we have added an Exchange E-mail account in Outlook. So we do a workaround:
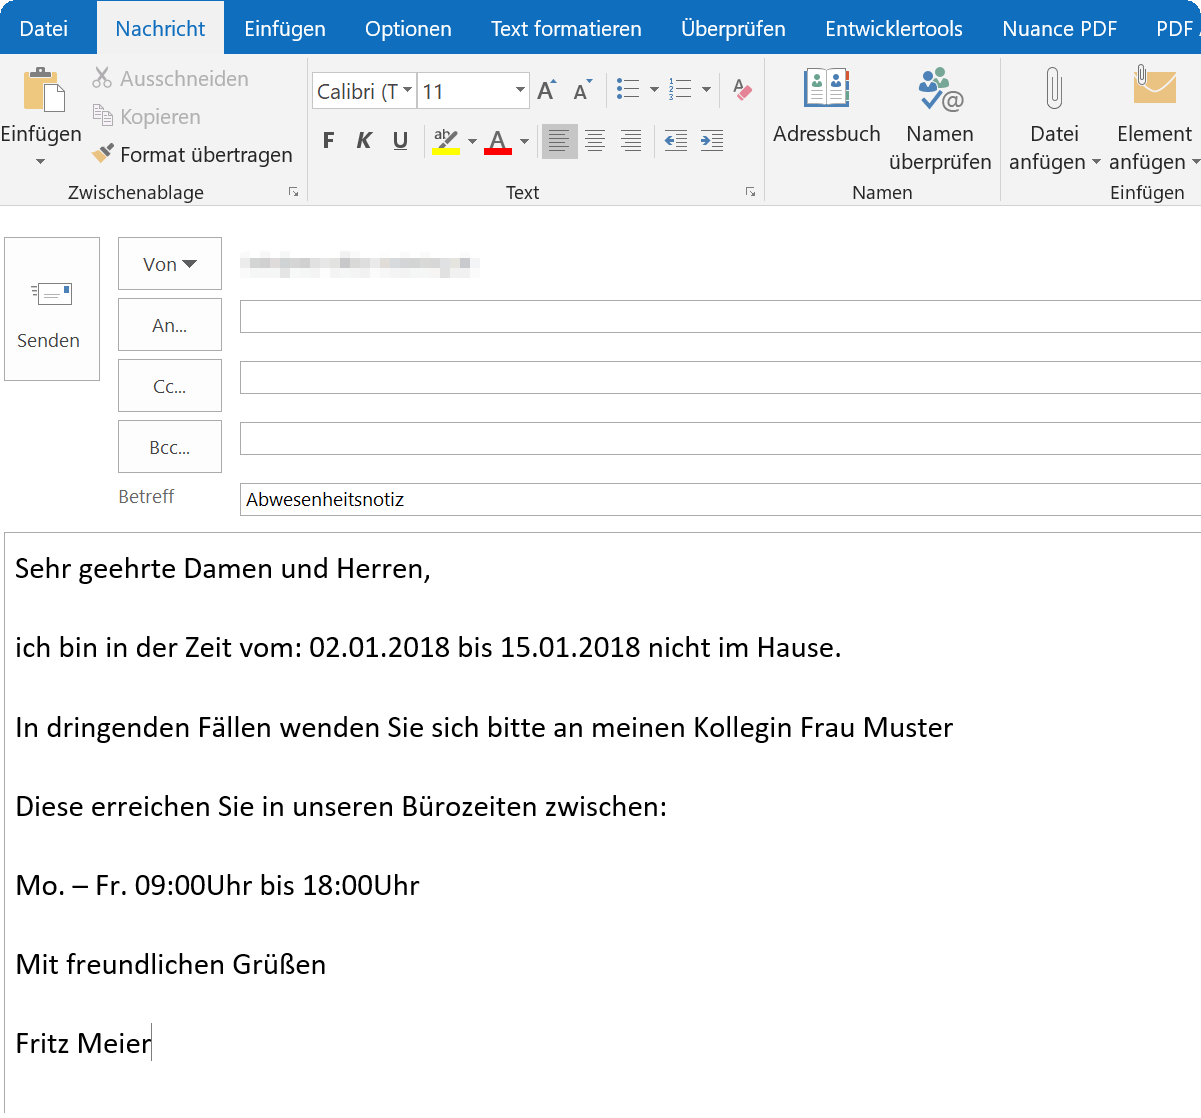
Write a new e-mail with the content that should automatically be sent to a sender as a reply, leaving the recipient line free
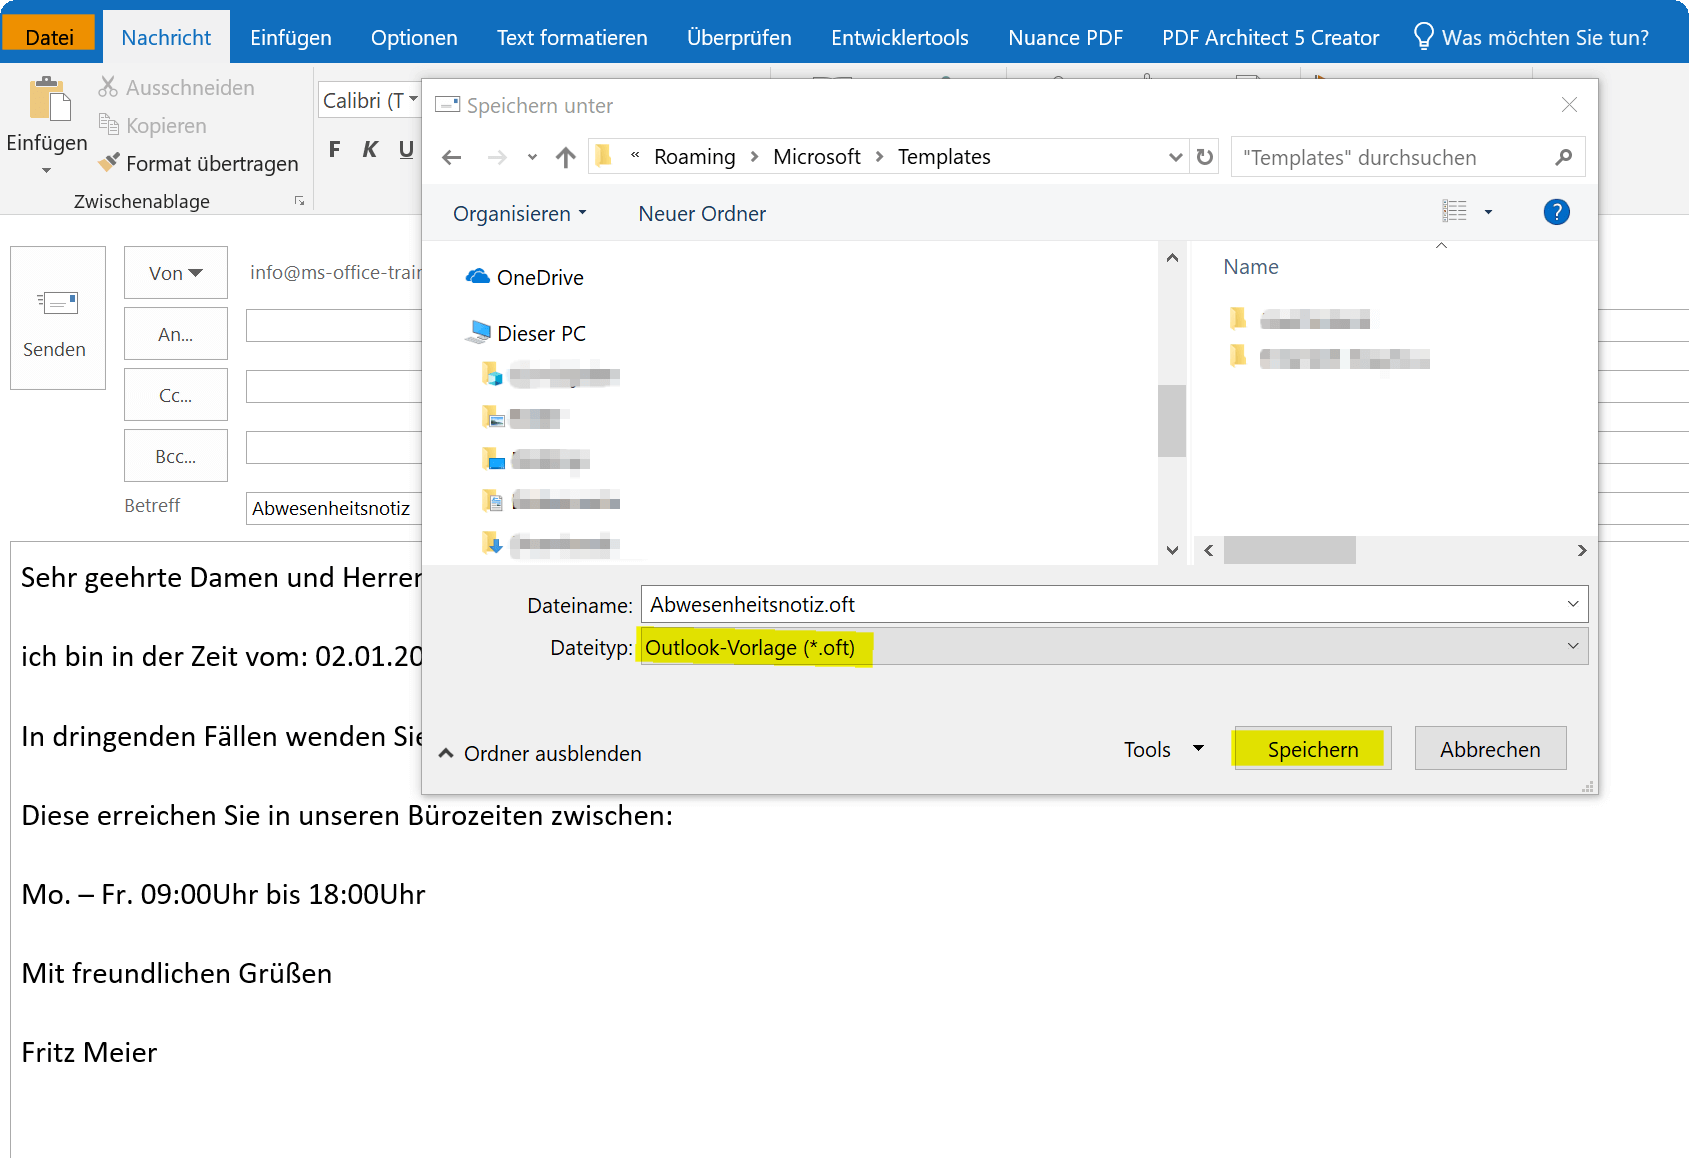
In the “Start” tab, go to “Save as”, select “Outlook Template * .oft” as the file format and save the template
See picture: (click to enlarge)
Next we go into Outlook we follows:
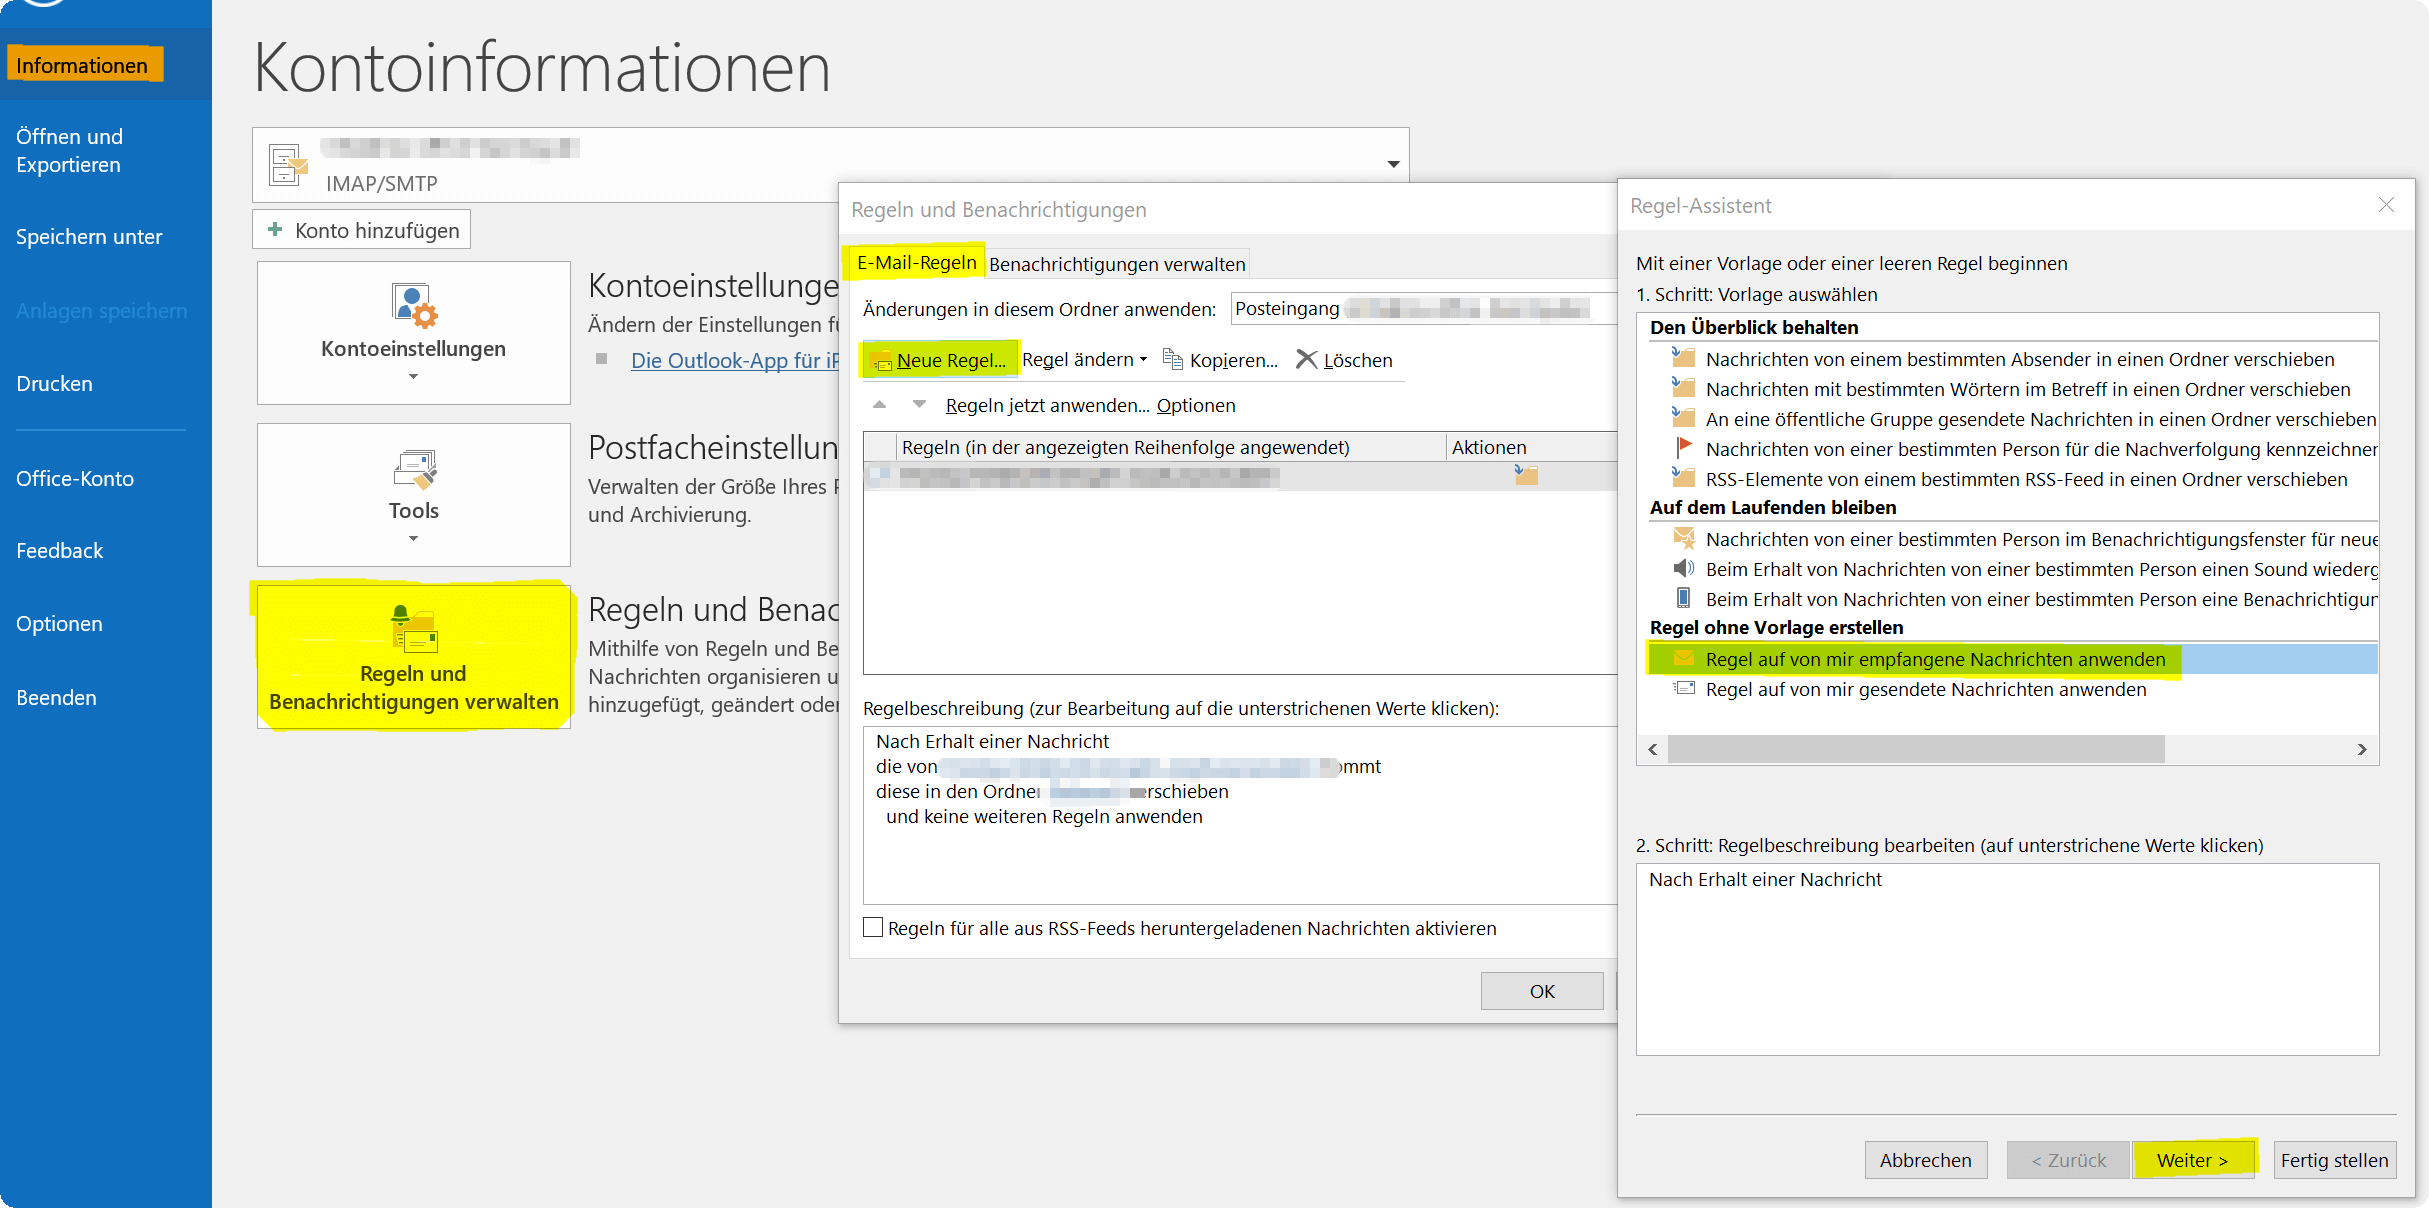
- Under the tab “File” – “Information” on “Manage rules and notifications”
- In the dialog box on “New Rule”
- In the next dialog box, click on “Apply rule to messages received by me”
- Then click on “Next”
See picture: (click to enlarge)
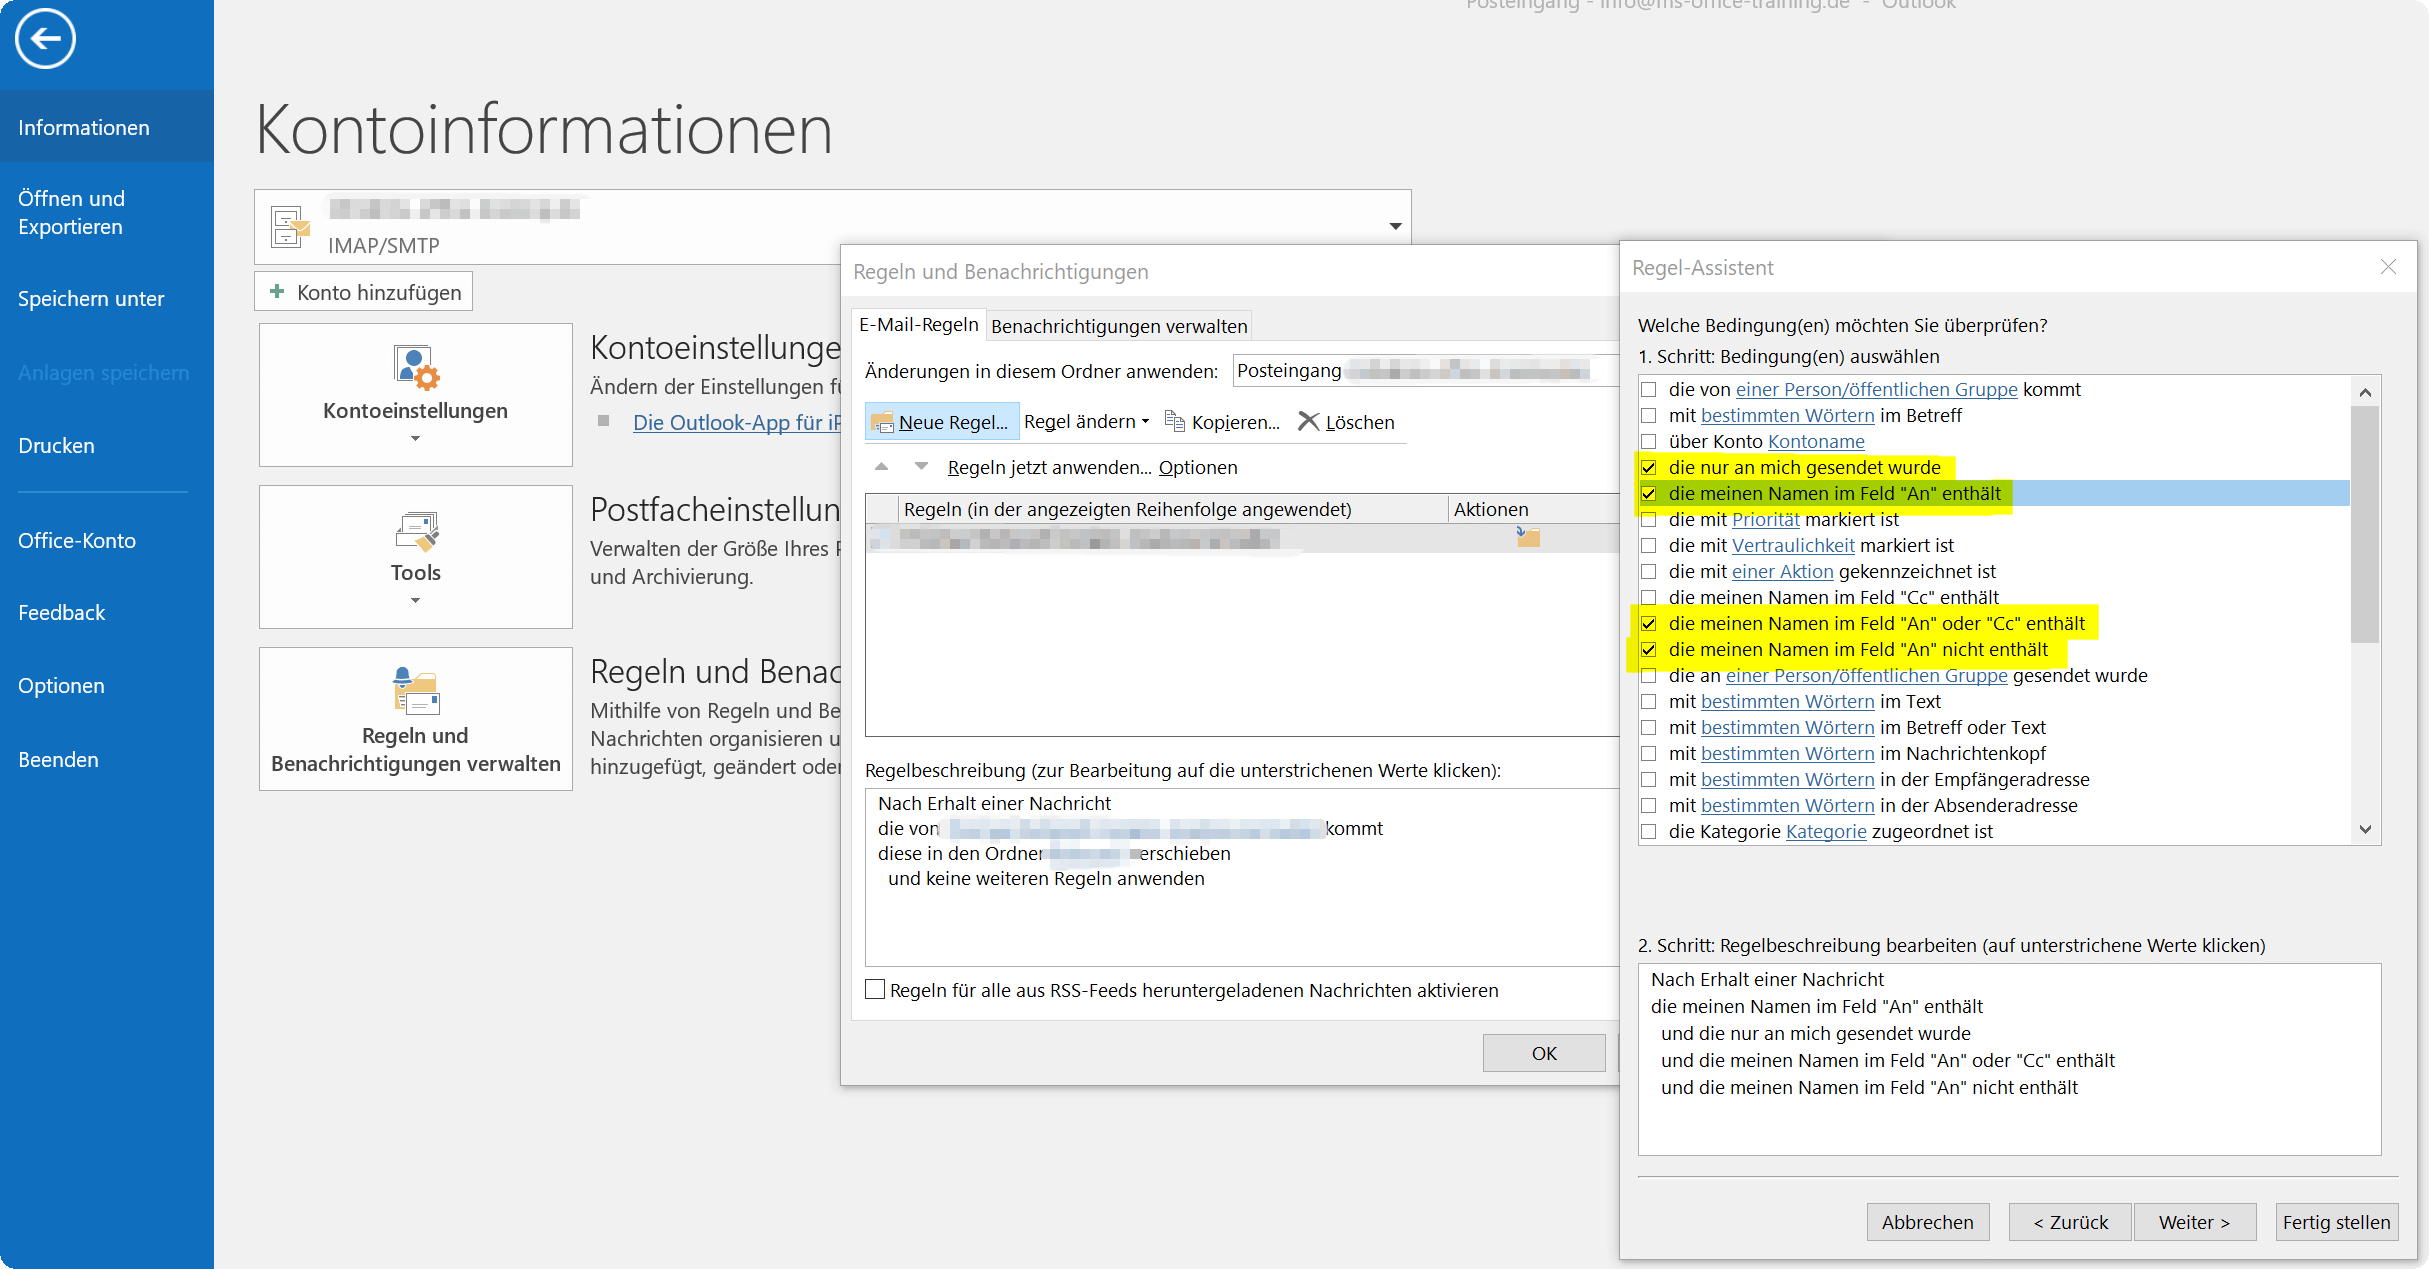
In this example, we simply apply our new rule to all messages that are either directly addressed to us or in which we are in the mailing list. Of course you can handle that as you like and specify everything individually.
Go on:
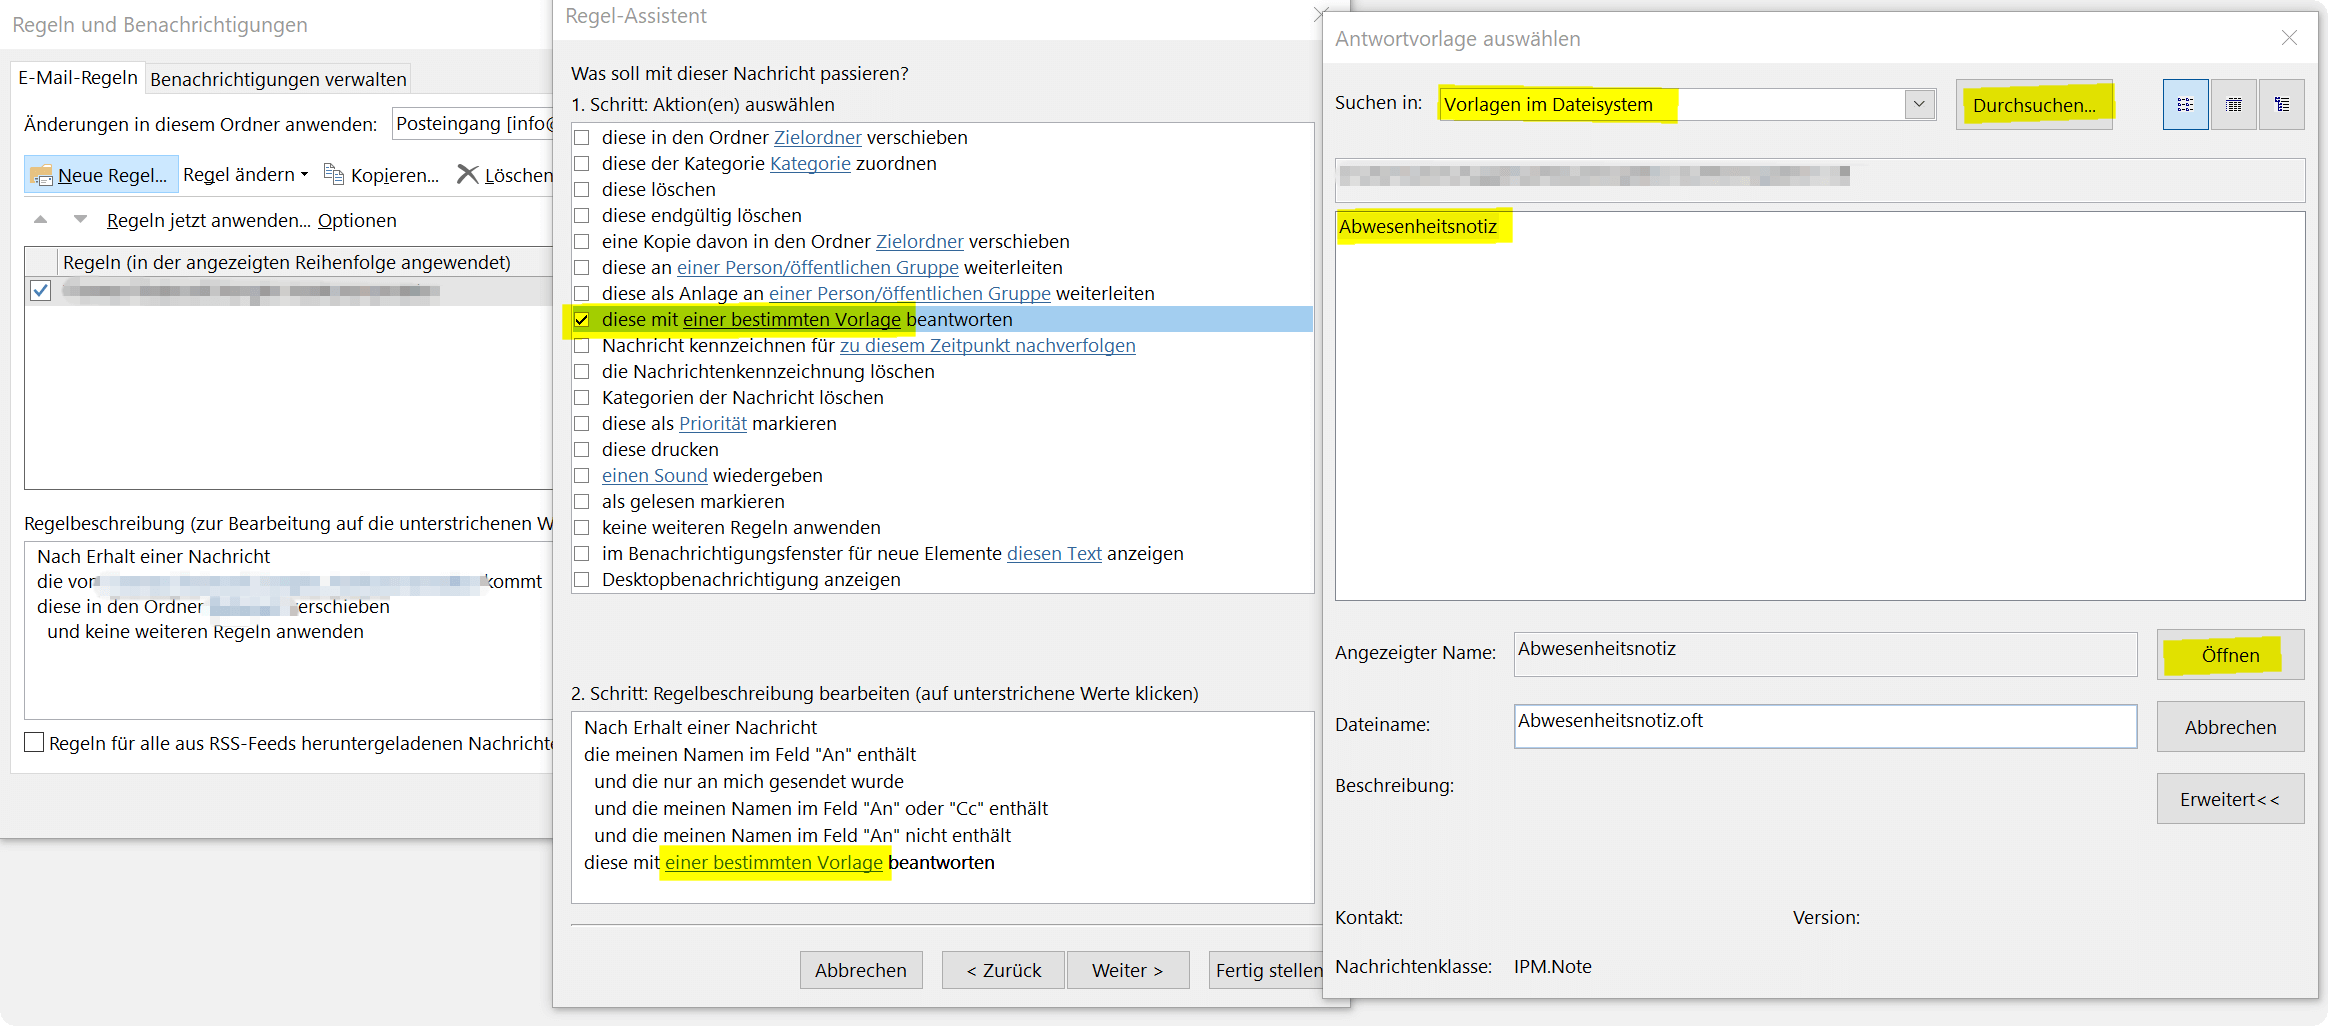
In the further dialog, specify what should happen to the e-mails and select “Answer this with a specific template”
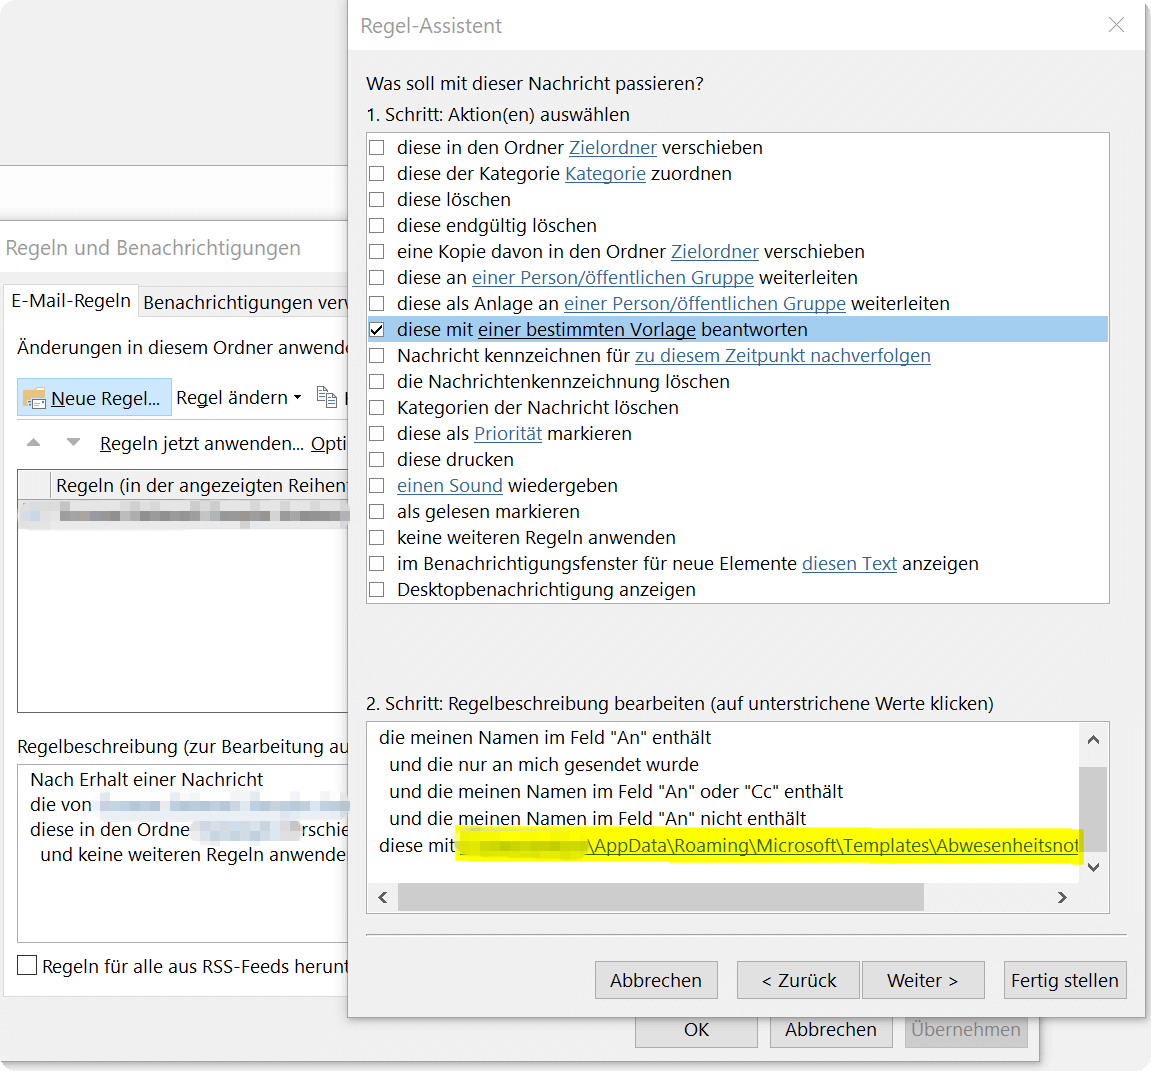
Click on the link in “a specific template”, and look in the next window for the template you previously saved as such
See picture: (click to enlarge)
You will see in the next dialog window that our rule is expanding and clarifying exactly what should happen when. We could theoretically put an end to it, and finish our rule as it is, or we can refine it a little bit further.
Since it is known that there is an exception for each rule, we also have the option of selecting from a large number of exceptions in the following.
See picture: (click to enlarge)
After we’ve fixed any exceptions, we can now click Finish and name our rule in the last step of our rule.
It also makes sense to come up with a name for it, which afterwards can be assigned from the memory of a certain rule construction (and not just Rule 1, Rule 2, etc.), because maybe someday you will create different rules.
See picture: (click to enlarge)
Well, that’s it.
This approach of using some type of Out of Office Assistant is quite fiddly, as you have seen, and so the whole thing works, of course, the machine on which Outlook is active with these rules will run the whole duration of your absence, since there is no Exchange Server You lose weight.
Popular Posts:
Integrate and use ChatGPT in Excel – is that possible?
ChatGPT is more than just a simple chatbot. Learn how it can revolutionize how you work with Excel by translating formulas, creating VBA macros, and even promising future integration with Office.
Create Out of Office Notice in Outlook
To create an Out of Office message in Microsoft Outlook - Office 365, and start relaxing on vacation
The best backup solutions for your data
Keep your data safe and secure! Discover our best backup solutions for your valuable information now. Because safety is the be-all and end-all - and we have the perfect tips.
Internet Addiction – A serious look at a growing problem
Internet addiction is just as serious an illness as alcohol or drug addiction. Just that this is a mental illness. In this article we want to go into the phenomenon in more detail and provide assistance.
Main keyboard shortcuts in Windows 10/11
Entdecken Sie die wichtigsten Shortcuts in Windows 11, um Ihre Produktivität zu steigern. Von allgemeinen Befehlen bis hin zu spezifischen Fenster-Management- und System-Shortcuts, lernen Sie, wie Sie mit diesen Tastenkombinationen effizienter arbeiten können.
Encrypt USB stick – These options are available
Protecting sensitive data is essential. Encrypting USB sticks provides an extra layer of security. Whether it's built-in software, operating system features, third-party software, or hardware encryption, there are numerous options.


