Concatenate text and date in Excel – Tutorial
Linking cells and content (also across files) is one of the most important core tasks that Excel offers. Of course, results from several cells can be calculated and displayed in another cell. But is it also possible to map individual content from several cells in a single cell with a function that can be configured as desired?
The answer is „yes, of course!“ you can do this with the „CONCATENATE“ and „TEXT CONCATENATE“ functions. Of course, the functions are not really new, but the same questions always come up for many users.
- How can I insert spaces between values?
- How to concatenate a date with texts in Excel?
In our little tutorial we will take a closer look at how concatenate date with text in Excel works, and above all how to use the function in such a way that the display is correct in the end. The solution lies in the combination of two functions. More about nested functions >>>
Concatenate date, text and time
Concatenate date, text and time
Before we start concatenating different formats from several cells, I would like to briefly describe the basic functionality. In our example we have shown 6 people in a table. Each cell contains a value (last name, first name, birthday, etc.). We now want to merge these values into a single cell.
For concatenation we use TEXTCONCATENATE with separators, and then two more examples with the CONCATENATE function with and without spaces.
see fig. (click to enlarge)
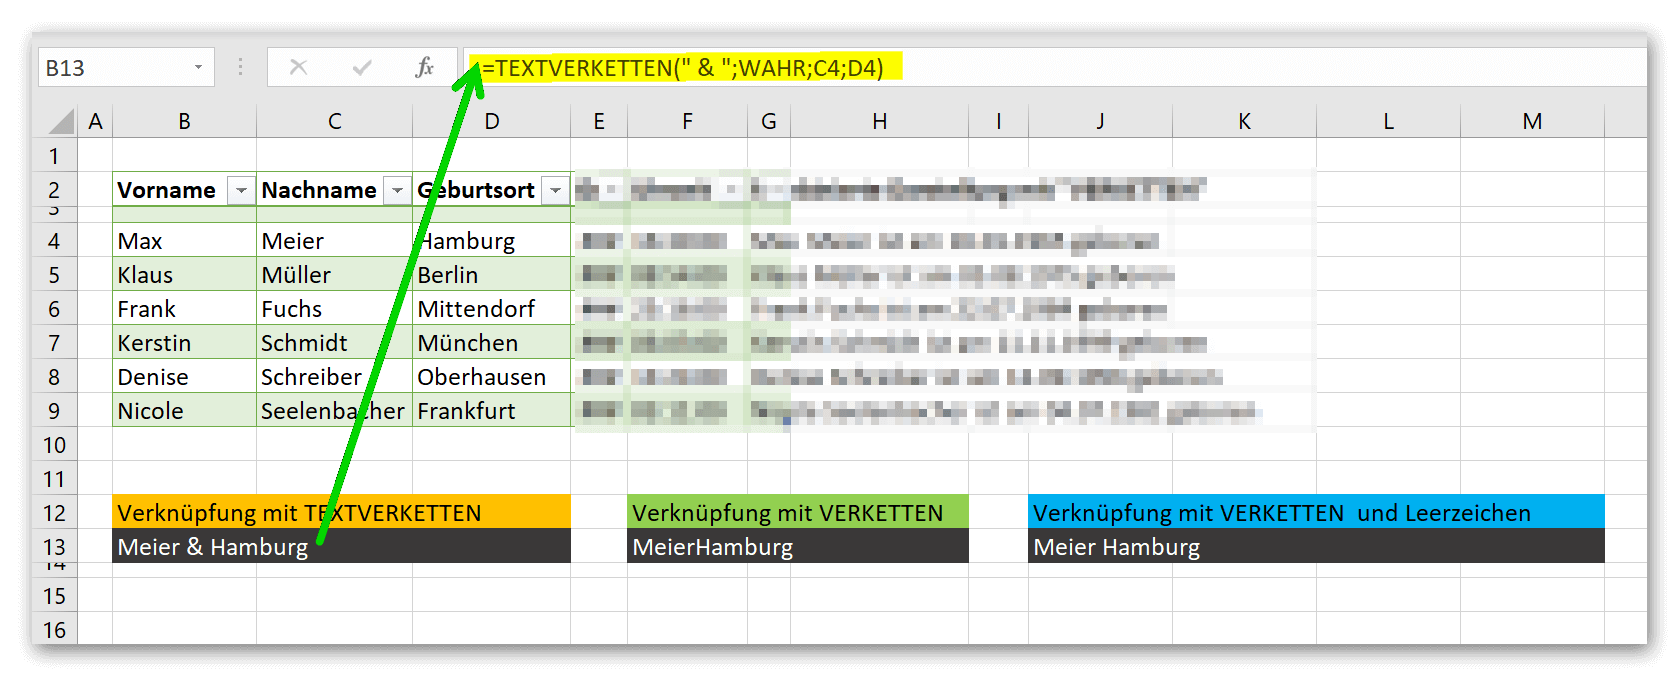
In the first picture, concatenation works well with a delimiter of our choice and the function =CONCATENATE(“ & „;TRUE;C4;D4). What is probably noticeable here is that a space was left before and after the & character. If we hadn’t done this, the values from the two cells would have been mapped to the target cell, but then everything would have been written together Meier&Hamburg.
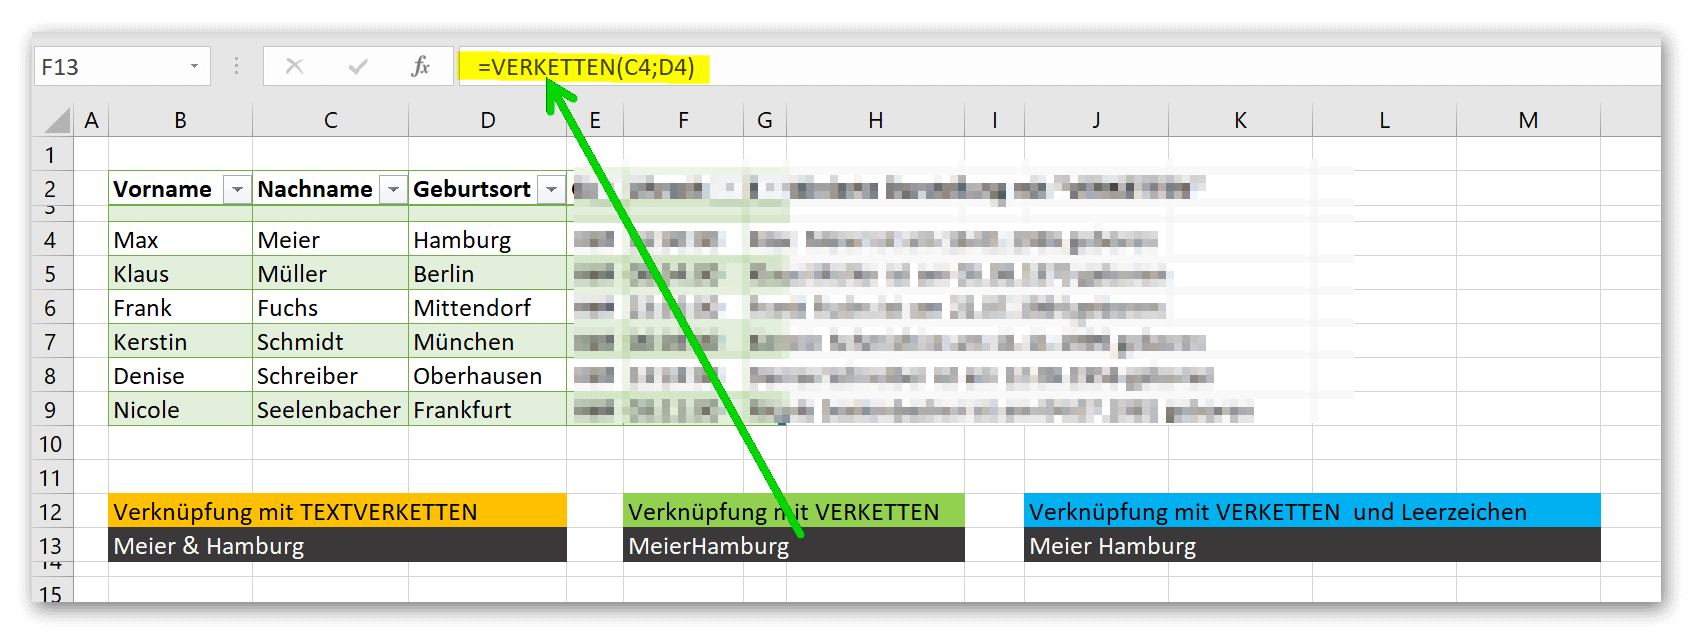
In the second picture we see what happens when we use the CONCATENATE function as is. The values from cells C4 and D4 are simply pasted into the destination cell with no spaces or separators. Completely impractical for what we want in the end.
In the third picture we work again with TEXTCHAINS but use a space instead of a separator. It is important here that you (whether any separator or a space is used) always put the space or separator in quotation marks. If you don’t do this, Excel will consider the character as part of the function and, for example, try to calculate with a mathematical character inserted, which will probably fail.
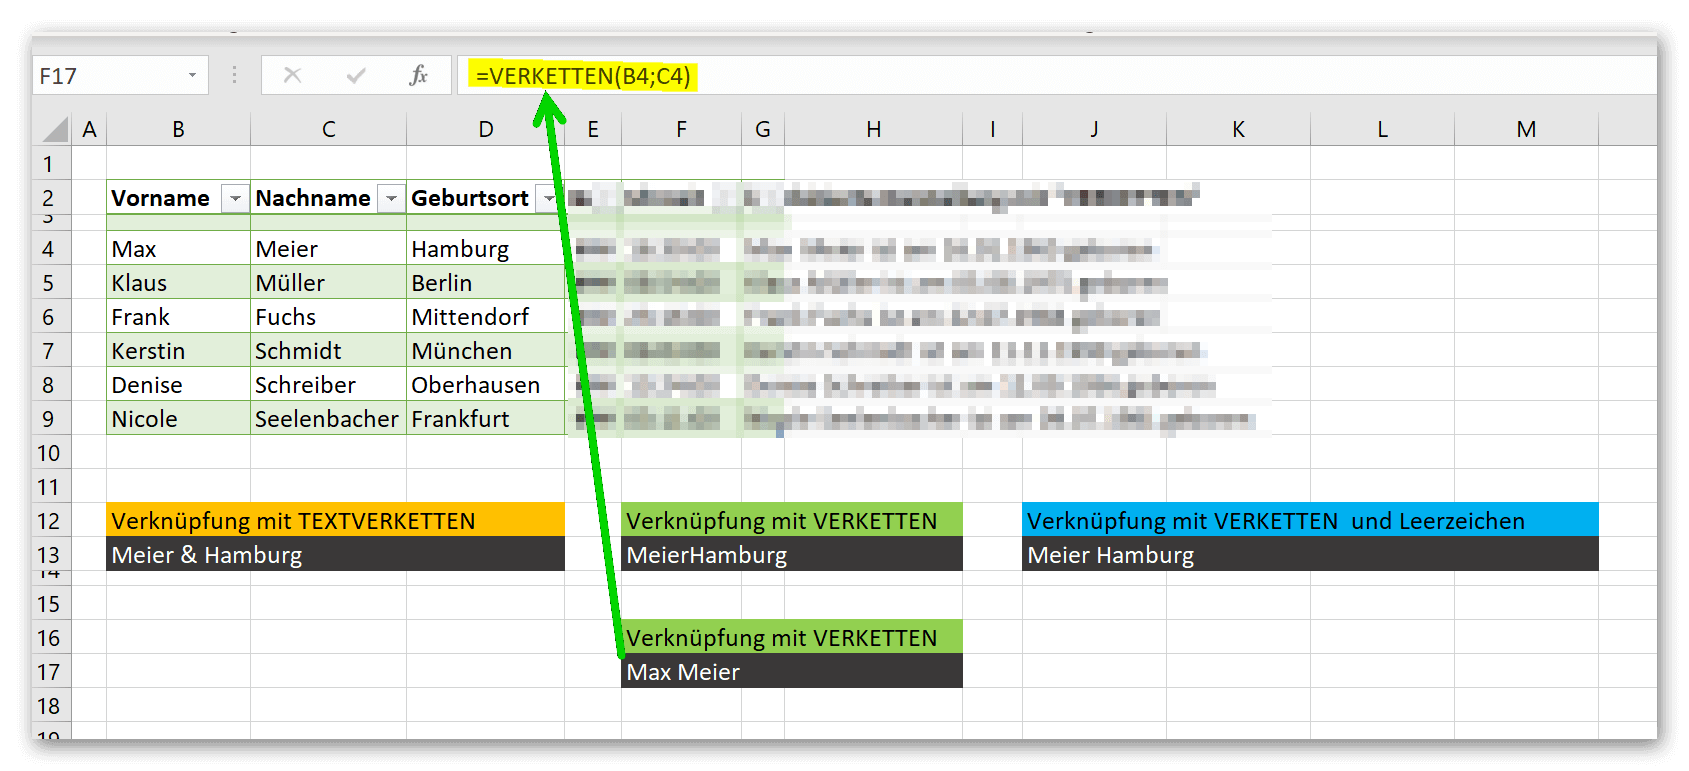
But Excel is not completely stupid at this point, because if you want to use the CONCATENATE function to display cells B4 and C4 with first and last names in the target cell, a space is automatically inserted with this function. It seems that Excel recognizes that this is a name that is usually written separately.
see fig. (click) to enlarge)
The difference between CONCATENATE and TEXT CONCATENATE is actually primarily that the TEXT CONCATENATE function offers the extended possibility to specify a space right at the beginning of the function, with which the values of the individual cells are to be separated from one another, instead of simply lining up all the character strings together.
So much for the basic functionality of concatenation in Excel. But now we want to do what the title of this tutorial says. We want to create a whole sentence in a single target cell from different individual values that are each in a cell.
Our sample table now shows a total of six columns with surname, first name, place of birth, birthday, time and a result column. The aim should be to bring the values from the individual cells into a meaningful sentence using the TEXTCONCATENATE function in combination with formatted values, which is then displayed in a cell. As a result, the table should look like the following figure.
see fig. (click to enlarge)
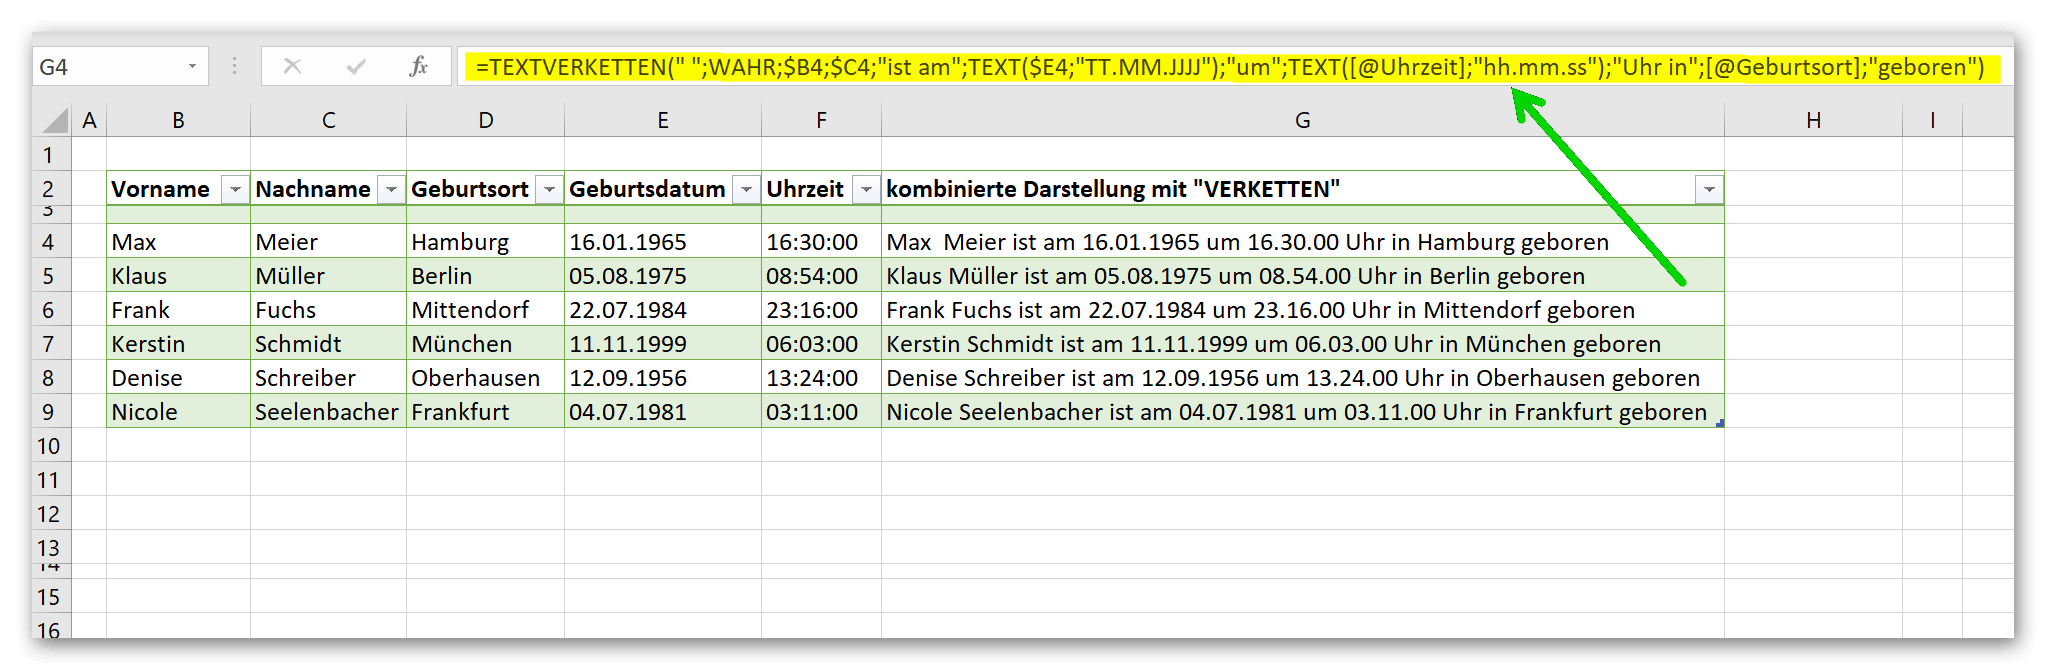
At first glance, this looks a bit confusing, but don’t worry, we will now take the function apart and explain it piece by piece.
- = TEXTCONCATENATE( | This is where our function begins
- = “ „ | Here we enter the separator which we want to have between all values. In our example just a space.
- = TRUE | With this we determine whether empty cells that we specified as reference points in the function should be ignored.
- = ;$B4;$C4 | These are the first points of reference (surname and first name) that make up our sentence.
- = „is on“ | represents a fixed text which is necessary for meaningful text formation. You could also use a cell as a reference point, but since we don’t have one with the required text, we simply write the text in quotation marks ourselves.
- = ;TEXT($E4;“DD.MM.YYYY“) | Here we refer to cell E4, which contains the date of birth, and at the same time we combine the CONCATENATE function with the TEXT function. Because this gives us the opportunity to tell Excel that the text we retrieve from cell E4 should have a certain format. In our example a date format.
- = „around“ | again a fixed text for the sentence formation.
- = ;TEXT([@time];hh.mm.ss) | At this point we are referring to the time, and instead of using the date format as before, we simply use the text format: time. Important: In our function, cell F4 is not the reference point, as you would expect, but [@time]. This has to do with the fact that in our example we are working with a dynamic table through which each cell below a column gets a column name that is then used here.
- = „clock in“ | again a fixed text for the sentence formation.
- = ;[@birthplace] | Again the column name instead of cell D4 as reference point.
- = „born“ | And again a fixed text for the sentence formation
Explanations: The more complex a function becomes, the greater the susceptibility to errors. Here, however, you can often use Excel’s error correction and either display the calculation method, or you will immediately receive an error message in which Excel will mark the relevant position in the processing line where an error is hidden.
You may also have noticed that we put a $ sign in front of reference points such as cell B4. This is so that we don’t have to write this function separately for each line, but can simply use the copy control. The column is then fixed by the $ sign in front of a reference point and does not jump to the next column as usual when copying a formula, which would have messed up our entire function.
We hope that we were able to help you with our little tutorial and wish you lots of success trying it out.
Before we start concatenating different formats from several cells, I would like to briefly describe the basic functionality. In our example we have shown 6 people in a table. Each cell contains a value (last name, first name, birthday, etc.). We now want to merge these values into a single cell.
For concatenation we use TEXTCONCATENATE with separators, and then two more examples with the CONCATENATE function with and without spaces.
see fig. (click to enlarge)
In the first picture, concatenation works well with a delimiter of our choice and the function =CONCATENATE(“ & „;TRUE;C4;D4). What is probably noticeable here is that a space was left before and after the & character. If we hadn’t done this, the values from the two cells would have been mapped to the target cell, but then everything would have been written together Meier&Hamburg.
In the second picture we see what happens when we use the CONCATENATE function as is. The values from cells C4 and D4 are simply pasted into the destination cell with no spaces or separators. Completely impractical for what we want in the end.
In the third picture we work again with TEXTCHAINS but use a space instead of a separator. It is important here that you (whether any separator or a space is used) always put the space or separator in quotation marks. If you don’t do this, Excel will consider the character as part of the function and, for example, try to calculate with a mathematical character inserted, which will probably fail.
But Excel is not completely stupid at this point, because if you want to use the CONCATENATE function to display cells B4 and C4 with first and last names in the target cell, a space is automatically inserted with this function. It seems that Excel recognizes that this is a name that is usually written separately.
see fig. (click) to enlarge)
The difference between CONCATENATE and TEXT CONCATENATE is actually primarily that the TEXT CONCATENATE function offers the extended possibility to specify a space right at the beginning of the function, with which the values of the individual cells are to be separated from one another, instead of simply lining up all the character strings together.
So much for the basic functionality of concatenation in Excel. But now we want to do what the title of this tutorial says. We want to create a whole sentence in a single target cell from different individual values that are each in a cell.
Our sample table now shows a total of six columns with surname, first name, place of birth, birthday, time and a result column. The aim should be to bring the values from the individual cells into a meaningful sentence using the TEXTCONCATENATE function in combination with formatted values, which is then displayed in a cell. As a result, the table should look like the following figure.
see fig. (click to enlarge)
At first glance, this looks a bit confusing, but don’t worry, we will now take the function apart and explain it piece by piece.
- = TEXTCONCATENATE( | This is where our function begins
- = “ „ | Here we enter the separator which we want to have between all values. In our example just a space.
- = TRUE | With this we determine whether empty cells that we specified as reference points in the function should be ignored.
- = ;$B4;$C4 | These are the first points of reference (surname and first name) that make up our sentence.
- = „is on“ | represents a fixed text which is necessary for meaningful text formation. You could also use a cell as a reference point, but since we don’t have one with the required text, we simply write the text in quotation marks ourselves.
- = ;TEXT($E4;“DD.MM.YYYY“) | Here we refer to cell E4, which contains the date of birth, and at the same time we combine the CONCATENATE function with the TEXT function. Because this gives us the opportunity to tell Excel that the text we retrieve from cell E4 should have a certain format. In our example a date format.
- = „around“ | again a fixed text for the sentence formation.
- = ;TEXT([@time];hh.mm.ss) | At this point we are referring to the time, and instead of using the date format as before, we simply use the text format: time. Important: In our function, cell F4 is not the reference point, as you would expect, but [@time]. This has to do with the fact that in our example we are working with a dynamic table through which each cell below a column gets a column name that is then used here.
- = „clock in“ | again a fixed text for the sentence formation.
- = ;[@birthplace] | Again the column name instead of cell D4 as reference point.
- = „born“ | And again a fixed text for the sentence formation
Explanations: The more complex a function becomes, the greater the susceptibility to errors. Here, however, you can often use Excel’s error correction and either display the calculation method, or you will immediately receive an error message in which Excel will mark the relevant position in the processing line where an error is hidden.
You may also have noticed that we put a $ sign in front of reference points such as cell B4. This is so that we don’t have to write this function separately for each line, but can simply use the copy control. The column is then fixed by the $ sign in front of a reference point and does not jump to the next column as usual when copying a formula, which would have messed up our entire function.
We hope that we were able to help you with our little tutorial and wish you lots of success trying it out.
Popular Posts:

Outlook fragt ständig nach dem Passwort? So stoppen Sie die Dauerschleife
Wenn Outlook trotz gespeichertem Passwort ständig nach den Anmeldedaten fragt, blockiert das den E-Mail-Verkehr. Meist helfen das Löschen defekter Windows-Anmeldedaten oder neue App-Passwörter. Erfahren Sie hier, wie Sie das Problem mit wenigen Klicks dauerhaft lösen.

Mikrofon geht nicht in Teams, Zoom oder Meet?
Ein stummes Mikrofon im Meeting ist frustrierend. Oft sind kleine Hardware-Fehler, fehlende System-Rechte oder falsche App-Einstellungen schuld. Dieser Ratgeber liefert Ihnen systematische Schritt-für-Schritt-Lösungen, damit Sie in Teams, Zoom und Meet wieder gehört werden.

Der Drucker druckt nicht: Ursachen, Fehlerquellen und schnelle Lösungen
Ein streikender Drucker kostet Nerven, lässt sich aber meist schnell reparieren. In diesem Ratgeber zeigen wir dir Schritt für Schritt, wie du Papierstaus, WLAN-Abbrüche, Treiberfehler und leere Patronen erkennst und behebst, damit dein Gerät sofort wieder druckt.

Was tun, wenn Outlook nicht mehr startet oder abstürzt?
Wenn Microsoft Outlook plötzlich einfriert oder sich nicht öffnen lässt, ist schnelle Hilfe gefragt. In diesem Artikel zeigen wir Ihnen die effektivsten Lösungswege – vom abgesicherten Modus über die Office-Reparatur bis hin zum Reparieren beschädigter Datendateien.

Erste Hilfe: Wenn das Windows-Update hängt
Ein eingefrorenes Windows-Update ist ärgerlich, lässt sich aber meist schnell lösen. Dieser Ratgeber zeigt Ihnen, wie Sie mit Geduld, einem sicheren Neustart und Windows-Bordmitteln wie der Problembehandlung oder dem Leeren des Caches das System wieder zum Laufen bringen.

Reibungsloser Wechsel: Passwörter und Lesezeichen sicher umziehen
Der Wechsel auf einen neuen PC oder Browser ist schnell erledigt. Mit unserer Anleitung exportieren und importieren Sie Lesezeichen und Passwörter absolut sicher. Erfahren Sie, worauf Sie bei Chrome, Firefox und Edge achten müssen und warum ein Passwortmanager lohnt.
Angebote 2025/2026 in: Vorlagen


Popular Posts:
Outlook fragt ständig nach dem Passwort? So stoppen Sie die Dauerschleife
Wenn Outlook trotz gespeichertem Passwort ständig nach den Anmeldedaten fragt, blockiert das den E-Mail-Verkehr. Meist helfen das Löschen defekter Windows-Anmeldedaten oder neue App-Passwörter. Erfahren Sie hier, wie Sie das Problem mit wenigen Klicks dauerhaft lösen.
Mikrofon geht nicht in Teams, Zoom oder Meet?
Ein stummes Mikrofon im Meeting ist frustrierend. Oft sind kleine Hardware-Fehler, fehlende System-Rechte oder falsche App-Einstellungen schuld. Dieser Ratgeber liefert Ihnen systematische Schritt-für-Schritt-Lösungen, damit Sie in Teams, Zoom und Meet wieder gehört werden.
Der Drucker druckt nicht: Ursachen, Fehlerquellen und schnelle Lösungen
Ein streikender Drucker kostet Nerven, lässt sich aber meist schnell reparieren. In diesem Ratgeber zeigen wir dir Schritt für Schritt, wie du Papierstaus, WLAN-Abbrüche, Treiberfehler und leere Patronen erkennst und behebst, damit dein Gerät sofort wieder druckt.
Was tun, wenn Outlook nicht mehr startet oder abstürzt?
Wenn Microsoft Outlook plötzlich einfriert oder sich nicht öffnen lässt, ist schnelle Hilfe gefragt. In diesem Artikel zeigen wir Ihnen die effektivsten Lösungswege – vom abgesicherten Modus über die Office-Reparatur bis hin zum Reparieren beschädigter Datendateien.
Erste Hilfe: Wenn das Windows-Update hängt
Ein eingefrorenes Windows-Update ist ärgerlich, lässt sich aber meist schnell lösen. Dieser Ratgeber zeigt Ihnen, wie Sie mit Geduld, einem sicheren Neustart und Windows-Bordmitteln wie der Problembehandlung oder dem Leeren des Caches das System wieder zum Laufen bringen.
Reibungsloser Wechsel: Passwörter und Lesezeichen sicher umziehen
Der Wechsel auf einen neuen PC oder Browser ist schnell erledigt. Mit unserer Anleitung exportieren und importieren Sie Lesezeichen und Passwörter absolut sicher. Erfahren Sie, worauf Sie bei Chrome, Firefox und Edge achten müssen und warum ein Passwortmanager lohnt.
Angebote 2025/2026 in: Vorlagen