Create professional letter templates in Word
In a society that is characterized by bureaucracy, nobody gets past more frequent correspondence with various places. Therefore, it makes sense to create a template in which the letterhead is already prepared.
If you have multiple people living in your household, you could either create a separate template for each one, or you could take advantage of the controls in Word 2016 to create a dynamic template that works for everyone.
We want to describe how to create dynamic letter templates in Word through form fields.
1. Show formatting characters
1. Show formatting characters
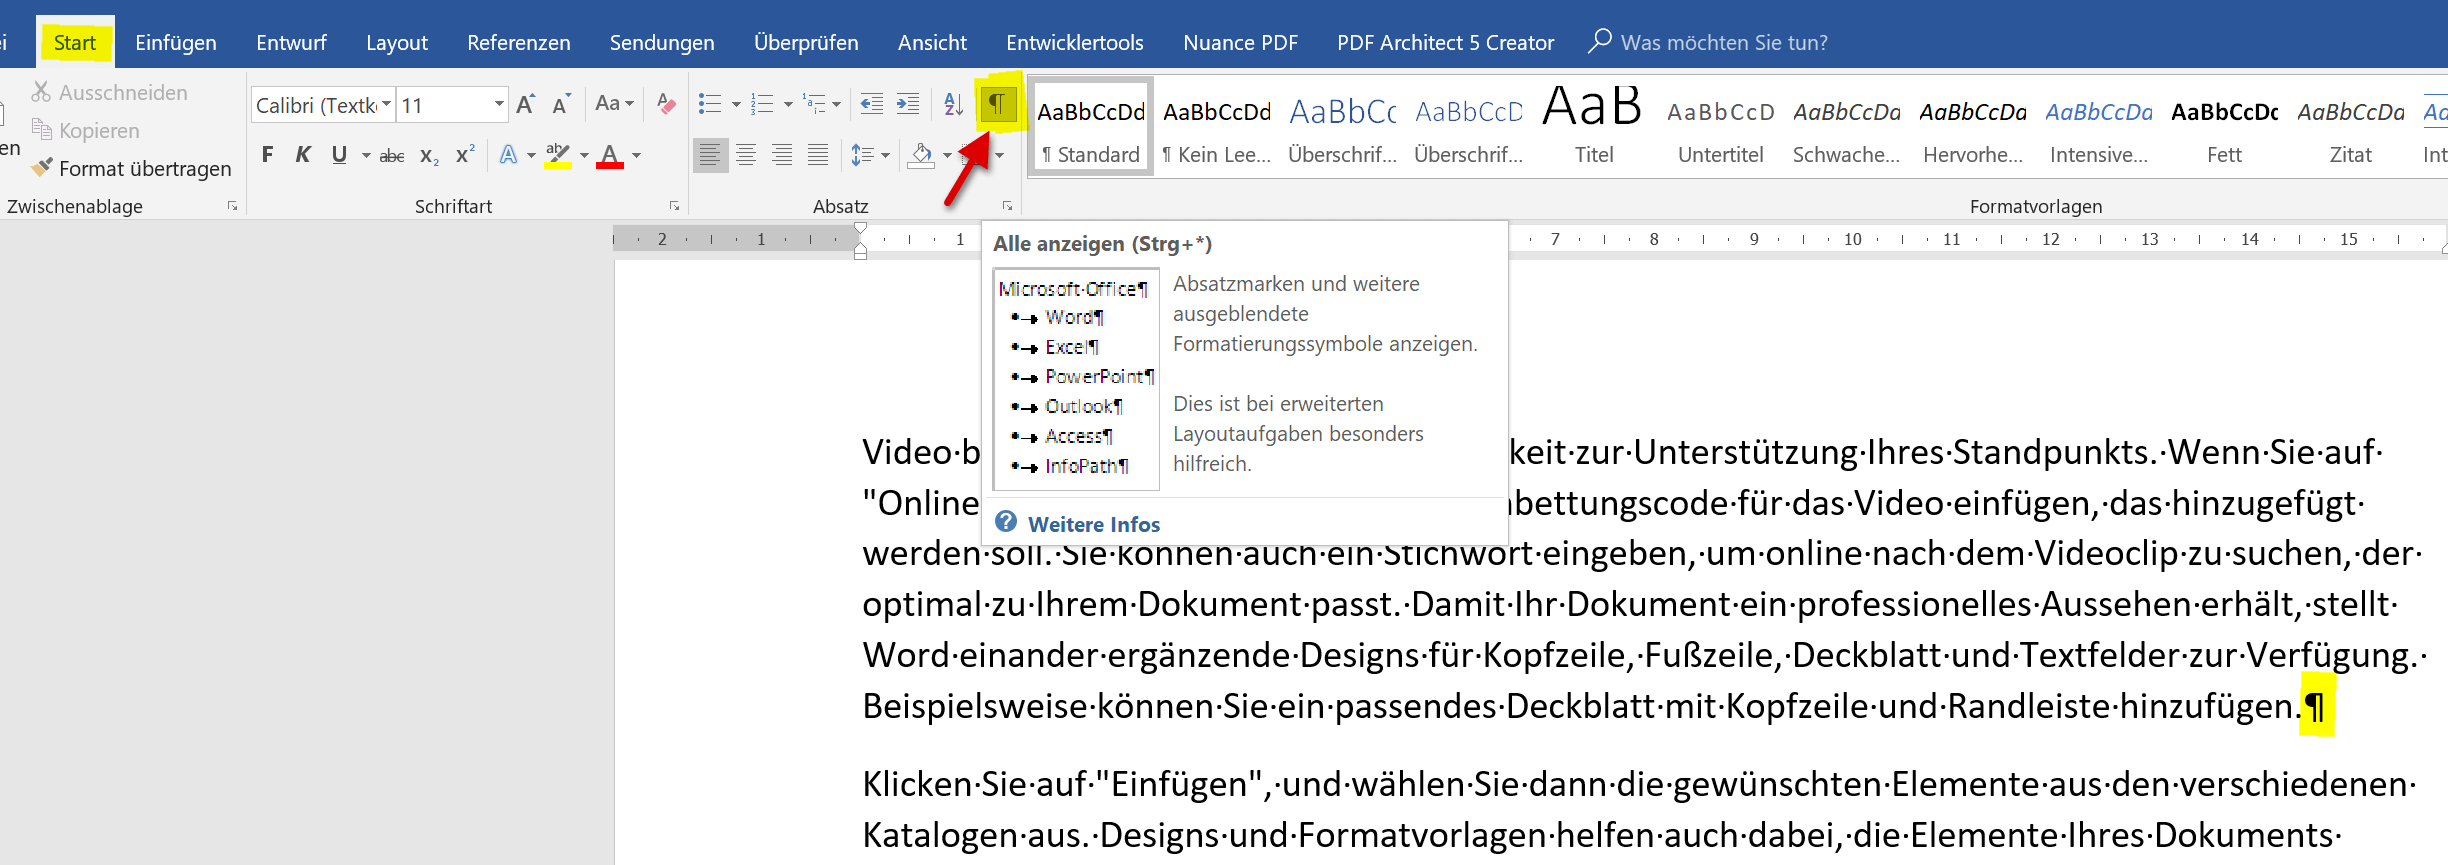
As a first step, I recommend (as in all work under Word) to show the formatting characters, so we can see where paragraphs, blank lines, tab stops, etc. are.
Fortunately, this is quite simple, and can also be turned off and then off via one-click.
In the tab: „Start“ and the symbol group „Paragraph“, click on the corresponding symbol.
See picture: (click to enlarge)
2. Page setup
2. Page setup
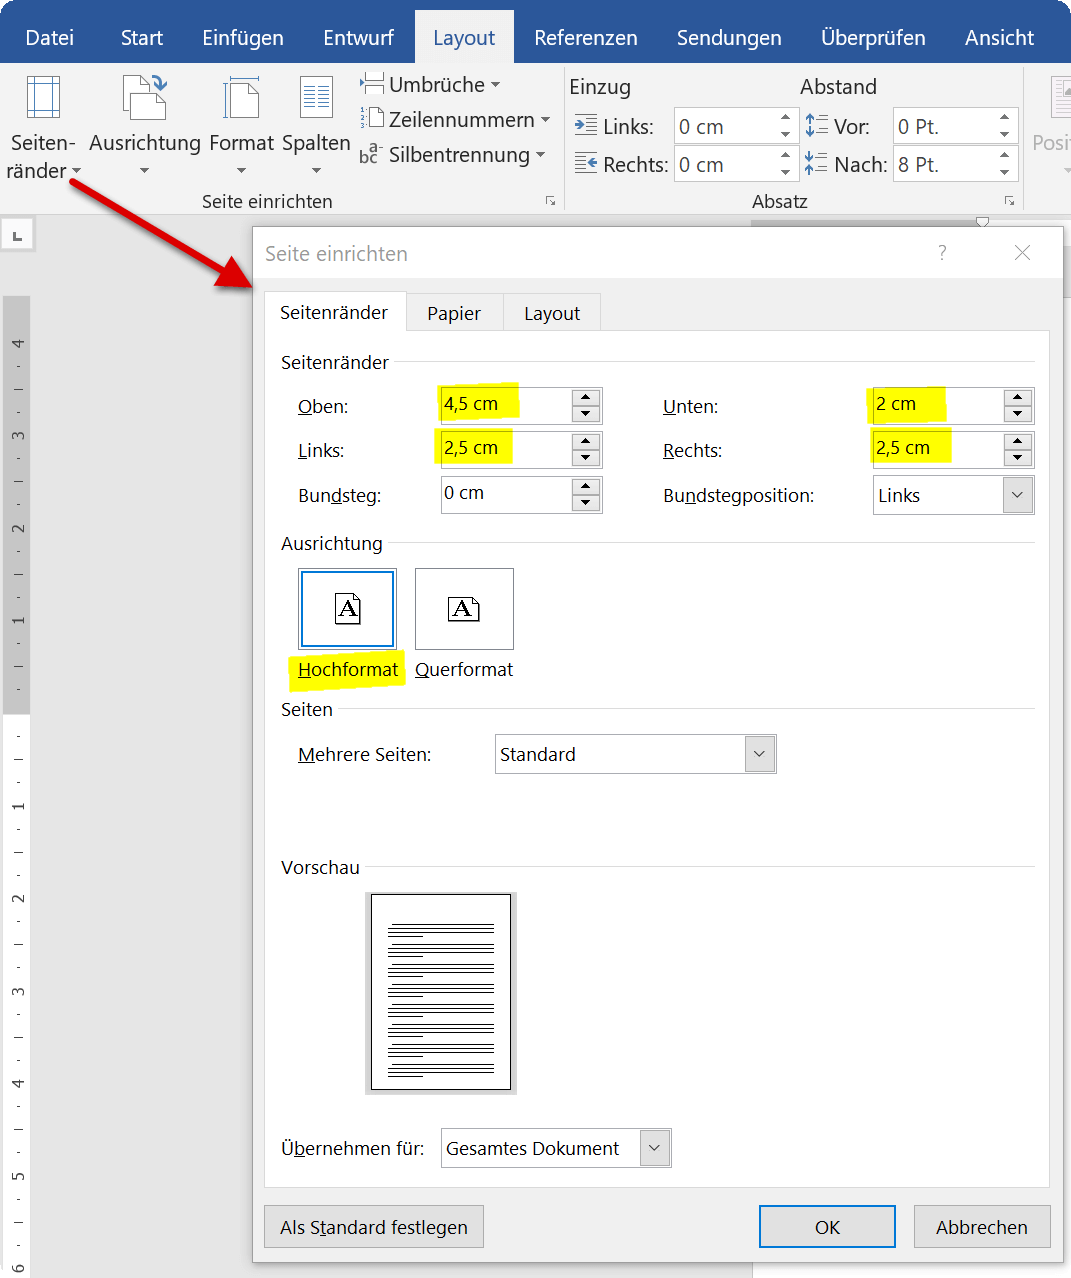
Next, we set up our page so that later the letterhead fits exactly into an envelope (DIN Lang) with window. To do this we go to the „Layout“ – „Page margins“ tab at the bottom of „Custom margins“
There we set the dimensions as follows:
- Above: 4.5 cm
- Left: 2.5 cm
- Right: 2.5 cm
- Below: 2.0 cm
- Gutter: 0.0 cm
- Gutter position: left
- Orientation: Portrait
See picture: (click to enlarge)
Next, we set up our page so that later the letterhead fits exactly into an envelope (DIN Lang) with window. To do this we go to the „Layout“ – „Page margins“ tab at the bottom of „Custom margins“
There we set the dimensions as follows:
- Above: 4.5 cm
- Left: 2.5 cm
- Right: 2.5 cm
- Below: 2.0 cm
- Gutter: 0.0 cm
- Gutter position: left
- Orientation: Portrait
See picture:

3. Enable developer tools in Word
3. Enable developer tools in Word
Since we want to create a dynamic letter template, we need the controls in Word at this point.
Although these are deactivated in the standard installation, it is recommended to make them permanently available via the options menu, since they can be used repeatedly for a variety of tasks.
To do this we go to the tab „File“ – „Options“ – „Customize Ribbon“ and activate the item „Developer Tools“ under the main tabs on the right side of the dialog box.
See picture: (click to enlarge)
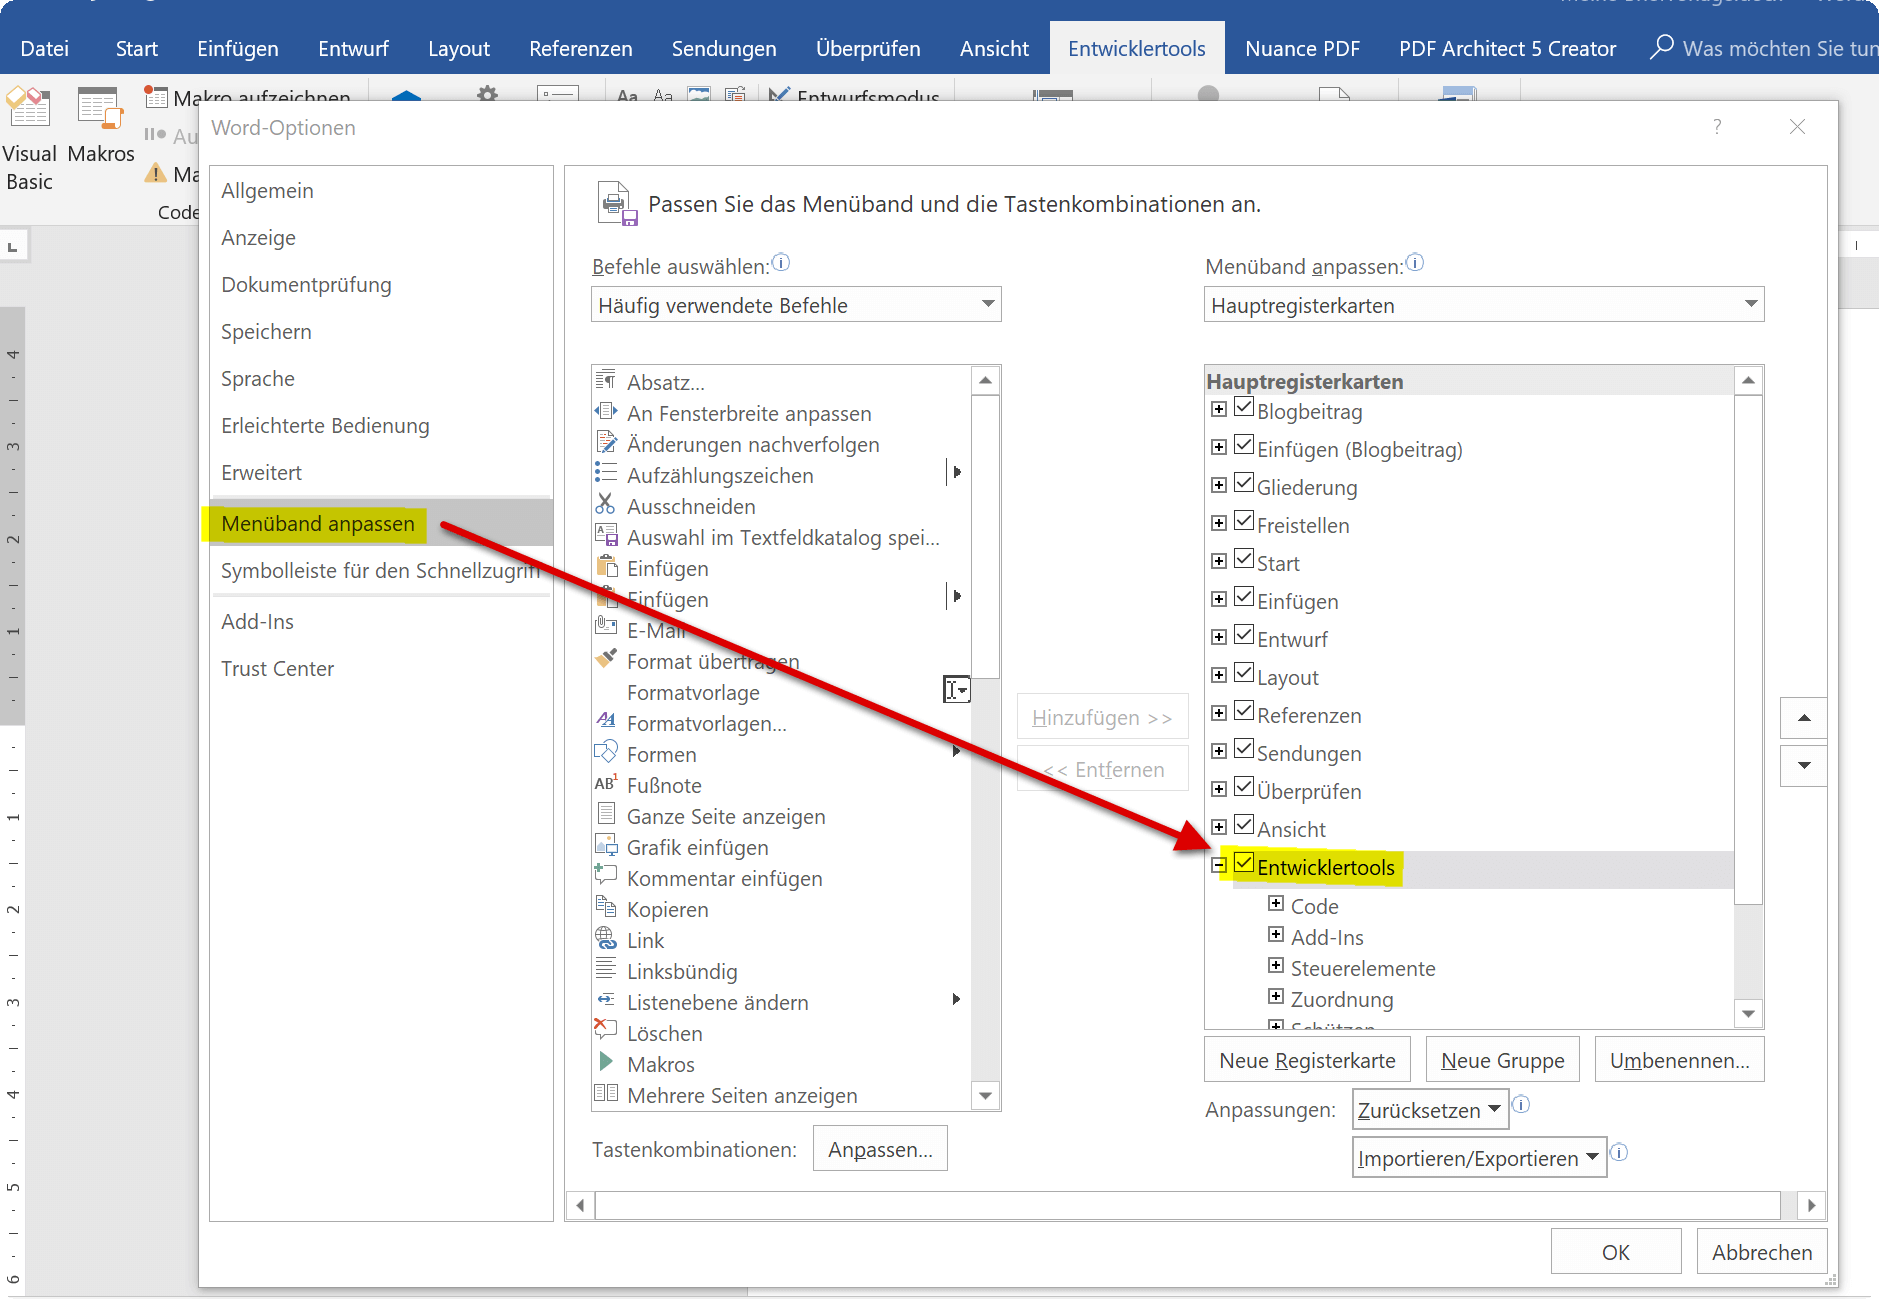
After activation, the new „Developer Tools“ tab is permanently available in every document, which you can use for all sorts of purposes.
Since we want to create a dynamic letter template, we need the controls in Word at this point.
Although these are deactivated in the standard installation, it is recommended to make them permanently available via the options menu, since they can be used repeatedly for a variety of tasks.
To do this we go to the tab „File“ – „Options“ – „Customize Ribbon“ and activate the item „Developer Tools“ under the main tabs on the right side of the dialog box.
See picture:

After activation, the new „Developer Tools“ tab is permanently available in every document, which you can use for all sorts of purposes.
4. Prepare letterhead in Word
4. Prepare letterhead in Word
Now that we’ve made the basic settings and activated the tools we need, we can go to the first part of the letterhead.
Our cursor is now set to 4.5 cm from above and 2.5 cm from left to the layout setting previously set.
In this first line we insert our sender address in short form, so that the recipient can see who the sender is even before opening, and also for the postman, who, if the letter is undeliverable, can come back to us.
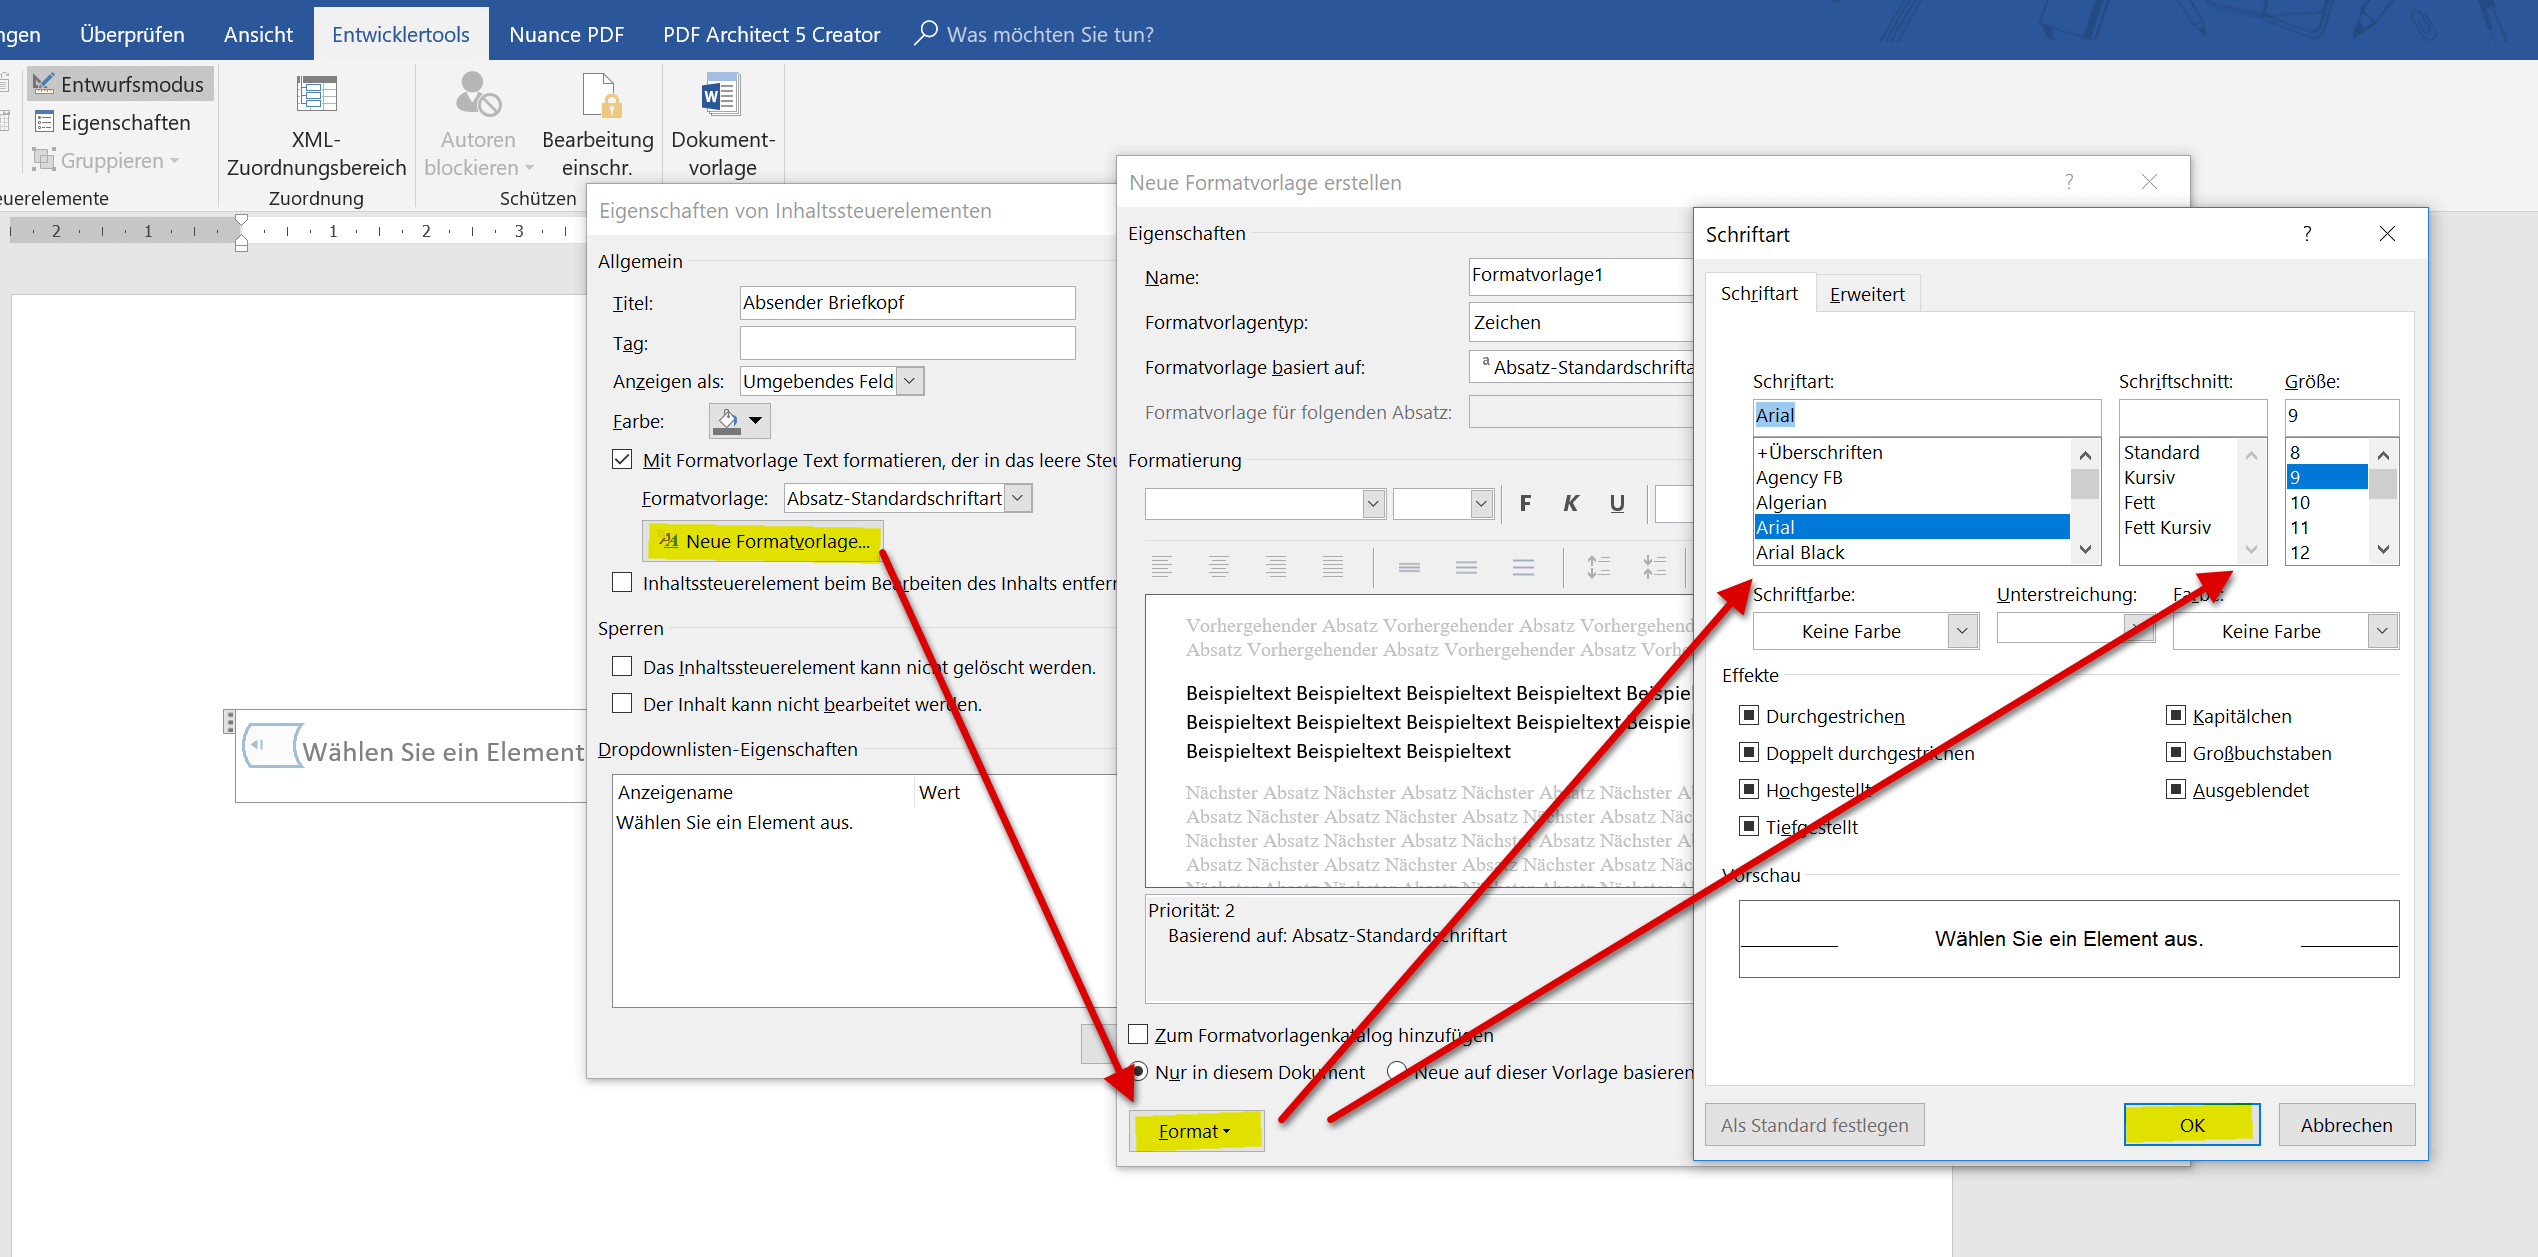
- On the Developer tab – Controls tab, select the Drop-down List Control tool
- Then click the design mode
- Click on „Properties“ in the context menu (right mouse button) of the drop-down box
- Check the box next to „Apply text using style sheet ….“
- Click on „New Style“
- In the next dialog box, click on „Format“ – „Font“
- Select the font and font size and confirm with „OK“
See picture: (click to enlarge)
Note:
In our example we set the font for the top line to „Arial“ and the size to „9 points“. This is a good value according to experience, but of course you can of course set it completely free.
In addition, you can of course choose from already created styles, if you have a suitable for it, and do not have to make these settings completely new.
Now that we’ve made the basic settings and activated the tools we need, we can go to the first part of the letterhead.
Our cursor is now set to 4.5 cm from above and 2.5 cm from left to the layout setting previously set.
In this first line we insert our sender address in short form, so that the recipient can see who the sender is even before opening, and also for the postman, who, if the letter is undeliverable, can come back to us.
- On the Developer tab – Controls tab, select the Drop-down List Control tool
- Then click the design mode
- Click on „Properties“ in the context menu (right mouse button) of the drop-down box
- Check the box next to „Apply text using style sheet ….“
- Click on „New Style“
- In the next dialog box, click on „Format“ – „Font“
- Select the font and font size and confirm with „OK“
See picture:


Note:
In our example we set the font for the top line to „Arial“ and the size to „9 points“. This is a good value according to experience, but of course you can of course set it completely free.
In addition, you can of course choose from already created styles, if you have a suitable for it, and do not have to make these settings completely new.
5. Contents of drop-down list controls
5. Contents of drop-down list controls
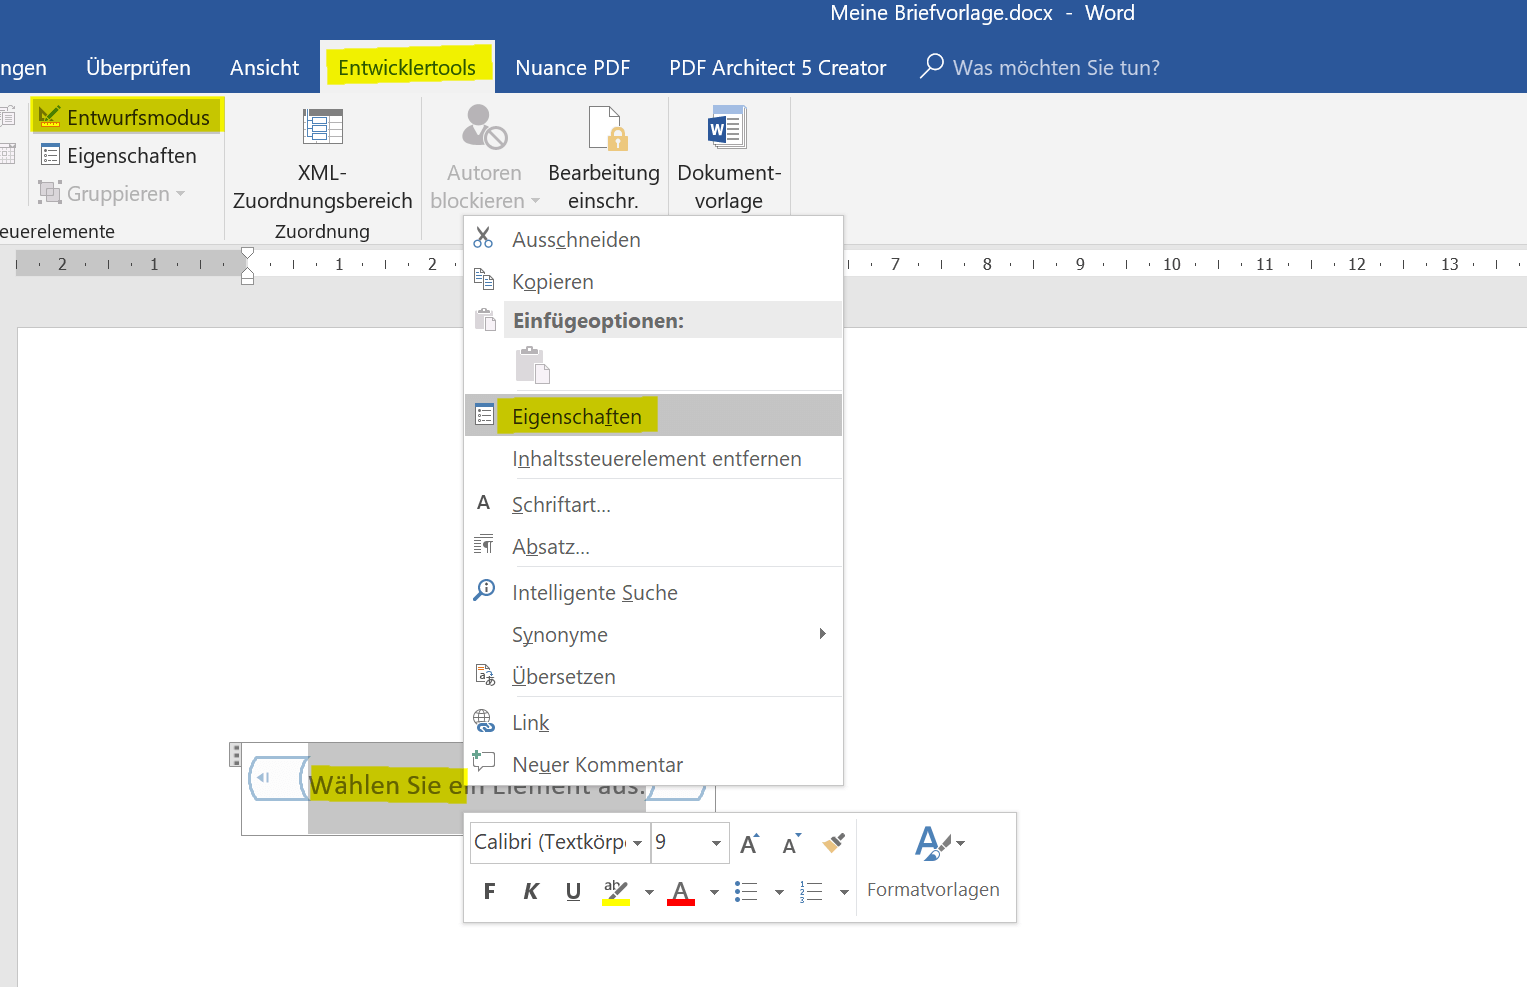
After the basic formatting of the drop-down list control, we can now turn to the desired interchangeable content.
For this we simply stay in the Properties dialog box and:
- Click once on the default „Select an item“
- Then change to „Change“
- In the next dialogue window, we exchange this value for our 1st sender address, and confirm with „OK“
- Then click on „Add“ and insert the next sender address, which should be available later
You can repeat these steps as often as you like and insert the desired sender addresses that you want to be available for selection.
See picture: (click to enlarge)

After the basic formatting of the drop-down list control, we can now turn to the desired interchangeable content.
For this we simply stay in the Properties dialog box and:
- Click once on the default „Select an item“
- Then change to „Change“
- In the next dialogue window, we exchange this value for our 1st sender address, and confirm with „OK“
- Then click on „Add“ and insert the next sender address, which should be available later
You can repeat these steps as often as you like and insert the desired sender addresses that you want to be available for selection.
See picture:

6. Insert recipient fields
6. Insert recipient fields
After we have inserted and adjusted the top sender line, we end the design mode again at short notice, and we can try out the result here.
There is now a drop-down list box available via which you can easily select your previously entered sender addresses.
Next we leave one line free (1x enter key) and start with the fields for the recipient address.
- To do this, we again create a drop-down list element in the first line of the recipient field
- Then go back to design mode
- Swap the text marked there for „salutation“
- And then insert the desired forms of address „Mr.“ – „woman“ – „company“ and so on
- Close the draft mode
Then we go down one line (no paragraph!) By pressing „Shift“ + „Enter“ and insert element fields for text.
- In the Developer tools, select the Rich Text Content Control item
- Switch to design mode
- Replace the marked text with „Name“
- As described earlier, switch to the properties of the content control
- Enter the desired description title
- Use the styles to either select the default or set a custom style
In our example, we have here again to the font „Arial“ and the font size set to 11 points. Repeat the points just described for all other recipient fields (street, postcode, city, etc.)
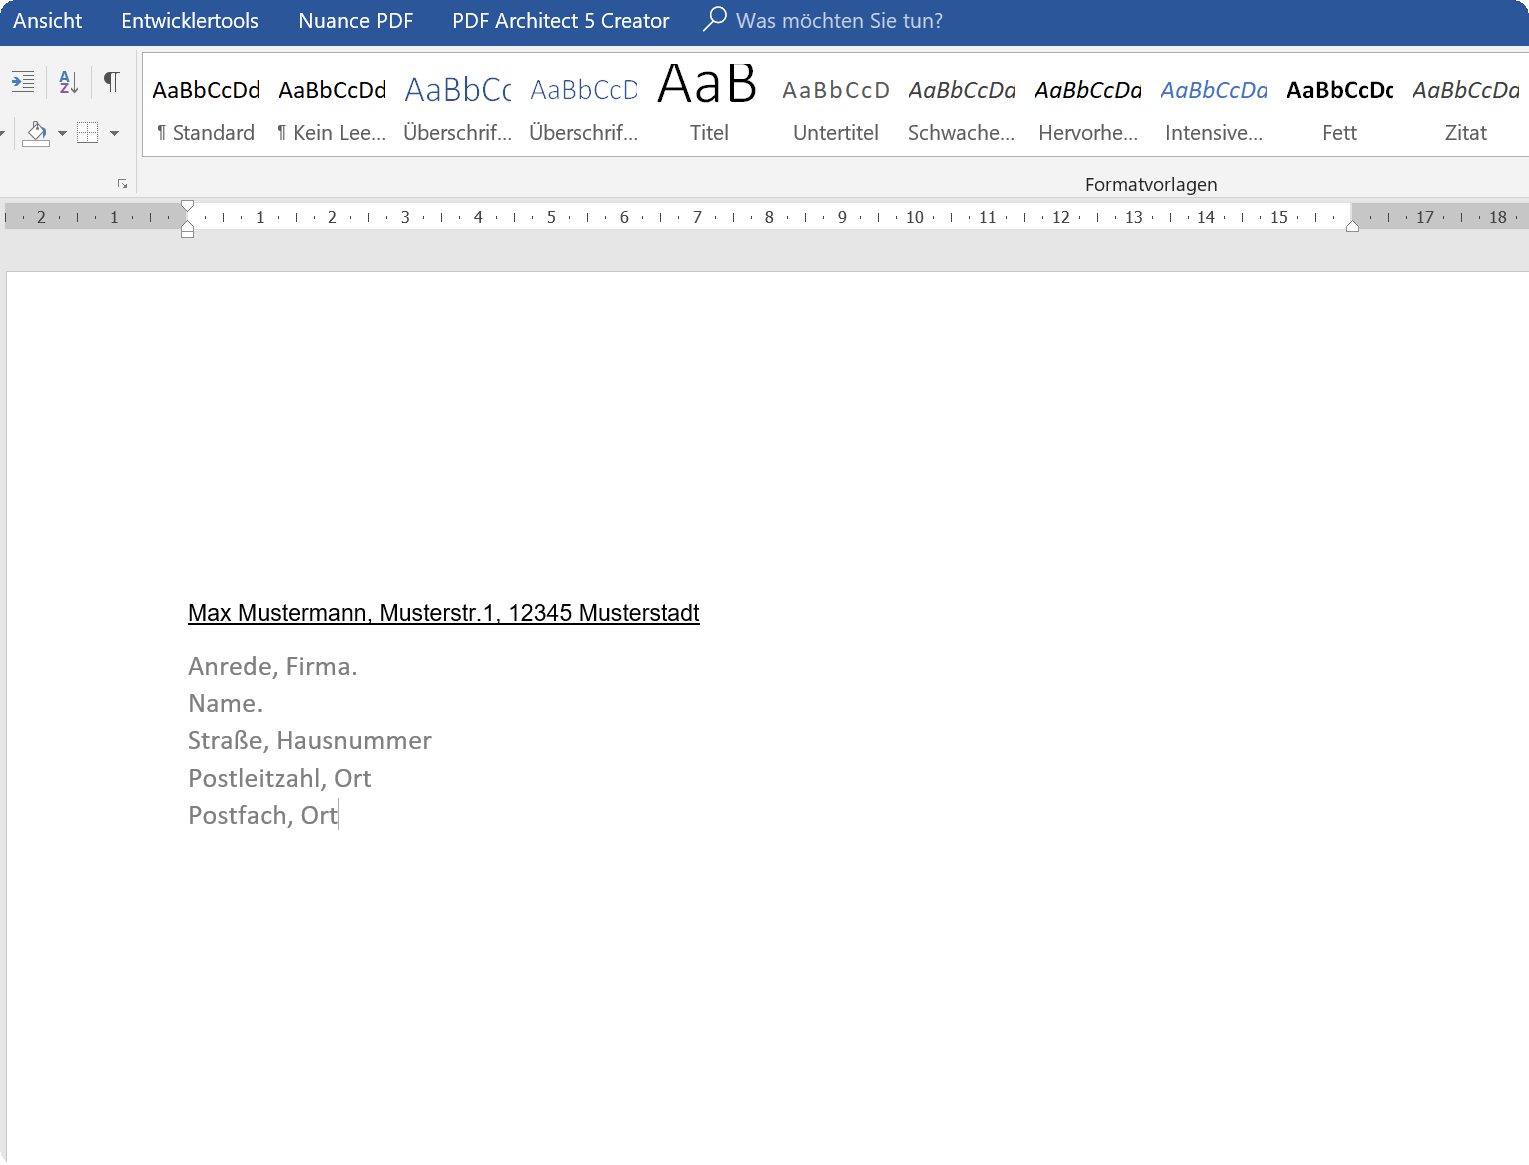
In the end, the whole thing should look like this:
See picture: (click to enlarge)
Letterhead in draft mode
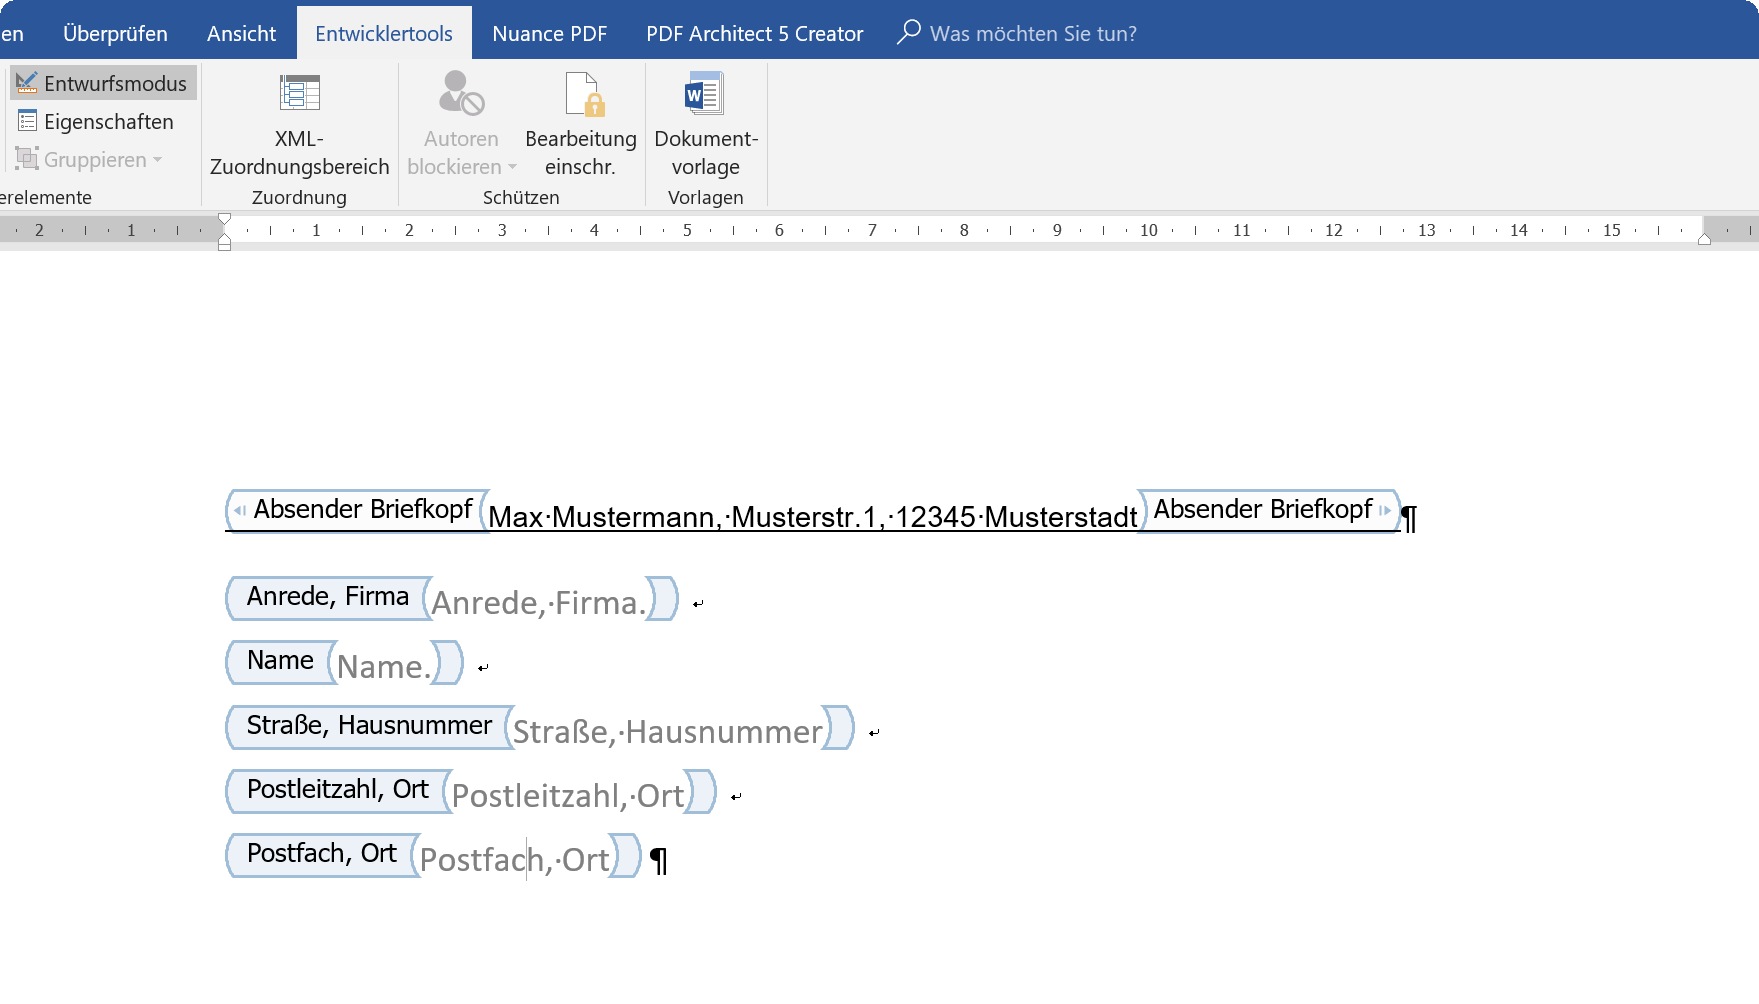
Letterhead in standard view
After we have inserted and adjusted the top sender line, we end the design mode again at short notice, and we can try out the result here.
There is now a drop-down list box available via which you can easily select your previously entered sender addresses.
Next we leave one line free (1x enter key) and start with the fields for the recipient address.
- To do this, we again create a drop-down list element in the first line of the recipient field
- Then go back to design mode
- Swap the text marked there for „salutation“
- And then insert the desired forms of address „Mr.“ – „woman“ – „company“ and so on
- Close the draft mode
Then we go down one line (no paragraph!) By pressing „Shift“ + „Enter“ and insert element fields for text.
- In the Developer tools, select the Rich Text Content Control item
- Switch to design mode
- Replace the marked text with „Name“
- As described earlier, switch to the properties of the content control
- Enter the desired description title
- Use the styles to either select the default or set a custom style
In our example, we have here again to the font „Arial“ and the font size set to 11 points. Repeat the points just described for all other recipient fields (street, postcode, city, etc.)
In the end, the whole thing should look like this:
See picture:
Letterhead in draft mode

Letterhead in standard view

7. Insert date control in Word
7. Insert date control in Word
Now we have done a good deal.
Next, we’ll add a date control so we do not have to enter it, but simply pick it from a drop-down box.
To do this, we proceed as follows:
- Place the cursor in the last line after the control in the receiver field
- Put a left-aligned tab stop at 11 cm
- Press the TAB key once
- Use the Developer tools to insert the Date Picker content control
- Return to design mode
- As before, adjust the date selector for the other elements via the context menu of the element
See picture: (click to enlarge)
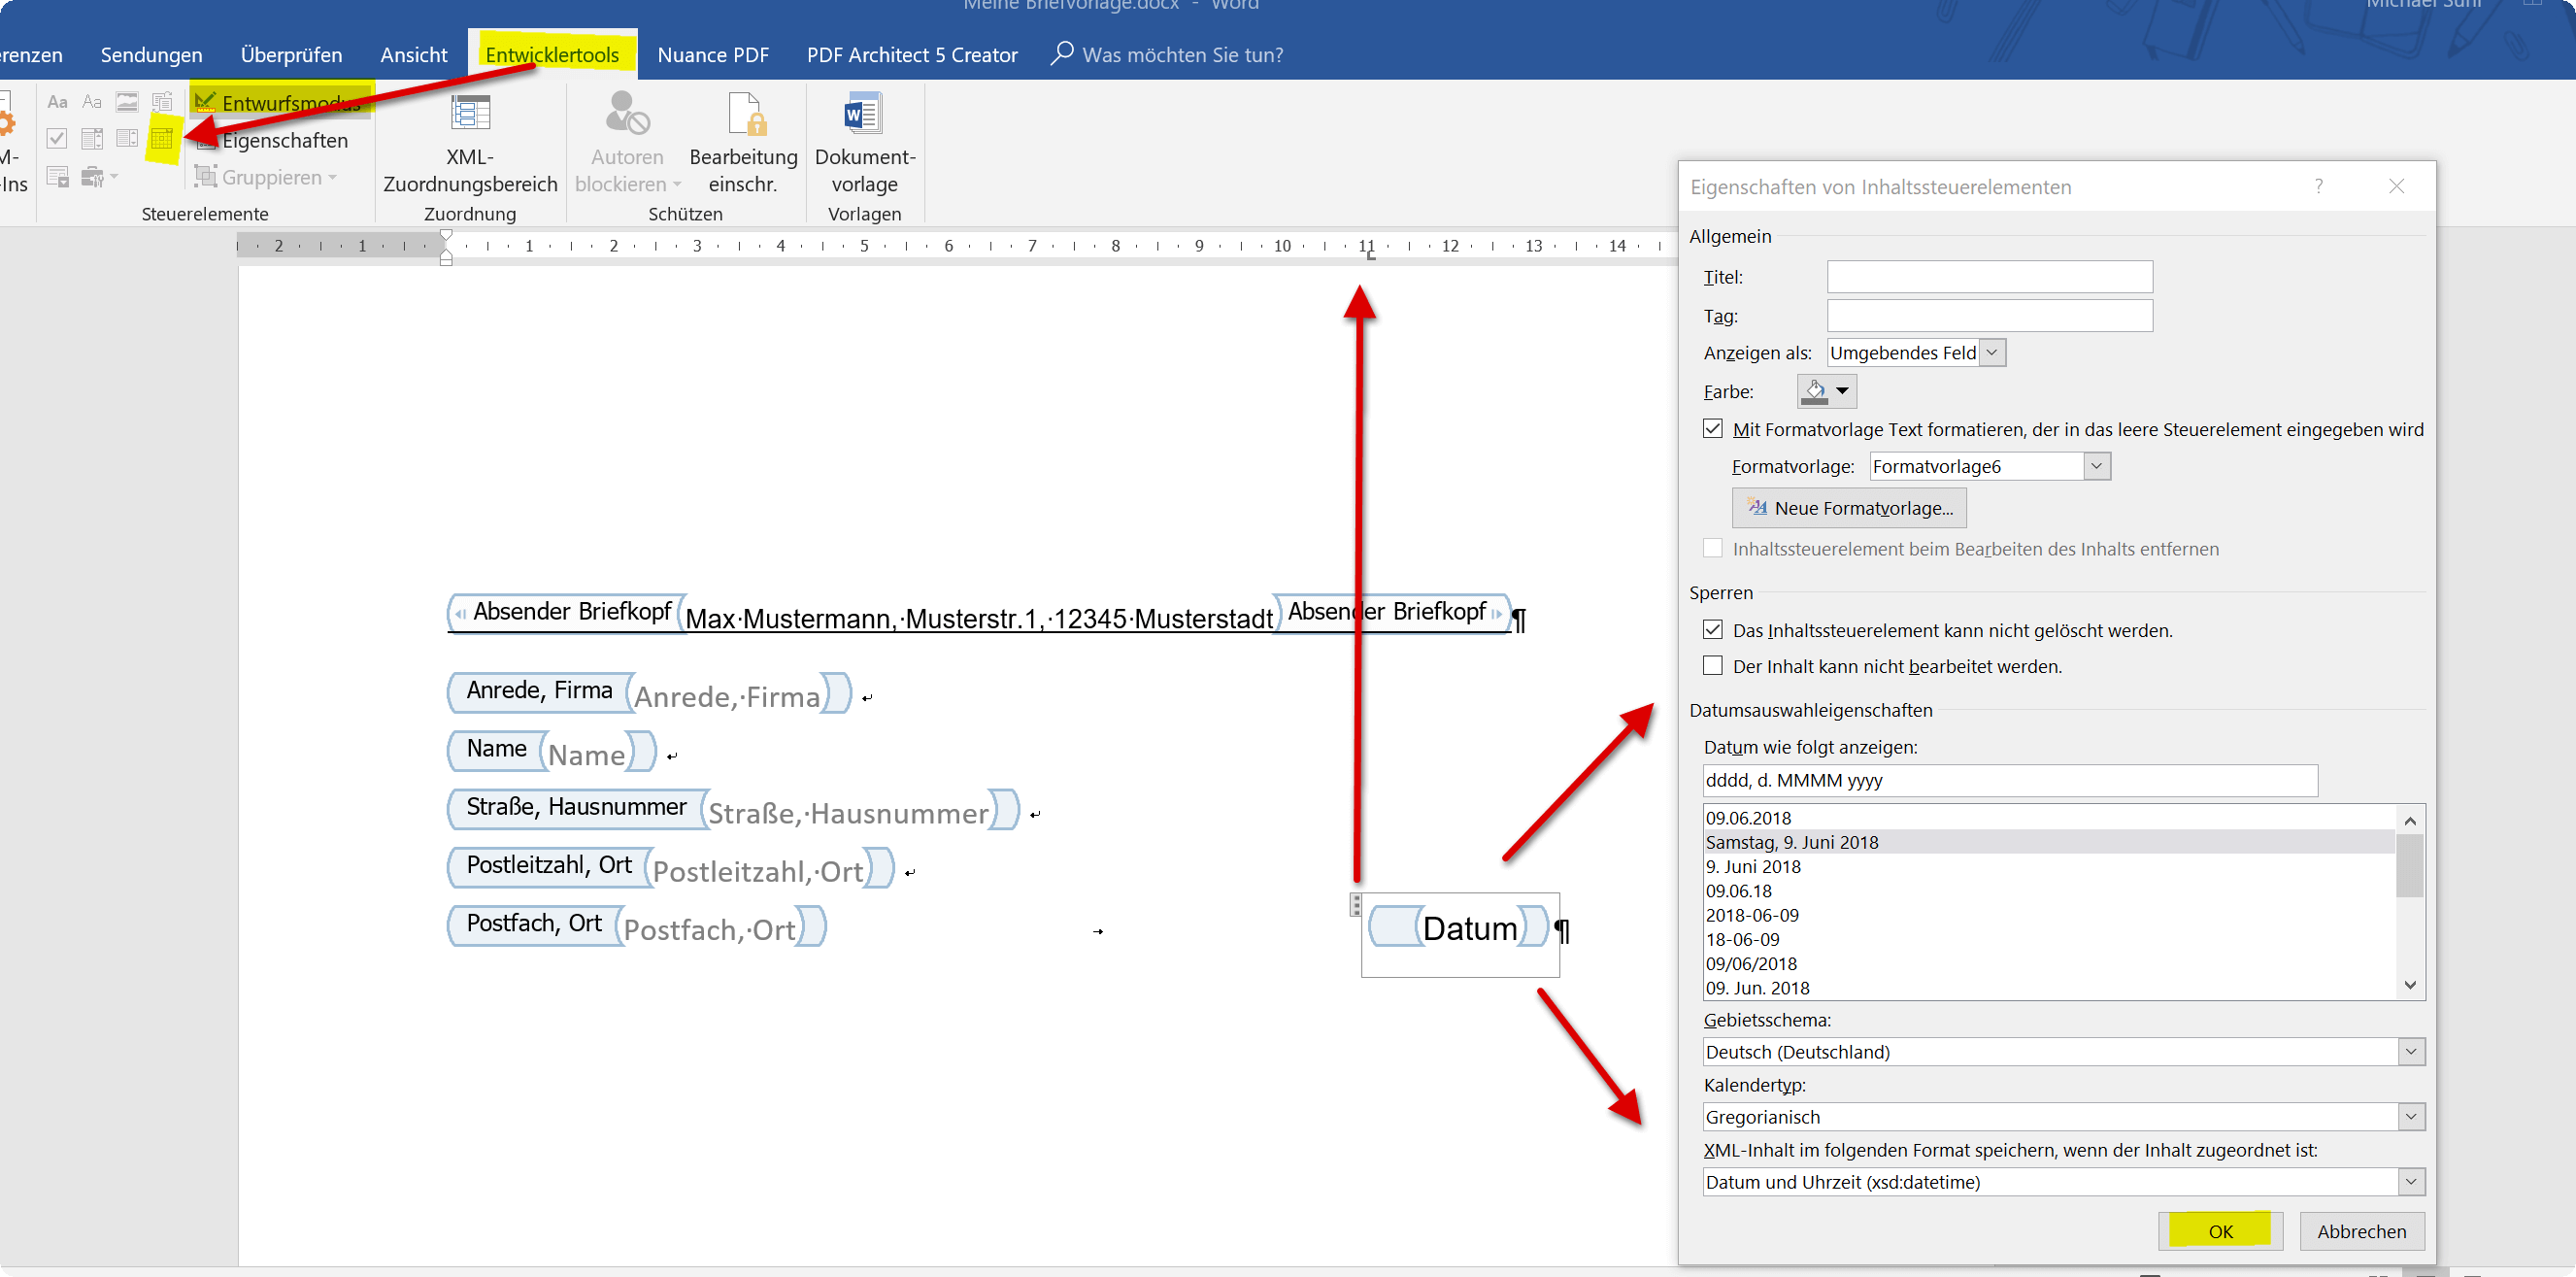
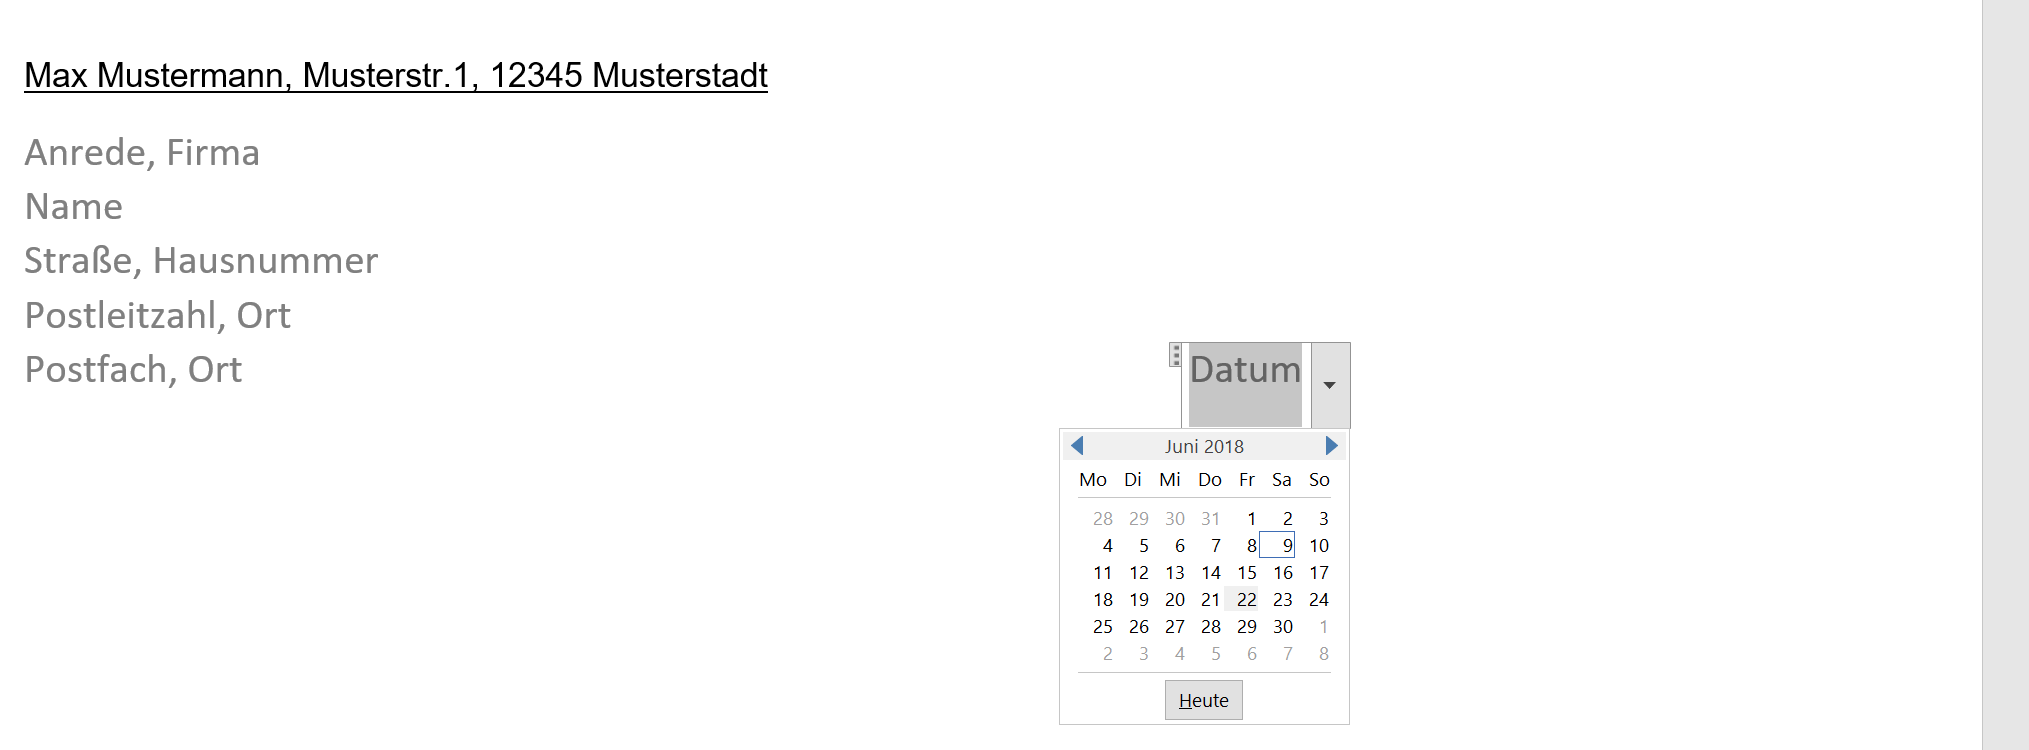
When all settings have been made, the whole thing should look like this, and you can easily paste the date over the selection.
See picture: (click to enlarge)
Now we have done a good deal.
Next, we’ll add a date control so we do not have to enter it, but simply pick it from a drop-down box.
To do this, we proceed as follows:
- Place the cursor in the last line after the control in the receiver field
- Put a left-aligned tab stop at 11 cm
- Press the TAB key once
- Use the Developer tools to insert the Date Picker content control
- Return to design mode
- As before, adjust the date selector for the other elements via the context menu of the element
See picture:

When all settings have been made, the whole thing should look like this, and you can easily paste the date over the selection.
See picture:

8. Fields for salutation, subject and letter text
8. Fields for salutation, subject and letter text
Next we continue with the subject line (Dear Mister or Mr.), as well as the title line, and of course the field for our actual letter text
- For this we start from the date line and release 3 paragraphs
- Insert a Rich Text control here again and adjust it as described above
- Then we release a paragraph again and reinsert a drop-down list control, which we use with e.g. „Dear Sir / Madam“ and so on.
- Now again leave a paragraph free, and again insert a Rich Text control for the letter text
The whole thing should look like this:
See picture: (click to enlarge)
Letter template in draft mode

Letter template in standard view

Next we continue with the subject line (Dear Mister or Mr.), as well as the title line, and of course the field for our actual letter text
- For this we start from the date line and release 3 paragraphs
- Insert a Rich Text control here again and adjust it as described above
- Then we release a paragraph again and reinsert a drop-down list control, which we use with e.g. „Dear Sir / Madam“ and so on.
- Now again leave a paragraph free, and again insert a Rich Text control for the letter text
The whole thing should look like this:
See picture:
Letter template in draft mode

Letter template in standard view

9. Greeting formula in letter template
9. Greeting formula in letter template
Now we have almost made it, and can make us to the greeting line.
For this purpose, we simply leave 2 paragraphs underneath the Text element for the letter text, and either add a dropdown box there, for example, to select between „Best regards“ or „Best regards“, etc., or we will leave that alone At this point, remove the control altogether, and write a static salutation into it.
Next, I would again leave 2-3 paragraphs free to leave room for a signature between the greeting line and the name
There, we simply add a dropdown element with the sender name, which should be available to us later.
10. Insert page numbers in Word
10. Insert page numbers in Word
Since our letter can sometimes have more than one page, we should now use for the sake of completeness, an automatic numbering of the page numbers in our letter template.
To do this, we proceed as follows:
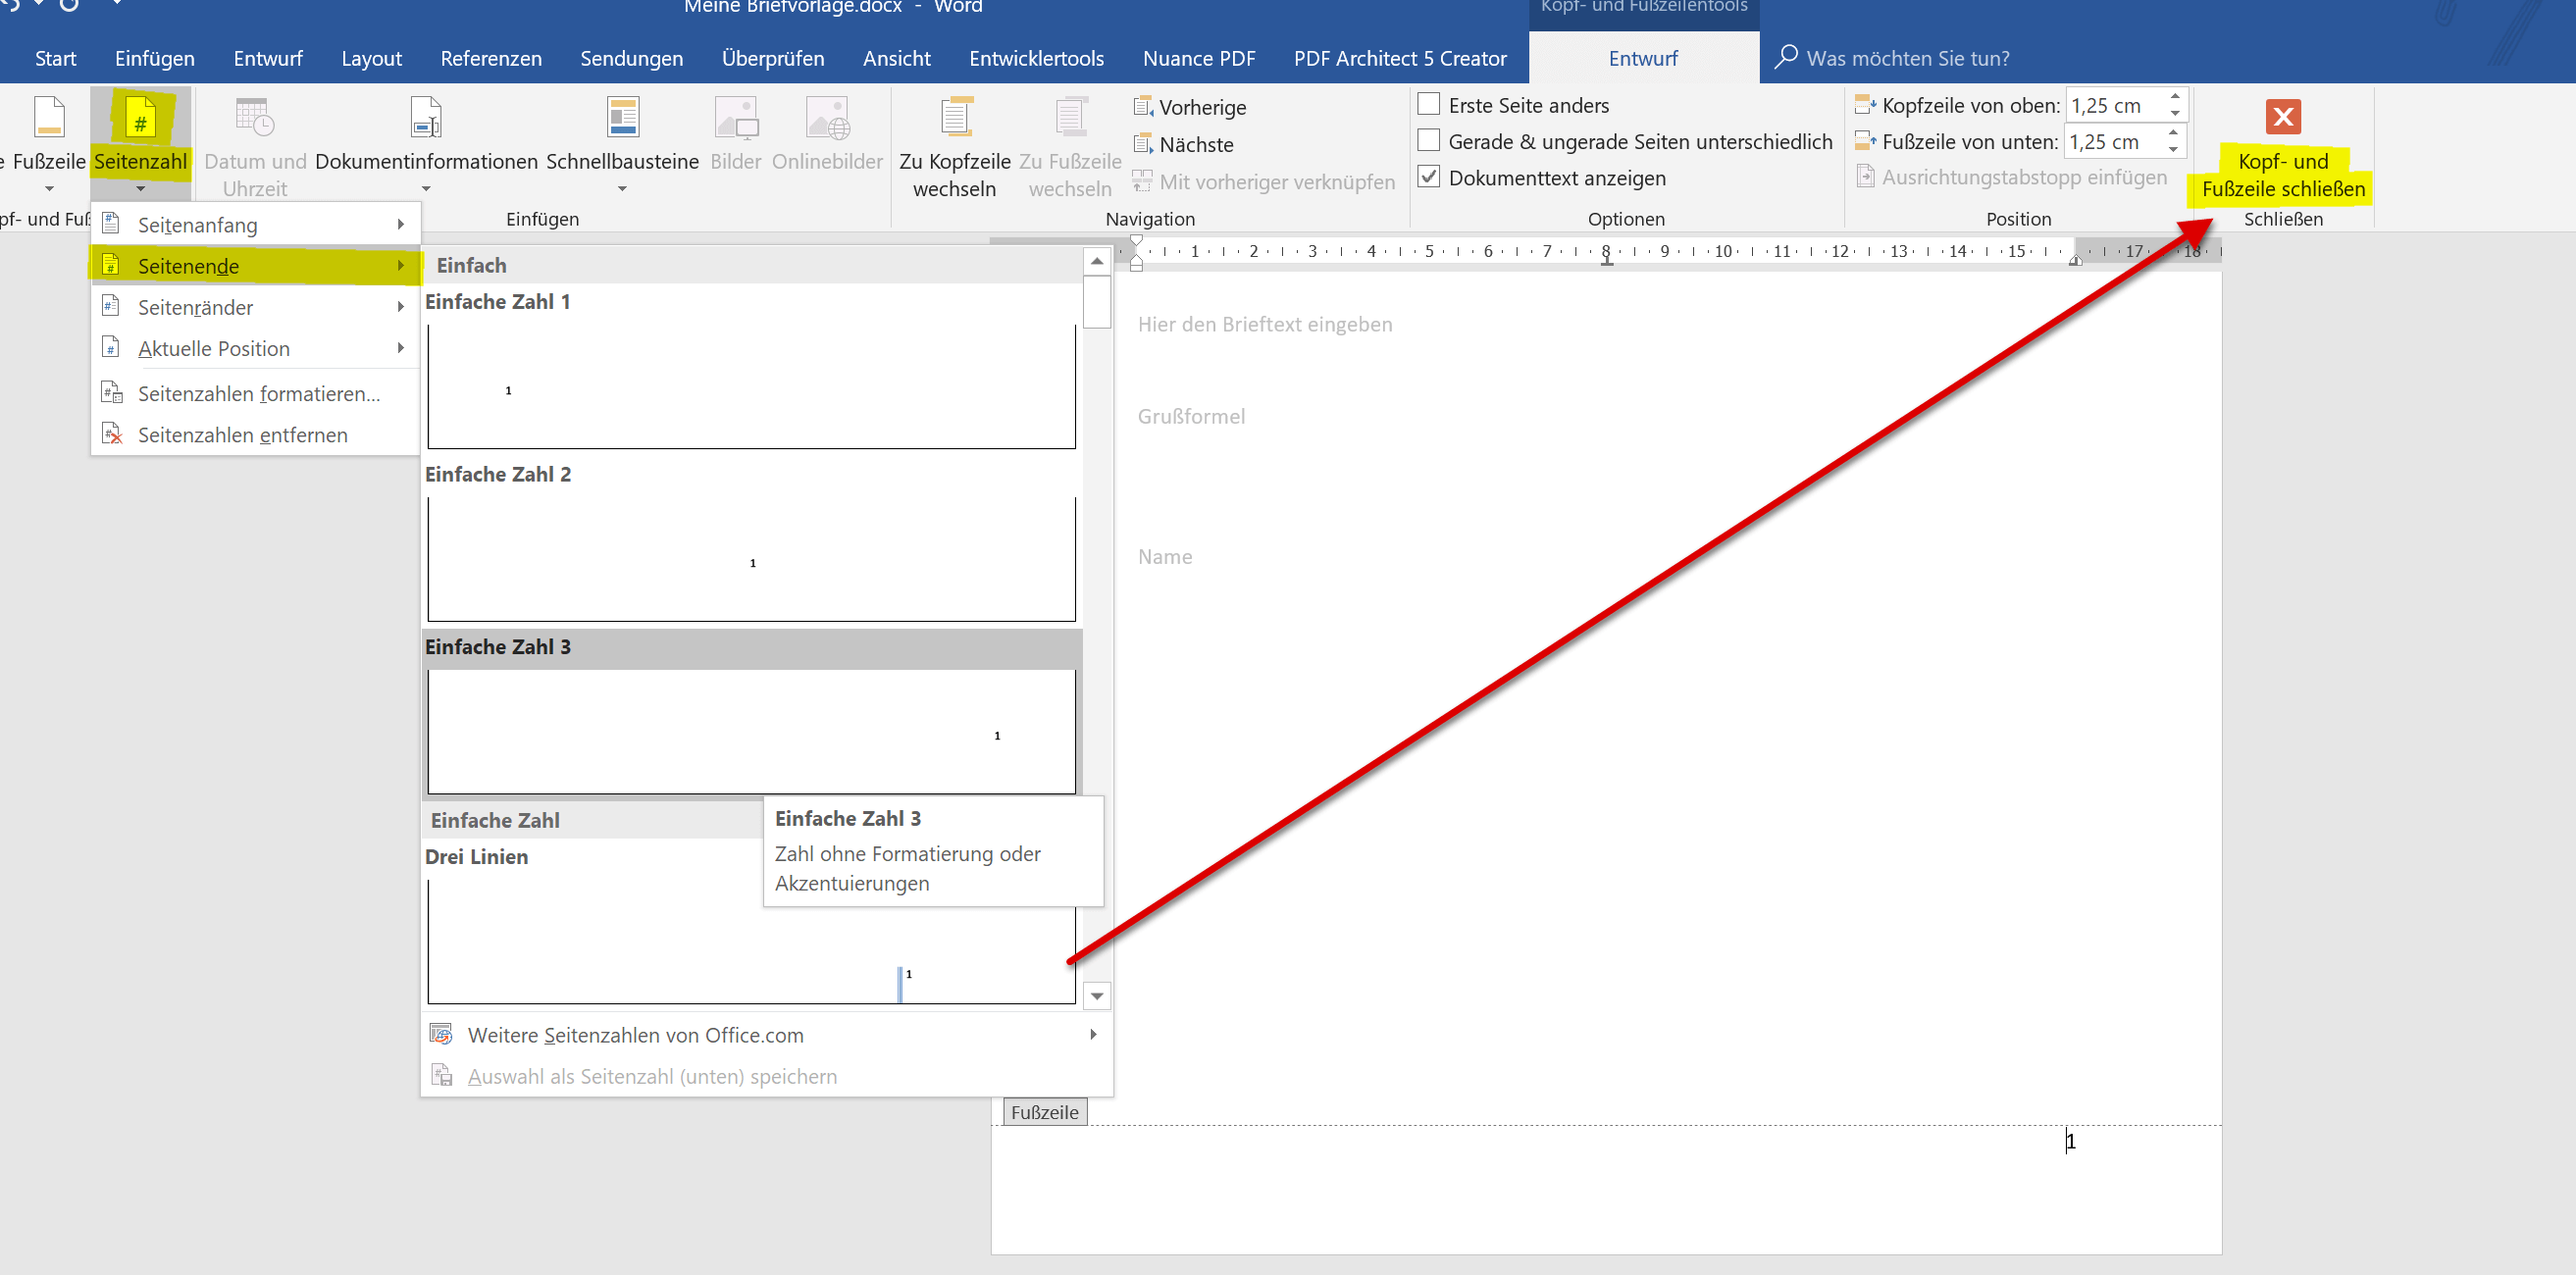
- In the footer of the document, double-click on it, which automatically activates the edit mode for headers and footers
- On the left side of the formula bar, go to „Page Number“ – „Page End“ and select a preferred number format, or create your own
- Close the Header and Footer area again
In the end, our letter template should look like this:
See picture: (click to enlarge)
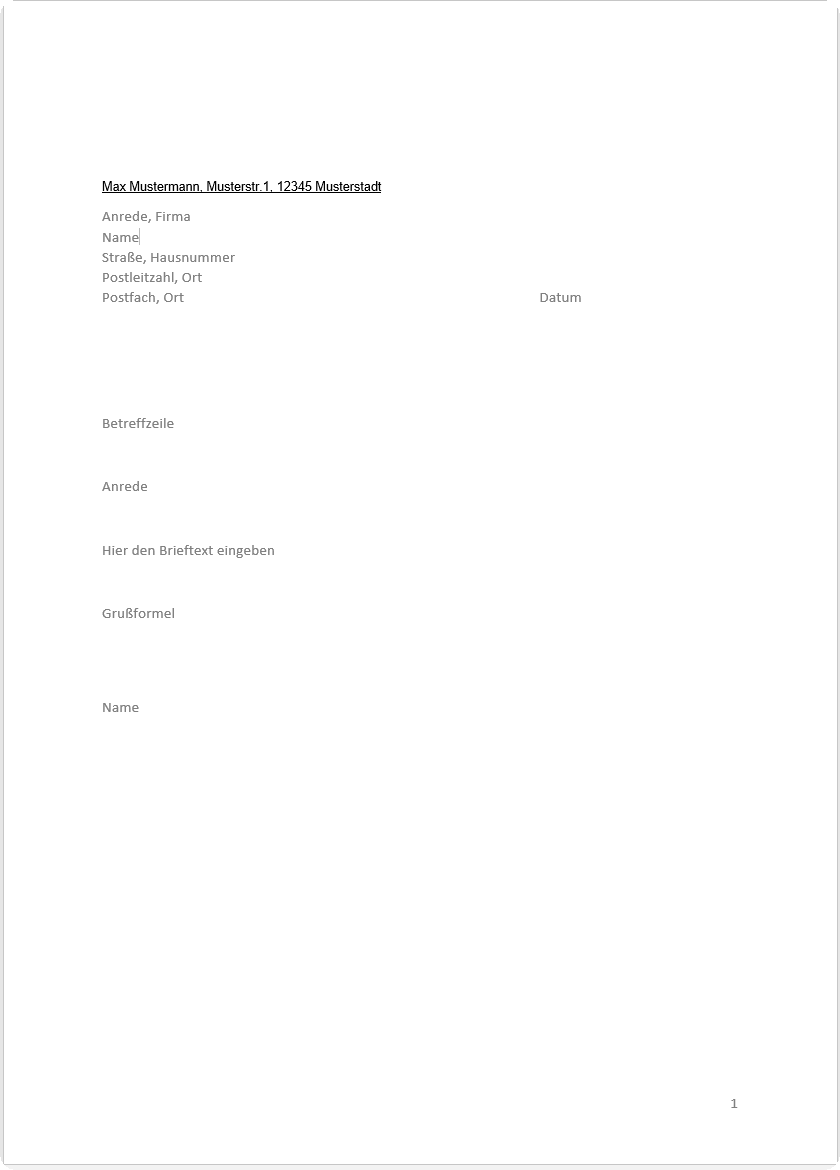
Note:
You do not have to worry about the small distance in our template between the letter field and the greeting line. The greeting line automatically shifts down the more text you put into your letter.
Since our letter can sometimes have more than one page, we should now use for the sake of completeness, an automatic numbering of the page numbers in our letter template.
To do this, we proceed as follows:
- In the footer of the document, double-click on it, which automatically activates the edit mode for headers and footers
- On the left side of the formula bar, go to „Page Number“ – „Page End“ and select a preferred number format, or create your own
- Close the Header and Footer area again
In the end, our letter template should look like this:
See picture:


Note:
You do not have to worry about the small distance in our template between the letter field and the greeting line. The greeting line automatically shifts down the more text you put into your letter.
11. Enable edit protection in Word
11. Enable edit protection in Word
Before we save the letter template, I recommend to activate the processing protection so that only form fields can be filled out. This gives you the advantage that you do not accidentally change something in the template on the controls, because as you have seen, the whole thing is not even made on the fast.
For processing protection, go to the tab „Review“ – „Restrict processing“ in the editing restrictions and set best that only the filling of forms is allowed.
Save the document afterwards as .dotx (template).
Once you have made this selection, the „Custom Office Templates“ location is automatically suggested, and you can later easily retrieve the template from any document in Word.
See picture: (click to enlarge)

Before we save the letter template, I recommend to activate the processing protection so that only form fields can be filled out. This gives you the advantage that you do not accidentally change something in the template on the controls, because as you have seen, the whole thing is not even made on the fast.
For processing protection, go to the tab „Review“ – „Restrict processing“ in the editing restrictions and set best that only the filling of forms is allowed.
Save the document afterwards as .dotx (template).
Once you have made this selection, the „Custom Office Templates“ location is automatically suggested, and you can later easily retrieve the template from any document in Word.
See picture:

Popular Posts:

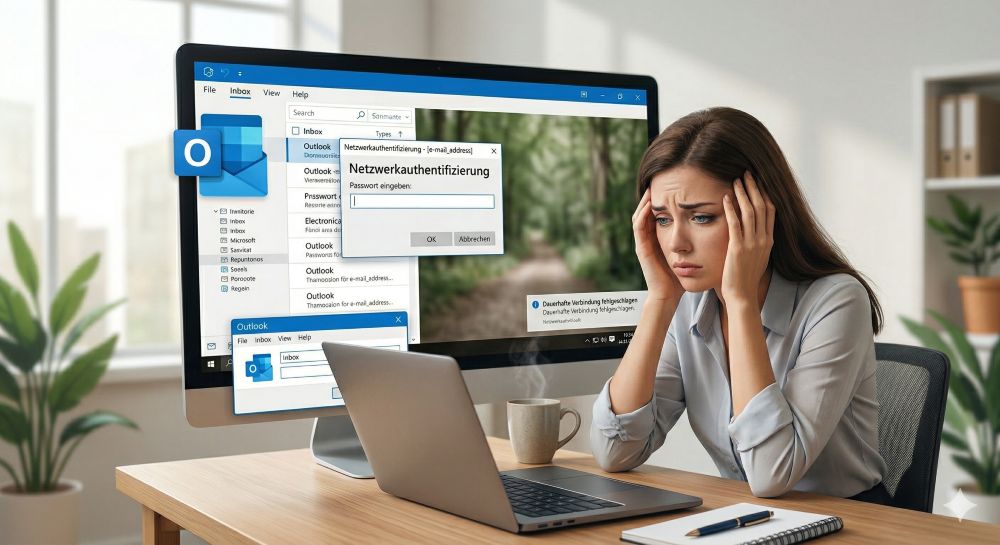
Outlook fragt ständig nach dem Passwort? So stoppen Sie die Dauerschleife
Wenn Outlook trotz gespeichertem Passwort ständig nach den Anmeldedaten fragt, blockiert das den E-Mail-Verkehr. Meist helfen das Löschen defekter Windows-Anmeldedaten oder neue App-Passwörter. Erfahren Sie hier, wie Sie das Problem mit wenigen Klicks dauerhaft lösen.

Mikrofon geht nicht in Teams, Zoom oder Meet?
Ein stummes Mikrofon im Meeting ist frustrierend. Oft sind kleine Hardware-Fehler, fehlende System-Rechte oder falsche App-Einstellungen schuld. Dieser Ratgeber liefert Ihnen systematische Schritt-für-Schritt-Lösungen, damit Sie in Teams, Zoom und Meet wieder gehört werden.

Der Drucker druckt nicht: Ursachen, Fehlerquellen und schnelle Lösungen
Ein streikender Drucker kostet Nerven, lässt sich aber meist schnell reparieren. In diesem Ratgeber zeigen wir dir Schritt für Schritt, wie du Papierstaus, WLAN-Abbrüche, Treiberfehler und leere Patronen erkennst und behebst, damit dein Gerät sofort wieder druckt.

Was tun, wenn Outlook nicht mehr startet oder abstürzt?
Wenn Microsoft Outlook plötzlich einfriert oder sich nicht öffnen lässt, ist schnelle Hilfe gefragt. In diesem Artikel zeigen wir Ihnen die effektivsten Lösungswege – vom abgesicherten Modus über die Office-Reparatur bis hin zum Reparieren beschädigter Datendateien.

Erste Hilfe: Wenn das Windows-Update hängt
Ein eingefrorenes Windows-Update ist ärgerlich, lässt sich aber meist schnell lösen. Dieser Ratgeber zeigt Ihnen, wie Sie mit Geduld, einem sicheren Neustart und Windows-Bordmitteln wie der Problembehandlung oder dem Leeren des Caches das System wieder zum Laufen bringen.

Reibungsloser Wechsel: Passwörter und Lesezeichen sicher umziehen
Der Wechsel auf einen neuen PC oder Browser ist schnell erledigt. Mit unserer Anleitung exportieren und importieren Sie Lesezeichen und Passwörter absolut sicher. Erfahren Sie, worauf Sie bei Chrome, Firefox und Edge achten müssen und warum ein Passwortmanager lohnt.
Angebote 2025/2026 in: Vorlagen


Popular Posts:
Outlook fragt ständig nach dem Passwort? So stoppen Sie die Dauerschleife
Wenn Outlook trotz gespeichertem Passwort ständig nach den Anmeldedaten fragt, blockiert das den E-Mail-Verkehr. Meist helfen das Löschen defekter Windows-Anmeldedaten oder neue App-Passwörter. Erfahren Sie hier, wie Sie das Problem mit wenigen Klicks dauerhaft lösen.
Mikrofon geht nicht in Teams, Zoom oder Meet?
Ein stummes Mikrofon im Meeting ist frustrierend. Oft sind kleine Hardware-Fehler, fehlende System-Rechte oder falsche App-Einstellungen schuld. Dieser Ratgeber liefert Ihnen systematische Schritt-für-Schritt-Lösungen, damit Sie in Teams, Zoom und Meet wieder gehört werden.
Der Drucker druckt nicht: Ursachen, Fehlerquellen und schnelle Lösungen
Ein streikender Drucker kostet Nerven, lässt sich aber meist schnell reparieren. In diesem Ratgeber zeigen wir dir Schritt für Schritt, wie du Papierstaus, WLAN-Abbrüche, Treiberfehler und leere Patronen erkennst und behebst, damit dein Gerät sofort wieder druckt.
Was tun, wenn Outlook nicht mehr startet oder abstürzt?
Wenn Microsoft Outlook plötzlich einfriert oder sich nicht öffnen lässt, ist schnelle Hilfe gefragt. In diesem Artikel zeigen wir Ihnen die effektivsten Lösungswege – vom abgesicherten Modus über die Office-Reparatur bis hin zum Reparieren beschädigter Datendateien.
Erste Hilfe: Wenn das Windows-Update hängt
Ein eingefrorenes Windows-Update ist ärgerlich, lässt sich aber meist schnell lösen. Dieser Ratgeber zeigt Ihnen, wie Sie mit Geduld, einem sicheren Neustart und Windows-Bordmitteln wie der Problembehandlung oder dem Leeren des Caches das System wieder zum Laufen bringen.
Reibungsloser Wechsel: Passwörter und Lesezeichen sicher umziehen
Der Wechsel auf einen neuen PC oder Browser ist schnell erledigt. Mit unserer Anleitung exportieren und importieren Sie Lesezeichen und Passwörter absolut sicher. Erfahren Sie, worauf Sie bei Chrome, Firefox und Edge achten müssen und warum ein Passwortmanager lohnt.
Angebote 2025/2026 in: Vorlagen