Protect Word documents from editing
If you have created important documents in Word, then these are not for everyone and must therefore be protected against unauthorized access or manipulation. There are various ways in Word for either only certain areas of the Word document to secure, or completely protected from access by unauthorized persons.
Honestly, one has to say that, of course, no protection offers 100% security. Therefore, it may be advisable to use a double backup by protecting the Word document itself, and then packing it again as a ZIP or RAR file and encrypting it as well.
How you can do all this we would like to describe in this article.
1. Protect individual areas in the document
1. Protect individual areas in the document
If you want to protect some parts of a Word document from unauthorized editing, you really can not avoid the use of controls. These can then later be treated as form areas, and be protected separately.
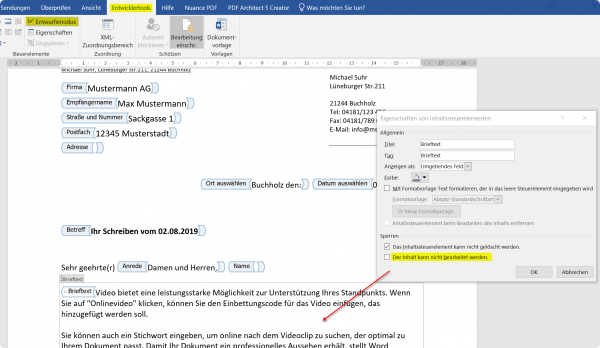
So suppose that you have created a letter with form controls, and want to explicitly protect certain areas here, then go to the “Design Mode” in the Word menu via the tab “Developer Tools” and select the context menu (right mouse button) Properties of the element concerned. In this way, you can protect each individual element separately before processing.
See picture (click to enlarge)
You can certainly see that while this method is quite labor intensive, on the other hand it offers the widest variety of restrictions on third-party access.
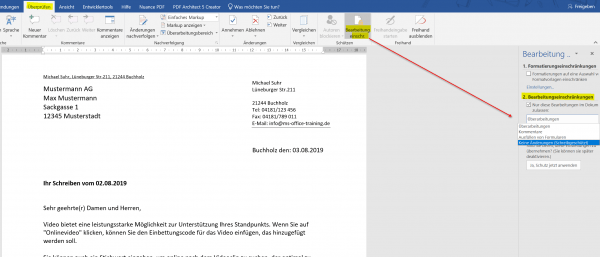
It is a bit easier in Word to go to the tab “Review” – “Restrict Editing”, and there, under the possibilities given by Word to restrict editing. Here you can protect the document so that either only edits of comments, the completion of form fields is allowed, or just no changes may be made.
See picture (click to enlarge)
2. Protect entire Word document from editing
2. Protect entire Word document from editing
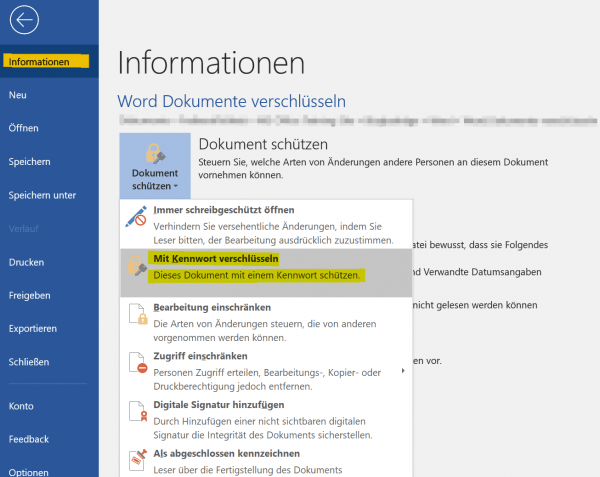
If you want to completely protect your Word document from unauthorized access, the simplest method is to use the Word menu “File” and select the “Protect Document” section. Here you can provide the entire Word document, for example, with a password protection, so that the file without a password can not be opened at all.
However, you should remember the password of course well, otherwise it will be difficult for you as a creator to get back to the document again.
See picture (click to enlarge)
3. Conclusion
3. Conclusion
As you have seen, depending on how extensive and dedicated you want to protect your Word document, it is more or less costly to do it. Of course, it would be desirable that Microsoft offers more options here in the future, just as it is possible, for example, as in Excel, to release each cell individually for itself or even to block it.
By the way, the possibilities of protecting your document do not offer 100% security. Because the password protection which can be used to open the Word document can be leveraged with appropriate tools on the Internet in part. But it’s still better than not doing anything to guard against unauthorized access.
Popular Posts:
Integrate and use ChatGPT in Excel – is that possible?
ChatGPT is more than just a simple chatbot. Learn how it can revolutionize how you work with Excel by translating formulas, creating VBA macros, and even promising future integration with Office.
Create Out of Office Notice in Outlook
To create an Out of Office message in Microsoft Outlook - Office 365, and start relaxing on vacation
The best backup solutions for your data
Keep your data safe and secure! Discover our best backup solutions for your valuable information now. Because safety is the be-all and end-all - and we have the perfect tips.
Internet Addiction – A serious look at a growing problem
Internet addiction is just as serious an illness as alcohol or drug addiction. Just that this is a mental illness. In this article we want to go into the phenomenon in more detail and provide assistance.
Main keyboard shortcuts in Windows 10/11
Entdecken Sie die wichtigsten Shortcuts in Windows 11, um Ihre Produktivität zu steigern. Von allgemeinen Befehlen bis hin zu spezifischen Fenster-Management- und System-Shortcuts, lernen Sie, wie Sie mit diesen Tastenkombinationen effizienter arbeiten können.
Encrypt USB stick – These options are available
Protecting sensitive data is essential. Encrypting USB sticks provides an extra layer of security. Whether it's built-in software, operating system features, third-party software, or hardware encryption, there are numerous options.


