Create a Word letter template with form fields
In a society characterized by bureaucracy, no one can avoid frequent correspondence with a wide variety of bodies. Therefore it makes sense to create a letter template according to DIN 5008 in Word in which the most important elements are already prepared.
If there are several people in your household, you could either create a separate template for each one, or you could use the control elements and form fields in Microsoft Word and build a dynamic letter template according to DIN 5008 that can be used by everyone.
In this article we would like to describe how you can use control elements to create dynamic letter templates in accordance with DIN 5008 with form fields and drop-down lists.
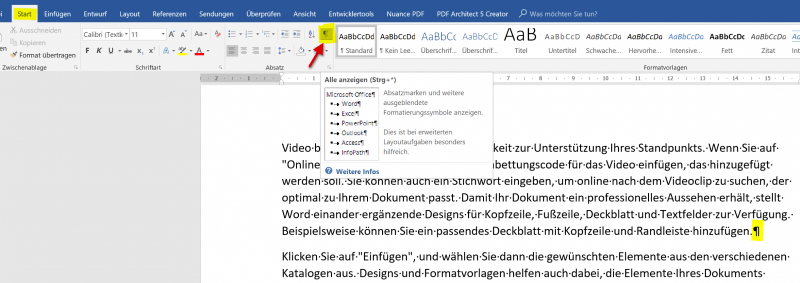
1. Show formatting marks
1. Show formatting marks
As a first step, I recommend (as with all work in Word) to display the formatting marks so that we can see where paragraphs, blank lines, tabs, etc. are located. Fortunately, this is quite easy and can also be switched on and off with one click.
In the “Start” tab and the “Section” icon group, click on the corresponding icon.
See figure: (click to enlarge)
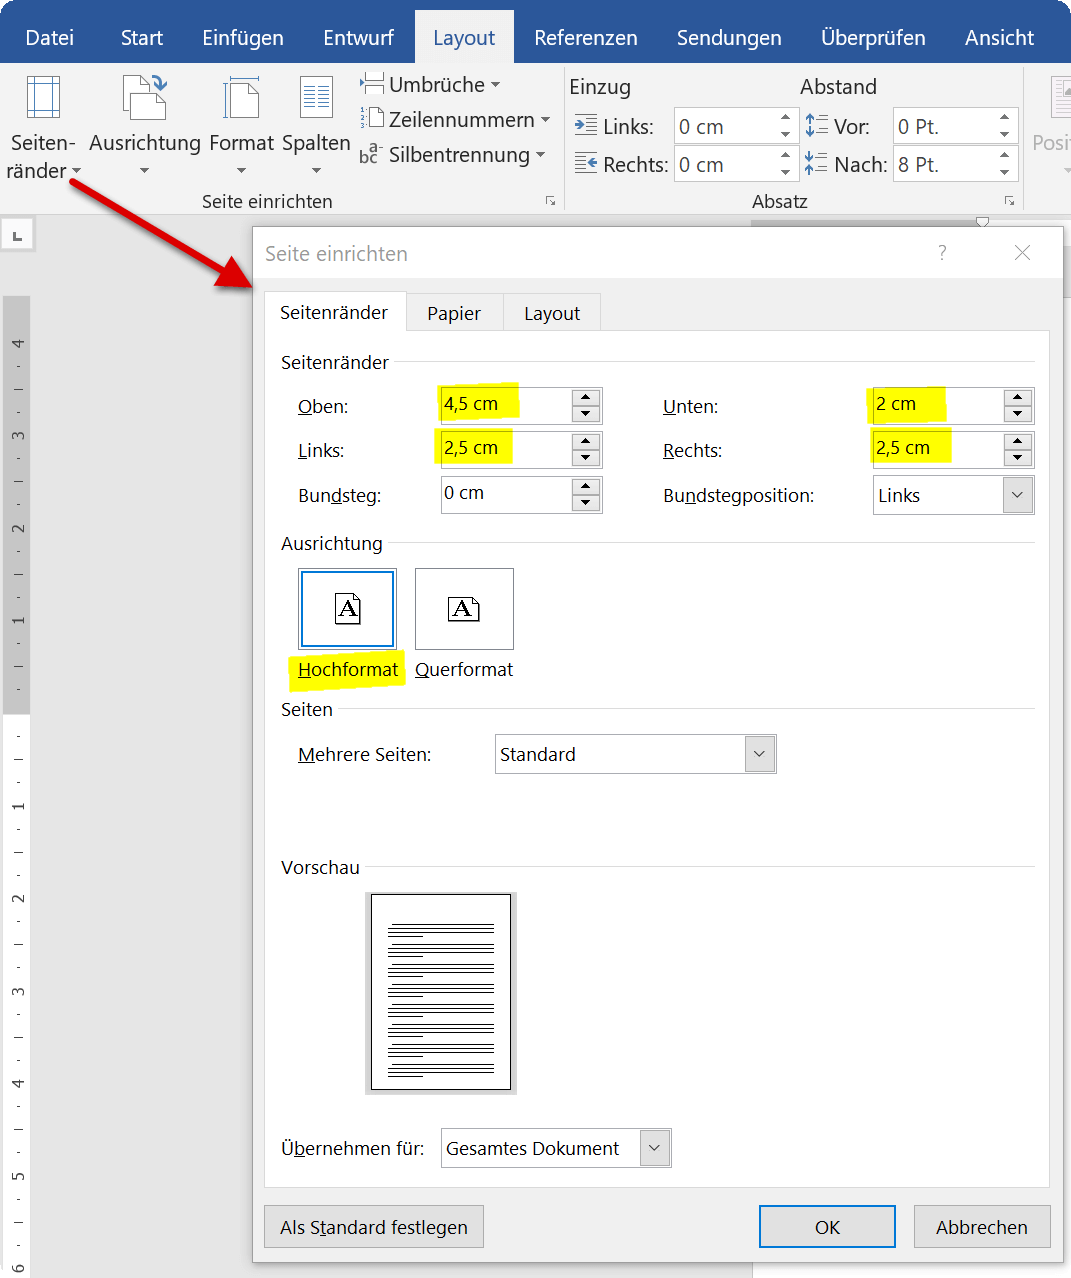
2. set up page
2. set up page
Next, we set up our site according to DIN 5008 so that later the letterhead fits exactly into an envelope (DIN long) with a viewing window. To do this, go to the “Layout” – “Margins” tab at the bottom and click on “Custom margins”
There we set the dimensions as follows:
- Top: 4.5cm
- Left: 2.0cm
- Right: 2.0 cm
- Bottom: 2.5cm
- Gutter: 0.0 cm
- Gutter Position: Left
- Orientation: portrait
See figure: (click to enlarge)

3. Enable developer tools in Word
3. Enable developer tools in Word
Since we want to create a dynamic letter template, we need the controls in Word at this point.
These are deactivated in the standard installation, but it is advisable to make them permanently available via the options menu, as you can use them for a wide variety of tasks from time to time.
To do this we go to the “File” tab – “Options” – “Customize the ribbon” and there under the main tabs on the right side of the dialog box we activate the item “Developer tools”
See fig. (click to enlarge)
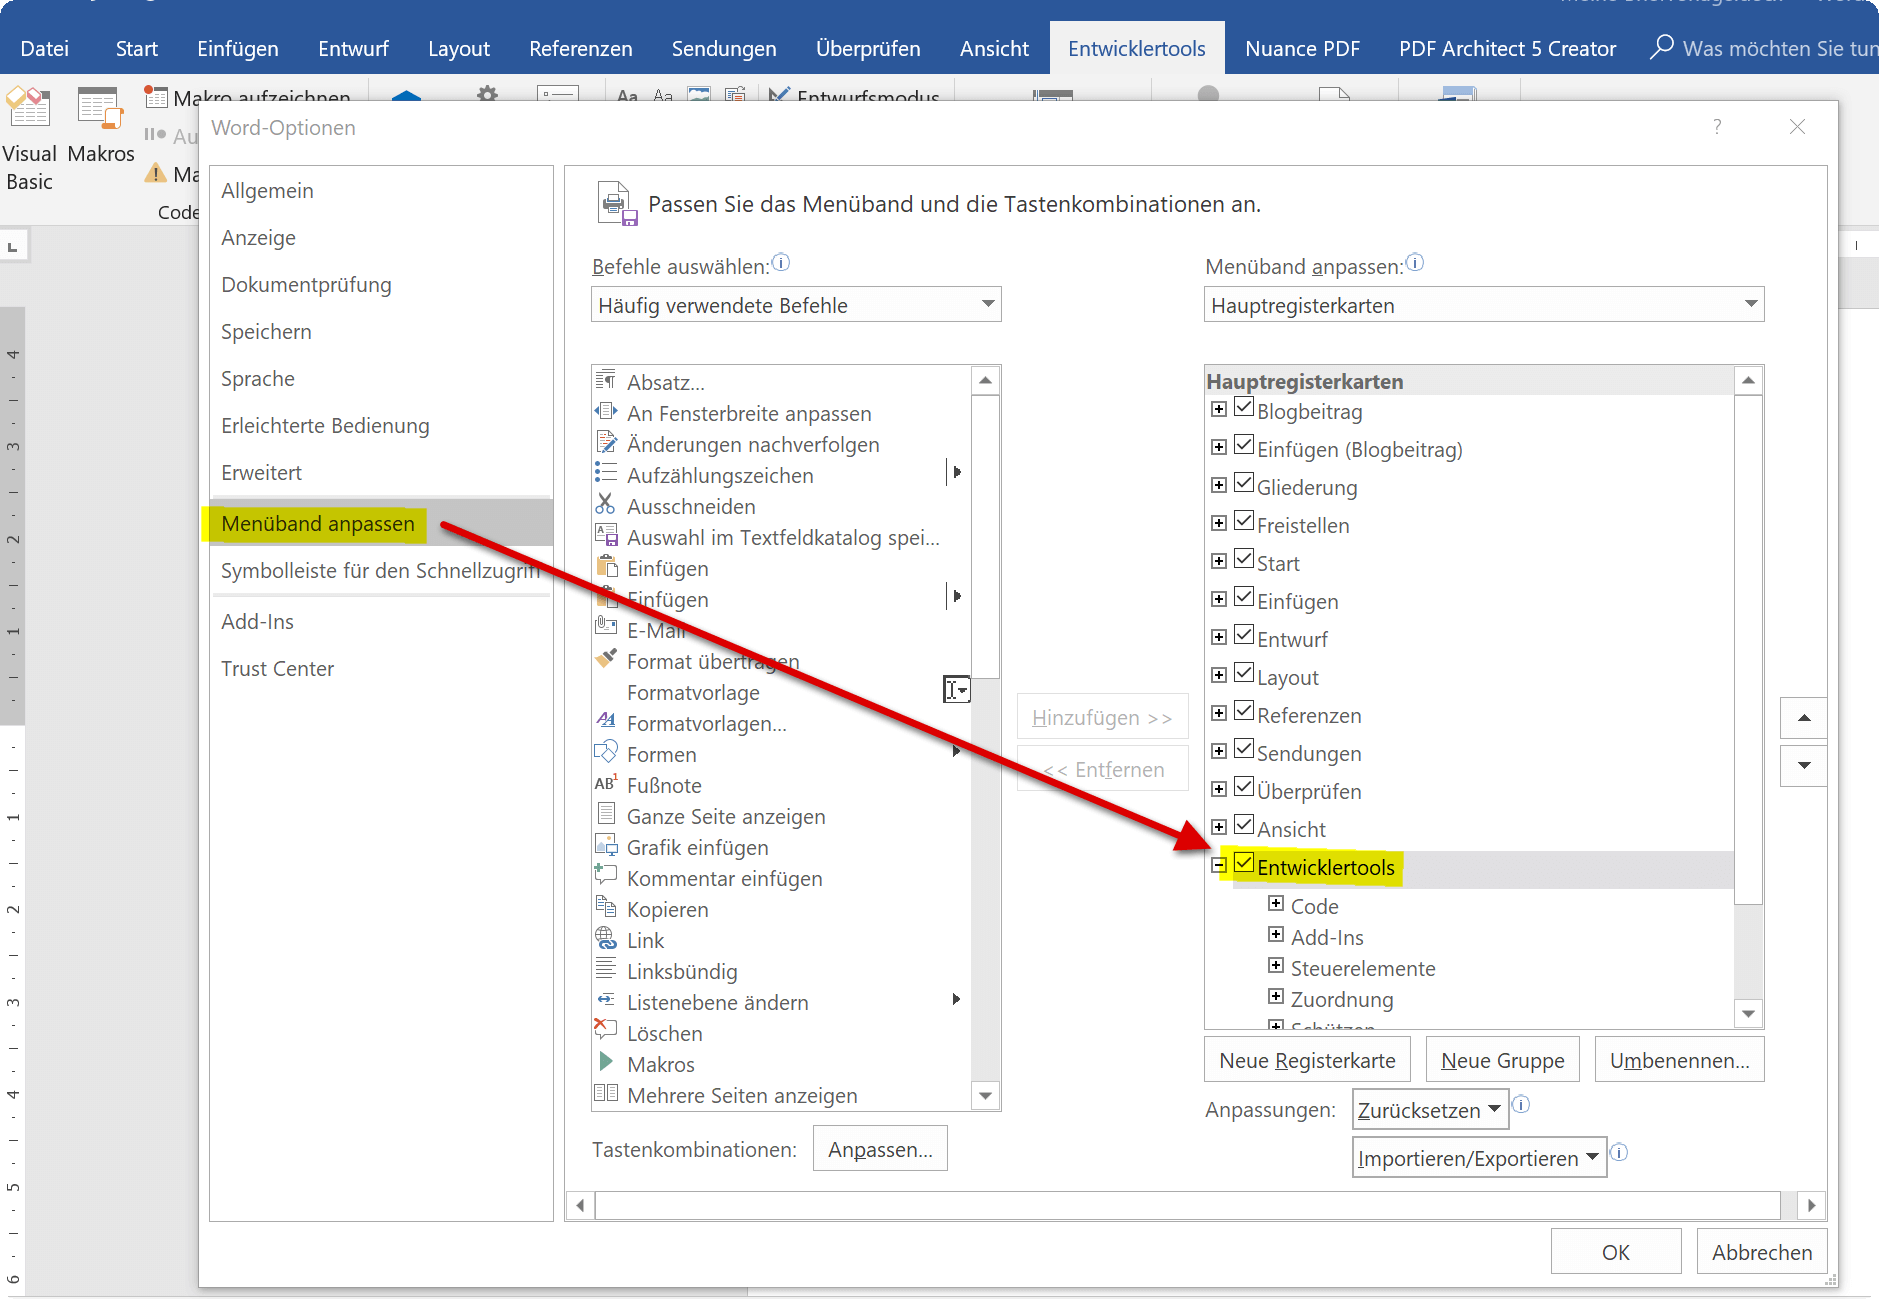
After activation, the new “Developer tools” tab is permanently available in every document, which you can use for all kinds of purposes, as already mentioned.
Since we want to create a dynamic letter template, we need the controls in Word at this point.
These are deactivated in the standard installation, but it is advisable to make them permanently available via the options menu, as you can use them for a wide variety of tasks from time to time.
To do this we go to the “File” tab – “Options” – “Customize the ribbon” and there under the main tabs on the right side of the dialog box we activate the item “Developer tools”
See fig. (click to enlarge)
After activation, the new “Developer tools” tab is permanently available in every document, which you can use for all kinds of purposes, as already mentioned.
4. Prepare letterhead in Word
4. Prepare letterhead in Word
Now that we’ve made the basic settings and activated the necessary tools, we can start with the first part of the letterhead.
Our cursor is now at 4.5 cm from the top and 2.5 cm from the left after the layout setting that was previously set.
In this first line we add our sender address in short form, so that the recipient can see who the sender is before opening it, and also for the postman, so that if the letter cannot be delivered, he can come back to us.
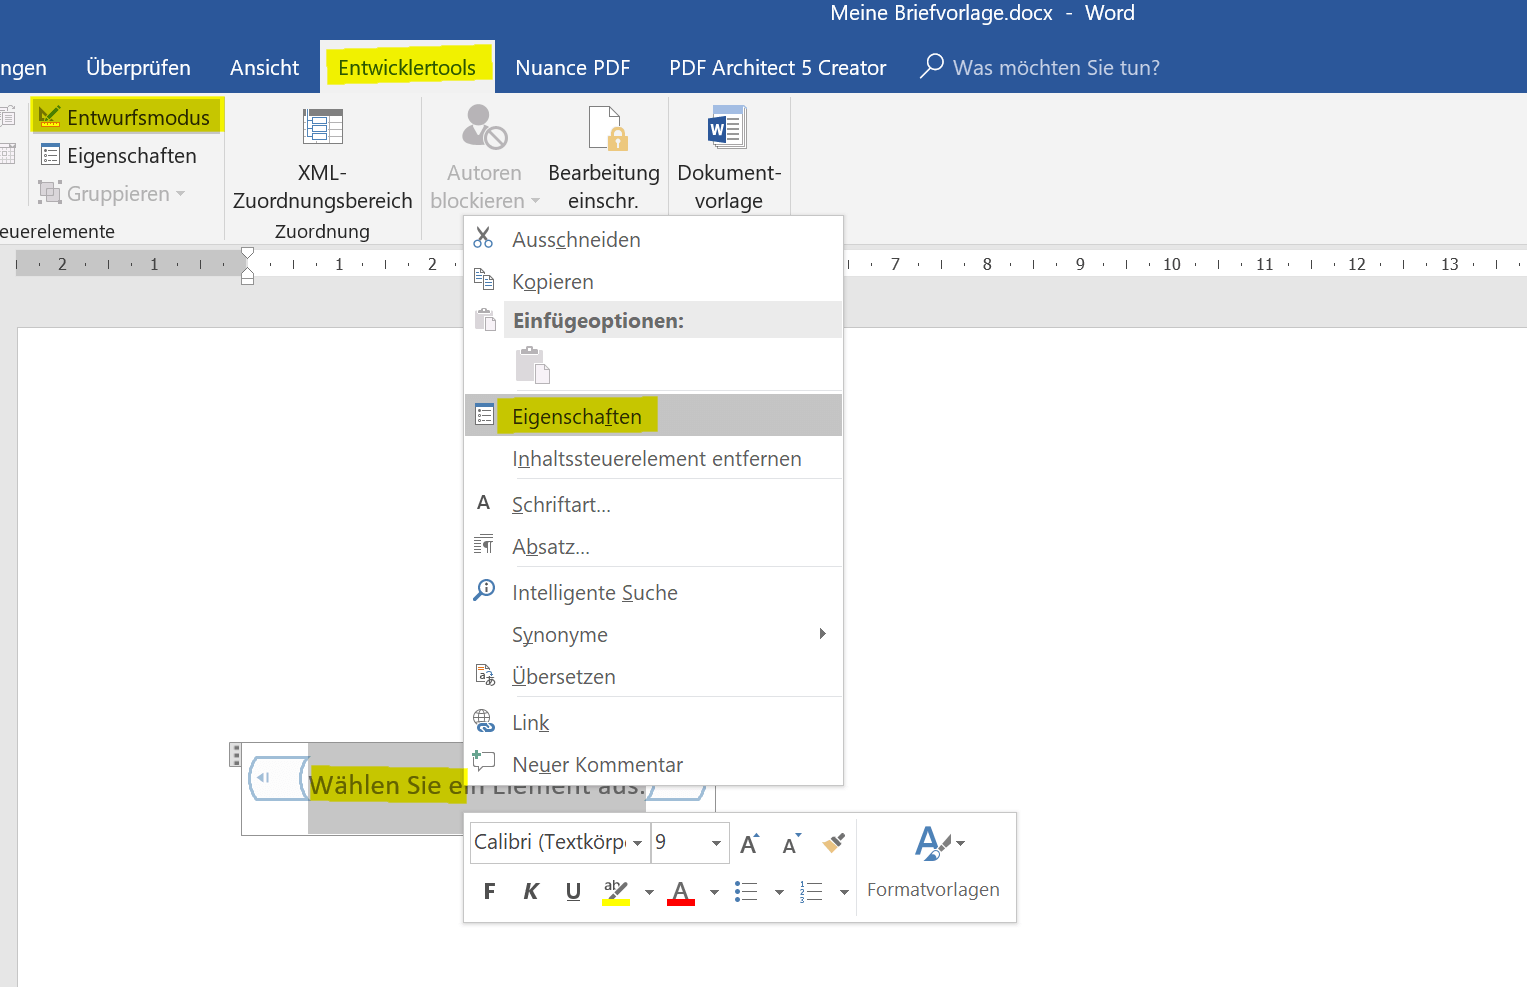
- From the Developer – Controls tab, select the Drop-Down List Control tool
- Then click Design Mode
- In the context menu (right mouse button) of the drop-down box, click on “Properties”
- Activate the check mark “Use format template to apply text that….”
- Click New Style
- In the next dialog window on “Format” – “Font”
- Select the font and font size and confirm with “OK”
See figure: (click to enlarge)
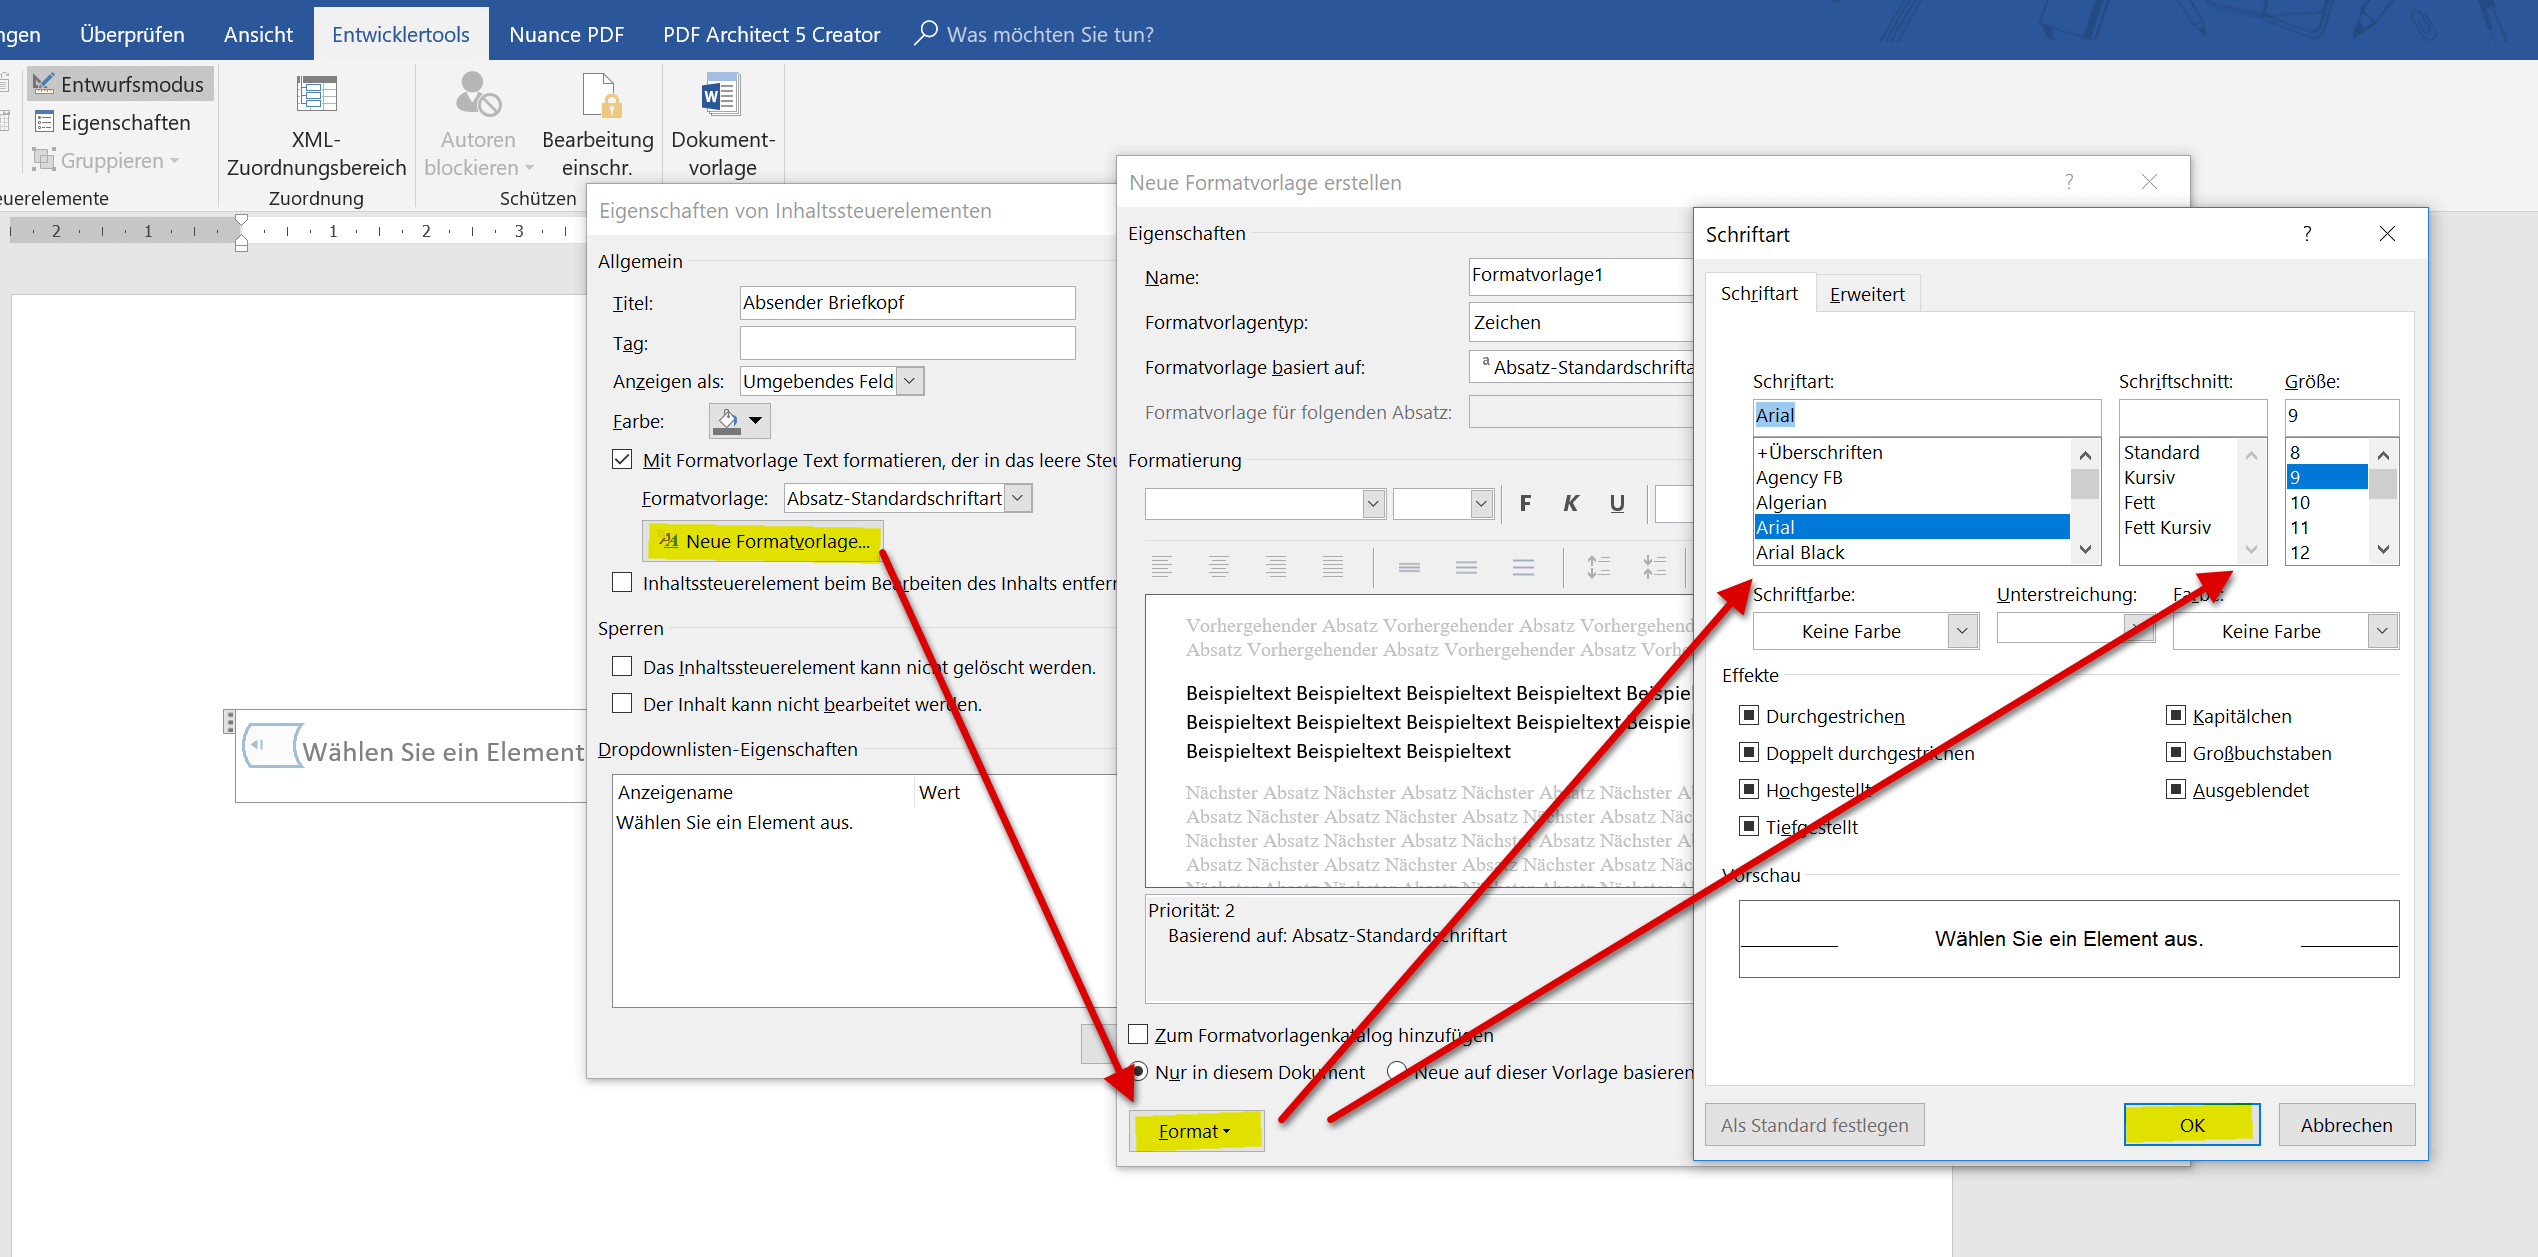
A notice:
In our example, we have set the font for the top line to “Arial” and the size to “9 points”. Experience has shown that this is a good value, but in the end you can of course also define it completely freely.
In addition, you can of course also select from already created format templates if you have a suitable one ready and do not have to make these settings from scratch.
Now that we’ve made the basic settings and activated the necessary tools, we can start with the first part of the letterhead.
Our cursor is now at 4.5 cm from the top and 2.5 cm from the left after the layout setting that was previously set.
In this first line we add our sender address in short form, so that the recipient can see who the sender is before opening it, and also for the postman, so that if the letter cannot be delivered, he can come back to us.
- From the Developer – Controls tab, select the Drop-Down List Control tool
- Then click Design Mode
- In the context menu (right mouse button) of the drop-down box, click on “Properties”
- Activate the check mark “Use format template to apply text that….”
- Click New Style
- In the next dialog window on “Format” – “Font”
- Select the font and font size and confirm with “OK”
See figure: (click to enlarge)
A notice:
In our example, we have set the font for the top line to “Arial” and the size to “9 points”. Experience has shown that this is a good value, but in the end you can of course also define it completely freely.
In addition, you can of course also select from already created format templates if you have a suitable one ready and do not have to make these settings from scratch.
5. Contents of drop-down list controls
5. Contents of drop-down list controls
After the basic formatting of the dropdown list control, we can now get to the desired exchangeable content.
To do this, we simply remain in the Properties dialog box and:
- Click once on the default “Select an item”.
- Then click “Change”
- In the next dialog window, we exchange this value for our 1st sender address and confirm with “OK”
- Then click on “Add” and add the next sender address there, which should be available for selection later
You can repeat these steps as often as you like and add the desired sender addresses that should be available for selection.
See figure: (click to enlarge)

6. Insert recipient fields
6. Insert recipient fields
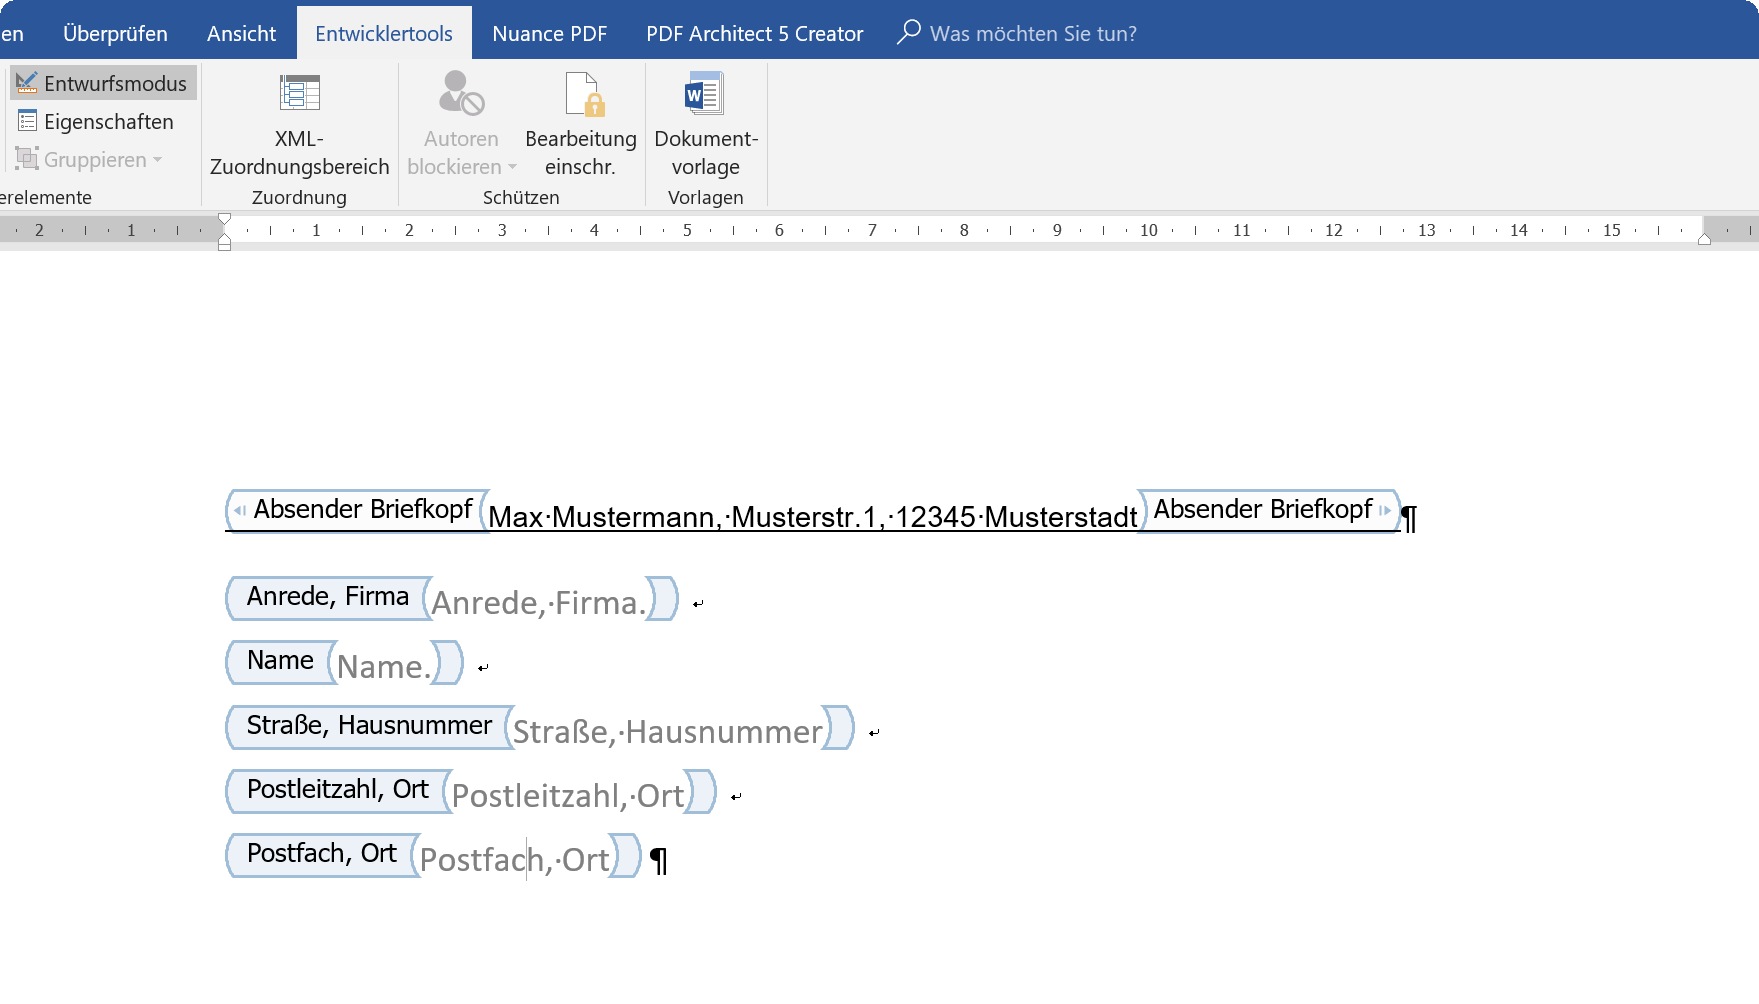
After we have inserted and adjusted the top sender line, we close the draft mode again for a short time and can already try out the result here.
A drop-down list box is now available via which you can easily select the sender addresses you entered previously.
Next we leave one line empty (1x Enter key) and start with the fields for the recipient address.
- To do this, we create a drop-down list element again in the first line of the recipient field
- Then go back to design mode
- Replace the text marked there with “Salutation”.
- And then add the desired form of address “Mr.” – “Ms.” – “Company” etc
- Close design mode again
Then we go down one line (not a paragraph!) by pressing “Shift” + “Enter” and insert element fields for text there.
- In the Developer Tools, select the Rich Text Content Control item
- Switch to draft mode
- Replace the selected text with “Name”.
- Go to the properties of the content control as described before
- Enter the desired description title
- Either select the standard via the format templates or define an individual format template
In our example, we have again used the “Arial” font and set the font size to 11 points. Repeat the points just described for all other recipient fields (street, zip code, city, etc.)
In the end it should all look like this:
See figure: (click to enlarge)
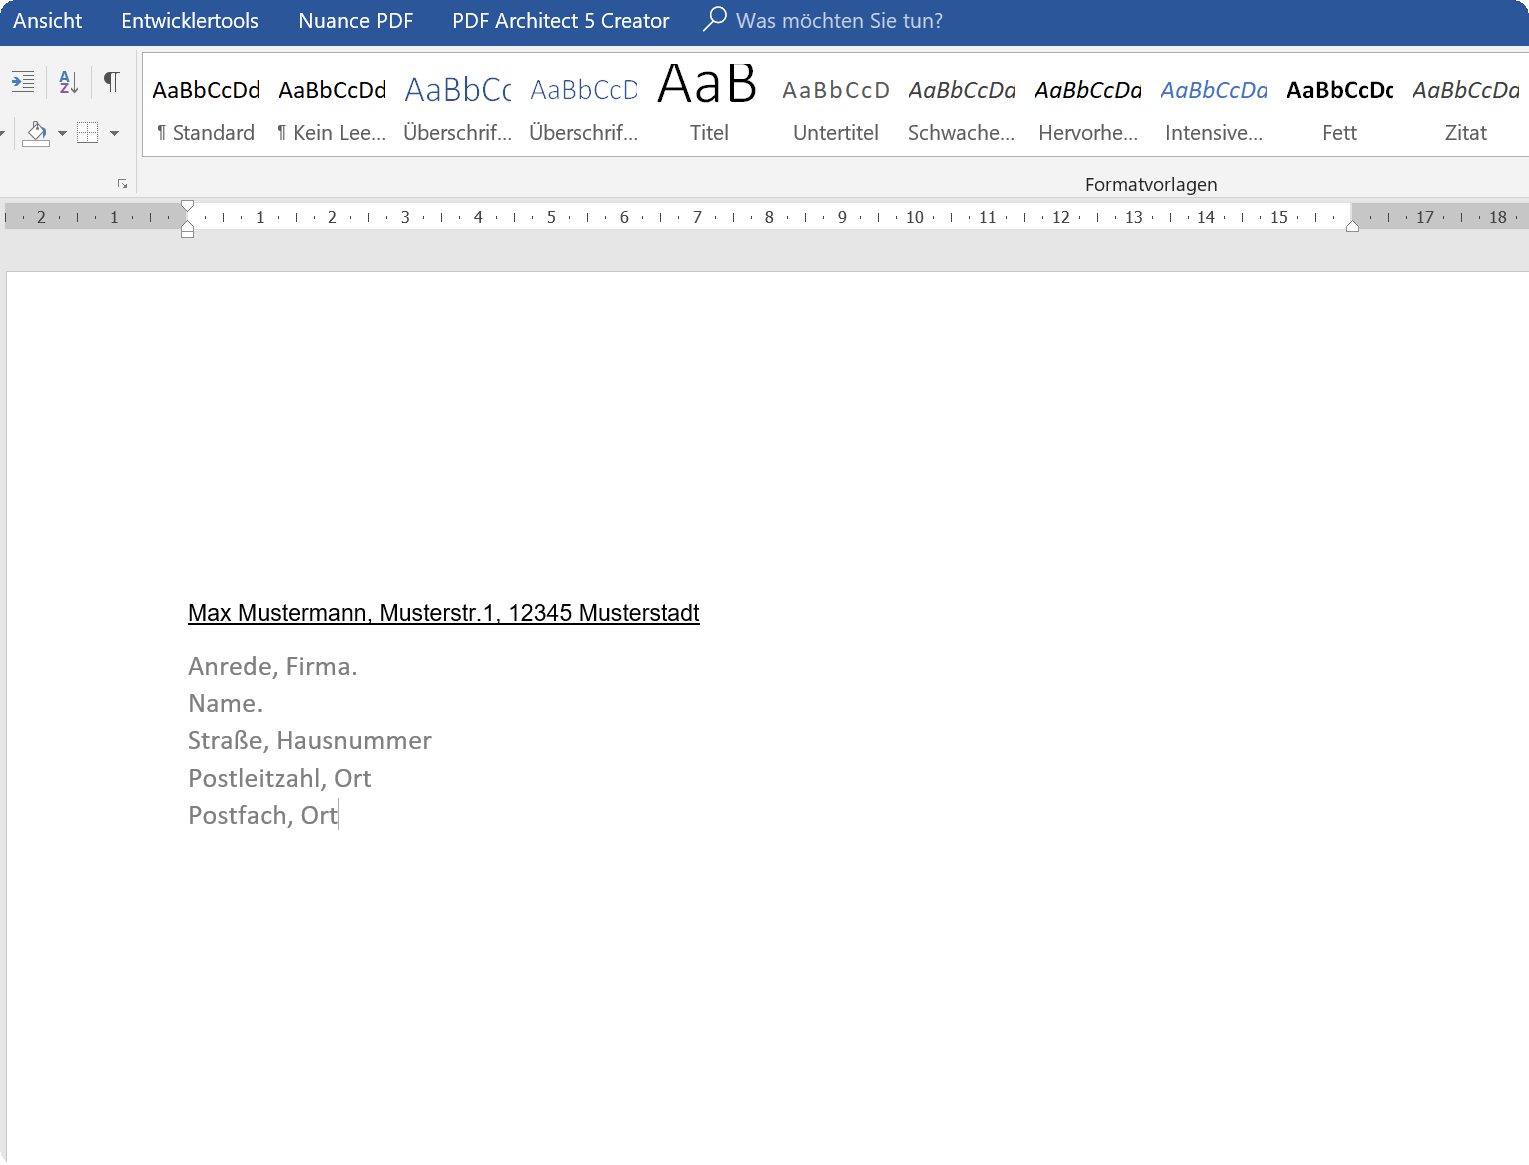
Letterhead in draft mode
Letterhead in the default view
After we have inserted and adjusted the top sender line, we close the draft mode again for a short time and can already try out the result here.
A drop-down list box is now available via which you can easily select the sender addresses you entered previously.
Next we leave one line empty (1x Enter key) and start with the fields for the recipient address.
- To do this, we create a drop-down list element again in the first line of the recipient field
- Then go back to design mode
- Replace the text marked there with “Salutation”.
- And then add the desired form of address “Mr.” – “Ms.” – “Company” etc
- Close design mode again
Then we go down one line (not a paragraph!) by pressing “Shift” + “Enter” and insert element fields for text there.
- In the Developer Tools, select the Rich Text Content Control item
- Switch to draft mode
- Replace the selected text with “Name”.
- Go to the properties of the content control as described before
- Enter the desired description title
- Either select the standard via the format templates or define an individual format template
In our example, we have again used the “Arial” font and set the font size to 11 points. Repeat the points just described for all other recipient fields (street, zip code, city, etc.)
In the end it should all look like this:
See figure: (click to enlarge)
Letterhead in draft mode
Letterhead in the default view
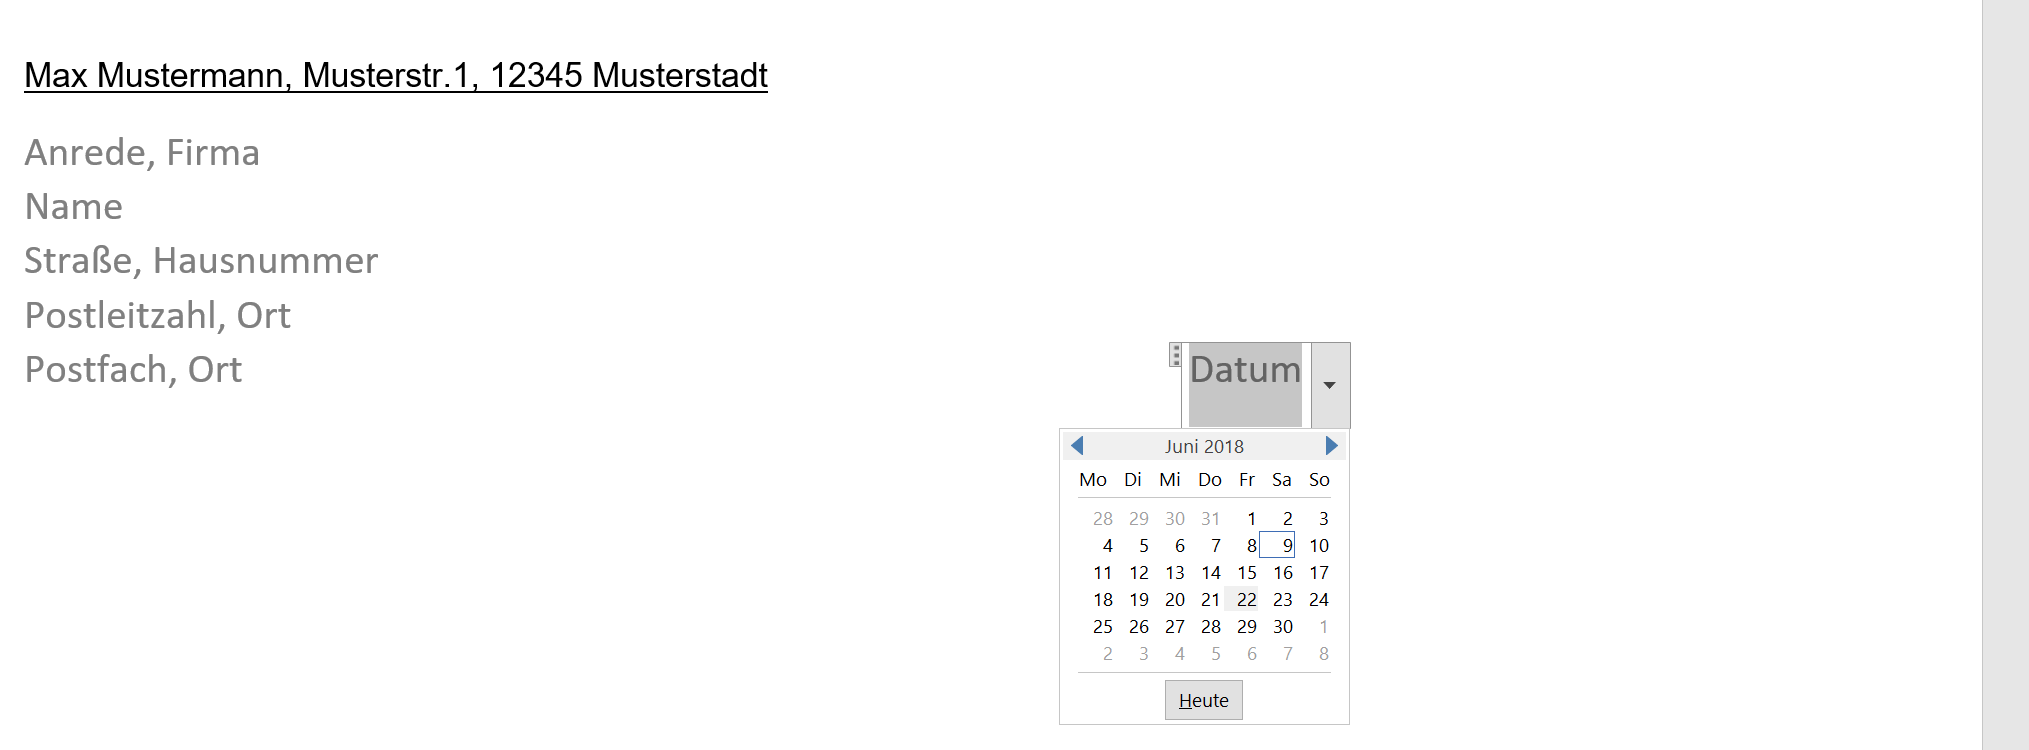
7. Insert date control in Word
7. Insert date control in Word
We’ve come a long way now.
Next, we’ll add a control element for the date so that we don’t have to enter it, but can simply select it from a dropdown box.
To do this, we proceed as follows:
- Position the cursor on the last line after the control in the recipient field
- Set a left-justified tab stop at 11 cm
- Press the TAB key once
- Insert the Date Picker content control using the developer tools
- Go into design mode again
- As with the other elements, adjust the date picker via the element’s context menu
See figure: (click to enlarge)
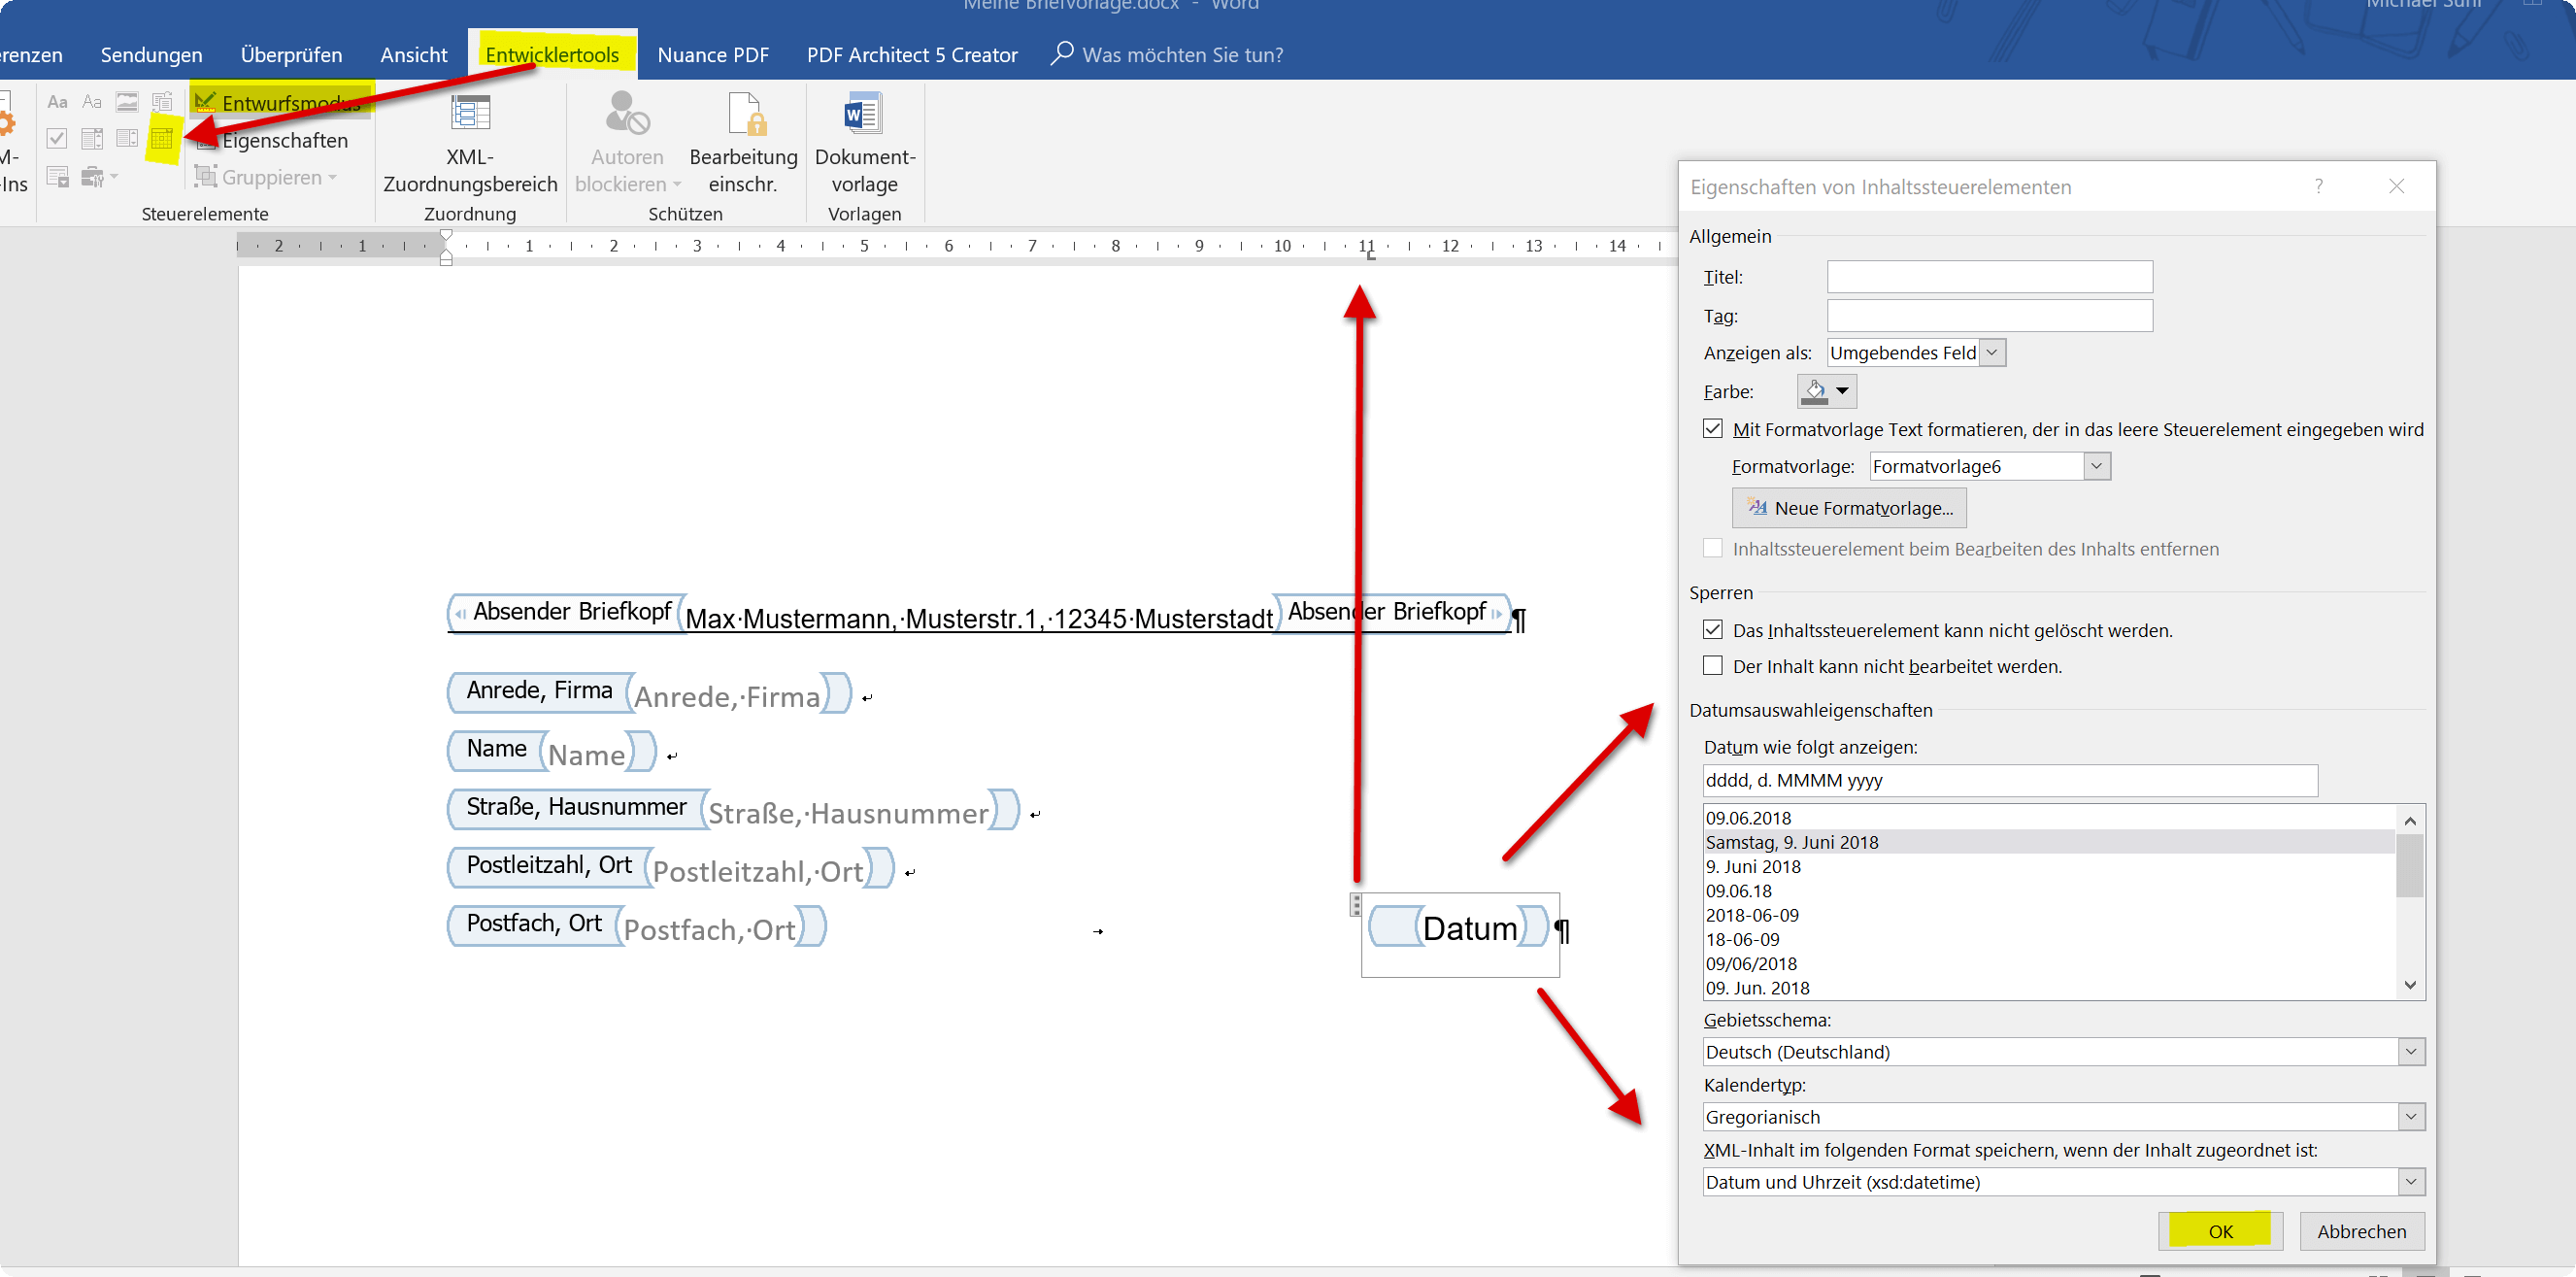
When all the settings have been made, the whole thing should look like this, and you can easily insert the date using the selection.
See figure: (click to enlarge)
We’ve come a long way now.
Next, we’ll add a control element for the date so that we don’t have to enter it, but can simply select it from a dropdown box.
To do this, we proceed as follows:
- Position the cursor on the last line after the control in the recipient field
- Set a left-justified tab stop at 11 cm
- Press the TAB key once
- Insert the Date Picker content control using the developer tools
- Go into design mode again
- As with the other elements, adjust the date picker via the element’s context menu
See figure: (click to enlarge)
When all the settings have been made, the whole thing should look like this, and you can easily insert the date using the selection.
See figure: (click to enlarge)
8. Fields for salutation, subject and letter text
8. Fields for salutation, subject and letter text
Next, we continue with the subject line (Dear Ms. or Mr.), as well as the salutation line, and of course the field for our actual letter text
- To do this, we start from the date line and leave 3 paragraphs blank
- Insert a rich text control again here and adapt it as described above
- Then we leave another paragraph blank and add another drop-down list control, which we fill with e.g. “Dear Sir / Dear Madam” etc.
- Now leave a paragraph blank again and insert a rich text control for the text of the letter again
The whole thing should then look like this:
See figure: (click to enlarge)
Letter template in draft mode

Letter template in the standard view

Next, we continue with the subject line (Dear Ms. or Mr.), as well as the salutation line, and of course the field for our actual letter text
- To do this, we start from the date line and leave 3 paragraphs blank
- Insert a rich text control again here and adapt it as described above
- Then we leave another paragraph blank and add another drop-down list control, which we fill with e.g. “Dear Sir / Dear Madam” etc.
- Now leave a paragraph blank again and insert a rich text control for the text of the letter again
The whole thing should then look like this:
See figure: (click to enlarge)
Letter template in draft mode
Letter template in the standard view
9. Salutation in letter template
9. Salutation in letter template
Now we’re almost there, and we can start the greeting line.
To do this, we simply leave 2 paragraphs free under the text element for the letter text and either add a dropdown field there to be able to choose between “Best regards” or “Best regards” etc., for example, or we leave that control completely at this point, and write in a static salutation.
Next, I would leave another 2-3 paragraphs free to leave room for a signature between the greeting line and the name
There we simply add another dropdown element with the sender name, which we should be able to choose from later.
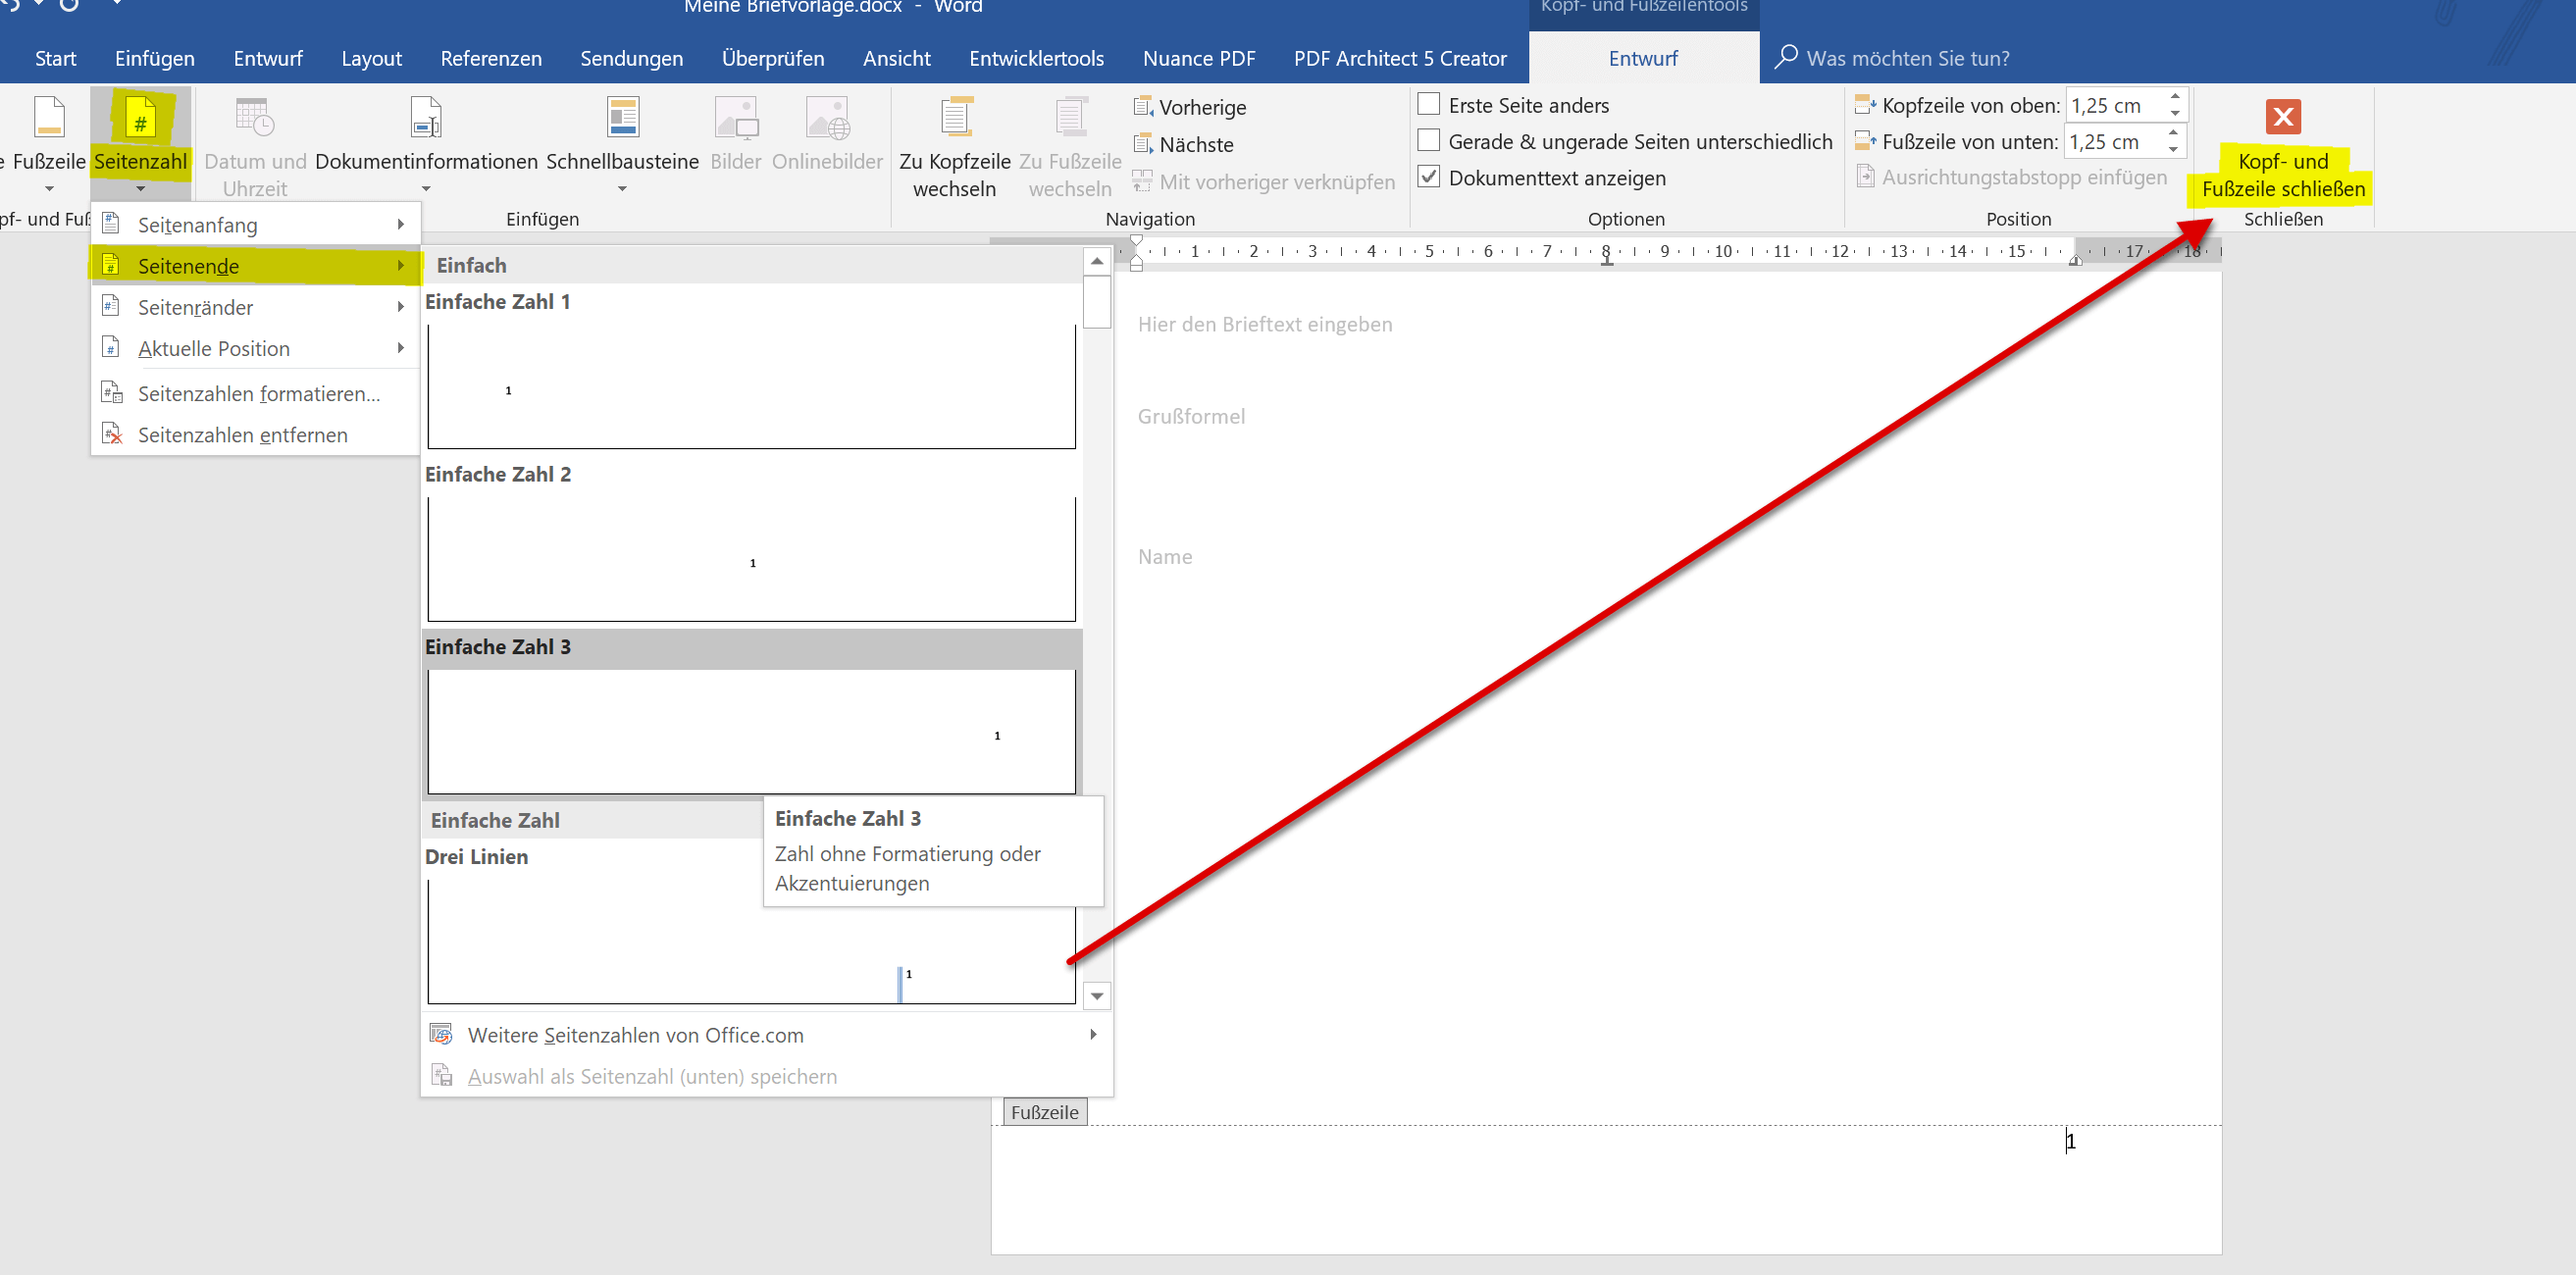
10. Insert page numbers in Word
10. Insert page numbers in Word
Since our letter can sometimes have more than one page, we should now use automatic page numbering in our letter template for the sake of completeness.
To do this, we proceed as follows:
- Double-click in the footer of the document and the editing mode for headers and footers will be activated automatically
- On the left side of the formula bar, go to “Page Number” – “End of Page” and select a preferred number format or create your own
- Close the Header and Footer pane again
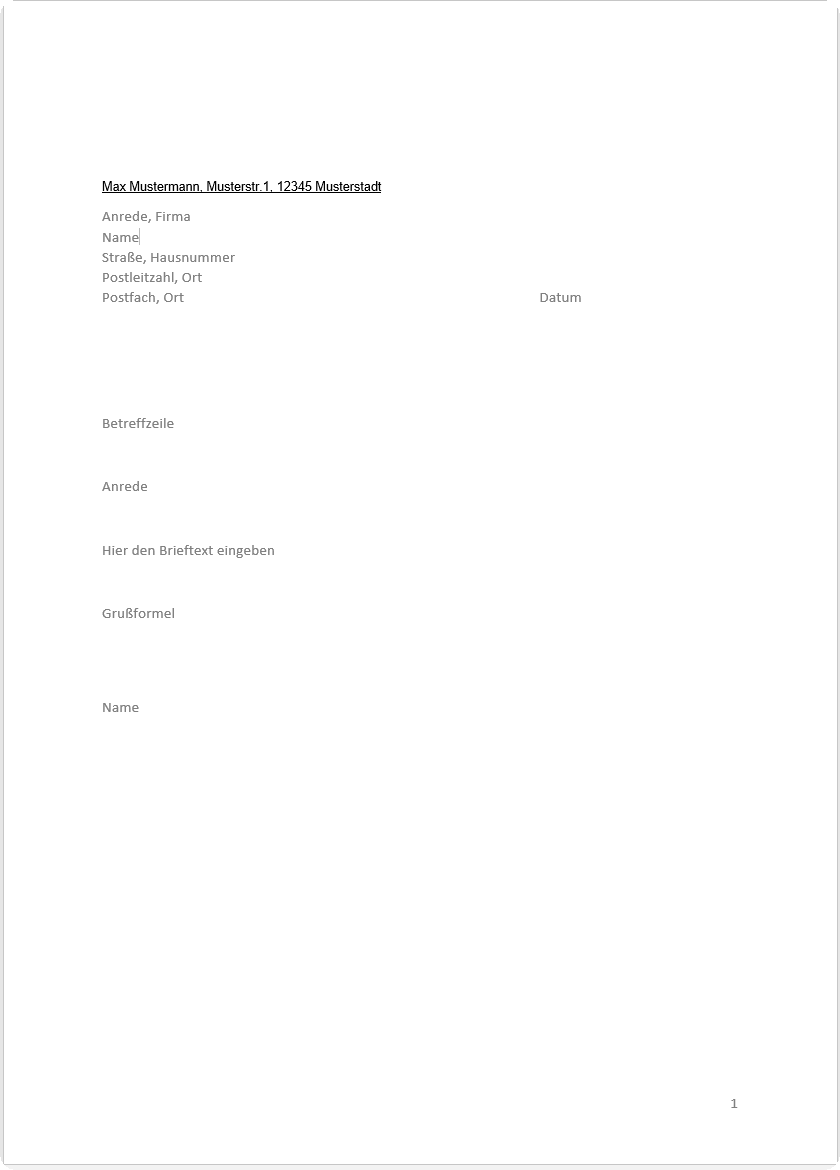
In the end, our letter template should look like this:
See figure: (click to enlarge)
A notice:
You don’t need to worry about the small space between the letter text box and the greeting line in our template. The greeting line automatically moves down as you add more text to your letter.
Tip:
If you are doing all this for the first time, it can be a bit tricky, which is why we also offer a professional Word letter template according to DIN 5008 with all the trimmings for download.
Since our letter can sometimes have more than one page, we should now use automatic page numbering in our letter template for the sake of completeness.
To do this, we proceed as follows:
- Double-click in the footer of the document and the editing mode for headers and footers will be activated automatically
- On the left side of the formula bar, go to “Page Number” – “End of Page” and select a preferred number format or create your own
- Close the Header and Footer pane again
In the end, our letter template should look like this:
See figure: (click to enlarge)
A notice:
You don’t need to worry about the small space between the letter text box and the greeting line in our template. The greeting line automatically moves down as you add more text to your letter.
Tip:
If you are doing all this for the first time, it can be a bit tricky, which is why we also offer a professional Word letter template according to DIN 5008 with all the trimmings for download.
11. Turn on edit protection in Word
11. Turn on edit protection in Word
Before we save the letter template, I recommend activating the editing protection so that only form fields can be filled out. This gives you the advantage that something in the template on the controls is not accidentally changed, because as you have seen, the whole thing is not done quickly.
- For editing protection, go to the “Review” – “Restrict editing” tab and go to the editing restrictions and set there that only the filling out of forms is allowed.
You should then save the document as a .dotx (template).
As soon as you have made this selection, the “Custom Office Templates” location is automatically suggested, and you can later conveniently call up the template from any document in Word.
See figure: (click to enlarge)

Popular Posts:

Ad-free home network: Install Pi-hole on Windows
Say goodbye to ads on smart TVs and in apps: Pi-hole software turns your Windows laptop into a network filter. This article explains step-by-step how to install it via Docker and configure the necessary DNS settings in your FRITZ!Box.

How to tune your FRITZ!Box into a professional call server
A professional telephone system can be built using a FRITZ!Box and a laptop. This article shows step by step how to use the free software "Phoner" to schedule announcements and record calls – including important legal information (§ 201 StGB).

Why to-do lists are a waste of time
Do you feel unproductive at the end of the day, even though you've worked hard? Your to-do list is to blame. It tempts you to focus on easy tasks and ignores your limited time. This article explains why lists are "self-deception" and why professionals use a calendar instead.

Smartphone Wi-Fi security: Public hotspots vs. home network
Is smartphone Wi-Fi a security risk? This article analyzes in detail threats such as evil twin attacks and explains protective measures for when you're on the go. We also clarify why home Wi-Fi is usually secure and how you can effectively separate your smart home from sensitive data using a guest network.

Warum dein Excel-Kurs Zeitverschwendung ist – was du wirklich lernen solltest!
Hand aufs Herz: Wann hast du zuletzt eine komplexe Excel-Formel ohne Googeln getippt? Eben. KI schreibt heute den Code für dich. Erfahre, warum klassische Excel-Trainings veraltet sind und welche 3 modernen Skills deinen Marktwert im Büro jetzt massiv steigern.

Cybersicherheit: Die 3 größten Fehler, die 90% aller Mitarbeiter machen
Hacker brauchen keine Codes, sie brauchen nur einen unaufmerksamen Mitarbeiter. Von Passwort-Recycling bis zum gefährlichen Klick: Wir zeigen die drei häufigsten Fehler im Büroalltag und geben praktische Tipps, wie Sie zur menschlichen Firewall werden.
Offers 2024: Word & Excel Templates


Popular Posts:
Ad-free home network: Install Pi-hole on Windows
Say goodbye to ads on smart TVs and in apps: Pi-hole software turns your Windows laptop into a network filter. This article explains step-by-step how to install it via Docker and configure the necessary DNS settings in your FRITZ!Box.
How to tune your FRITZ!Box into a professional call server
A professional telephone system can be built using a FRITZ!Box and a laptop. This article shows step by step how to use the free software "Phoner" to schedule announcements and record calls – including important legal information (§ 201 StGB).
Why to-do lists are a waste of time
Do you feel unproductive at the end of the day, even though you've worked hard? Your to-do list is to blame. It tempts you to focus on easy tasks and ignores your limited time. This article explains why lists are "self-deception" and why professionals use a calendar instead.
Smartphone Wi-Fi security: Public hotspots vs. home network
Is smartphone Wi-Fi a security risk? This article analyzes in detail threats such as evil twin attacks and explains protective measures for when you're on the go. We also clarify why home Wi-Fi is usually secure and how you can effectively separate your smart home from sensitive data using a guest network.
Warum dein Excel-Kurs Zeitverschwendung ist – was du wirklich lernen solltest!
Hand aufs Herz: Wann hast du zuletzt eine komplexe Excel-Formel ohne Googeln getippt? Eben. KI schreibt heute den Code für dich. Erfahre, warum klassische Excel-Trainings veraltet sind und welche 3 modernen Skills deinen Marktwert im Büro jetzt massiv steigern.
Cybersicherheit: Die 3 größten Fehler, die 90% aller Mitarbeiter machen
Hacker brauchen keine Codes, sie brauchen nur einen unaufmerksamen Mitarbeiter. Von Passwort-Recycling bis zum gefährlichen Klick: Wir zeigen die drei häufigsten Fehler im Büroalltag und geben praktische Tipps, wie Sie zur menschlichen Firewall werden.
Offers 2024: Word & Excel Templates