Encrypt emails in Outlook – How it’s done
In 2018, around 848 billion (848,000,000,000) emails were sent in Germany alone.
A good half of these were spam mails, but it was still a considerable number. If you then consider the fact that most of them are sent unencrypted, it is actually a disaster how carelessly we (especially in Germany) handle our data.
Because standard e-mails are basically to be regarded as a postcard as far as security is concerned. What does that mean that anyone with the appropriate technical know-how can intercept and read them.
And this is often partly sensitive data such as account information or application documents that provide a lot of information about a person and must of course be treated confidentially.
However, there are definitely solutions for how you can ensure more security and data protection in everyday e-mail traffic by encrypting your e-mails.
1. Encrypted connection to the email provider
1. Encrypted connection to the email provider
If the e-mail encryption is to be seamless, then not only the e-mail itself must be encrypted, but also via a SSL/TLS secured connection to your e-mail provider.
In some cases, e-mail providers no longer even offer support for unsecured transmission paths, and immediately pass on the secured server setting data to your customers so that they can set them up in their e-mail program.
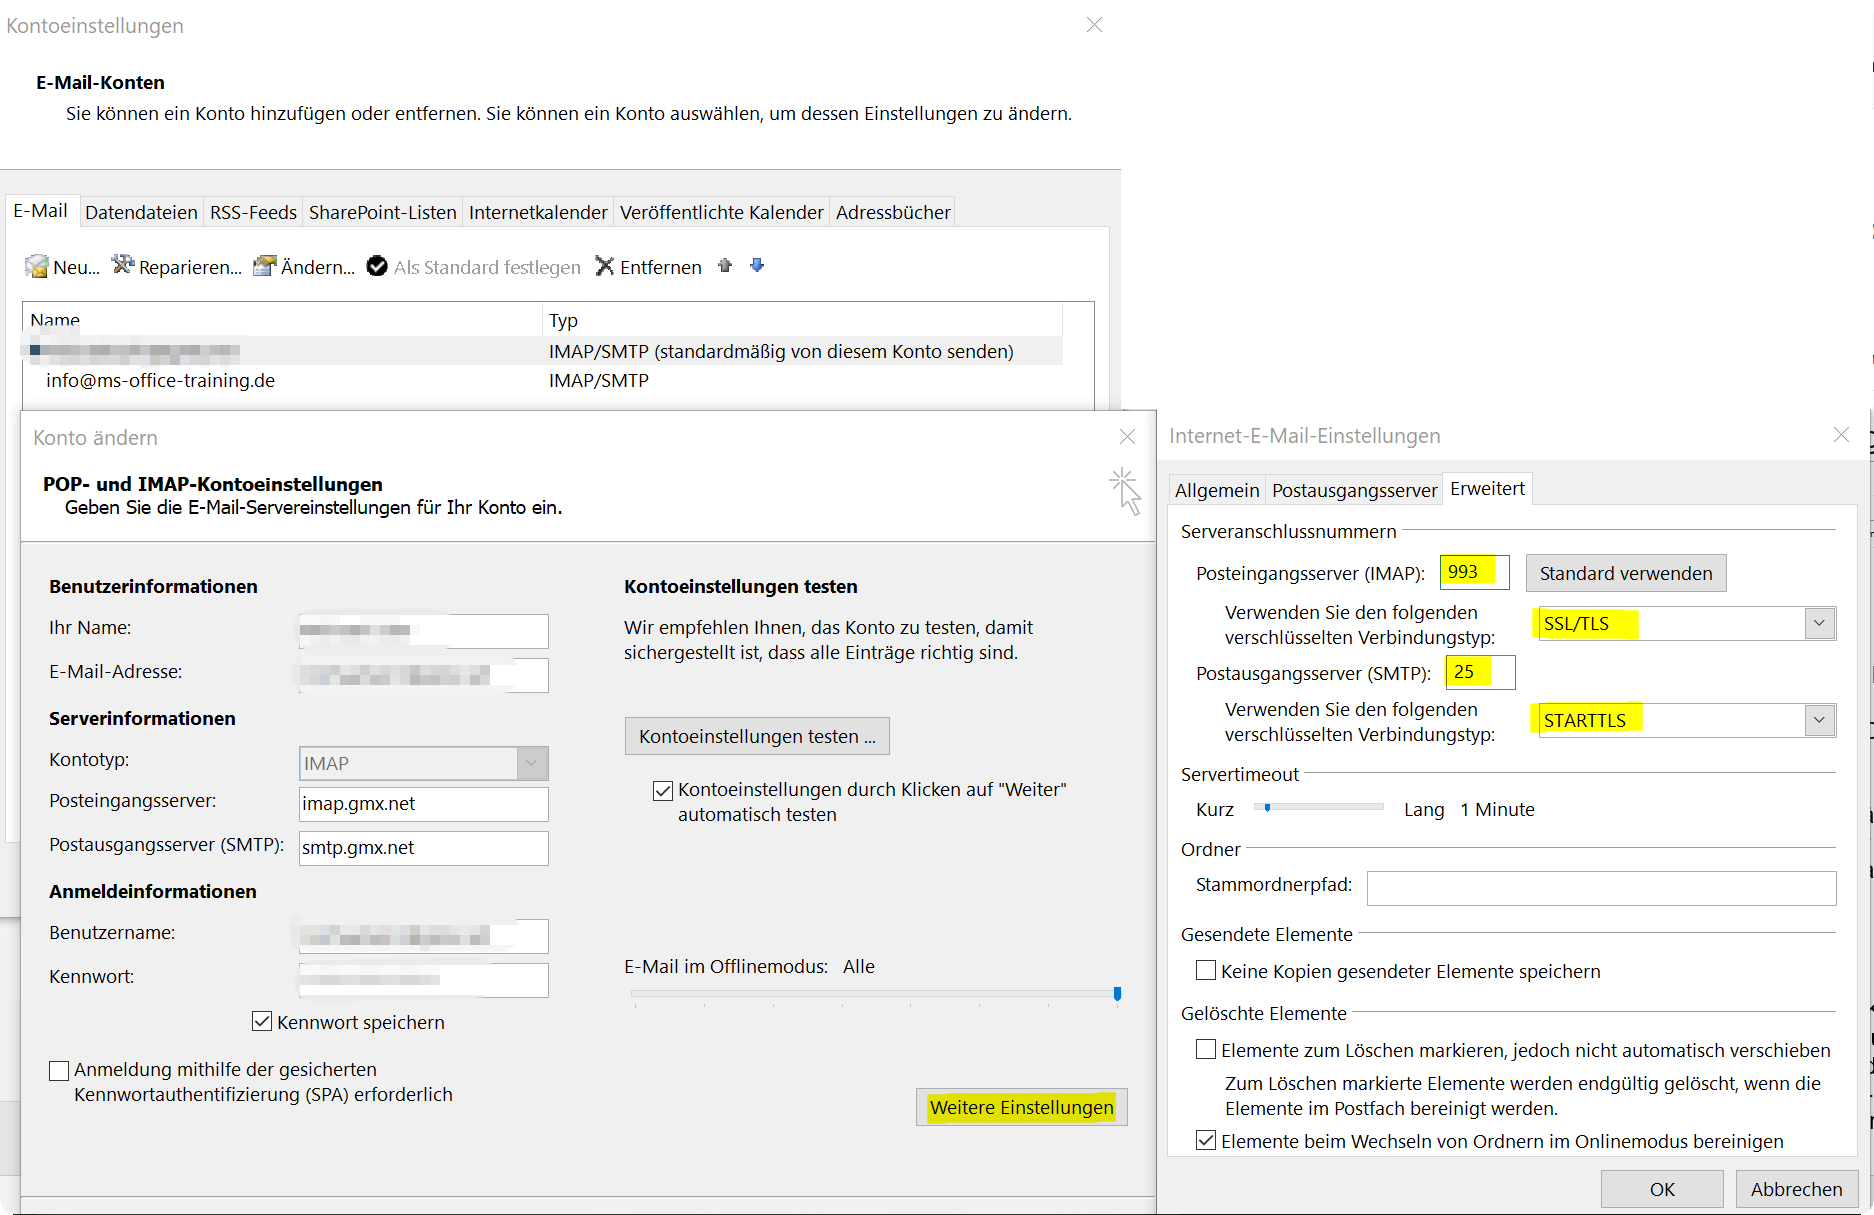
In Outlook, change the server settings for receiving and sending e-mails via the “File” – “Account settings” tab and there select the relevant e-mail account with a double left-click and go to the corresponding settings. There you should find the server connection numbers including the encryption method used under “Settings” – “Advanced Settings”.
You can find out exactly which these are and which ports you have to use directly from your e-mail provider.
See fig. (click to enlarge)
2. Request Digital ID in Outlook
2. Request Digital ID in Outlook
Outlook encryption is cryptographic, not password-based. This means that anyone who wants to use the encryption option in Outlook first needs a digital certificate. The recipient must also have such a certificate in order to be able to decrypt the e-mails.
There are different services that issue such certificates. However, this is not completely free.
Well-known certification services are:
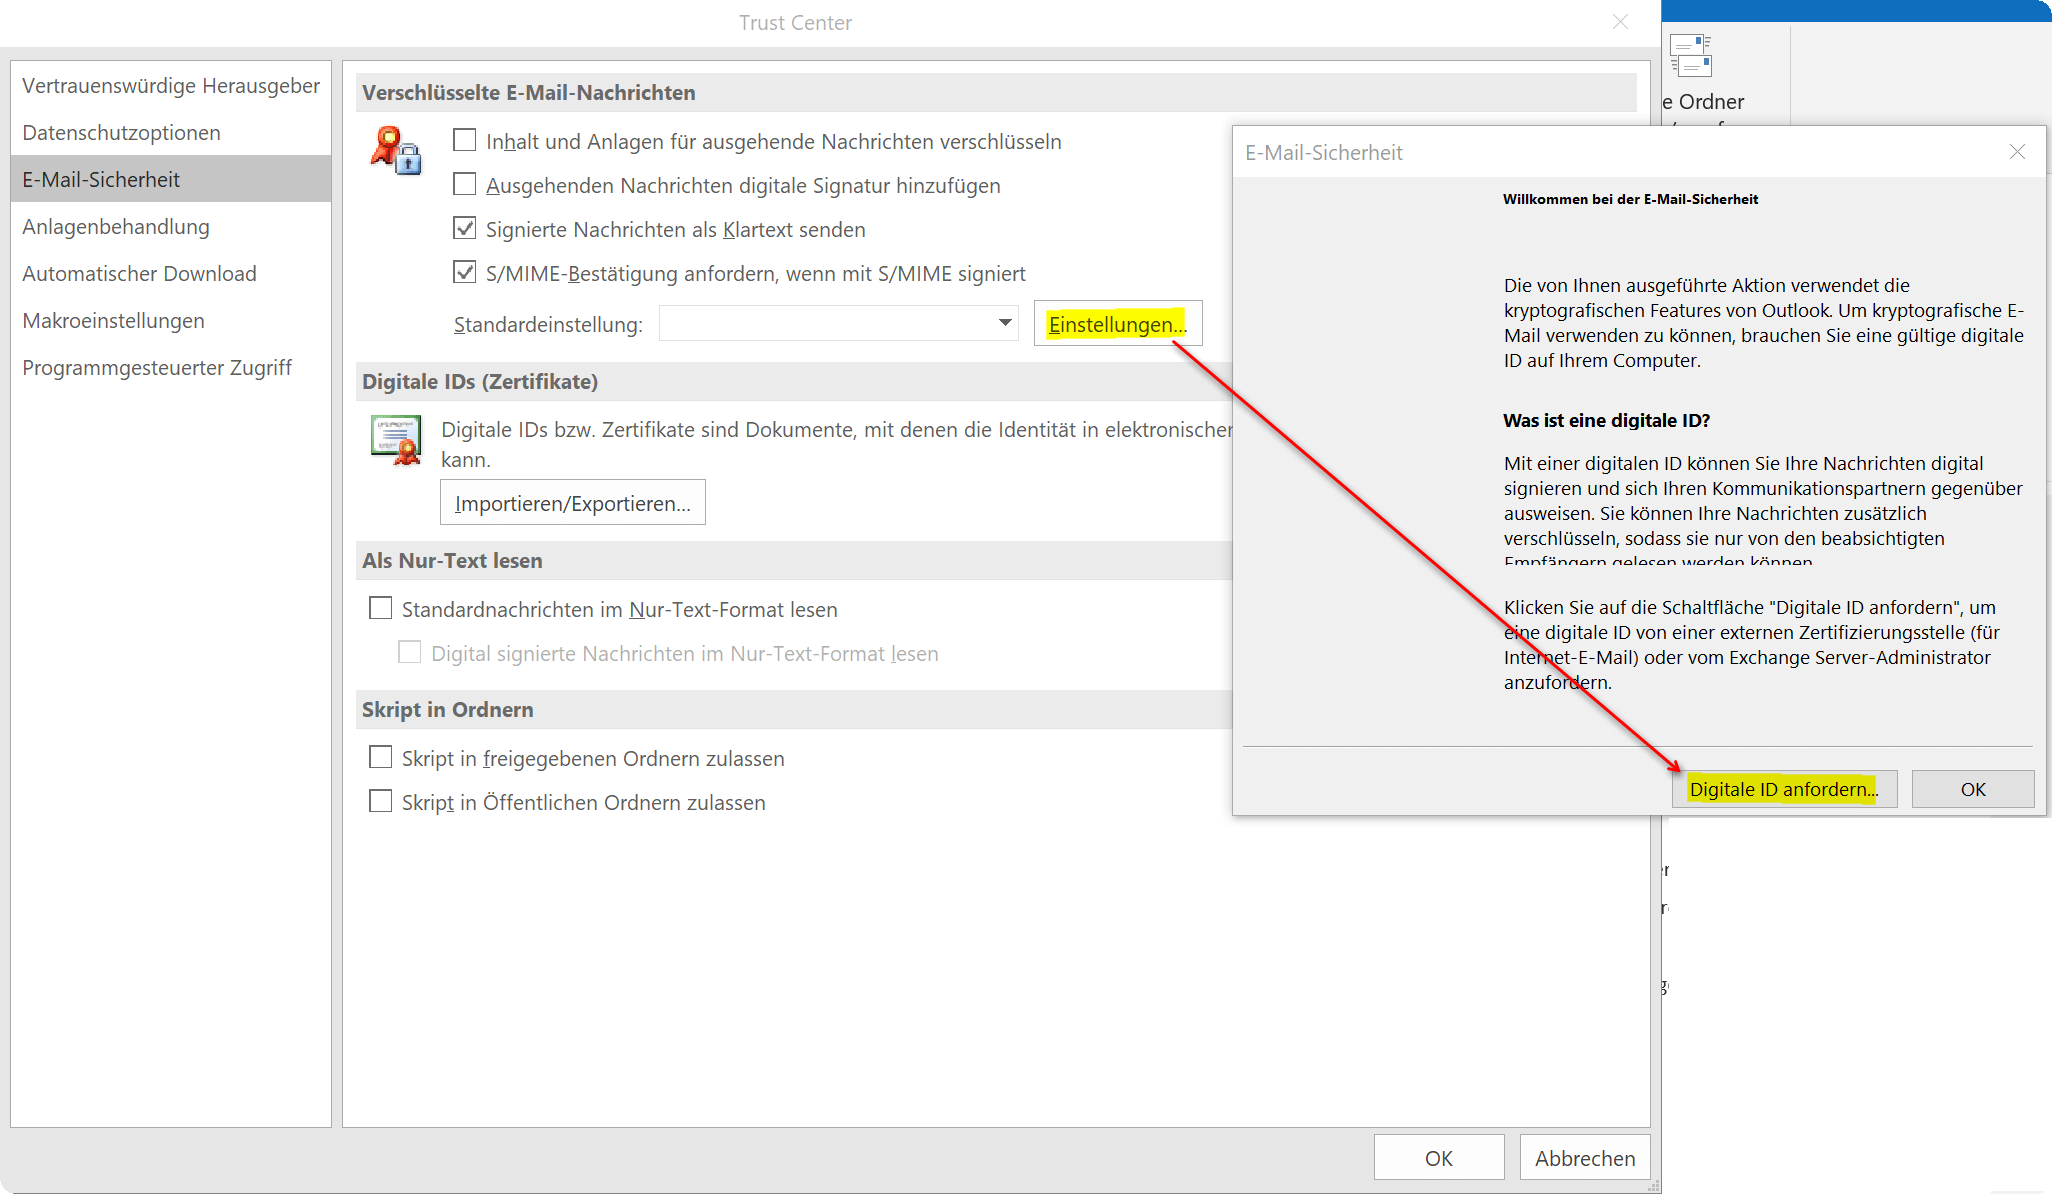
To get to the settings menu for the digital ID in Outlook, proceed as follows:
- Go to File and choose Options.
- Mark the Trust Center Security Center and click on Settings for the Trust Center or Security Center
- In the new window, go to the Email Security tab, click Settings, and then click Require Digital ID
- In the following, a Microsoft Office web page with further instructions and well-known services will be opened
- Here you now have the choice between the 3 services mentioned above. (These are of course not the only ones)
- Once you have confirmed your identity, you will receive your certificate with the digital ID as a download
- You will also receive instructions on how to correctly install the certificate from the respective provider
See fig. (click to enlarge)
So that recipients can now also decrypt your encrypted e-mails, they need the corresponding key.
To do this, you must send them a digitally signed message. This then contains your certificate and a public key, with which encrypted e-mails can be decrypted by the recipient.
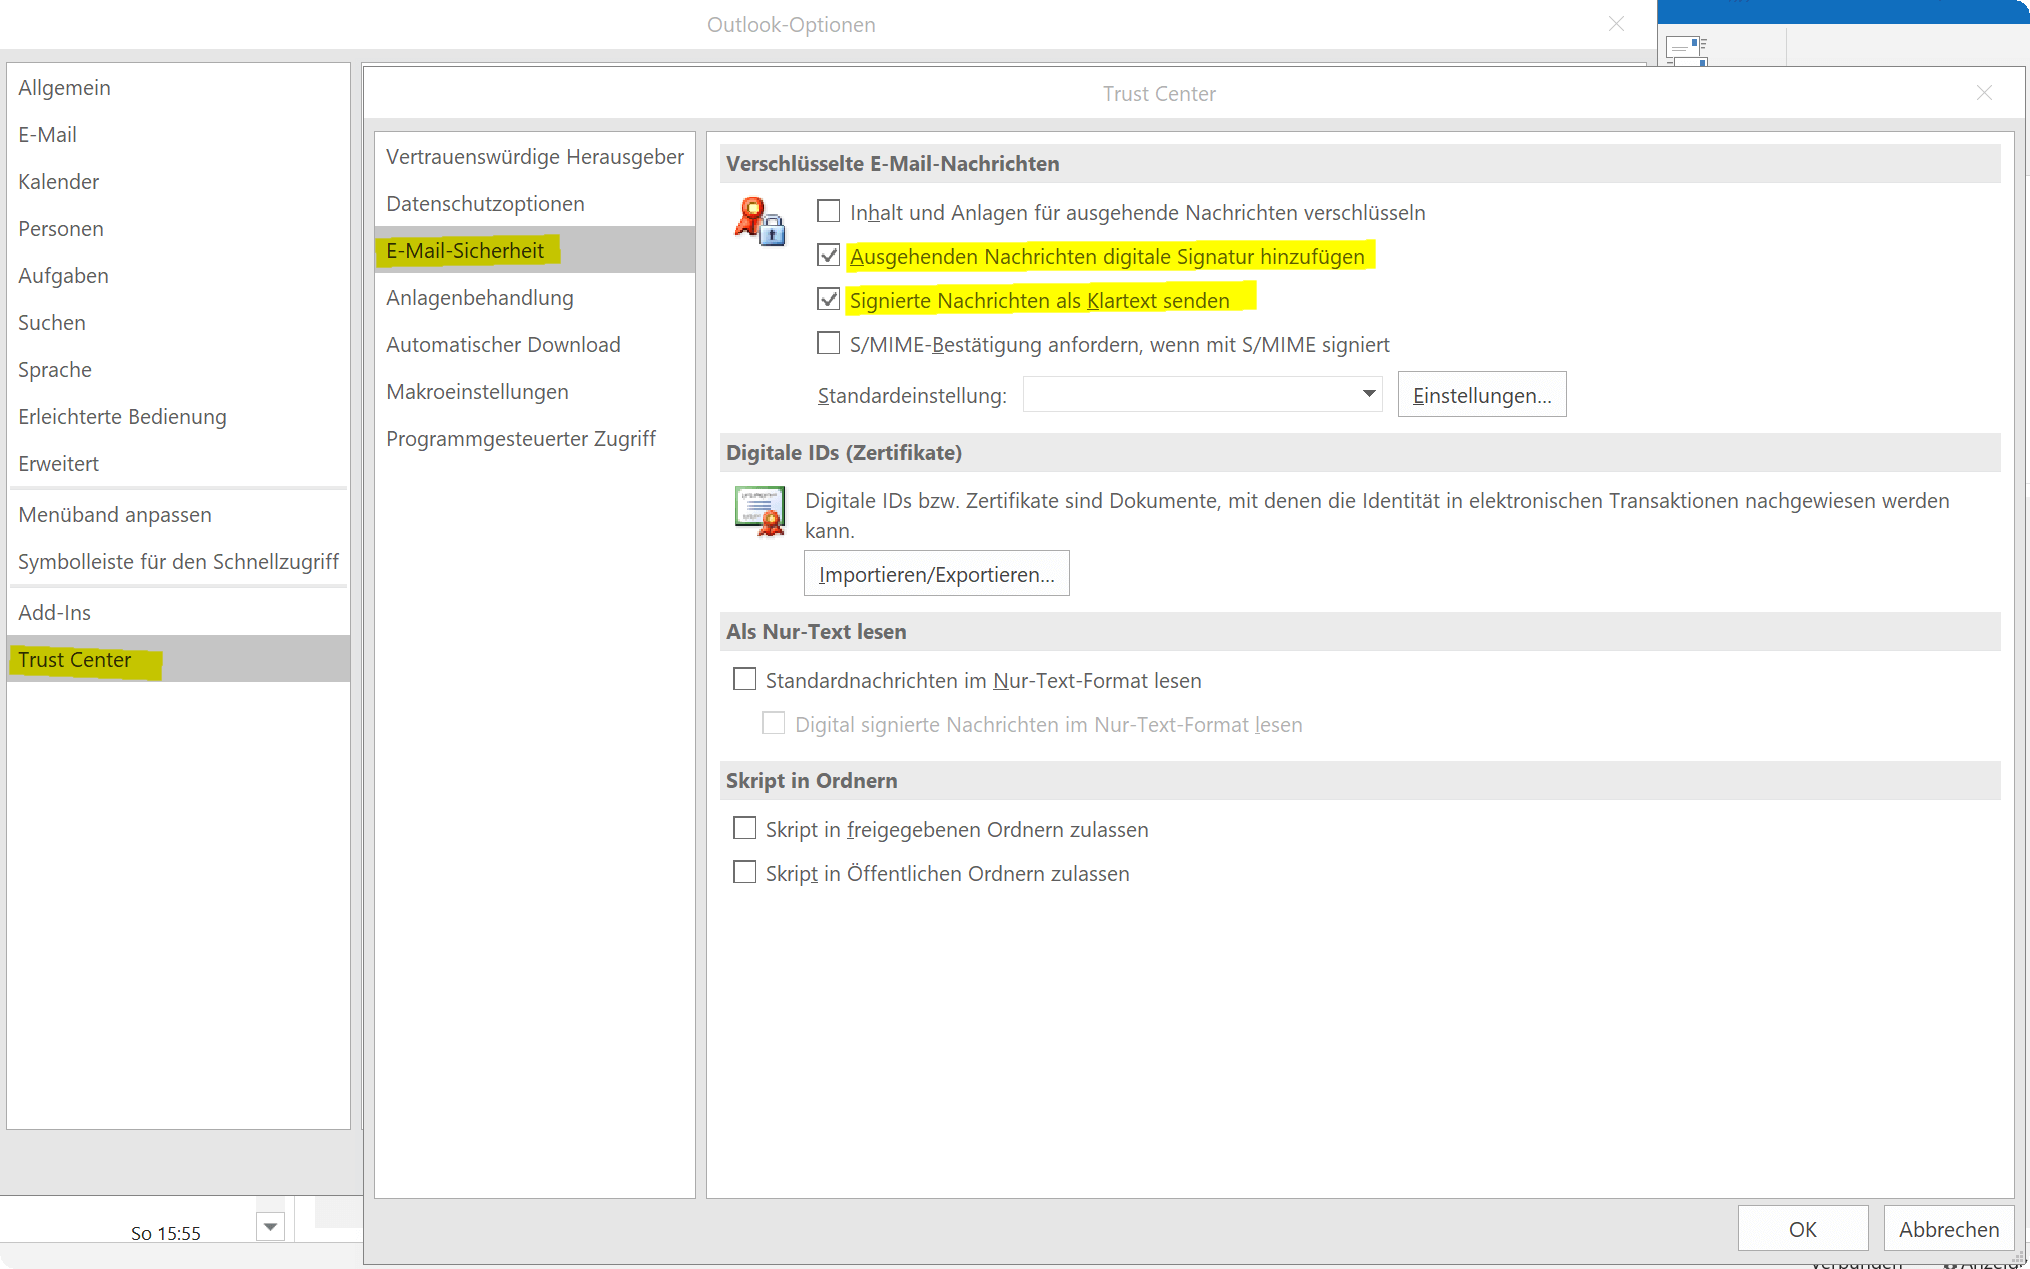
- To do this, go back to the Trust Center and E-Mail Security
- Then activate the box Add digital signature to messages under the item “Encrypted e-mail”.
- Optionally, you can also activate the item “Signed messages as plain text” so that recipients without S/MIME security can also read your messages.
- Then confirm with “OK”
See fig. (click to enlarge)
3. Send encrypted emails
3. Send encrypted emails
In order to be able to send encrypted e-mails with your freshly set up security certificate, simply open a new e-mail as usual and then go to the “Options” tab and activate the “Encrypt” item there. In this way you have then encrypted the message and attached files, and these can only be decrypted by a recipient to whom you have sent your certificate.
A notice:
The option to encrypt e-mails is only available in Outlook if you have also installed a corresponding certificate.
As you have seen, it is a lot of effort to ensure more security in e-mail traffic, and it is certainly not necessary for every e-mail. But it still makes sense to send sensitive data in encrypted form.
Popular Posts:
Integrate and use ChatGPT in Excel – is that possible?
ChatGPT is more than just a simple chatbot. Learn how it can revolutionize how you work with Excel by translating formulas, creating VBA macros, and even promising future integration with Office.
Create Out of Office Notice in Outlook
To create an Out of Office message in Microsoft Outlook - Office 365, and start relaxing on vacation
The best backup solutions for your data
Keep your data safe and secure! Discover our best backup solutions for your valuable information now. Because safety is the be-all and end-all - and we have the perfect tips.
Internet Addiction – A serious look at a growing problem
Internet addiction is just as serious an illness as alcohol or drug addiction. Just that this is a mental illness. In this article we want to go into the phenomenon in more detail and provide assistance.
Main keyboard shortcuts in Windows 10/11
Entdecken Sie die wichtigsten Shortcuts in Windows 11, um Ihre Produktivität zu steigern. Von allgemeinen Befehlen bis hin zu spezifischen Fenster-Management- und System-Shortcuts, lernen Sie, wie Sie mit diesen Tastenkombinationen effizienter arbeiten können.
Encrypt USB stick – These options are available
Protecting sensitive data is essential. Encrypting USB sticks provides an extra layer of security. Whether it's built-in software, operating system features, third-party software, or hardware encryption, there are numerous options.

