This is how the Name Manager works in Excel
Normally we are used to working in Excel with numbers and above all cell references. Hardly known, however, is the name manager function in Excel. This makes it easier for you to assign names to predefined areas, and then later make calculations in relation to each other.
The Excel Name Manager saves all the areas you have defined. Of course, you can also edit these conveniently later, thus expanding or reducing areas and the corresponding formulas. The advantage of defined areas lies in the clearer design of formulas. How it all works exactly, we would like to explain in more detail in our article.
1. Let Excel automatically assign names
1. Let Excel automatically assign names
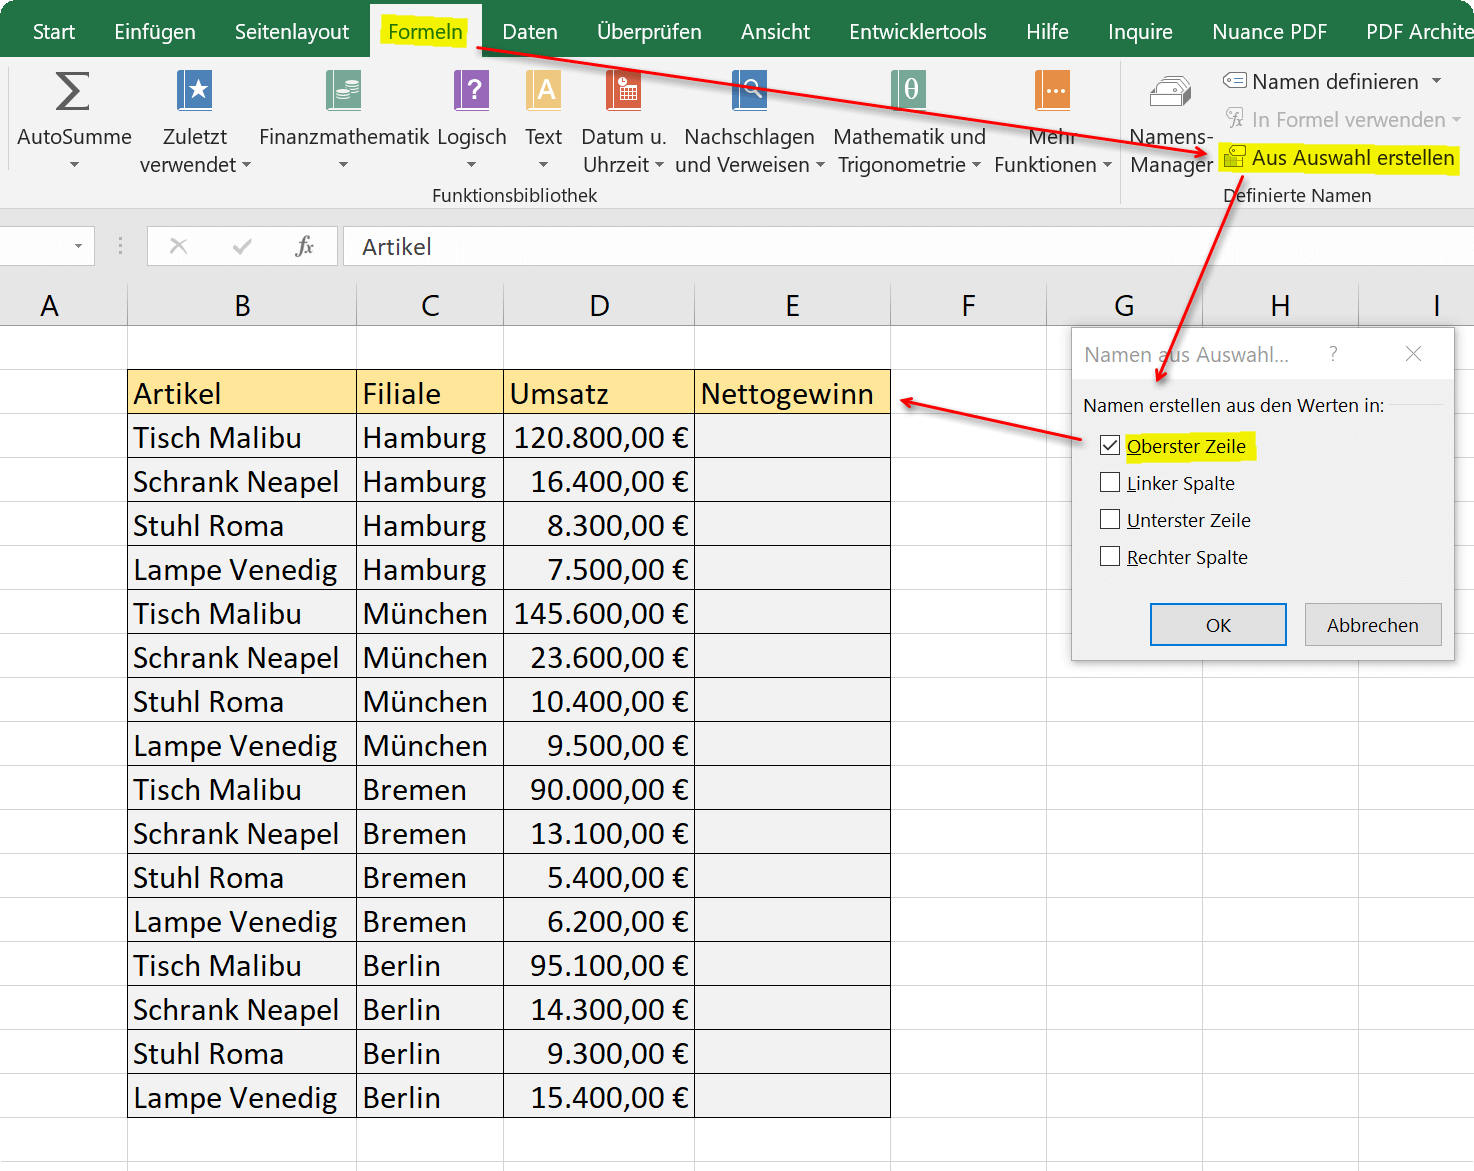
In our first example, we have created a small table that shows the sales for the top sellers of a furniture store in different branches. From this, Excel automatically assigns names for areas with which it can be calculated. It is important that your table contains headers. Because these are later used by the name manager as named areas.
In order to let the name manager automatically assign names, please proceed as follows:
- Mark your entire table
- Call the name manager via the tab: “Formulas” – “Create from selection”
- Put hooks where you have created headers (in the example only the top row)
- Confirm with OK”
After these first steps you will find under the button “Use in formula” also the headlines which you can use for calculations.
See picture (click to enlarge)
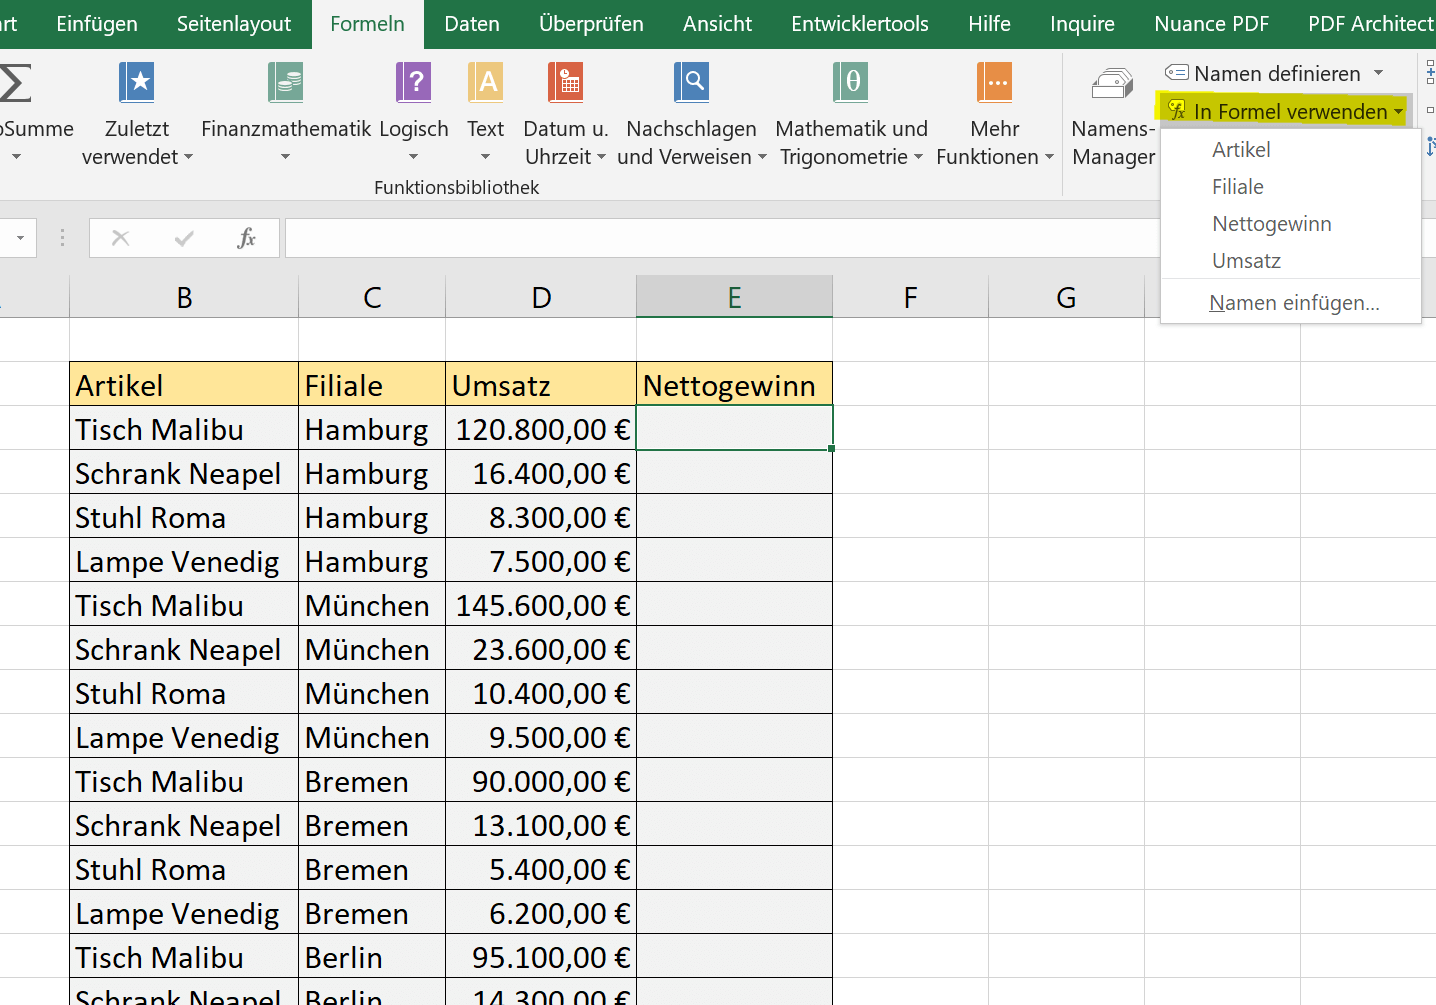

We simply want to calculate the net amounts in the right column of the table, and immediately use our name manager for it.
- Click in the first cell to calculate
- Then use the “Use formula” button to “Sales”
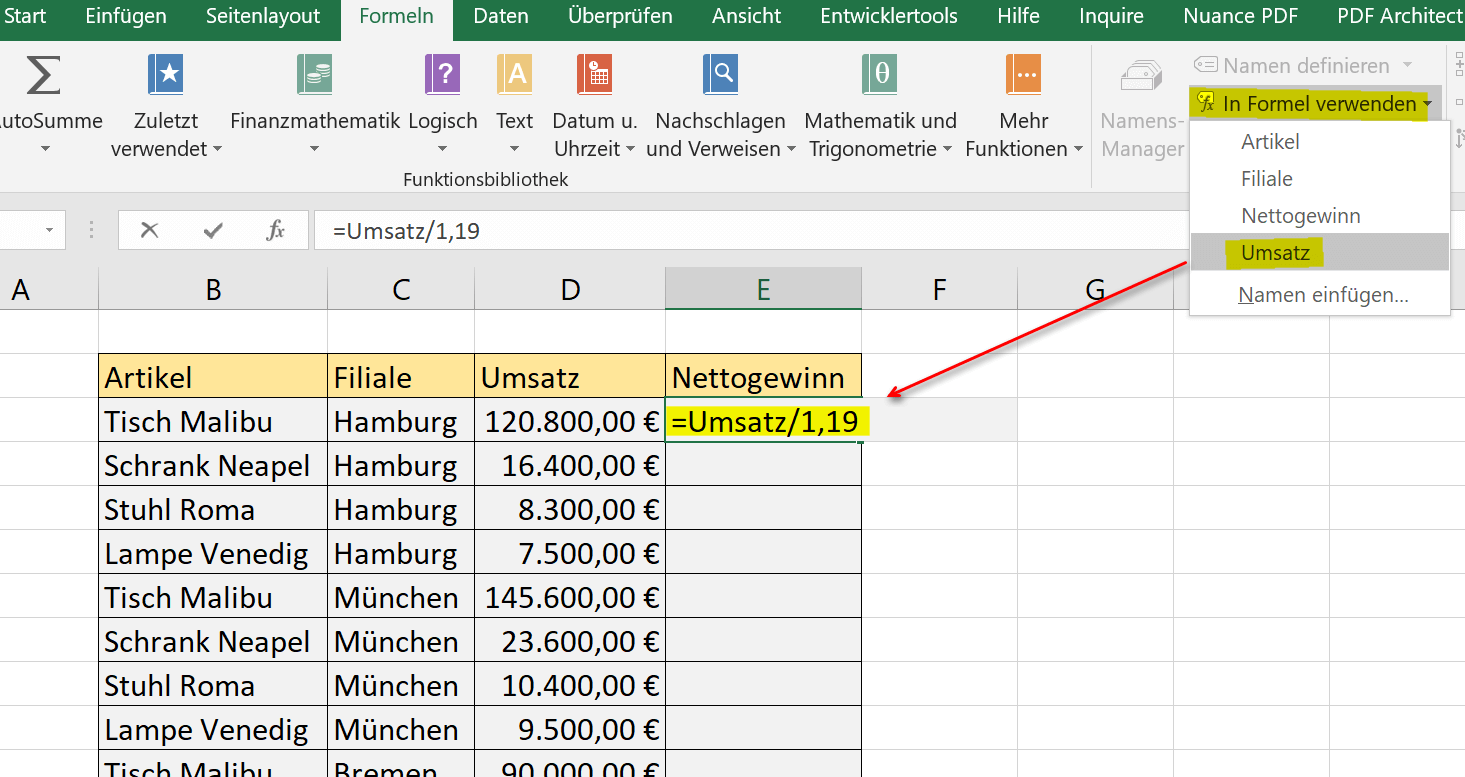
Since in our example we want to discount VAT of 19%, we divide the sales accordingly by 1.19. So we counted on names and absolute numbers here. Of course, for the tax rate could have also create a named area, and would have created only the name manager the formula.
After confirming the formula with “Enter”, all we have to do is extend the Excel copy control (double-click on the lower right corner of the cell) and calculate the net amounts for the whole table.
See picture (click to enlarge)
In our first example, we have created a small table that shows the sales for the top sellers of a furniture store in different branches. From this, Excel automatically assigns names for areas with which it can be calculated. It is important that your table contains headers. Because these are later used by the name manager as named areas.
In order to let the name manager automatically assign names, please proceed as follows:
- Mark your entire table
- Call the name manager via the tab: “Formulas” – “Create from selection”
- Put hooks where you have created headers (in the example only the top row)
- Confirm with OK”
After these first steps you will find under the button “Use in formula” also the headlines which you can use for calculations.
See picture (click to enlarge)
We simply want to calculate the net amounts in the right column of the table, and immediately use our name manager for it.
- Click in the first cell to calculate
- Then use the “Use formula” button to “Sales”
Since in our example we want to discount VAT of 19%, we divide the sales accordingly by 1.19. So we counted on names and absolute numbers here. Of course, for the tax rate could have also create a named area, and would have created only the name manager the formula.
After confirming the formula with “Enter”, all we have to do is extend the Excel copy control (double-click on the lower right corner of the cell) and calculate the net amounts for the whole table.
See picture (click to enlarge)
2. Defining individual areas as defined
2. Defining individual areas as defined
The procedure from our first example, in which we let Excel have the name automatically, is the fastest procedure, but of course not always what is needed.
Basically, you can give each cell in Excel a unique name in 2 ways:
- About the name manager
- Directly via name field (to the left of the edit line)
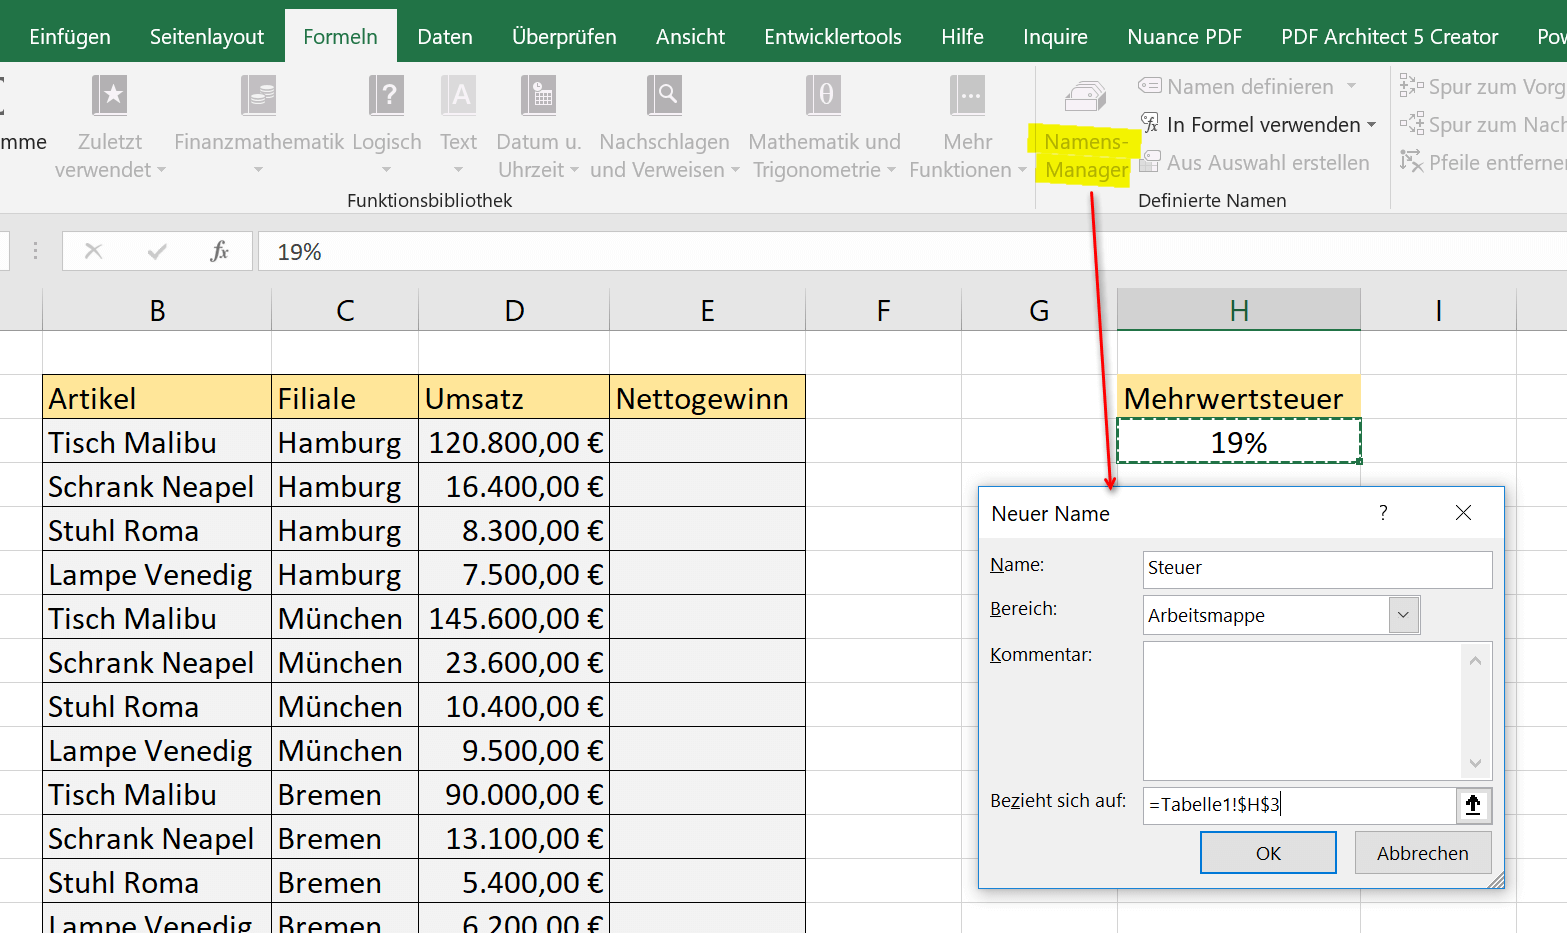
We have now changed our example so that we have entered the VAT rate in a separate cell, off the turnover table, and this named the “tax”.
You can name a cell using the Name Manager as follows:
- Under “Formulas” – “Name Manager” click on “New”
- Give the cell an arbitrary name
- Set the cell in question
- Confirm with OK”
See picture (click to enlarge)
Naming the cell directly via the name field works as follows:
- Click in the relevant cell with the value relevant for the calculation
- Enter any name to the left of the edit line and confirm with “Enter”
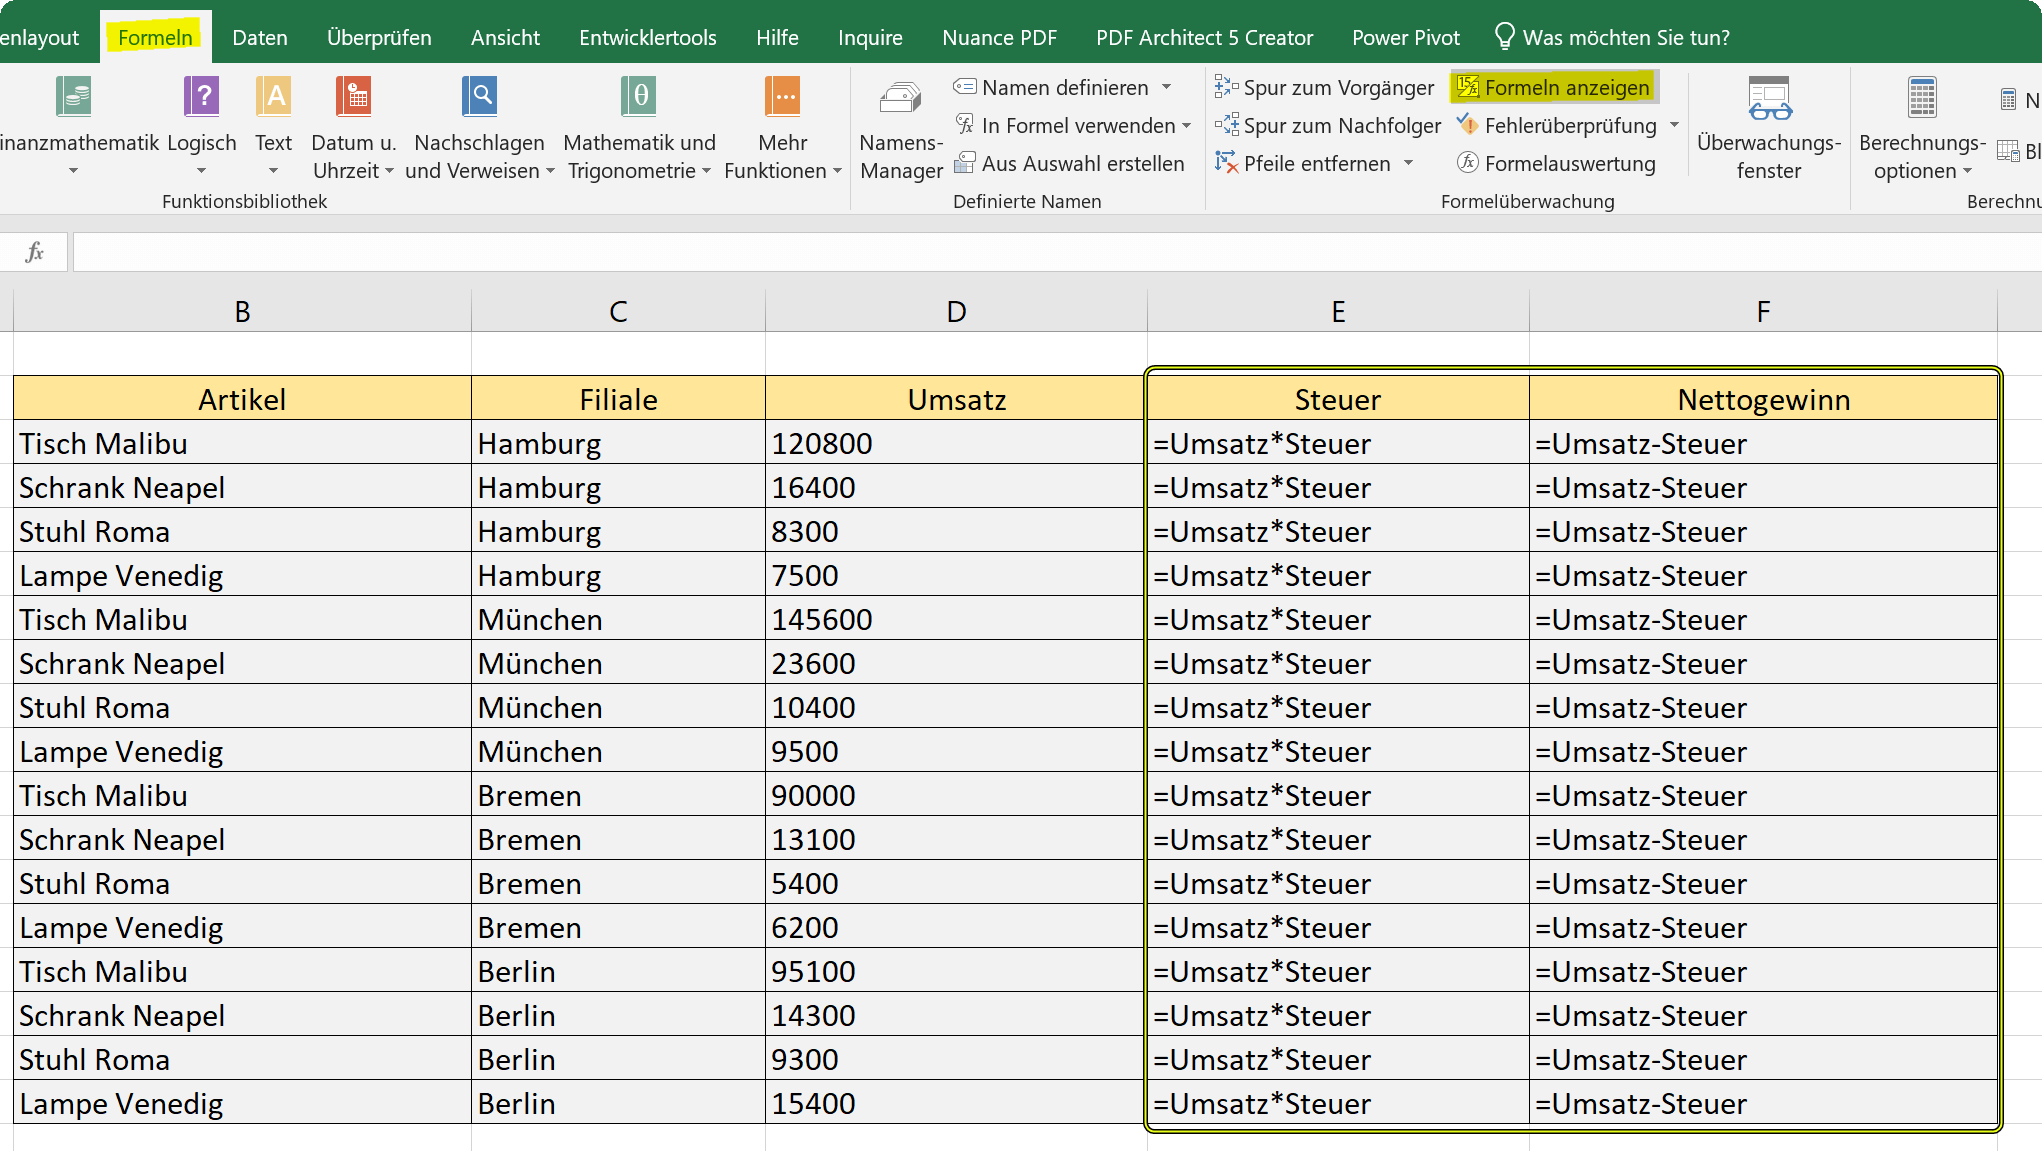
Regardless of which of the two methods you choose, the names assigned to cells are always displayed in the name manager so that you always have an overview of which cells a name has been assigned to. So that in our example this time we can really only perform the calculation via the name manager, we have added another column for the tax value.
Now, without having to enter another formula, we can do it all through the name manager. If you want to check where with which name was calculated, you can check this at any time on the tab “Formulas” – “Show formulas”.
See picture (click to enlarge)

The procedure from our first example, in which we let Excel have the name automatically, is the fastest procedure, but of course not always what is needed.
Basically, you can give each cell in Excel a unique name in 2 ways:
- About the name manager
- Directly via name field (to the left of the edit line)
We have now changed our example so that we have entered the VAT rate in a separate cell, off the turnover table, and this named the “tax”.
You can name a cell using the Name Manager as follows:
- Under “Formulas” – “Name Manager” click on “New”
- Give the cell an arbitrary name
- Set the cell in question
- Confirm with OK”
See picture (click to enlarge)
Naming the cell directly via the name field works as follows:
- Click in the relevant cell with the value relevant for the calculation
- Enter any name to the left of the edit line and confirm with “Enter”
Regardless of which of the two methods you choose, the names assigned to cells are always displayed in the name manager so that you always have an overview of which cells a name has been assigned to. So that in our example this time we can really only perform the calculation via the name manager, we have added another column for the tax value.
Now, without having to enter another formula, we can do it all through the name manager. If you want to check where with which name was calculated, you can check this at any time on the tab “Formulas” – “Show formulas”.
See picture (click to enlarge)
3. Conclusion
3. Conclusion
As you have seen, it is actually relatively easy to use the name manager, and so make the work a little clearer. Of course it’s a bit more work at the beginning, but it may be worthwhile to rely on this little helper, especially for more complex and long tables, instead of having to scroll through tables to make certain cell references for calculations.
Incidentally, it is also possible to use the name manager across tables. And as soon as you want to make calculations across multiple spreadsheets, you’ll soon appreciate the name manager.
Popular Posts:

Data Queries in Excel – Works with Power Query
So erstellen Sie aktive Datenabfragen durch Power Query aus verschiedensten Quellen in Excel, führen Daten aus verschiedenen Dateien und Tabellen zusammen.

Encrypt emails in Outlook – How it’s done
Standard e-mails are like postcards that everyone can theoretically read. But there are solutions for more security.

Incognito Mode Chrome and Firefox – How secure is it?
With this command in Windows 10 you can display the browser history despite incognito mode.

Environmentally friendly printing for more Climate protection
Climate protection starts small. And so not only can costs be saved through environmentally friendly and conscious printing in the office, but the climate can also be protected.

Create a Word letter template with form fields
Create a professional DIN 5008 letter template with form fields and drop-down lists in Microsoft Word, and write letters as easily as you would fill out a form.

Protect Word documents from editing
Protect your documents in Microsoft Word from unauthorized editing or block access completely.
Offers 2024: Word & Excel Templates


Popular Posts:
Data Queries in Excel – Works with Power Query
So erstellen Sie aktive Datenabfragen durch Power Query aus verschiedensten Quellen in Excel, führen Daten aus verschiedenen Dateien und Tabellen zusammen.
Encrypt emails in Outlook – How it’s done
Standard e-mails are like postcards that everyone can theoretically read. But there are solutions for more security.
Incognito Mode Chrome and Firefox – How secure is it?
With this command in Windows 10 you can display the browser history despite incognito mode.
Environmentally friendly printing for more Climate protection
Climate protection starts small. And so not only can costs be saved through environmentally friendly and conscious printing in the office, but the climate can also be protected.
Create a Word letter template with form fields
Create a professional DIN 5008 letter template with form fields and drop-down lists in Microsoft Word, and write letters as easily as you would fill out a form.
Protect Word documents from editing
Protect your documents in Microsoft Word from unauthorized editing or block access completely.
Offers 2024: Word & Excel Templates