Create Email rules for Inbox in Outlook
The fuller the inbox becomes, the more confusing the whole affair unfortunately becomes. And if you look for a specific e-mail, the search function of Outlook can be used, but too often too many results come to the fore, because the search term was not exactly narrowed down.
The solution lies in the definition of rules for incoming e-mails, which are then automatically sorted into previously created folders when they are received there. In our article we explain step by step how to bring order to chaos.
1. Create a new folder in the Inbox
1. Create a new folder in the Inbox
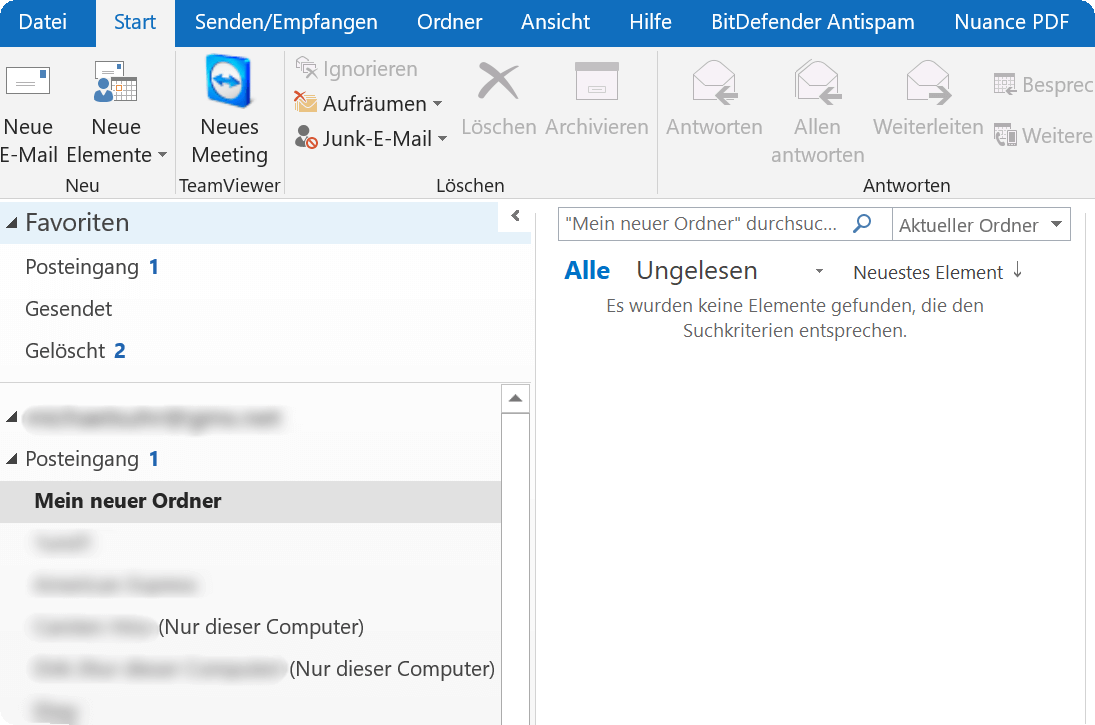
By default, all incoming e-mails arrive at Outlook in the “Inbox” folder, and that works well for quite a while until you look for a specific e-mail that might be a bit older.
Especially if you regularly receive e-mails from well-known senders (for example, online invoices from providers), it makes sense to create a separate folder for each of them, and have them automatically sorted by Outlook.
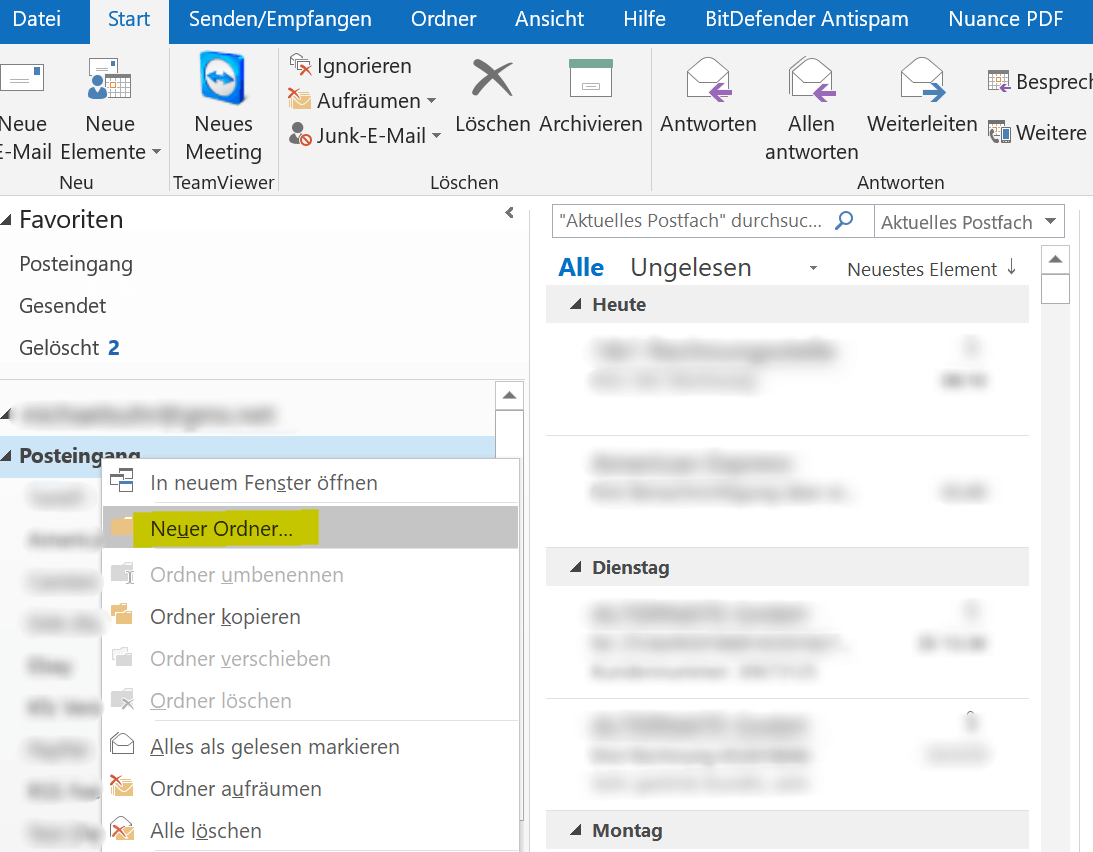
For this we first create a subfolder in the main folder “Inbox”.
- In the context menu (right mouse button) on the folder “Inbox”
- New folder
- Assign names to the folder
- confirm with “Enter”
See picture: (click to enlarge)
By default, all incoming e-mails arrive at Outlook in the “Inbox” folder, and that works well for quite a while until you look for a specific e-mail that might be a bit older.
Especially if you regularly receive e-mails from well-known senders (for example, online invoices from providers), it makes sense to create a separate folder for each of them, and have them automatically sorted by Outlook.
For this we first create a subfolder in the main folder “Inbox”.
- In the context menu (right mouse button) on the folder “Inbox”
- New folder
- Assign names to the folder
- confirm with “Enter”
See picture:

2. Difference between IMAP folder and folder (only this computer)
2. Difference between IMAP folder and folder (only this computer)
If you use an IMAP mailbox (which is recommended), and have already created some folders, it might happen that at some point after a newly created folder:
(only this computer)
This is due to the fact that (depending on the e-mail provider) usually only a certain contingent of so-called IMAP folders are provided by the provider. What does this mean when you create a new folder in Outlook then it will automatically be created in the folder structure on your e-mail server and you will have the sort order already on the e-mail server, not in Outlook.
Now if this quota is exhausted and you have a folder behind the “(only this computer)“, then the emails are still sorted according to your rules, but only within Outlook on your computer, and nothing more on the e-mail server.
This is always noticeable when you retrieve your e-mails with different devices, and you then lack the sorting there. Unless of course you set the same rules there again. Only halt finds no more synchronization between the devices.
See picture: (click to enlarge)

More about the IMAP (Internet Message Access Protocol) you can read here >>>
If you use an IMAP mailbox (which is recommended), and have already created some folders, it might happen that at some point after a newly created folder:
(only this computer)
This is due to the fact that (depending on the e-mail provider) usually only a certain contingent of so-called IMAP folders are provided by the provider. What does this mean when you create a new folder in Outlook then it will automatically be created in the folder structure on your e-mail server and you will have the sort order already on the e-mail server, not in Outlook.
Now if this quota is exhausted and you have a folder behind the “(only this computer)“, then the emails are still sorted according to your rules, but only within Outlook on your computer, and nothing more on the e-mail server.
This is always noticeable when you retrieve your e-mails with different devices, and you then lack the sorting there. Unless of course you set the same rules there again. Only halt finds no more synchronization between the devices.
See picture: (click to enlarge)
More about the IMAP (Internet Message Access Protocol) you can read here >>>
3. Set rules for specific emails
3. Set rules for specific emails
Now that we’ve created our folder, we can pick out an email from a recipient we like to get more mail from and sort it out.
To do this, we go to the mail in the overview of the Inbox folder and then select “Rules” – “Create rule” in the context menu (right mouse button).
Here we can change and adapt rules again and again.
See picture: (click to enlarge)

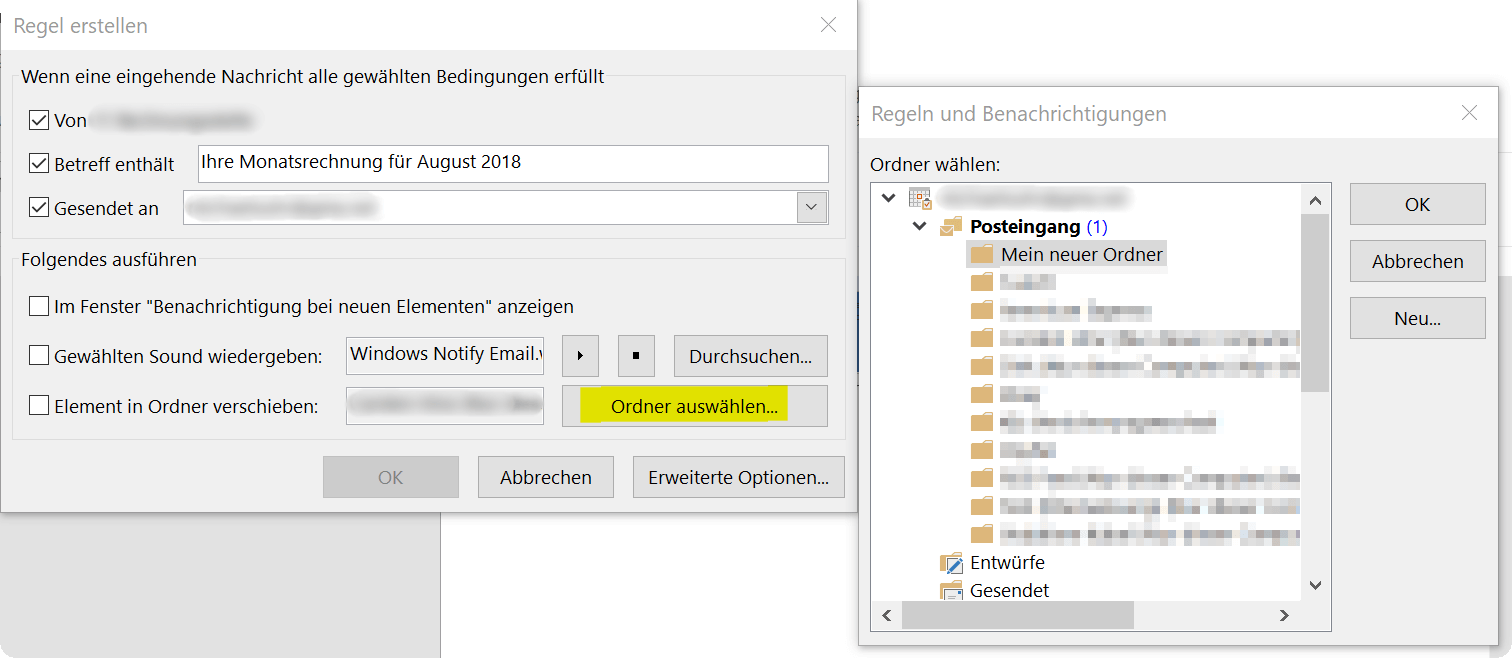
In the next dialog window, you can then specify which conditions must be met in order to have the e-mail moved to the new folder.
Here at least one rule must be activated for it to work. You can go into more detail under “Advanced Options” and further refine the whole. Once you have defined the folder and confirmed the two dialog boxes with “OK” comes a last window with the question whether the rule should apply to all already in the inbox e-mails.
Since then I recommend to set the hook, and with “OK” to confirm because Outlook then searches the entire inbox folder for these mails, and moves the items in the selected folder.
See picture: (click to enlarge)
We hope that we could provide you with this little guide a good help to bring more order in the daily e-mail chaos.
Now that we’ve created our folder, we can pick out an email from a recipient we like to get more mail from and sort it out.
To do this, we go to the mail in the overview of the Inbox folder and then select “Rules” – “Create rule” in the context menu (right mouse button).
Here we can change and adapt rules again and again.
See picture: (click to enlarge)
In the next dialog window, you can then specify which conditions must be met in order to have the e-mail moved to the new folder.
Here at least one rule must be activated for it to work. You can go into more detail under “Advanced Options” and further refine the whole. Once you have defined the folder and confirmed the two dialog boxes with “OK” comes a last window with the question whether the rule should apply to all already in the inbox e-mails.
Since then I recommend to set the hook, and with “OK” to confirm because Outlook then searches the entire inbox folder for these mails, and moves the items in the selected folder.
See picture: (click to enlarge)
We hope that we could provide you with this little guide a good help to bring more order in the daily e-mail chaos.
Popular Posts:

5 simple security rules against phishing and spam that everyone should know
Deceptively authentic emails from your bank, DHL, or PayPal? That's phishing! Data theft and viruses are a daily threat. We'll show you 5 simple rules (2FA, password managers, etc.) to protect yourself immediately and effectively and help you spot scammers.

The 5 best tips for a clean folder structure on your PC and in the cloud
Say goodbye to file chaos! "Offer_final_v2.docx" is a thing of the past. Learn 5 simple tips for a perfect folder structure on your PC and in the cloud (OneDrive). With proper file naming and archive rules, you'll find everything instantly.

Never do the same thing again: How to record a macro in Excel
Tired of repetitive tasks in Excel? Learn how to create your first personal "magic button" with the macro recorder. Automate formatting and save hours – no programming required! Click here for easy instructions.
IMAP vs. Local Folders: The secret to your Outlook structure and why it matters
Do you know the difference between IMAP and local folders in Outlook? Incorrect use can lead to data loss! We'll explain simply what belongs where, how to clean up your mailbox, and how to archive emails securely and for the long term.

Der ultimative Effizienz-Boost: Wie Excel, Word und Outlook für Sie zusammenarbeiten
Schluss mit manuellem Kopieren! Lernen Sie, wie Sie Excel-Listen, Word-Vorlagen & Outlook verbinden, um personalisierte Serien-E-Mails automatisch zu versenden. Sparen Sie Zeit, vermeiden Sie Fehler und steigern Sie Ihre Effizienz. Hier geht's zur einfachen Anleitung!

Agentic AI: The next quantum leap in artificial intelligence?
Forget simple chatbots! Agentic AI is here: Autonomous AI that plans, learns, and solves complex tasks for you. Discover how AI agents will revolutionize the world of work and your everyday life. Are you ready for the future of artificial intelligence?
Offers 2024: Word & Excel Templates


Popular Posts:
5 simple security rules against phishing and spam that everyone should know
Deceptively authentic emails from your bank, DHL, or PayPal? That's phishing! Data theft and viruses are a daily threat. We'll show you 5 simple rules (2FA, password managers, etc.) to protect yourself immediately and effectively and help you spot scammers.
The 5 best tips for a clean folder structure on your PC and in the cloud
Say goodbye to file chaos! "Offer_final_v2.docx" is a thing of the past. Learn 5 simple tips for a perfect folder structure on your PC and in the cloud (OneDrive). With proper file naming and archive rules, you'll find everything instantly.
Never do the same thing again: How to record a macro in Excel
Tired of repetitive tasks in Excel? Learn how to create your first personal "magic button" with the macro recorder. Automate formatting and save hours – no programming required! Click here for easy instructions.
IMAP vs. Local Folders: The secret to your Outlook structure and why it matters
Do you know the difference between IMAP and local folders in Outlook? Incorrect use can lead to data loss! We'll explain simply what belongs where, how to clean up your mailbox, and how to archive emails securely and for the long term.
Der ultimative Effizienz-Boost: Wie Excel, Word und Outlook für Sie zusammenarbeiten
Schluss mit manuellem Kopieren! Lernen Sie, wie Sie Excel-Listen, Word-Vorlagen & Outlook verbinden, um personalisierte Serien-E-Mails automatisch zu versenden. Sparen Sie Zeit, vermeiden Sie Fehler und steigern Sie Ihre Effizienz. Hier geht's zur einfachen Anleitung!
Agentic AI: The next quantum leap in artificial intelligence?
Forget simple chatbots! Agentic AI is here: Autonomous AI that plans, learns, and solves complex tasks for you. Discover how AI agents will revolutionize the world of work and your everyday life. Are you ready for the future of artificial intelligence?
Offers 2024: Word & Excel Templates