In 5 steps to the perfect Outlook signature
Who often writes e-mails will probably be annoyed at some point constantly manual the standard phrase “Sincerely” and put his name under it. It will be even more exhausting if you also want to insert additional contact data such as: address, telephone, fax, etc.
Fortunately, Outlook gives us the function of the signature template for this task.
This allows us to easily select different signatures (depending on the occasion and the recipient) and also provide them with business photos for business contacts or applications.
Read in our article how to make more impression with your signature in Microsoft Outlook.
1. Switch to the Outlook Options menu
1. Switch to the Outlook Options menu
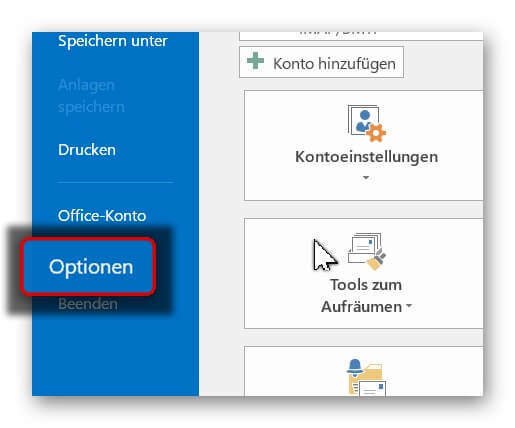
First we have to switch to the option menu of Outlook.
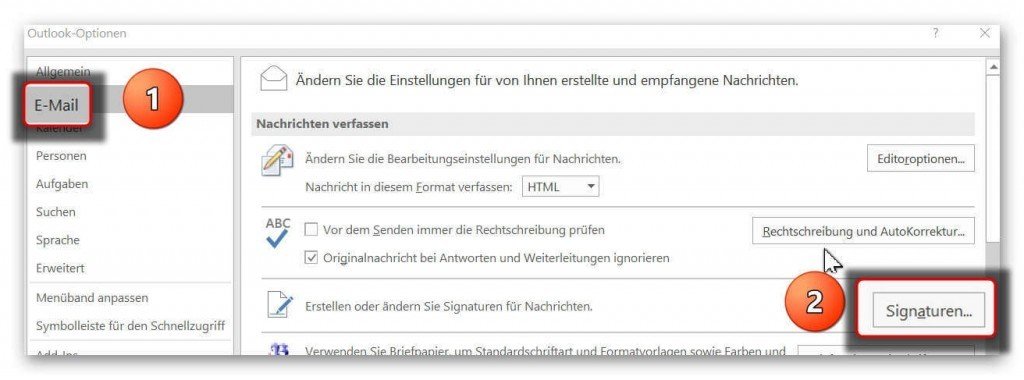
To do this, click on “File” in the tab on the left next to “Start” and change there in the e-mail options to “Signatures”
See picture (click to enlarge)

First we have to switch to the option menu of Outlook.
To do this, click on “File” in the tab on the left next to “Start” and change there in the e-mail options to “Signatures”
See picture (click to enlarge)
2. Name assigned for e-mail signature
2. Name assigned for e-mail signature
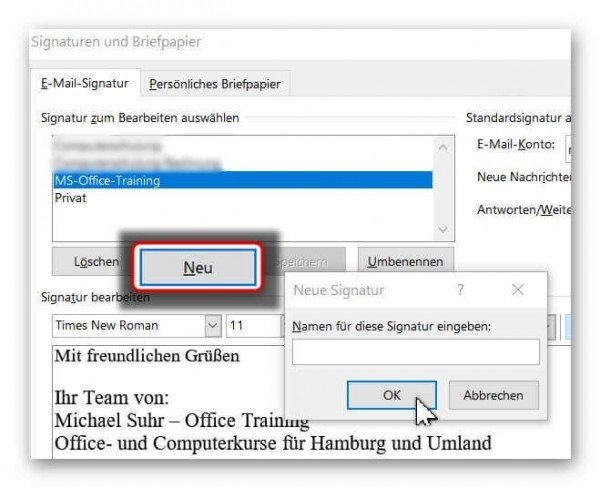
In the next step, we can give our signature a name.
If you do not give a name later “standard” will be available for selection.
Under the signatures overview, click on “New” and then enter your signature name there.
See picture (click to enlarge)

In the next step, we can give our signature a name.
If you do not give a name later “standard” will be available for selection.
Under the signatures overview, click on “New” and then enter your signature name there.
See picture (click to enlarge)
3. Create a signature in Outlook
3. Create a signature in Outlook
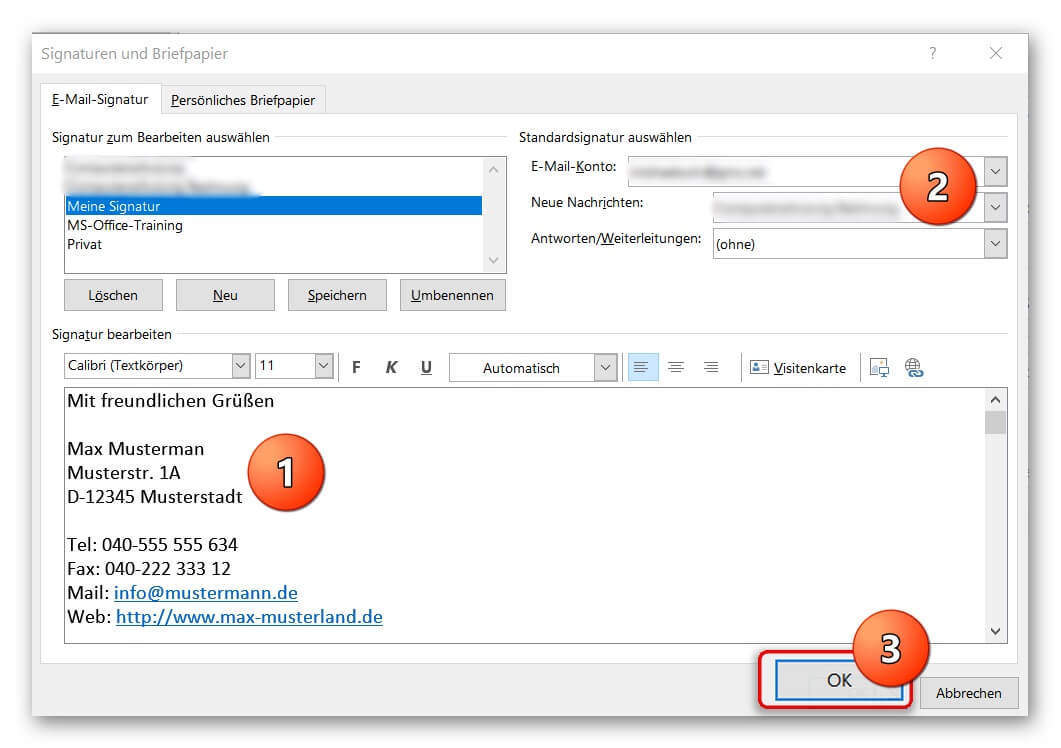
Next, proceed as follows:
- Enter your data (name, address, etc.) in the signature field.
You can also format the text components as you wish. (eg bold, italic, font size, etc.) - Assign a standard e-mail address to the signature. (does not apply to only 1 e-mail address)
- Check all entries again, and then confirm with “Ok”
See picture (click to enlarge)
4. Insert photo into your Outlook signature
4. Insert photo into your Outlook signature
If you also want to insert your photo for the final fine-tuning of your perfect Outlook signature, please note the following:
1. For what purpose will I use the signature?
For example, e-mail applications have become a matter of course today.
So, regardless of your e-mail attachment with the application documents, you have the opportunity to present yourself already with the signature at your best.
2. Which image format is the right one for my signature, so that it looks the same everywhere?
If you are unsure which format to choose the best, or your current portrait photo looks more like a standard application photo than a business photo, we recommend professional career photo editing.
The advantage: It does not need a new photo shoot here.
An image upload to our Partner Starmazing.de can make sense here.

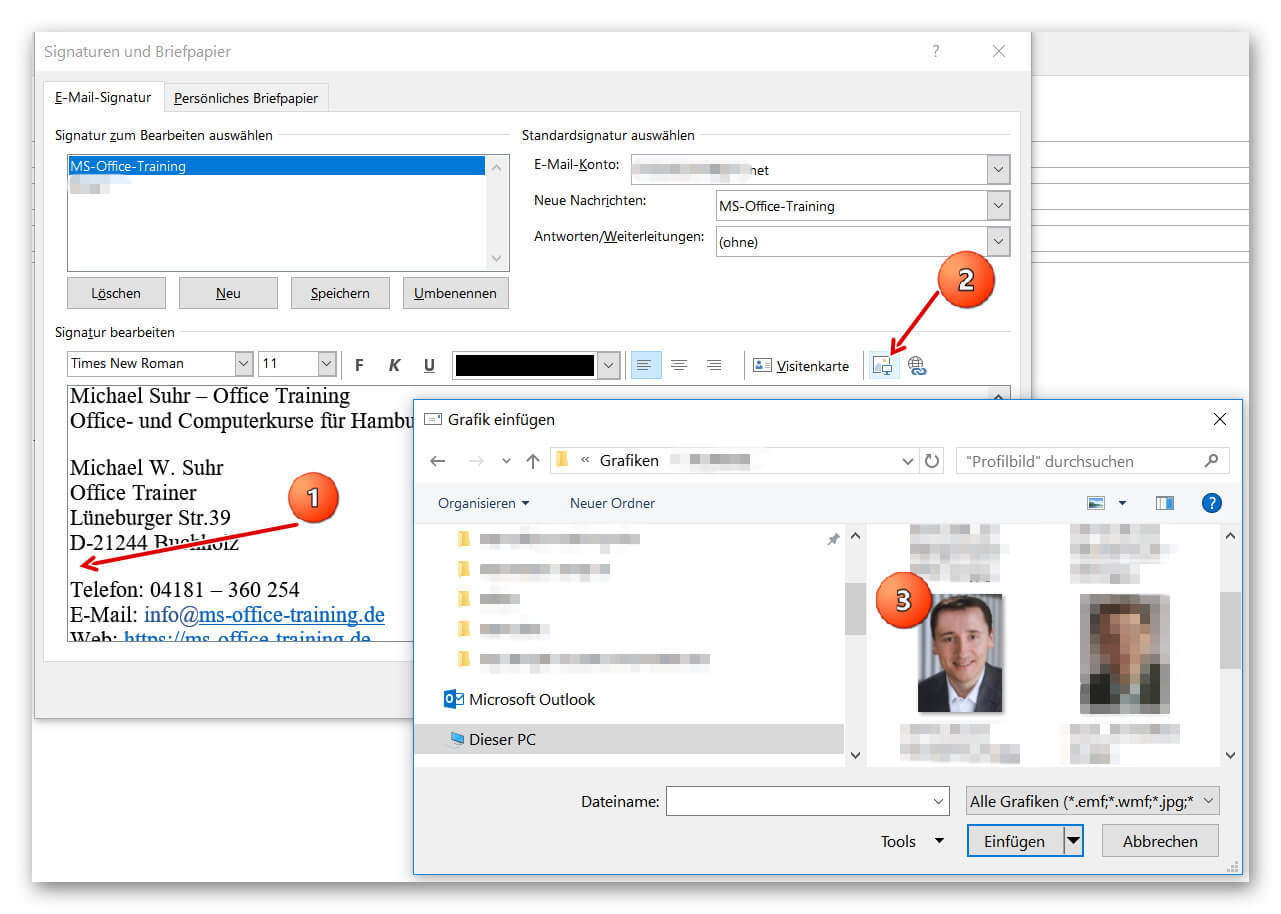
Then simply insert your photo as follows:
- Position the cursor at the position where you want to insert the image.
(for example, between address and other contact details such as phone and e-mail address) - Then click the image upload icon and select an optimized photo.
See picture (click to enlarge)
If you also want to insert your photo for the final fine-tuning of your perfect Outlook signature, please note the following:
1. For what purpose will I use the signature?
For example, e-mail applications have become a matter of course today.
So, regardless of your e-mail attachment with the application documents, you have the opportunity to present yourself already with the signature at your best.
2. Which image format is the right one for my signature, so that it looks the same everywhere?
If you are unsure which format to choose the best, or your current portrait photo looks more like a standard application photo than a business photo, we recommend professional career photo editing.
The advantage: It does not need a new photo shoot here.
An image upload to our Partner Starmazing.de can make sense here.
Then simply insert your photo as follows:
- Position the cursor at the position where you want to insert the image.
(for example, between address and other contact details such as phone and e-mail address) - Then click the image upload icon and select an optimized photo.
See picture (click to enlarge)
5. Insert the signature into an e-mail
5. Insert the signature into an e-mail
After we have created, assigned, and saved our signature, it will automatically be added to every e-mail after our message.
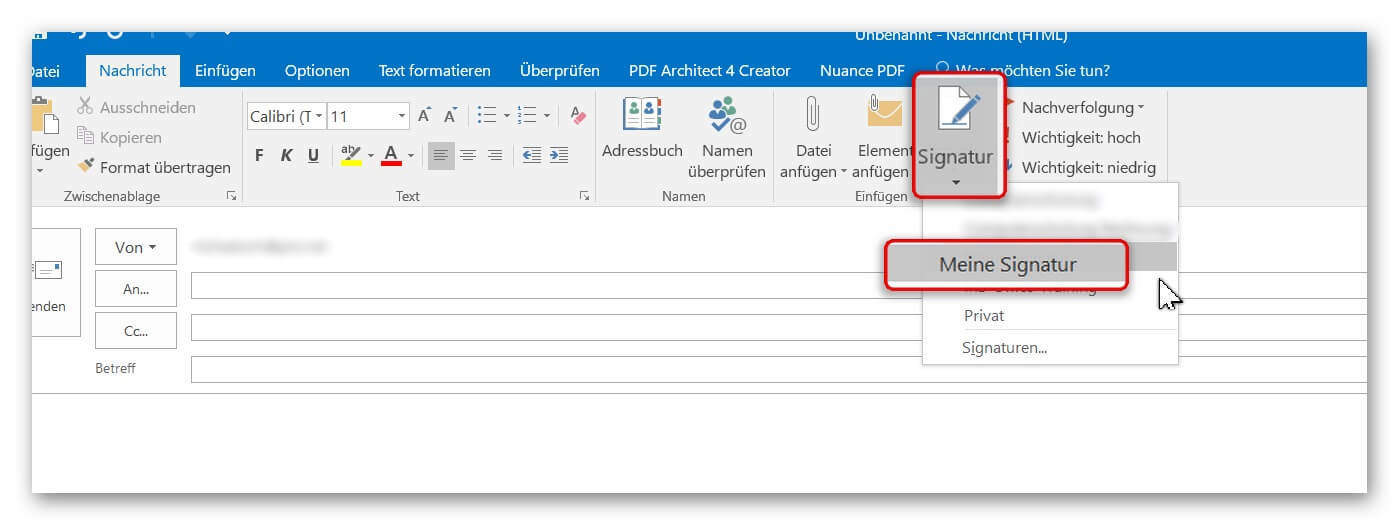
In case we did not do an automatic assignment (for example, if we want to use different signatures more often), proceed as follows:
- Position the cursor where you would normally put the salutation.
- And then click on “Signature” where you select the desired signature.
See picture (click to enlarge)
After we have created, assigned, and saved our signature, it will automatically be added to every e-mail after our message.
In case we did not do an automatic assignment (for example, if we want to use different signatures more often), proceed as follows:
- Position the cursor where you would normally put the salutation.
- And then click on “Signature” where you select the desired signature.
See picture (click to enlarge)
Popular Posts:

Create vacation planner in Excel
We explain how you can create your own vacation planner 2022 in Microsoft Excel. And of course with a display of public holidays and weekends.

Create annual calendar 2022 in Excel
In our tutorial we describe how you can create an annual calendar for 2022 with a display of the calendar week and public holidays in Excel, and use it anew every year.

Create individual charts in Excel
Charts are created quickly in Microsoft Excel. We explain how you can customize them, and also swap (transpose) the axes.

Create professional letter templates in Word
How to create a professional letter template with form fields in Microsoft Word, and only have to fill in text fields.

Edit Windows context menu – remove entries – add entries
The Windows context menu is extremely useful for quickly performing tasks related to the current selection. But on the other hand, it can quickly become confusing.

Create a digital signature in Outlook and Word
Create a digital signature in Microsoft Outlook and Word for more security.
Offers 2024: Word & Excel Templates


Popular Posts:
Create vacation planner in Excel
We explain how you can create your own vacation planner 2022 in Microsoft Excel. And of course with a display of public holidays and weekends.
Create annual calendar 2022 in Excel
In our tutorial we describe how you can create an annual calendar for 2022 with a display of the calendar week and public holidays in Excel, and use it anew every year.
Create individual charts in Excel
Charts are created quickly in Microsoft Excel. We explain how you can customize them, and also swap (transpose) the axes.
Create professional letter templates in Word
How to create a professional letter template with form fields in Microsoft Word, and only have to fill in text fields.
Edit Windows context menu – remove entries – add entries
The Windows context menu is extremely useful for quickly performing tasks related to the current selection. But on the other hand, it can quickly become confusing.
Create a digital signature in Outlook and Word
Create a digital signature in Microsoft Outlook and Word for more security.
Offers 2024: Word & Excel Templates