Create a Table of Contents in Word
If at some point you are faced with the task of writing a longer essay on a specific topic, then you can not really get around a table of contents.
In addition, of course, this table of contents should not only map the content, but also be a navigation with it, and may contain sub-items.
You will find out how to create a dynamic table of contents in Word in our article.
1. Create page for table of contents
1. Create page for table of contents
Before we begin to create our headings, I recommend first as a preparatory step, a blank page for the later table of contents einzufpfllegen. Because experience shows that once the headings are formatted as such are always fiddly, and no one needs that.
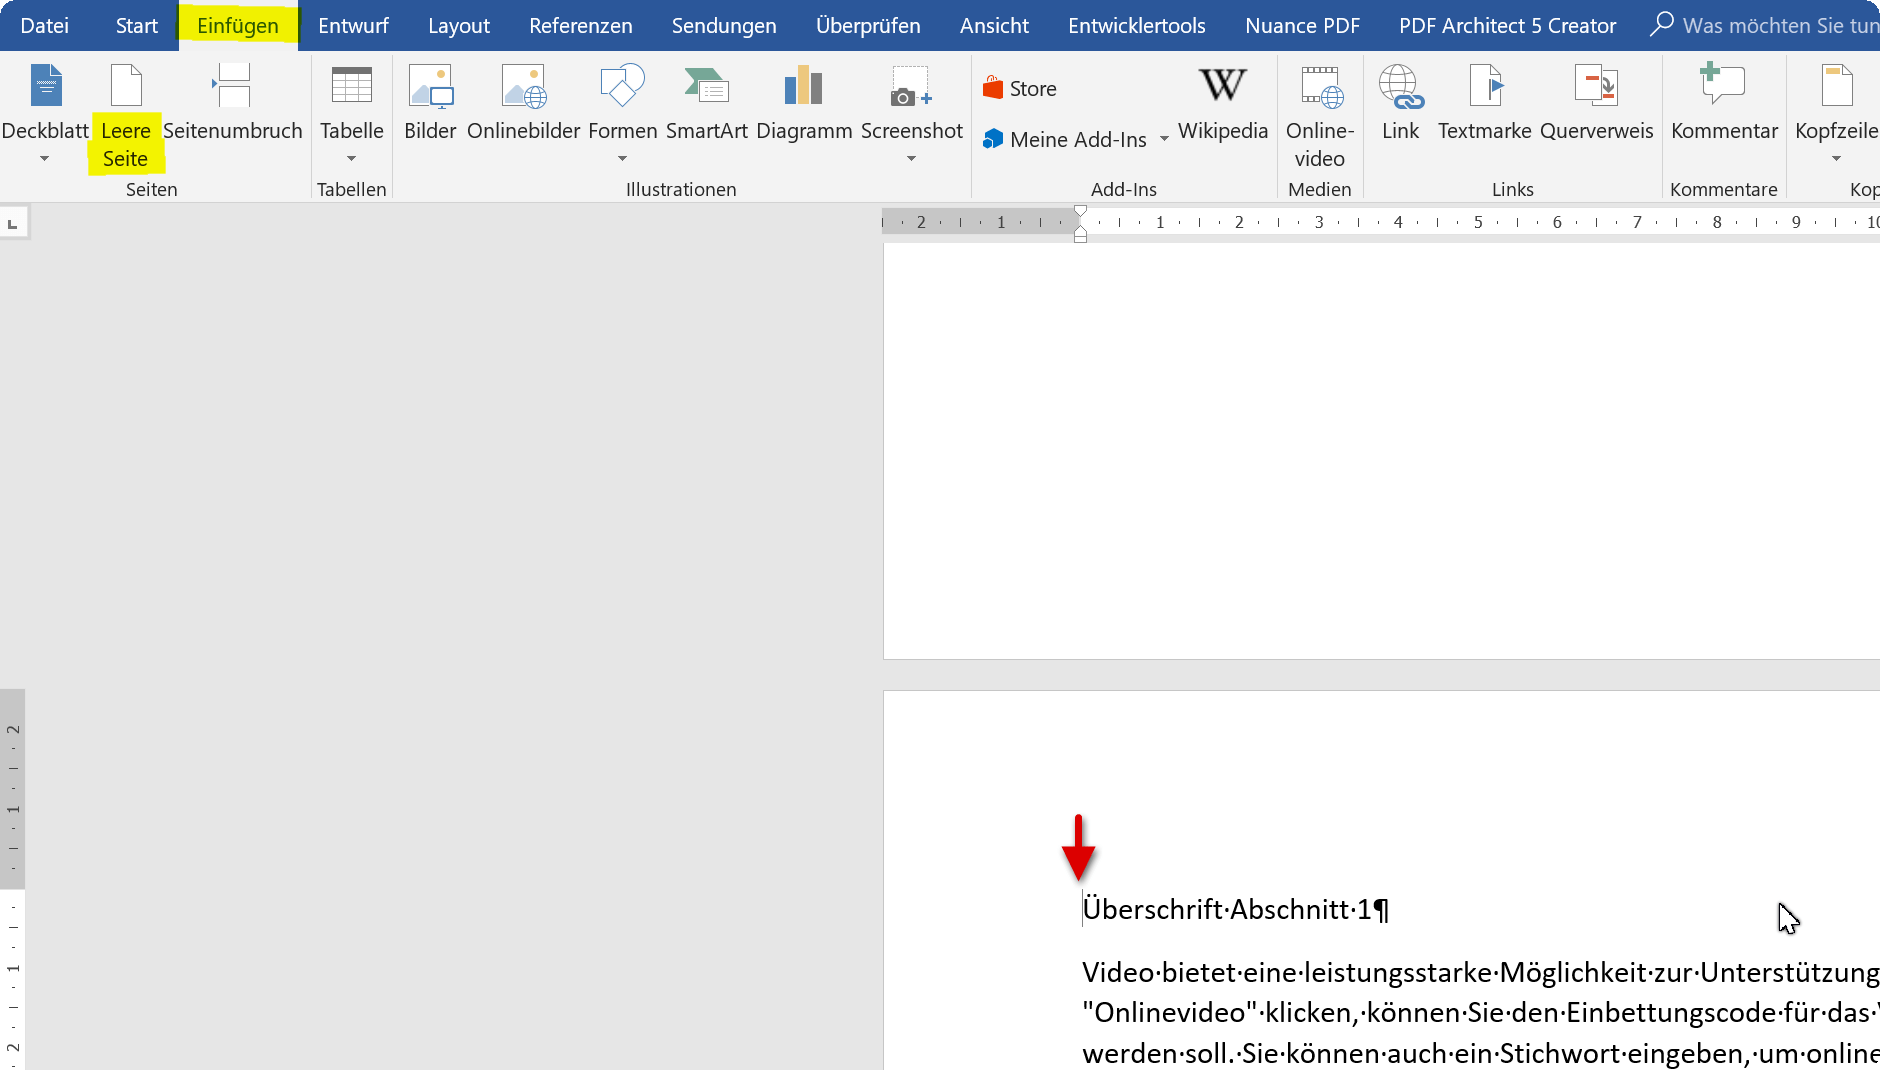
- Let’s first place our cursor in front of the first word on the first page of our document
- Then go to the tab “Paste” and there to “Empty page”
This simply creates a page break, and we have a blank page that we can later use for the table of contents.
Please also read our article: How to move pages in Word
See picture: (click to enlarge)
2. Create headings with one level in Word
2. Create headings with one level in Word
So that your table of contents works later as it should, and is accordingly dynamic, the headings of the individual sections must first be formatted correctly.
In the first example, we will start with just one level first.
- To do this, first mark all headings of the corresponding sections.
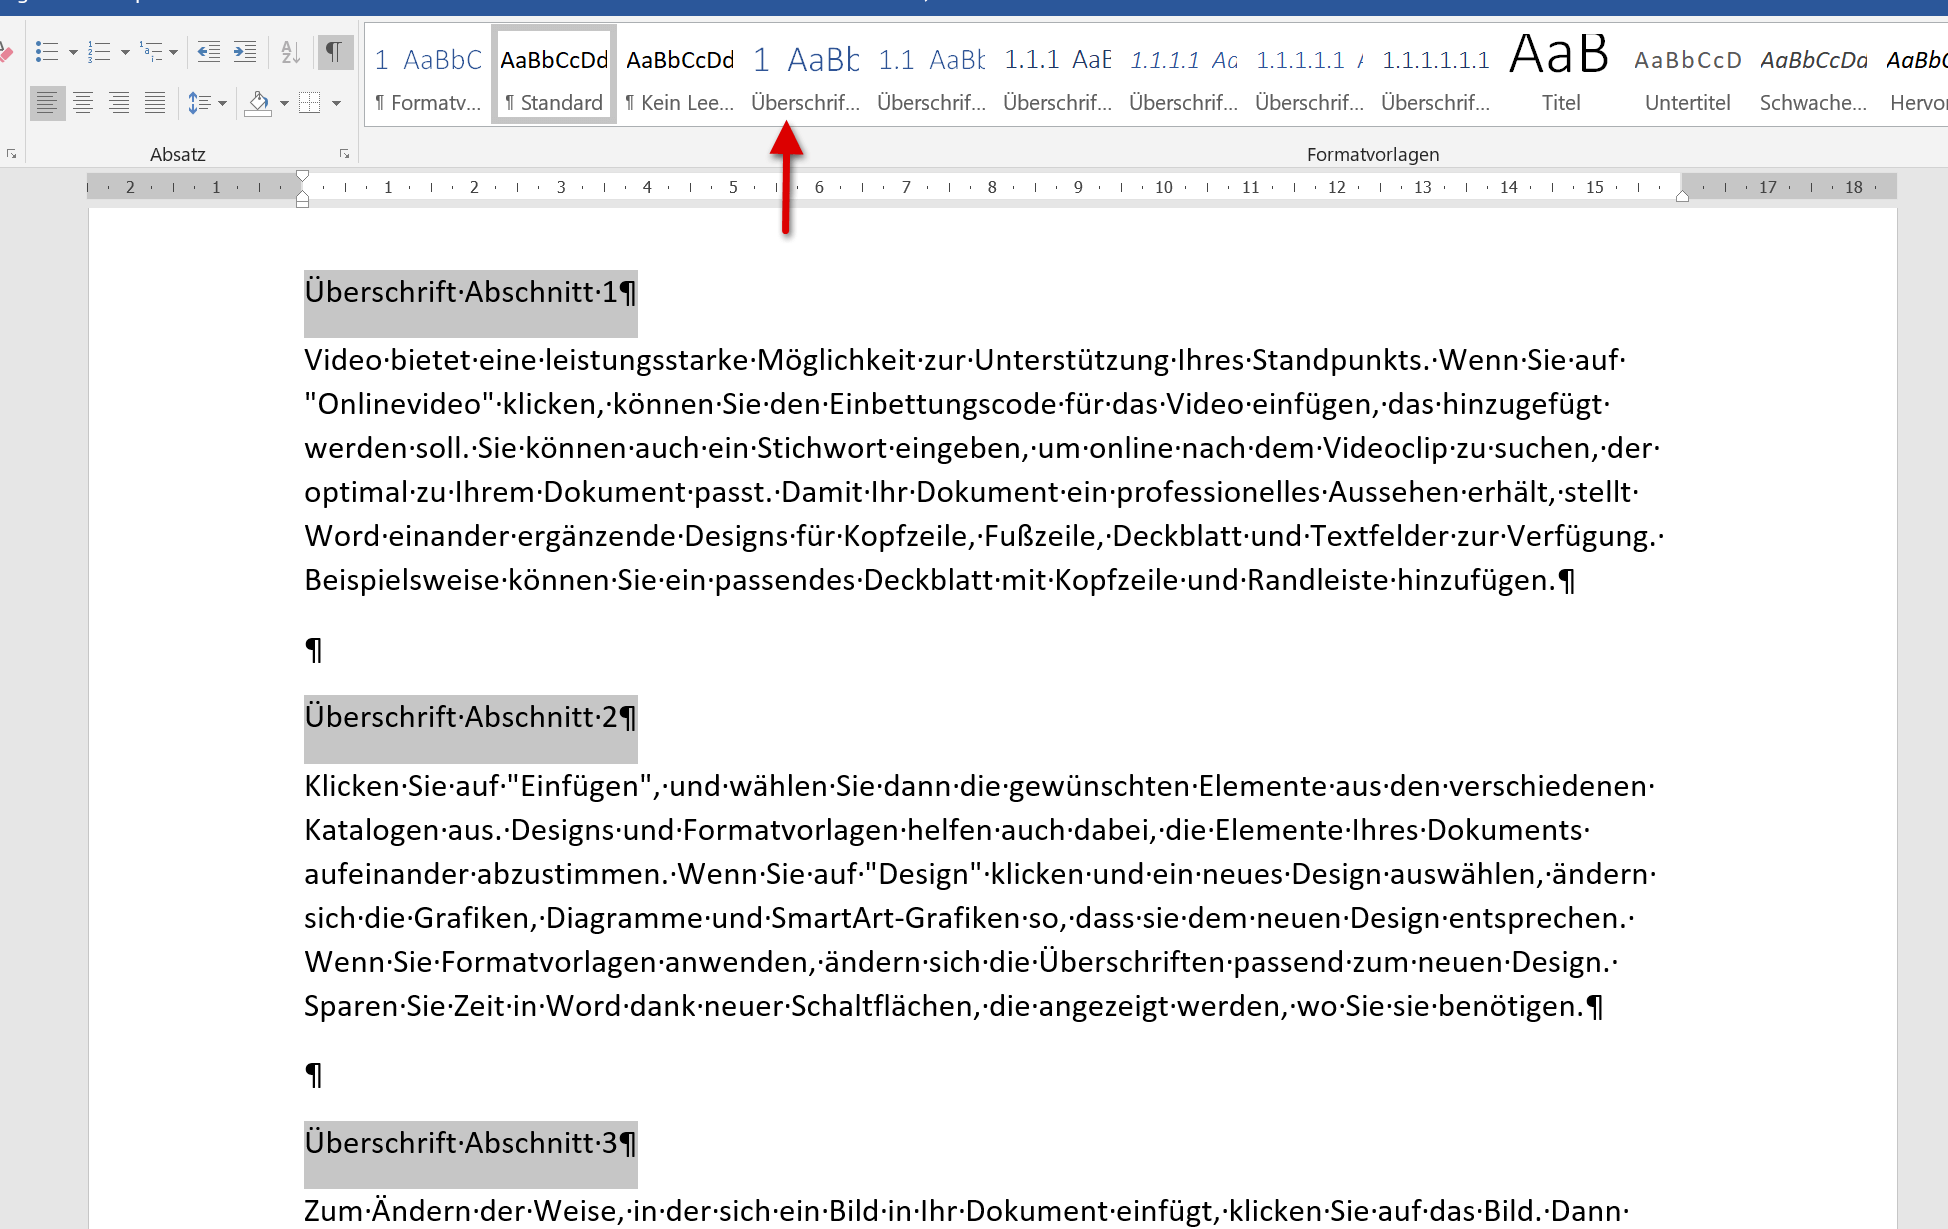
- Then click on “Heading 1” under the “Start” tab in the style sheets.
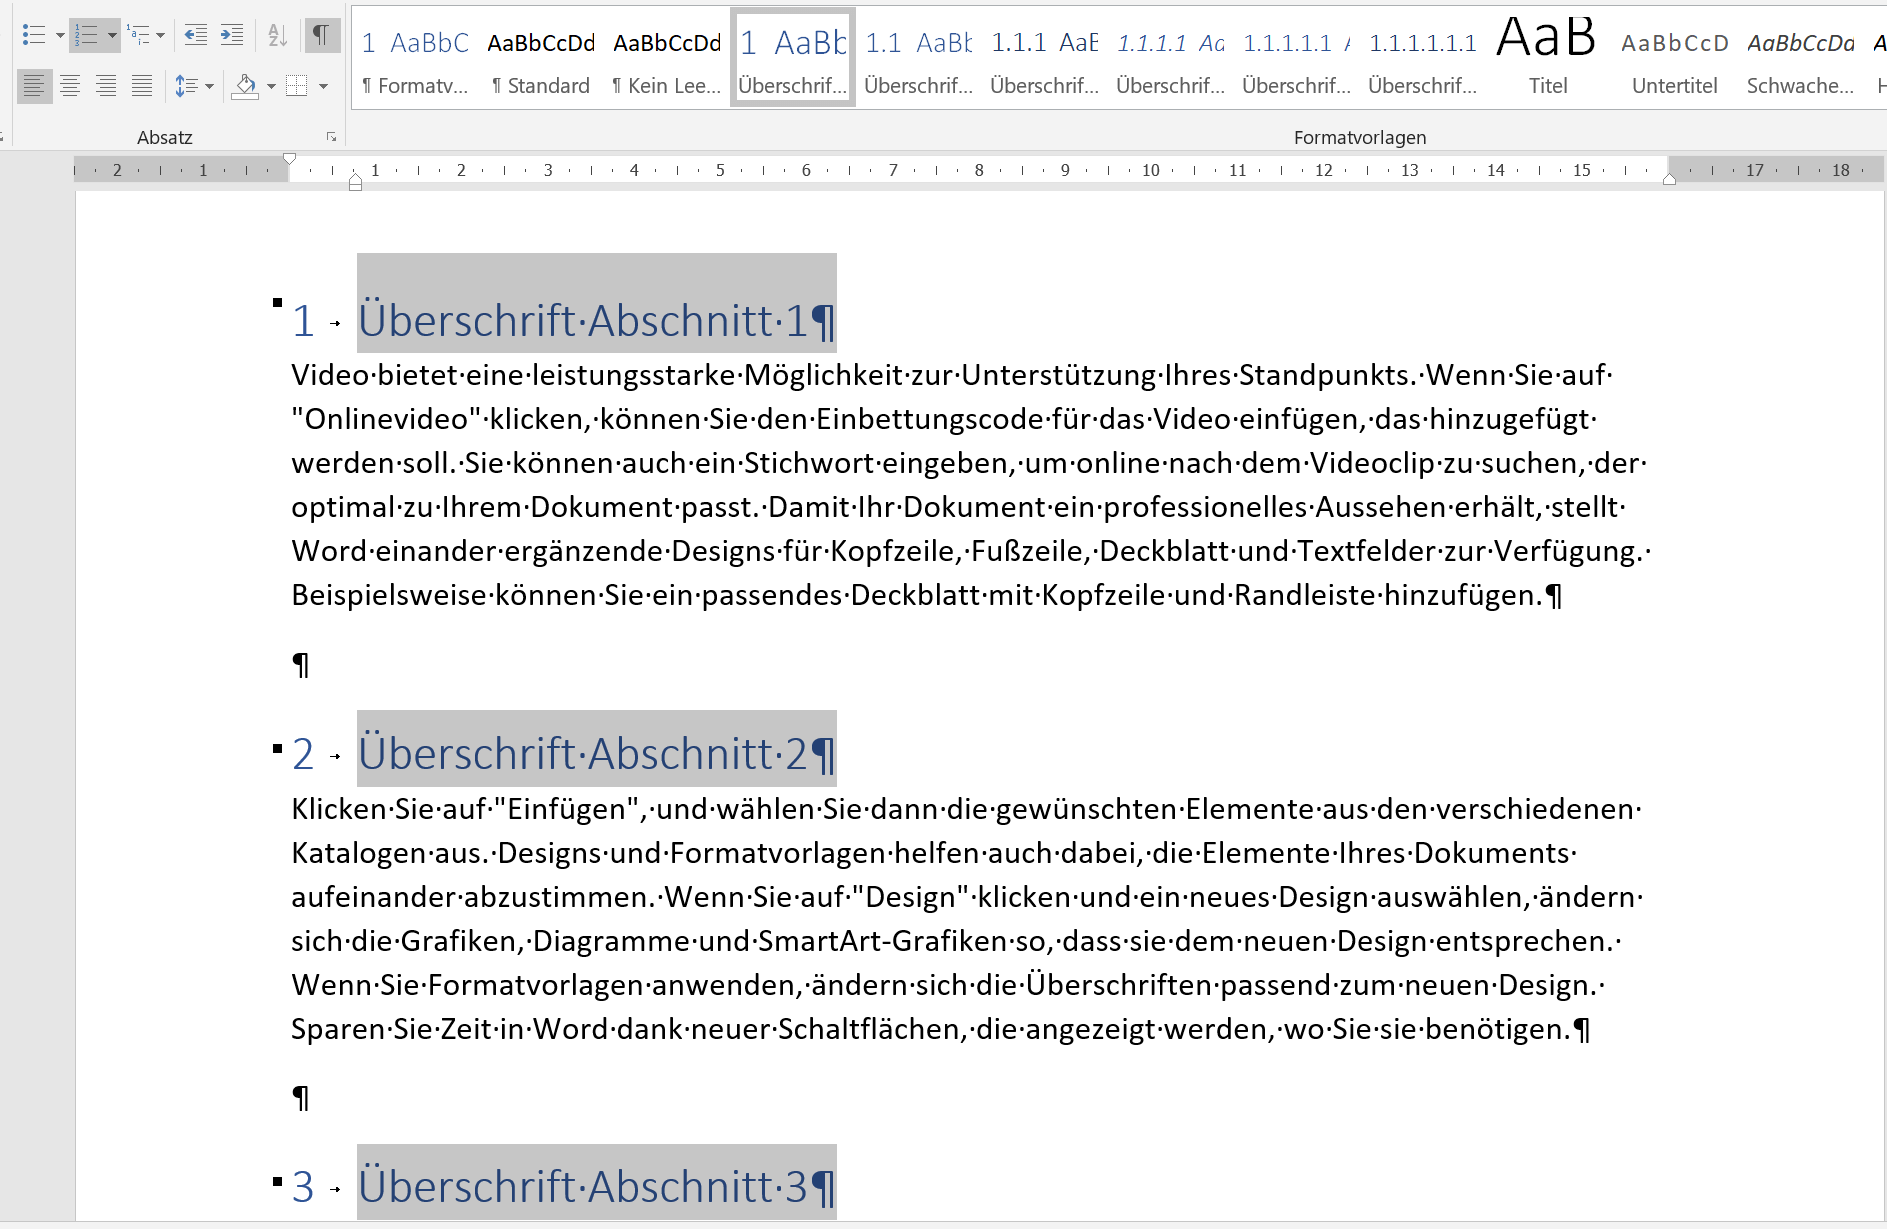
Then you can immediately see that Word has automatically numbered here.
See picture: (click to enlarge)
The formatting of the text which should serve as a headline is an elementary step so that Word knows later that it is a heading. It is not enough to simply put numbers in front of the desired headlines by hand, and then underline them for your sake and fat or similar. display.
So that your table of contents works later as it should, and is accordingly dynamic, the headings of the individual sections must first be formatted correctly.
In the first example, we will start with just one level first.
- To do this, first mark all headings of the corresponding sections.
- Then click on “Heading 1” under the “Start” tab in the style sheets.
Then you can immediately see that Word has automatically numbered here.
See picture: (click to enlarge)
The formatting of the text which should serve as a headline is an elementary step so that Word knows later that it is a heading. It is not enough to simply put numbers in front of the desired headlines by hand, and then underline them for your sake and fat or similar. display.
3. Create multi-level headings in Word
3. Create multi-level headings in Word
The more extensive your work becomes, the more it may be necessary to re-divide sections into sections that would otherwise become too cluttered. Therefore, in this section, we will focus on creating multi-level headings.
- First mark all headings of the incl. The planned second level
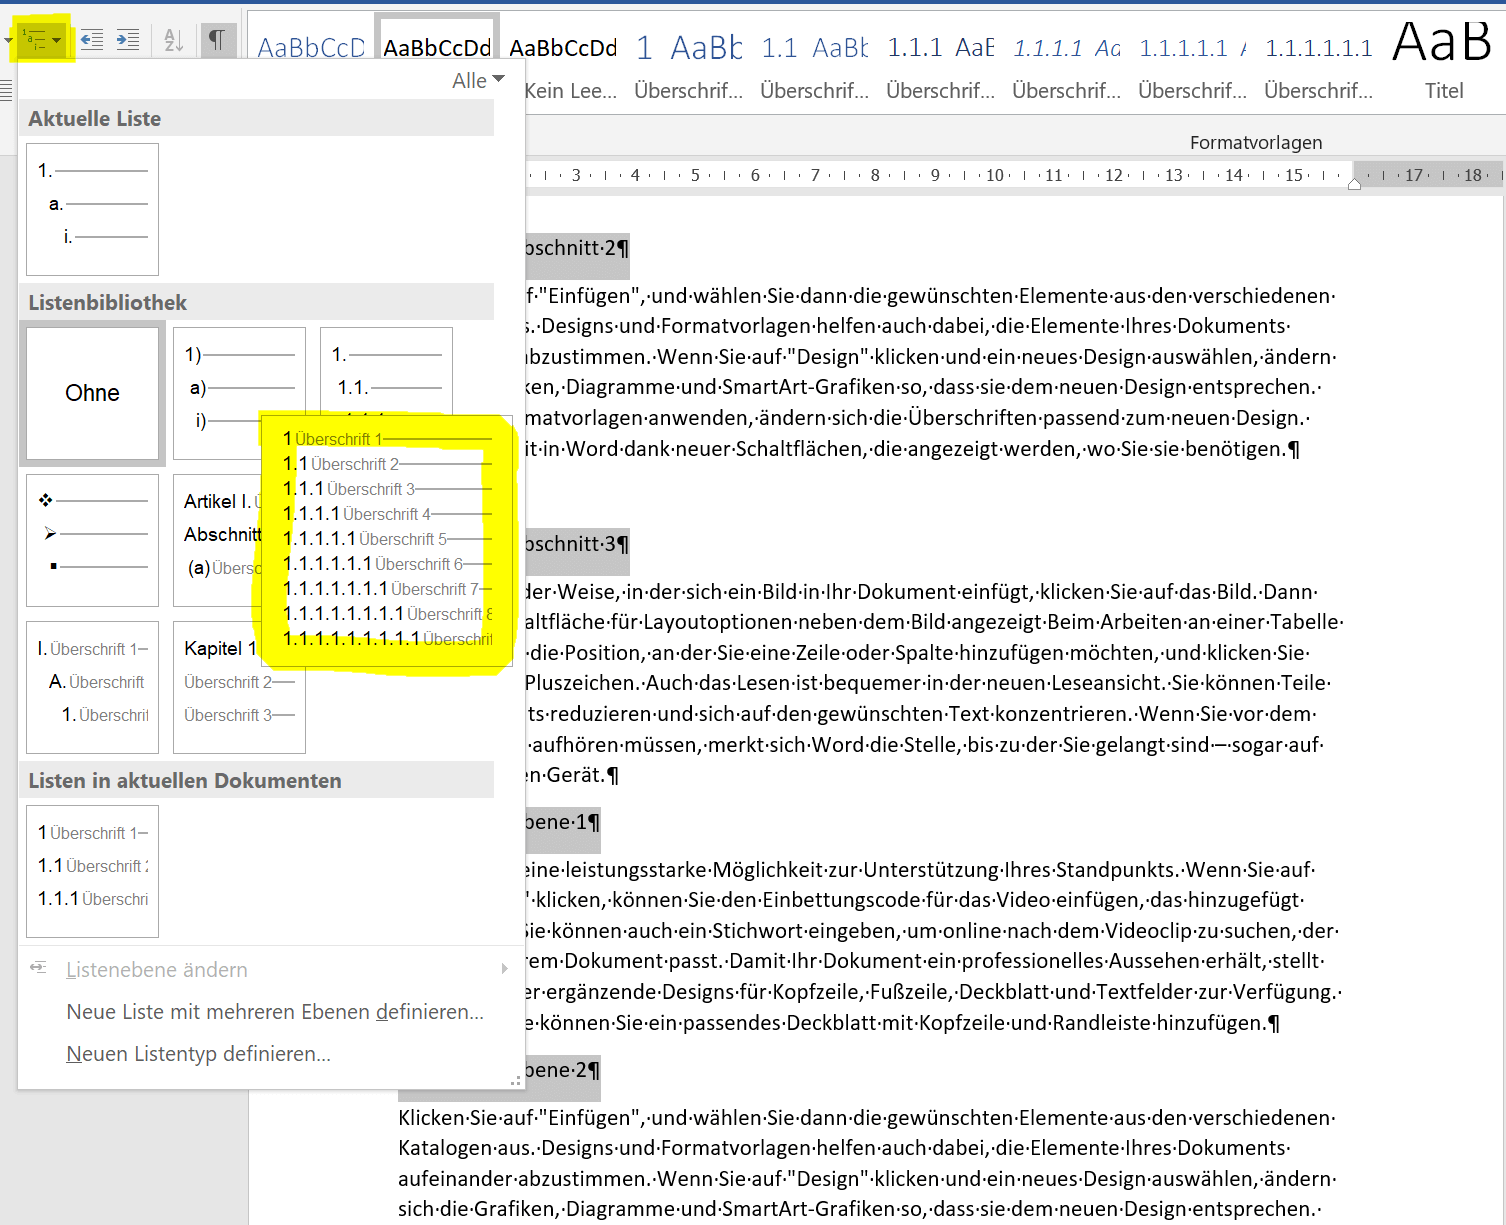
- Then go to the “Start” tab in the “List Library” and there to the item “Title structure”
Now all planned headlines (including those of the second outline level) are marked as a list.
- Now format the highlighted headings with Heading 1 (under Styles)
- Then just mark the desired second level headers
- Now change the list level under “Numbering Library” in the “Start” tab
See picture: (click to enlarge)
Here, too, we see that Word has formatted the corresponding second level headings with 3.1, 3.2, and so on. These can not be changed manually like this anymore.
The more extensive your work becomes, the more it may be necessary to re-divide sections into sections that would otherwise become too cluttered. Therefore, in this section, we will focus on creating multi-level headings.
- First mark all headings of the incl. The planned second level
- Then go to the “Start” tab in the “List Library” and there to the item “Title structure”
Now all planned headlines (including those of the second outline level) are marked as a list.
- Now format the highlighted headings with Heading 1 (under Styles)
- Then just mark the desired second level headers
- Now change the list level under “Numbering Library” in the “Start” tab
See picture: (click to enlarge)
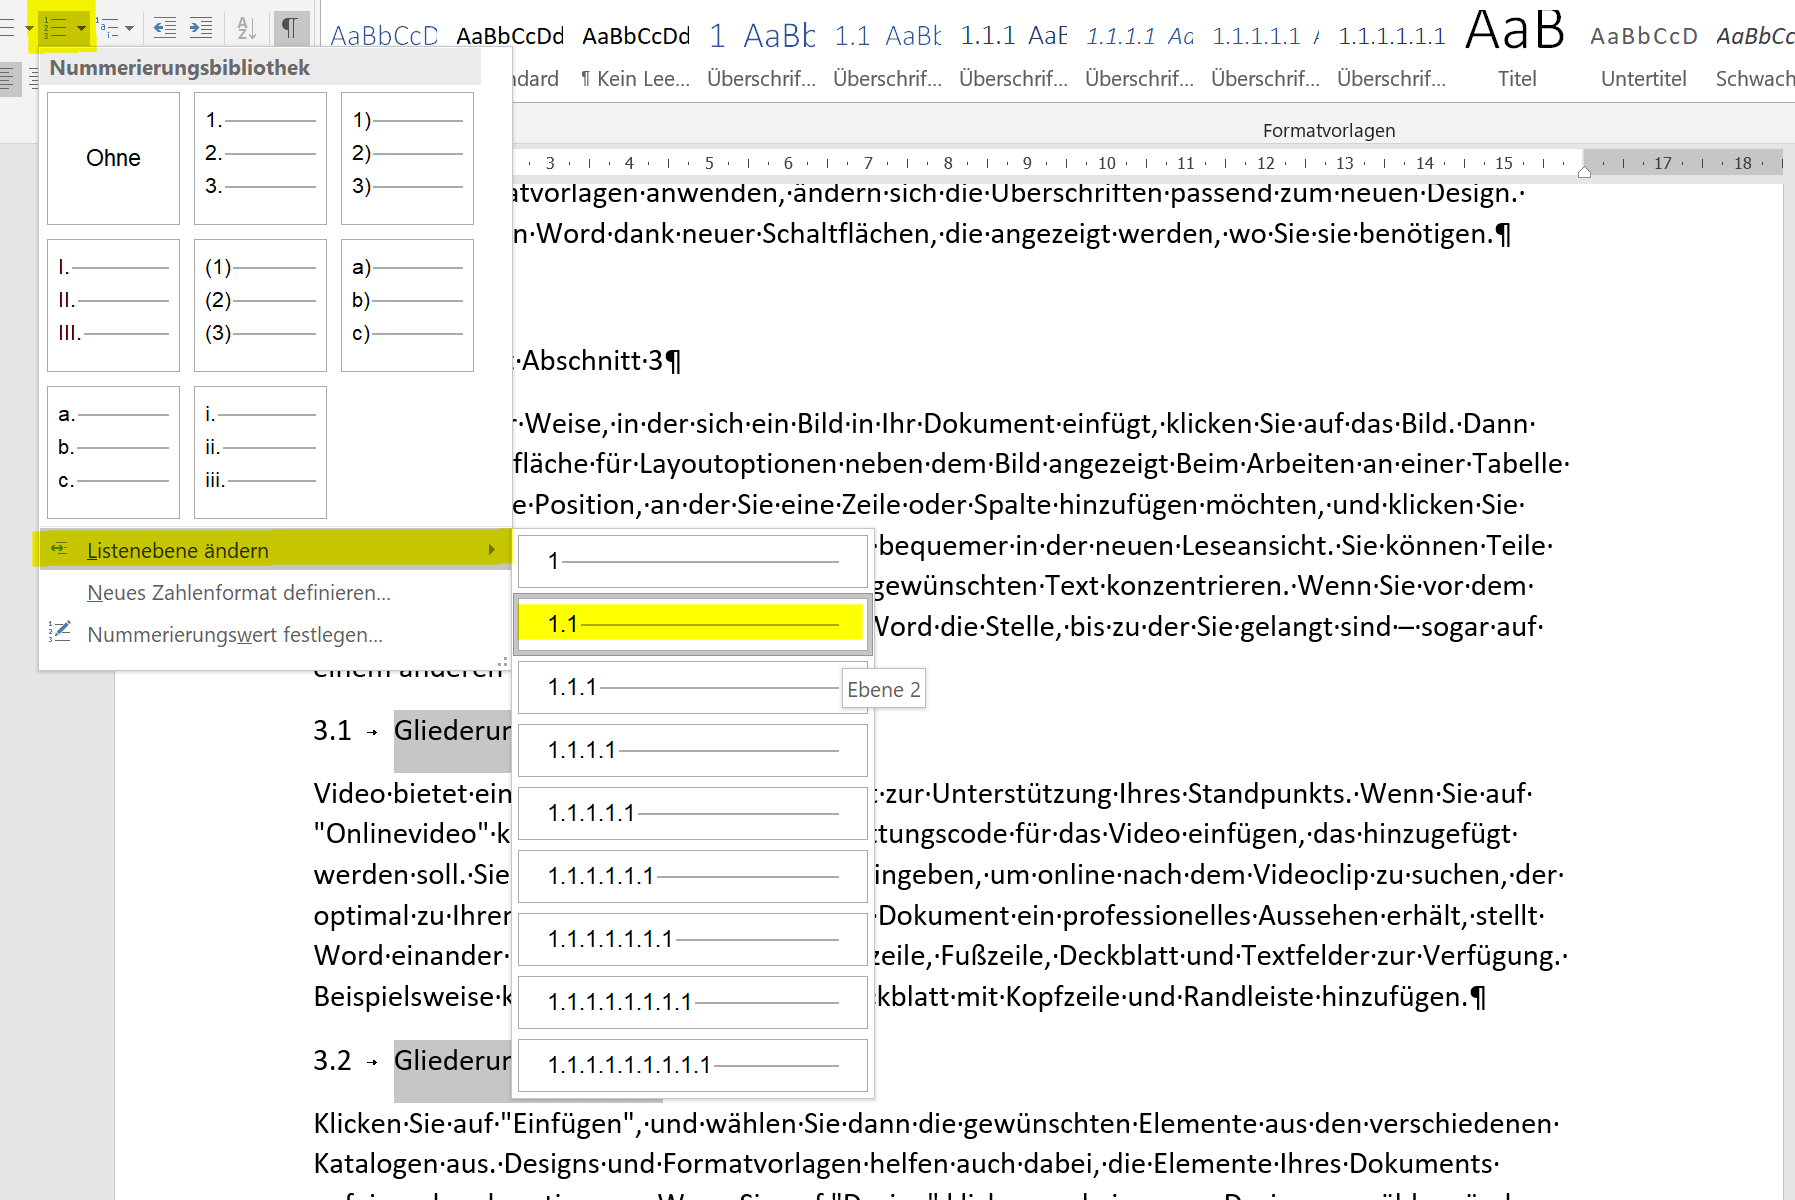
Here, too, we see that Word has formatted the corresponding second level headings with 3.1, 3.2, and so on. These can not be changed manually like this anymore.
4. Indent second level headings
4. Indent second level headings
Often it is also the case that you would like to indent the headings of the second level in order to visually distinguish them from the rest.
This can be arranged in the headings by changing the heading 2 style, and the texts below can then be easily accessed by enlarging the indentation.
Certainly in Word (as in all Office programs) there are many ways to Rome, but this is just one way to do it all. Incidentally, you can change all the possible parameters (color, font, etc.) under the styles we have just changed, or create completely your own and save them either only for the current document or in general.
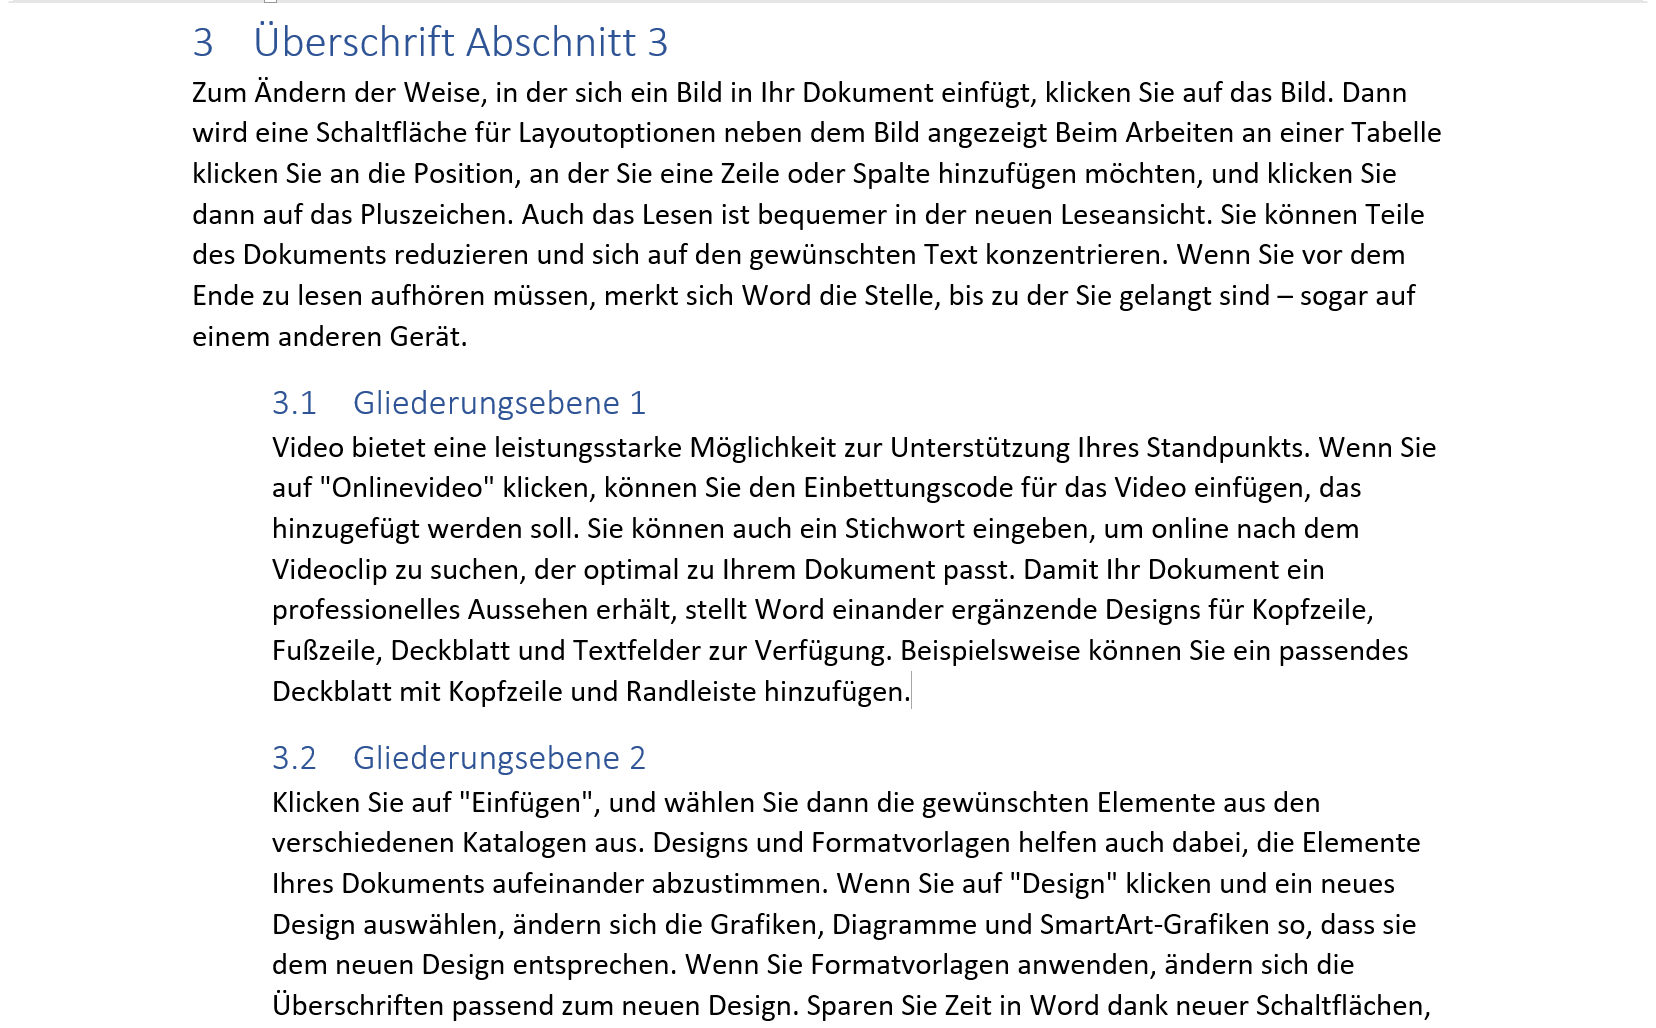
In the end, the whole thing should look like this:
See picture: (click to enlarge)
Often it is also the case that you would like to indent the headings of the second level in order to visually distinguish them from the rest.
This can be arranged in the headings by changing the heading 2 style, and the texts below can then be easily accessed by enlarging the indentation.
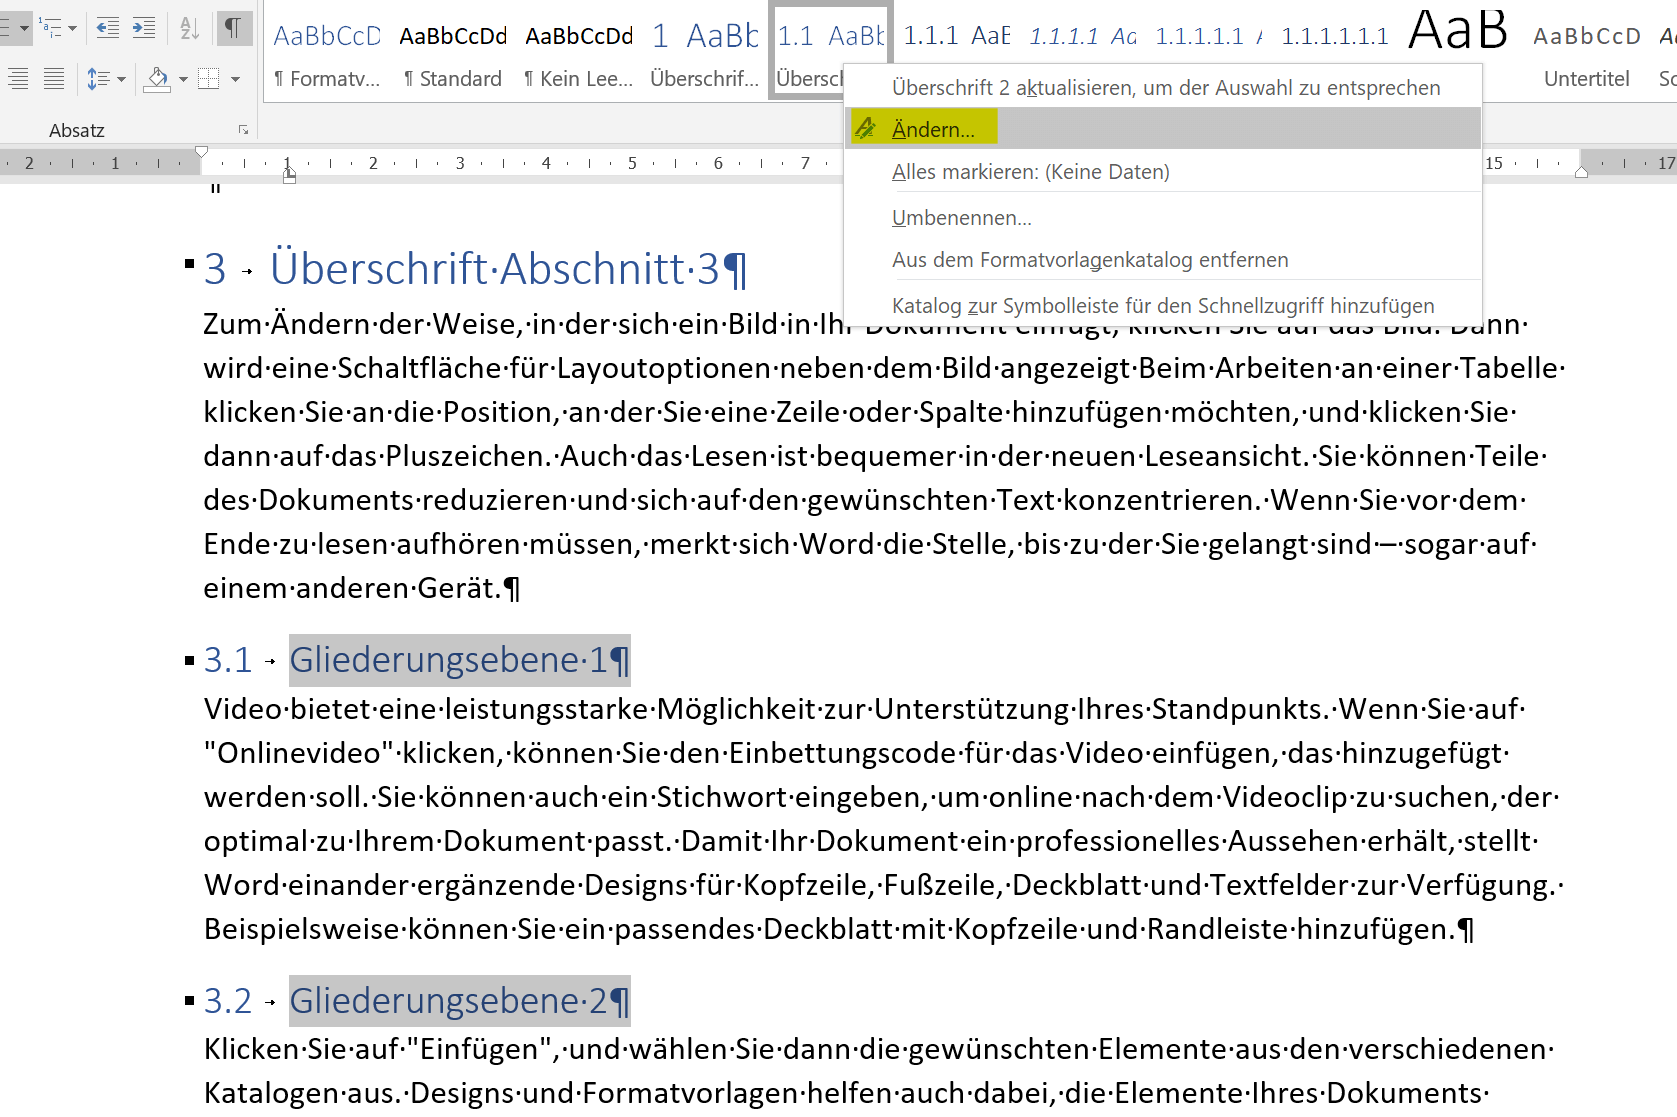
Step 1:
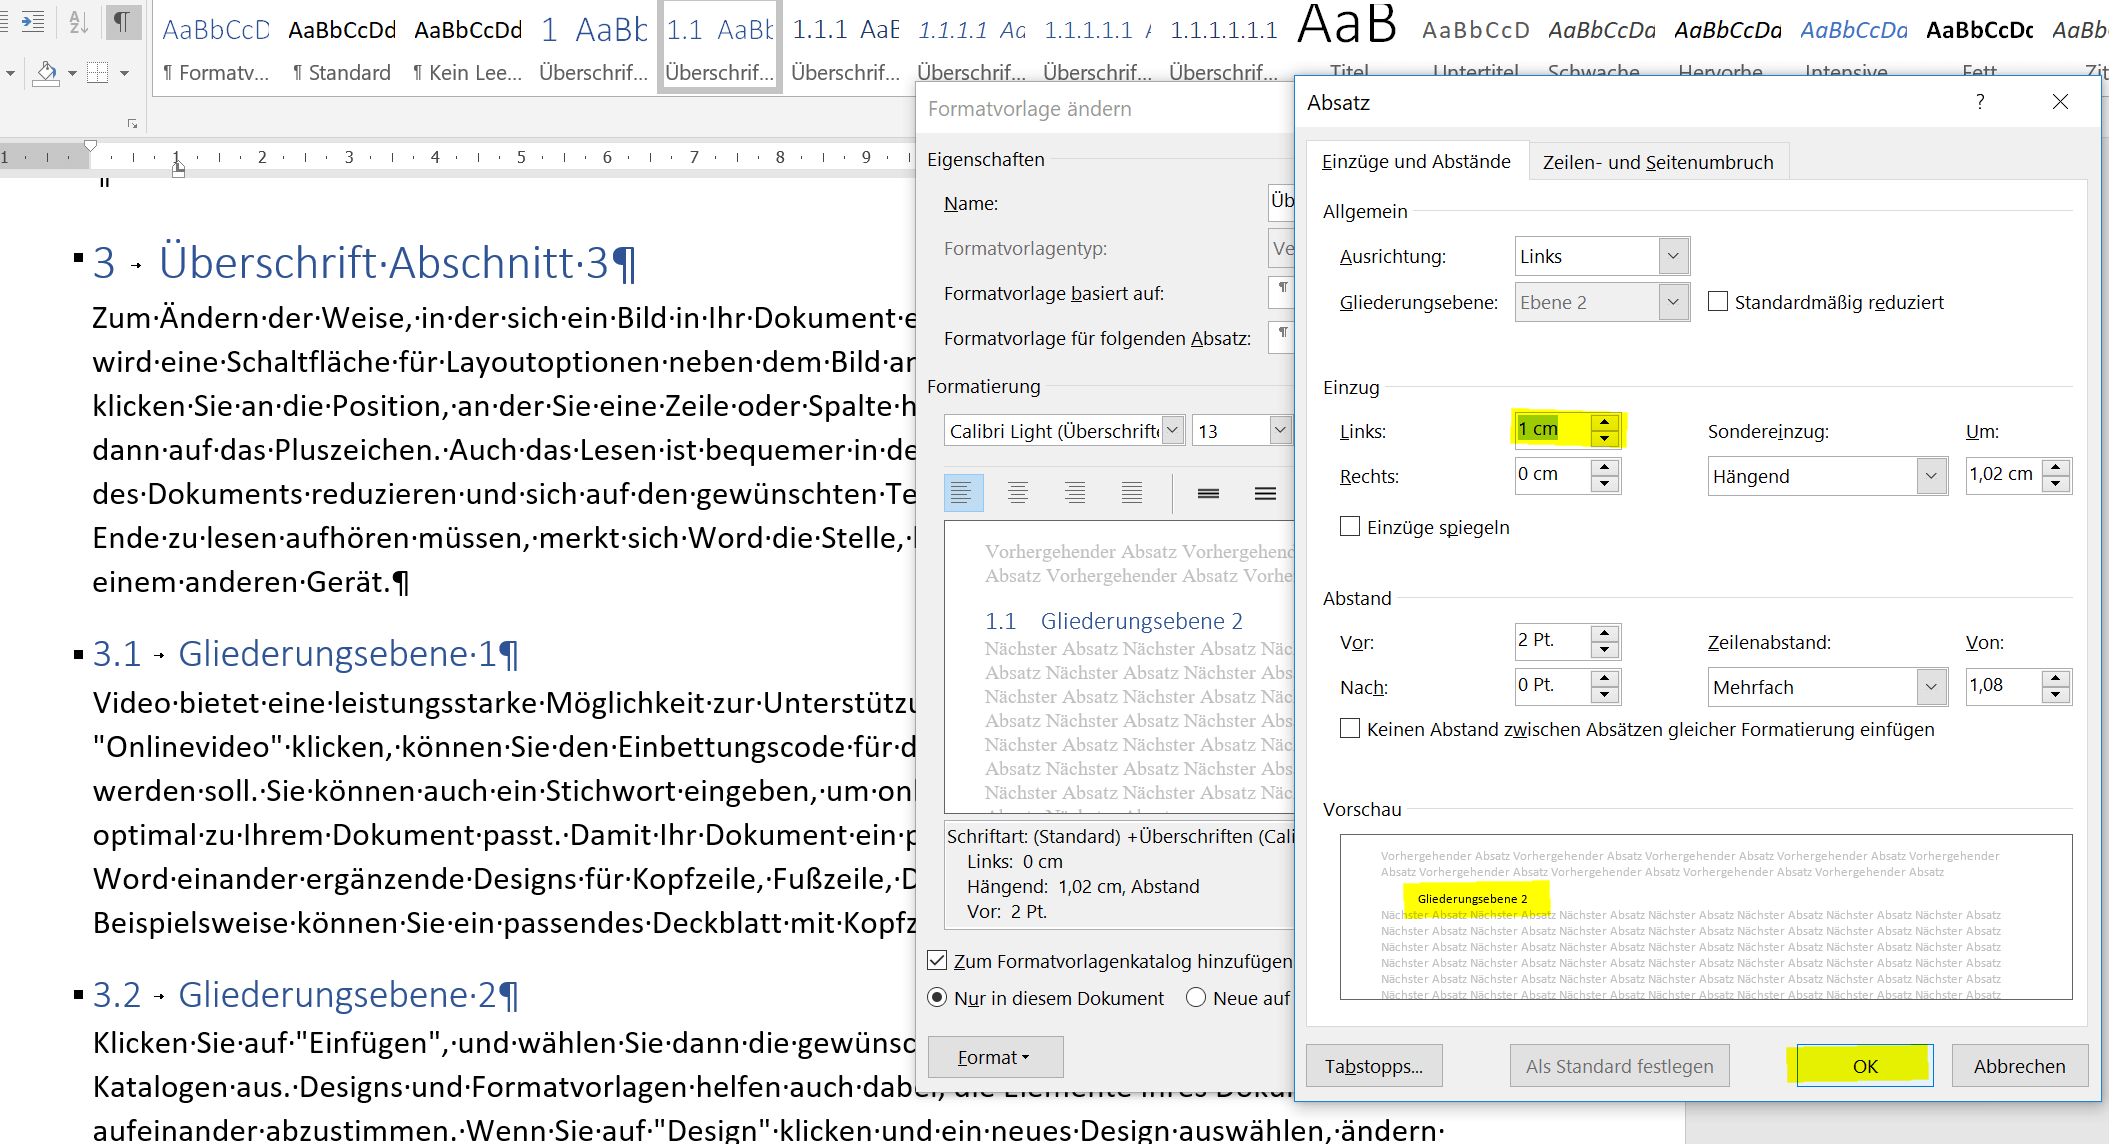
Select the headings of the 2nd level and click on “Change” in the context menu.
See picture:
Step 2:
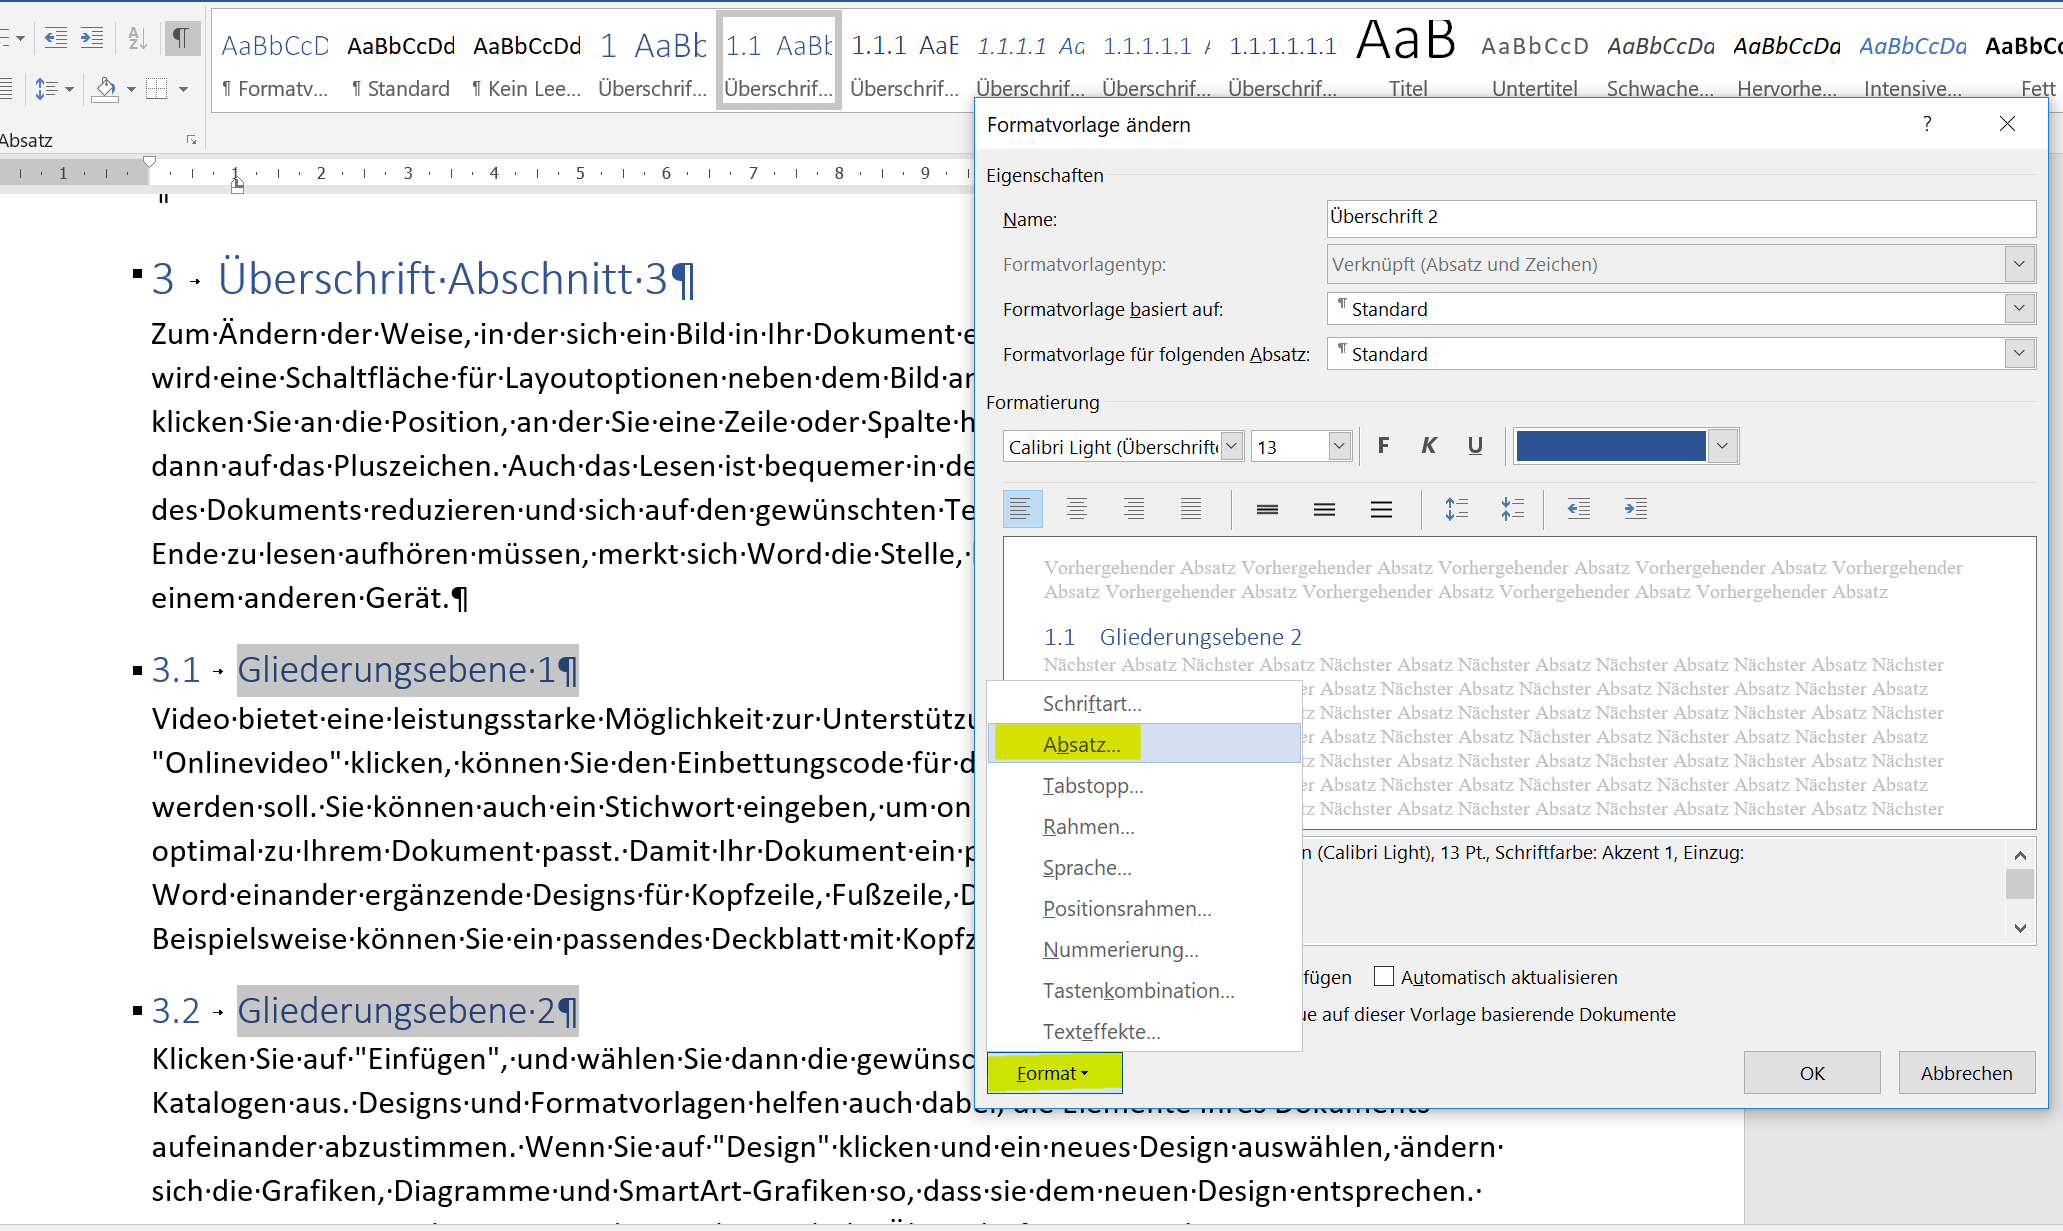
In the dialog box for the changes, click on “Format” and then on “Paragraph”
See picture:
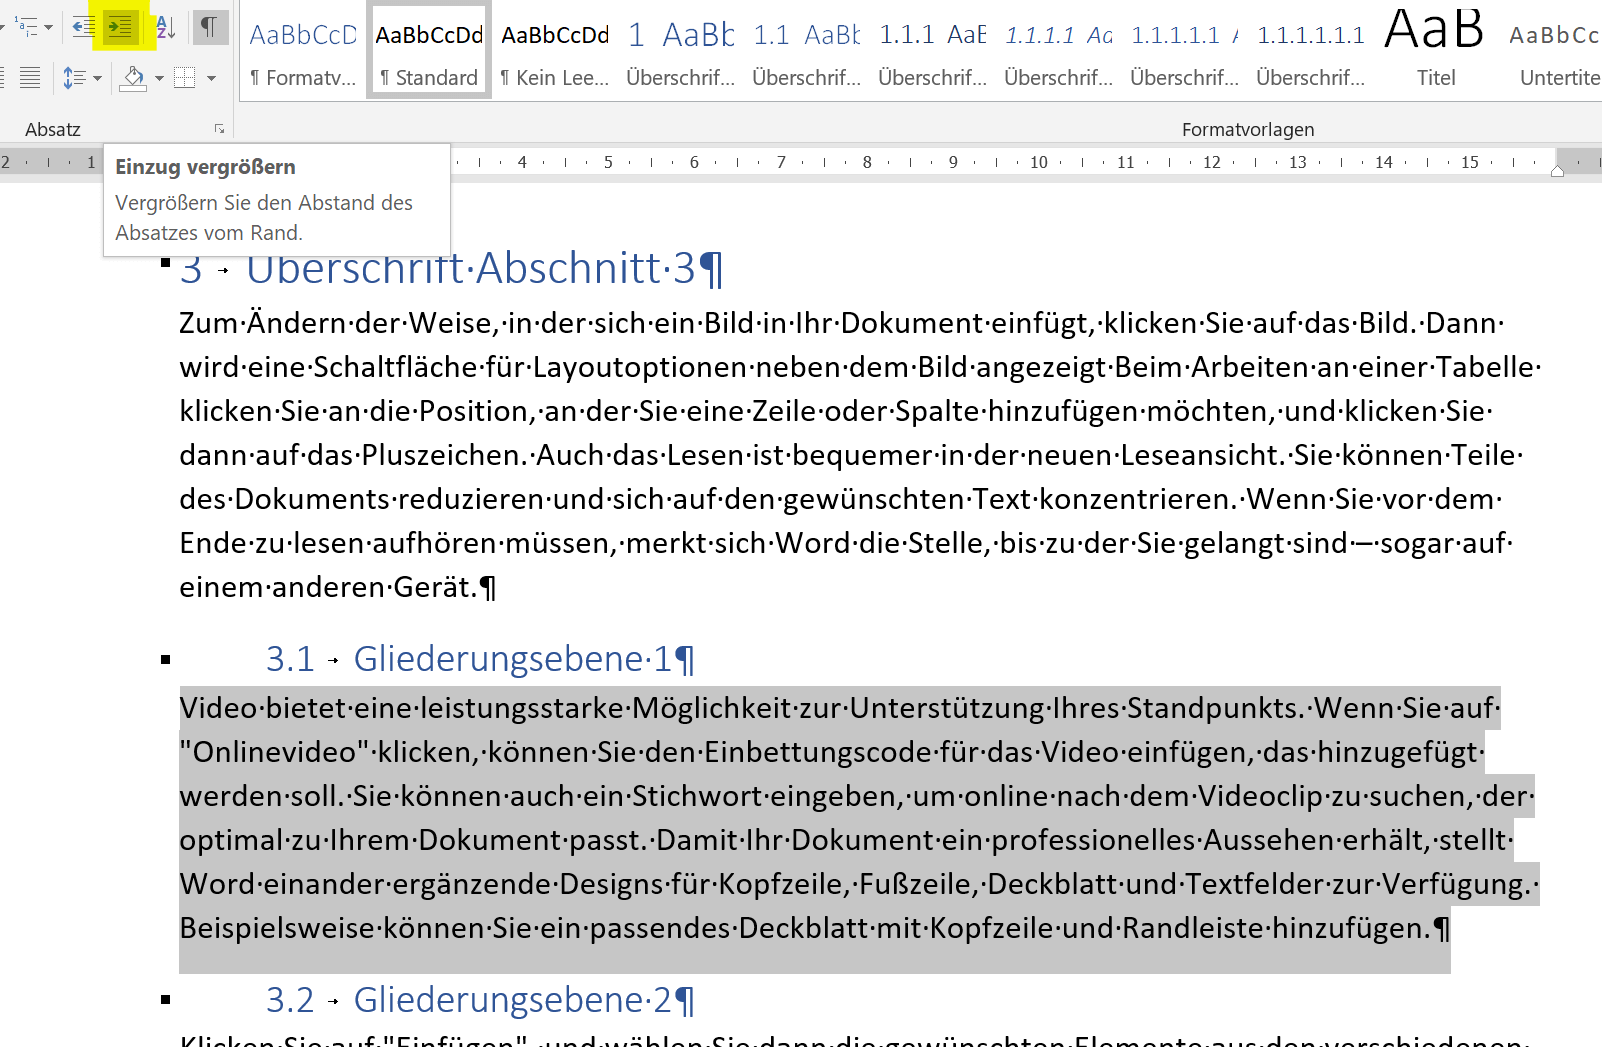
Step 4:
Select the text paragraphs under the second level headings and enlarge the left indent
See picture:
Certainly in Word (as in all Office programs) there are many ways to Rome, but this is just one way to do it all. Incidentally, you can change all the possible parameters (color, font, etc.) under the styles we have just changed, or create completely your own and save them either only for the current document or in general.
In the end, the whole thing should look like this:
See picture:
5. Insert table of contents in Word
5. Insert table of contents in Word
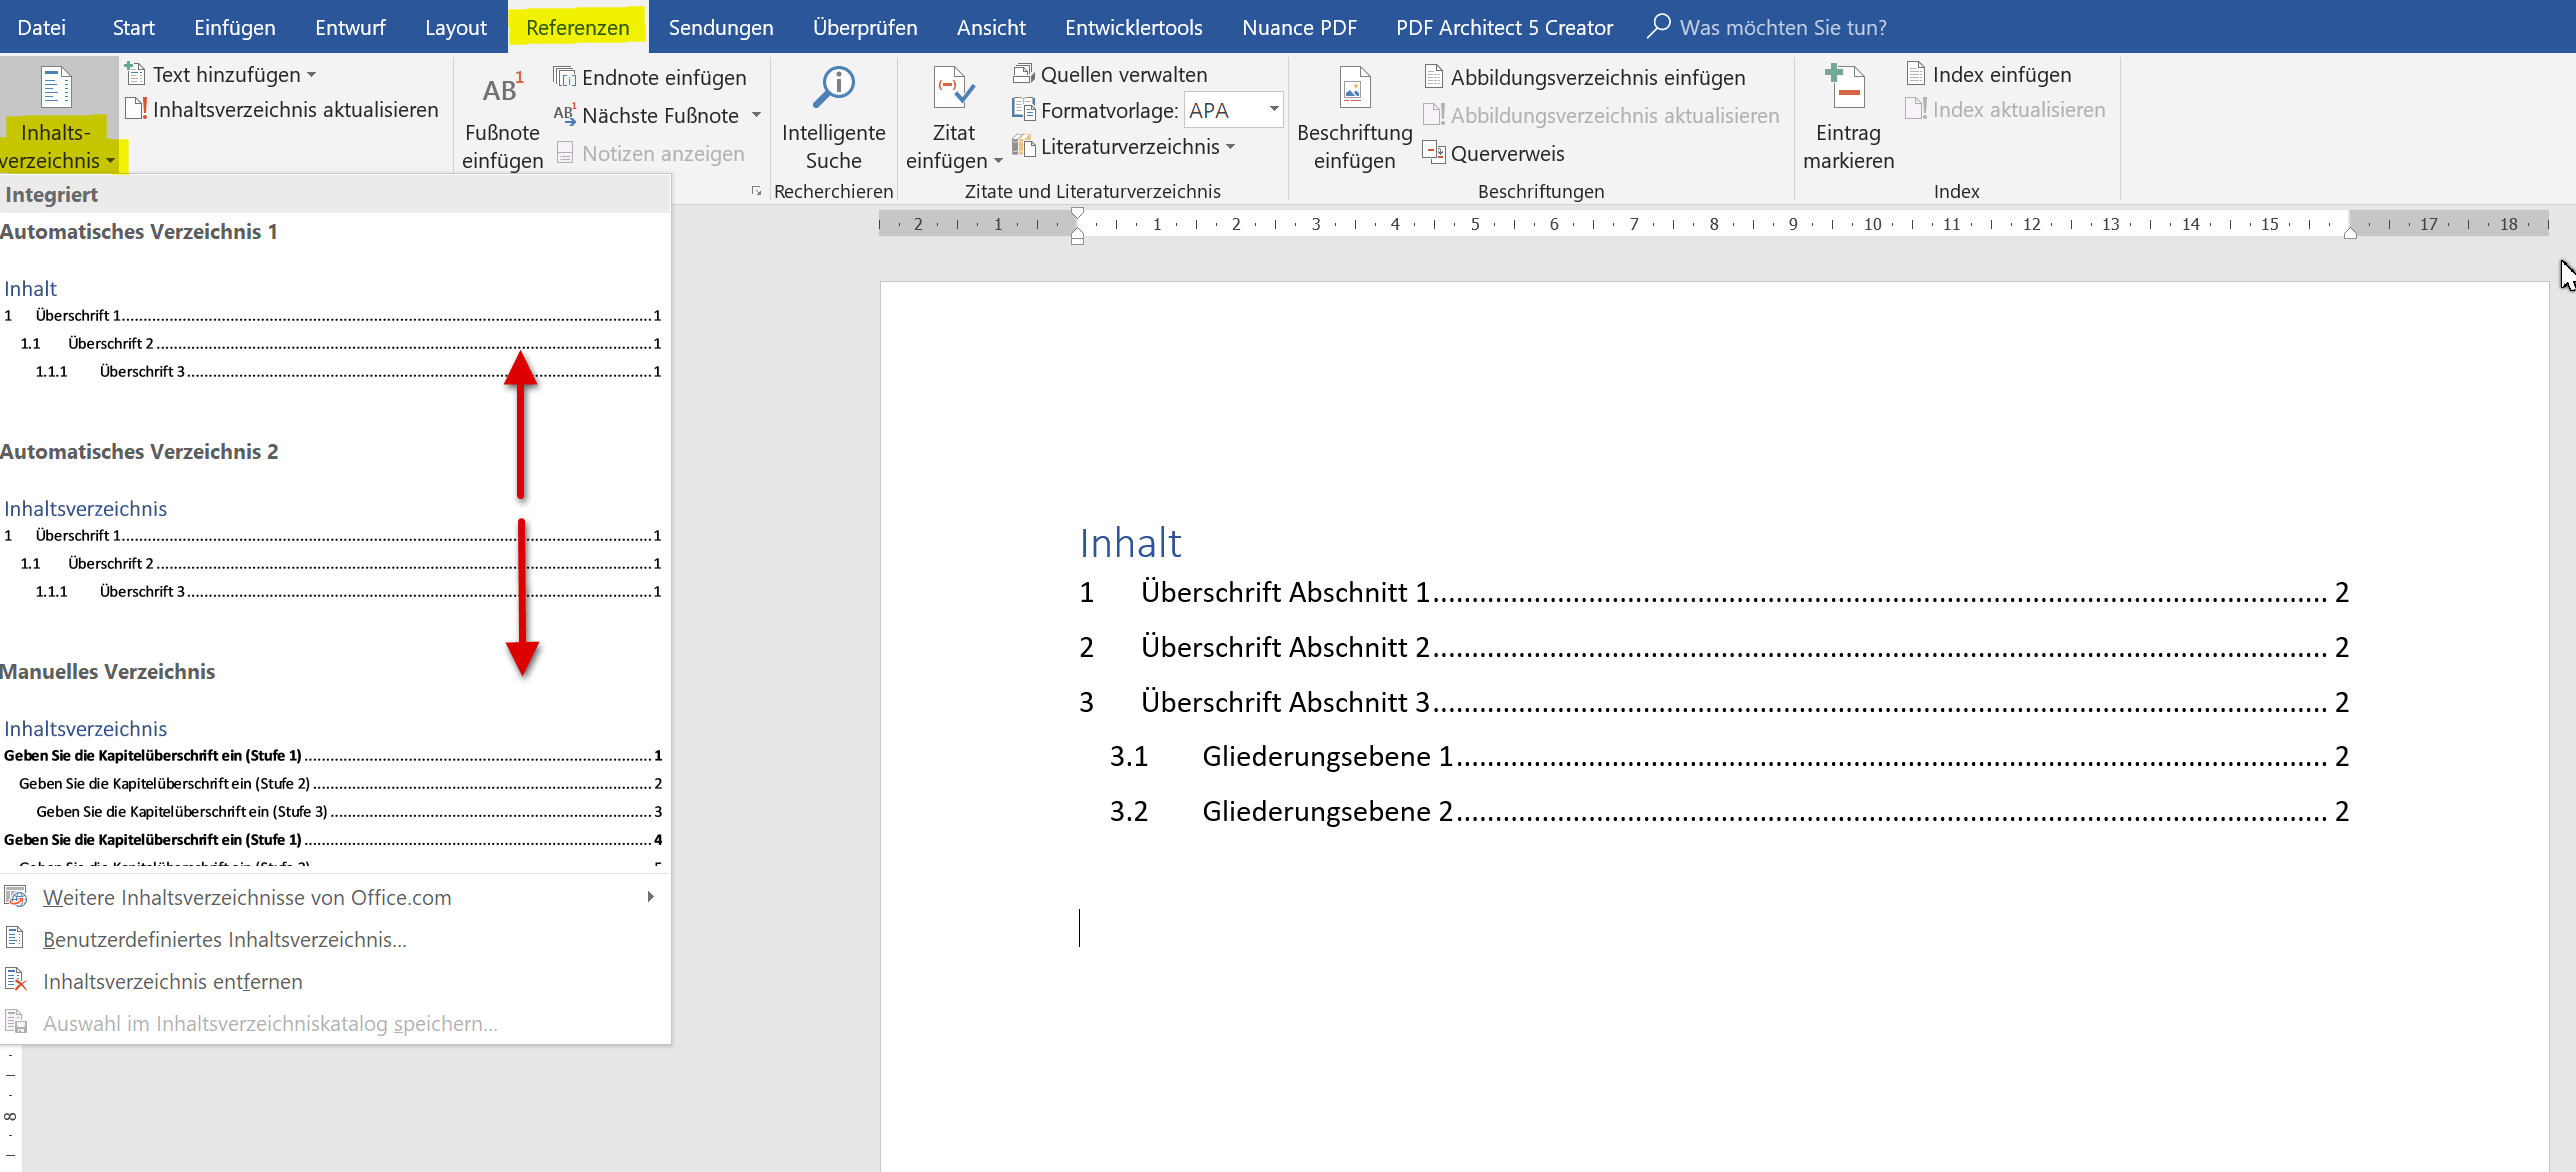
Now that we have completed the headings of the first and second levels, we can build into the very first empty page created at the beginning.
- For this we simply place the cursor on top of the first page
- Then click on “Table of Contents” in the “References” tab
Here you can now select an existing style sheet (usually enough), or you can create a completely new template according to your own ideas.
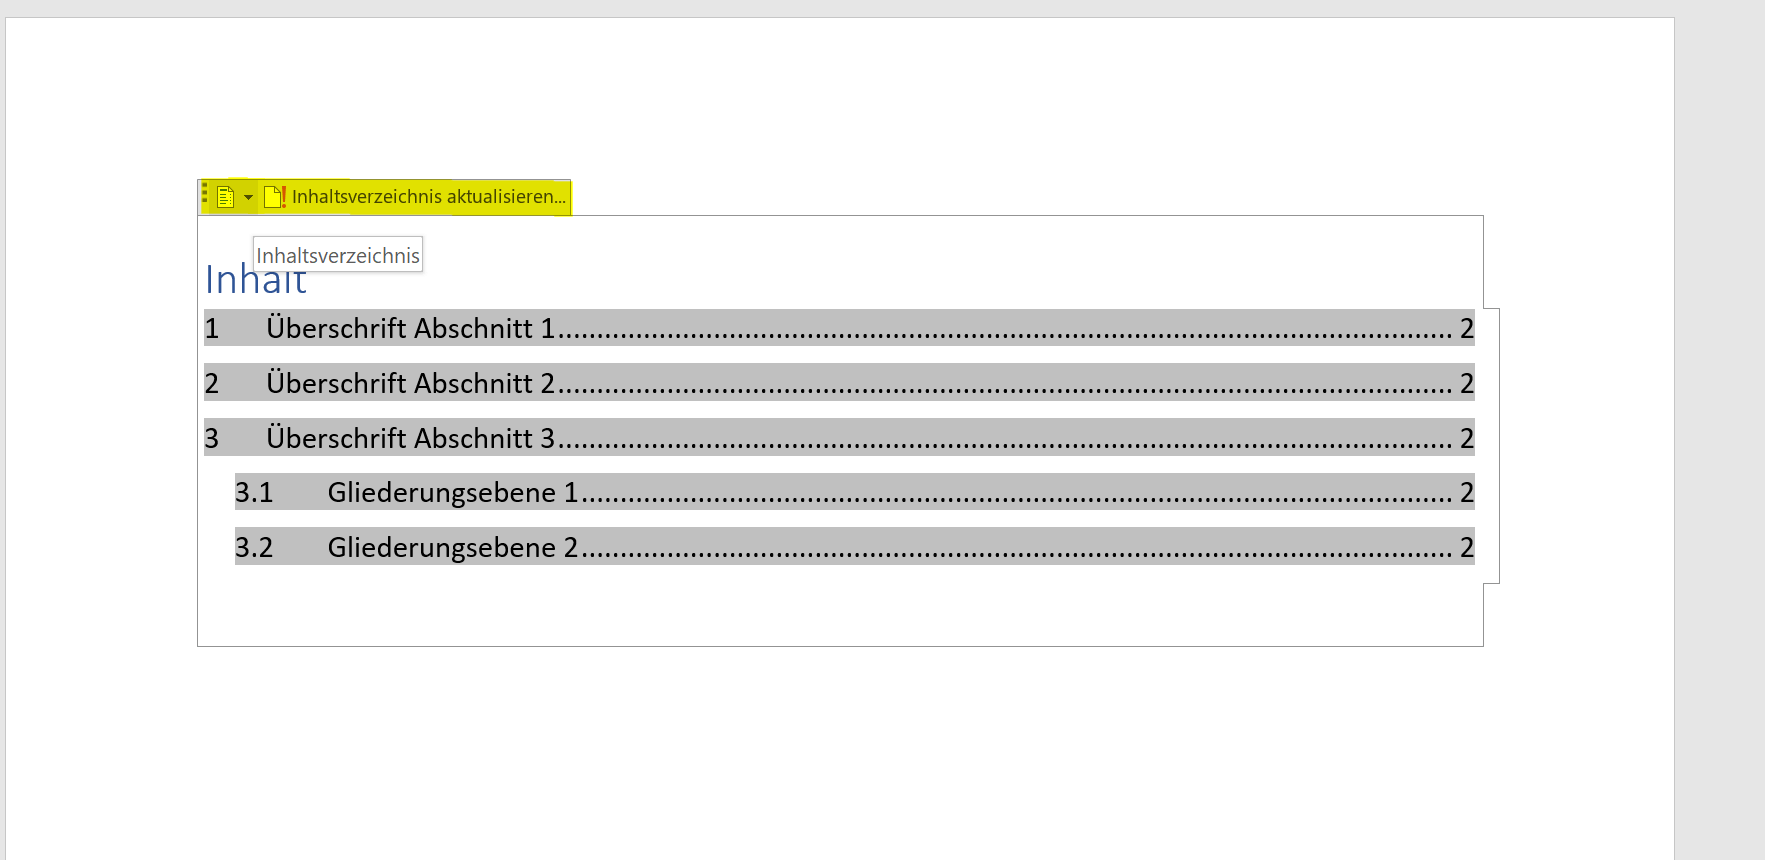
Of course, if you later make changes to the document, you can easily update it by going to the table of contents and clicking Update Table of Contents
See picture: (click to enlarge)
Insert table of contents:
Popular Posts:
Ad-free home network: Install Pi-hole on Windows
Say goodbye to ads on smart TVs and in apps: Pi-hole software turns your Windows laptop into a network filter. This article explains step-by-step how to install it via Docker and configure the necessary DNS settings in your FRITZ!Box.
How to tune your FRITZ!Box into a professional call server
A professional telephone system can be built using a FRITZ!Box and a laptop. This article shows step by step how to use the free software "Phoner" to schedule announcements and record calls – including important legal information (§ 201 StGB).
Why to-do lists are a waste of time
Do you feel unproductive at the end of the day, even though you've worked hard? Your to-do list is to blame. It tempts you to focus on easy tasks and ignores your limited time. This article explains why lists are "self-deception" and why professionals use a calendar instead.
Smartphone Wi-Fi security: Public hotspots vs. home network
Is smartphone Wi-Fi a security risk? This article analyzes in detail threats such as evil twin attacks and explains protective measures for when you're on the go. We also clarify why home Wi-Fi is usually secure and how you can effectively separate your smart home from sensitive data using a guest network.
Warum dein Excel-Kurs Zeitverschwendung ist – was du wirklich lernen solltest!
Hand aufs Herz: Wann hast du zuletzt eine komplexe Excel-Formel ohne Googeln getippt? Eben. KI schreibt heute den Code für dich. Erfahre, warum klassische Excel-Trainings veraltet sind und welche 3 modernen Skills deinen Marktwert im Büro jetzt massiv steigern.
Cybersicherheit: Die 3 größten Fehler, die 90% aller Mitarbeiter machen
Hacker brauchen keine Codes, sie brauchen nur einen unaufmerksamen Mitarbeiter. Von Passwort-Recycling bis zum gefährlichen Klick: Wir zeigen die drei häufigsten Fehler im Büroalltag und geben praktische Tipps, wie Sie zur menschlichen Firewall werden.


