Disable and add Windows 11 startup programs
Whether it’s Windows 10 or Windows 11. Over time, more and more programs somehow cheat their way into the autostart as if by magic, and thus not only slow down the system start, but can also slow down ongoing operations, depending on the hardware configuration. In this little tutorial we would like to briefly explain how you can add and remove startup programs in Windows 11 and thus have better control over the system.
Disable Windows 11 startup programs
Disable Windows 11 startup programs
As usual, there are several ways to get there. I would like to briefly address two of them here:
Method 1: Using Task Manager
Task Manager is a useful tool in Windows 11 that allows you to monitor and control various aspects of your system, including startup programs. Here is a step-by-step guide on how to remove startup programs using Task Manager:
- Open the Task Manager: right-click the taskbar and select “Task Manager” from the context menu, or press the key combination Ctrl + Shift + Esc.
- Select the Startup tab: In the Task Manager window, click the Startup tab to view a list of all programs that start automatically when you start your computer.
- Look through the list of startup programs until you find the program you want to remove.
- Click on the program to highlight it, then click the Disable button. This removes the program from the list of startup programs so that it no longer starts automatically when you start your computer.
- To ensure that the program no longer starts automatically, restart your computer.
see fig. (click to enlarge)


Method 2: Using the Windows Startup folder
Another way to remove startup programs in Windows 11 is to open the Startup folder and delete the offending programs from there. To do this, proceed as follows:
- Open the Startup folder: Click Windows key + R to open the Run dialog. Type “shell:startup” (without the quotes) and click OK. This will open the Startup folder.
- Browse the Startup folder until you find the program you want to remove.
- Right-click the program and select “Delete” from the context menu. This removes the program from the Startup folder so that it no longer starts automatically when you start your computer.
- To ensure that the program no longer starts automatically, restart your computer.
That was it already. The more unnecessary ballast you throw overboard, the faster your system will start up and be fully operational. Please note, however, that removing startup programs may affect the functioning of your system. If you are unsure about removing a program, I recommend disabling it first and testing if it causes any problems before removing it completely.
As usual, there are several ways to get there. I would like to briefly address two of them here:
Method 1: Using Task Manager
Task Manager is a useful tool in Windows 11 that allows you to monitor and control various aspects of your system, including startup programs. Here is a step-by-step guide on how to remove startup programs using Task Manager:
- Open the Task Manager: right-click the taskbar and select “Task Manager” from the context menu, or press the key combination Ctrl + Shift + Esc.
- Select the Startup tab: In the Task Manager window, click the Startup tab to view a list of all programs that start automatically when you start your computer.
- Look through the list of startup programs until you find the program you want to remove.
- Click on the program to highlight it, then click the Disable button. This removes the program from the list of startup programs so that it no longer starts automatically when you start your computer.
- To ensure that the program no longer starts automatically, restart your computer.
see fig. (click to enlarge)
Method 2: Using the Windows Startup folder
Another way to remove startup programs in Windows 11 is to open the Startup folder and delete the offending programs from there. To do this, proceed as follows:
- Open the Startup folder: Click Windows key + R to open the Run dialog. Type “shell:startup” (without the quotes) and click OK. This will open the Startup folder.
- Browse the Startup folder until you find the program you want to remove.
- Right-click the program and select “Delete” from the context menu. This removes the program from the Startup folder so that it no longer starts automatically when you start your computer.
- To ensure that the program no longer starts automatically, restart your computer.
That was it already. The more unnecessary ballast you throw overboard, the faster your system will start up and be fully operational. Please note, however, that removing startup programs may affect the functioning of your system. If you are unsure about removing a program, I recommend disabling it first and testing if it causes any problems before removing it completely.
Add Windows 11 startup programs
Add Windows 11 startup programs
Of course, in Windows 11 you can not only remove but also add startup programs to ensure that they start automatically when you boot your computer. Here is a step-by-step guide on how to add startup programs:
- Open the Startup folder: Click Windows key + R to open the Run dialog. Type “shell:startup” (without the quotes) and click OK. This will open the Startup folder.
- Open the Start menu: Click the Windows key to open the Start menu.
- Locate the program in the list or type the program name in the Start menu search box. Once you find the program, right-click it and choose “Open File Location” from the context menu.
- Right-click the program’s shortcut in the File Path window and select “Copy” from the context menu.
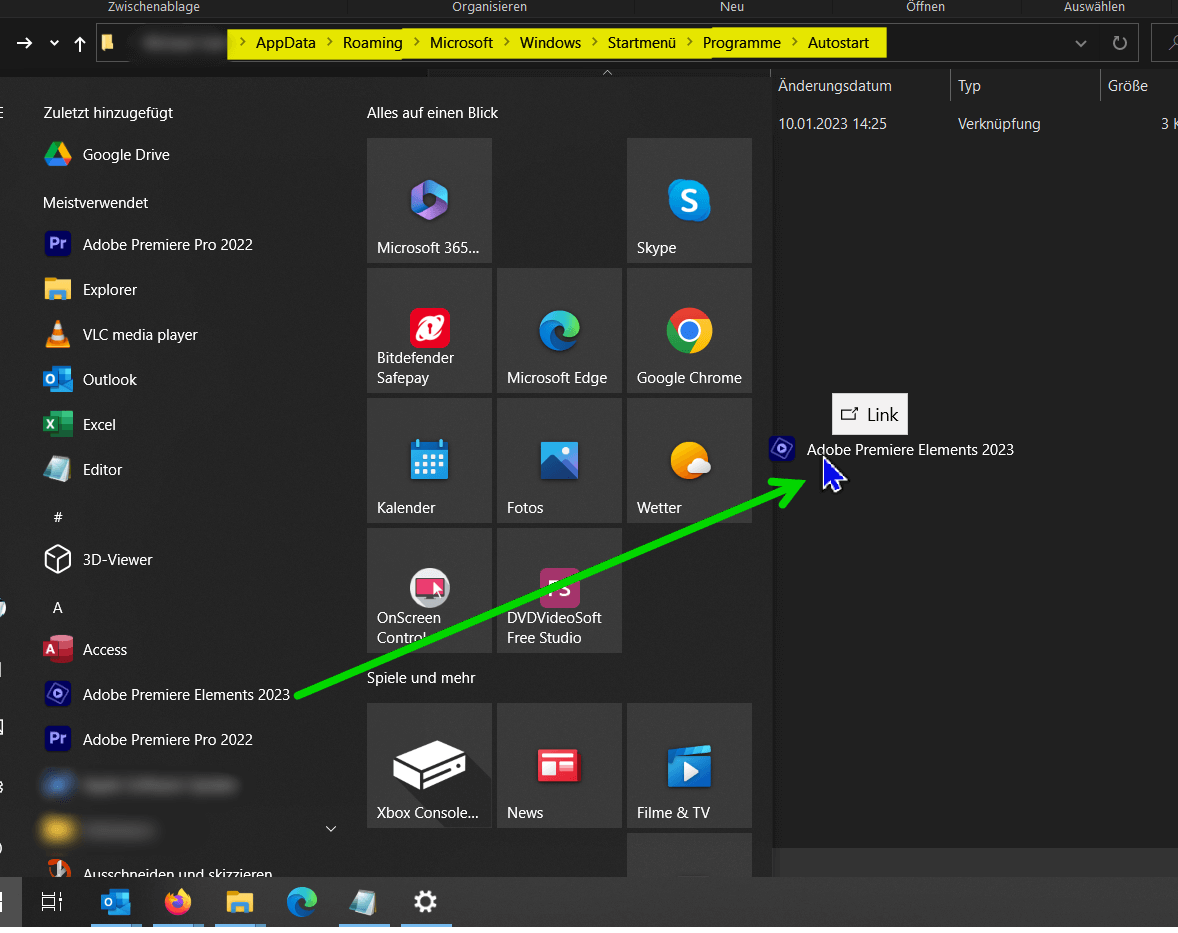
Add the program to the Startup folder: Right-click an empty area of the Startup folder and choose New, then Shortcut from the context menu. Paste the copied file path of the program into the “Location” field and click “Next“. Enter a name for the shortcut and click Finish.
Right-click the program’s shortcut in the Startup folder and select Properties from the context menu. Verify that the file path and shortcut name are correct.
Tip: It is even easier if you are in the start menu with your programs and hold down the left mouse button and drag the program from the start menu to the open autostart folder (drag & drop). The program remains in the start menu, but a shortcut is automatically created in the startup folder.
see fig. (click to enlarge)
To ensure that the program starts automatically when you start your computer, restart your computer.
Please note that adding startup programs can also affect the functioning of your system, as can removing startup programs. Make sure you understand what the program is doing and that it’s safe before adding it to the Startup folder. Because too many programs that start automatically with Windows only consume useless resources!
Of course, in Windows 11 you can not only remove but also add startup programs to ensure that they start automatically when you boot your computer. Here is a step-by-step guide on how to add startup programs:
- Open the Startup folder: Click Windows key + R to open the Run dialog. Type “shell:startup” (without the quotes) and click OK. This will open the Startup folder.
- Open the Start menu: Click the Windows key to open the Start menu.
- Locate the program in the list or type the program name in the Start menu search box. Once you find the program, right-click it and choose “Open File Location” from the context menu.
- Right-click the program’s shortcut in the File Path window and select “Copy” from the context menu.
Add the program to the Startup folder: Right-click an empty area of the Startup folder and choose New, then Shortcut from the context menu. Paste the copied file path of the program into the “Location” field and click “Next“. Enter a name for the shortcut and click Finish.
Right-click the program’s shortcut in the Startup folder and select Properties from the context menu. Verify that the file path and shortcut name are correct.
Tip: It is even easier if you are in the start menu with your programs and hold down the left mouse button and drag the program from the start menu to the open autostart folder (drag & drop). The program remains in the start menu, but a shortcut is automatically created in the startup folder.
see fig. (click to enlarge)
To ensure that the program starts automatically when you start your computer, restart your computer.
Please note that adding startup programs can also affect the functioning of your system, as can removing startup programs. Make sure you understand what the program is doing and that it’s safe before adding it to the Startup folder. Because too many programs that start automatically with Windows only consume useless resources!
Popular Posts:

So sieht das wirklich perfekte Homeoffice-Setup für 2026 aus
Ihr Homeoffice ist veraltet? Steigern Sie 2026 Produktivität & Gesundheit. Unser Guide zeigt das perfekte Setup: von ergonomischen Stühlen und 4K-Webcams bis zu Mesh-WLAN und Kabelmanagement. So investieren Sie in Ihre Karriere.

Internet, Telefon & TV: Die besten Komplettpakete
Internet, TV & Telefon aus einer Hand? Wir vergleichen die Komplettpakete von Telekom, Vodafone, O2 & 1&1. Wer punktet bei Speed, TV-Komfort (MagentaTV vs. GigaTV) und Preis? So finden Sie das beste Triple-Play-Angebot für Ihre Adresse.

5 Anzeichen, dass dein Chef dich im Homeoffice digital überwacht
Nur weil du im Homeoffice bist, heißt das nicht, dass dir niemand zusieht. "Bossware" ist auf dem Vormarsch. Wir zeigen 5 subtile Anzeichen für digitale Überwachung – von "Teams-Status"-Kult bis zu verdächtigen IT-Tools. So erkennst du die Warnsignale und schützt deine Karriere.

Schluss mit dem Tool-Chaos: 5 Apps, die Euer Office wirklich produktiver machen
Schluss mit digitaler Reibung: Diese 5 Apps machen Ihr Büro wirklich produktiver. Entdecken Sie, wie Asana, Loom, Notion, Zapier und Slack die Effizienz steigern, Meetings reduzieren und Ihr Team smarter vernetzen – wenn man sie richtig einsetzt.

AI in everyday office life: Your new invisible colleague
AI won't replace you – but those who use it will have a competitive edge. Make AI your co-pilot in the office! We'll show you four concrete hacks for faster emails, better meeting notes, and solved Excel problems. Get started today, no IT degree required.

Fünf vor Zwölf: Wie Sie erkennen, dass Sie kurz vor dem Burnout stehen
Erschöpfung ist normal, doch wenn das Wochenende keine Erholung mehr bringt und Zynismus die Motivation ersetzt, stehen Sie kurz vor dem Burnout. Erfahren Sie, welche 7 Warnsignale Sie niemals ignorieren dürfen und warum es jetzt lebenswichtig ist, die Notbremse zu ziehen
Offers 2024: Word & Excel Templates


Popular Posts:
So sieht das wirklich perfekte Homeoffice-Setup für 2026 aus
Ihr Homeoffice ist veraltet? Steigern Sie 2026 Produktivität & Gesundheit. Unser Guide zeigt das perfekte Setup: von ergonomischen Stühlen und 4K-Webcams bis zu Mesh-WLAN und Kabelmanagement. So investieren Sie in Ihre Karriere.
Internet, Telefon & TV: Die besten Komplettpakete
Internet, TV & Telefon aus einer Hand? Wir vergleichen die Komplettpakete von Telekom, Vodafone, O2 & 1&1. Wer punktet bei Speed, TV-Komfort (MagentaTV vs. GigaTV) und Preis? So finden Sie das beste Triple-Play-Angebot für Ihre Adresse.
5 Anzeichen, dass dein Chef dich im Homeoffice digital überwacht
Nur weil du im Homeoffice bist, heißt das nicht, dass dir niemand zusieht. "Bossware" ist auf dem Vormarsch. Wir zeigen 5 subtile Anzeichen für digitale Überwachung – von "Teams-Status"-Kult bis zu verdächtigen IT-Tools. So erkennst du die Warnsignale und schützt deine Karriere.
Schluss mit dem Tool-Chaos: 5 Apps, die Euer Office wirklich produktiver machen
Schluss mit digitaler Reibung: Diese 5 Apps machen Ihr Büro wirklich produktiver. Entdecken Sie, wie Asana, Loom, Notion, Zapier und Slack die Effizienz steigern, Meetings reduzieren und Ihr Team smarter vernetzen – wenn man sie richtig einsetzt.
AI in everyday office life: Your new invisible colleague
AI won't replace you – but those who use it will have a competitive edge. Make AI your co-pilot in the office! We'll show you four concrete hacks for faster emails, better meeting notes, and solved Excel problems. Get started today, no IT degree required.
Fünf vor Zwölf: Wie Sie erkennen, dass Sie kurz vor dem Burnout stehen
Erschöpfung ist normal, doch wenn das Wochenende keine Erholung mehr bringt und Zynismus die Motivation ersetzt, stehen Sie kurz vor dem Burnout. Erfahren Sie, welche 7 Warnsignale Sie niemals ignorieren dürfen und warum es jetzt lebenswichtig ist, die Notbremse zu ziehen
Offers 2024: Word & Excel Templates