Create Series Letters in Word
The function to create form letters Word actually has from the beginning, and of course always offers when the content of a message is always the same, and only the recipient changes.
But as long as there is this function, as long as there are always uncertainties about how fields must be inserted, and how the data source for the e-mail addresses and the salutation because now works exactly.
In our article we describe step by step how to create form letters with Microsoft Word – Office 365 and what to look for.
1. Prepare/Choose the address list
1. Prepare/Choose the address list
In order for Word to be able to create form letters, it needs a data source / address list that can be accessed.
In this all necessary information like:
- salutation
- Name first Name
- House no.
- Postcode / town
be saved.
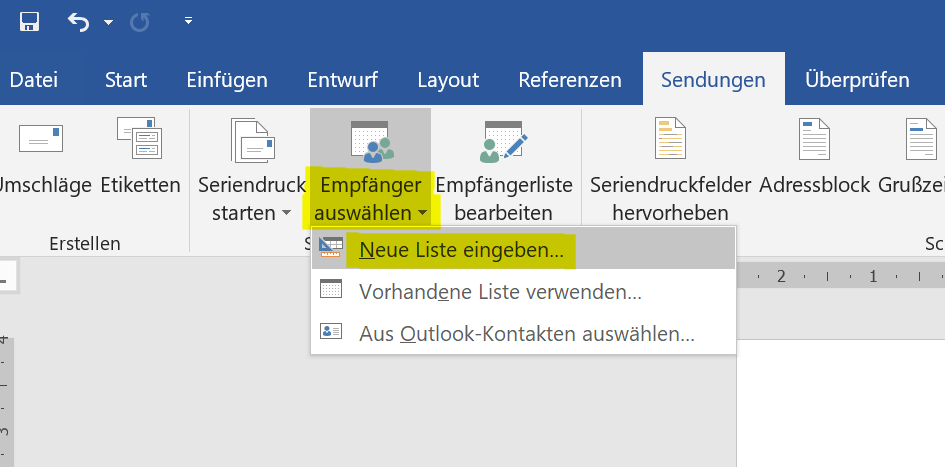
Basically, you can use almost any database where the contacts are reasonably organized. This can be an Excel list, or an Access database, or even your Outlook contact list. If you have not prepared yet, you can set it up under Word, and then save it later as an Access file.
See picture: (click to enlarge)
Important:
The main thing about the database is that it has a clean structure. What does that mean in columns and lines already mentioned above? Information is organized.
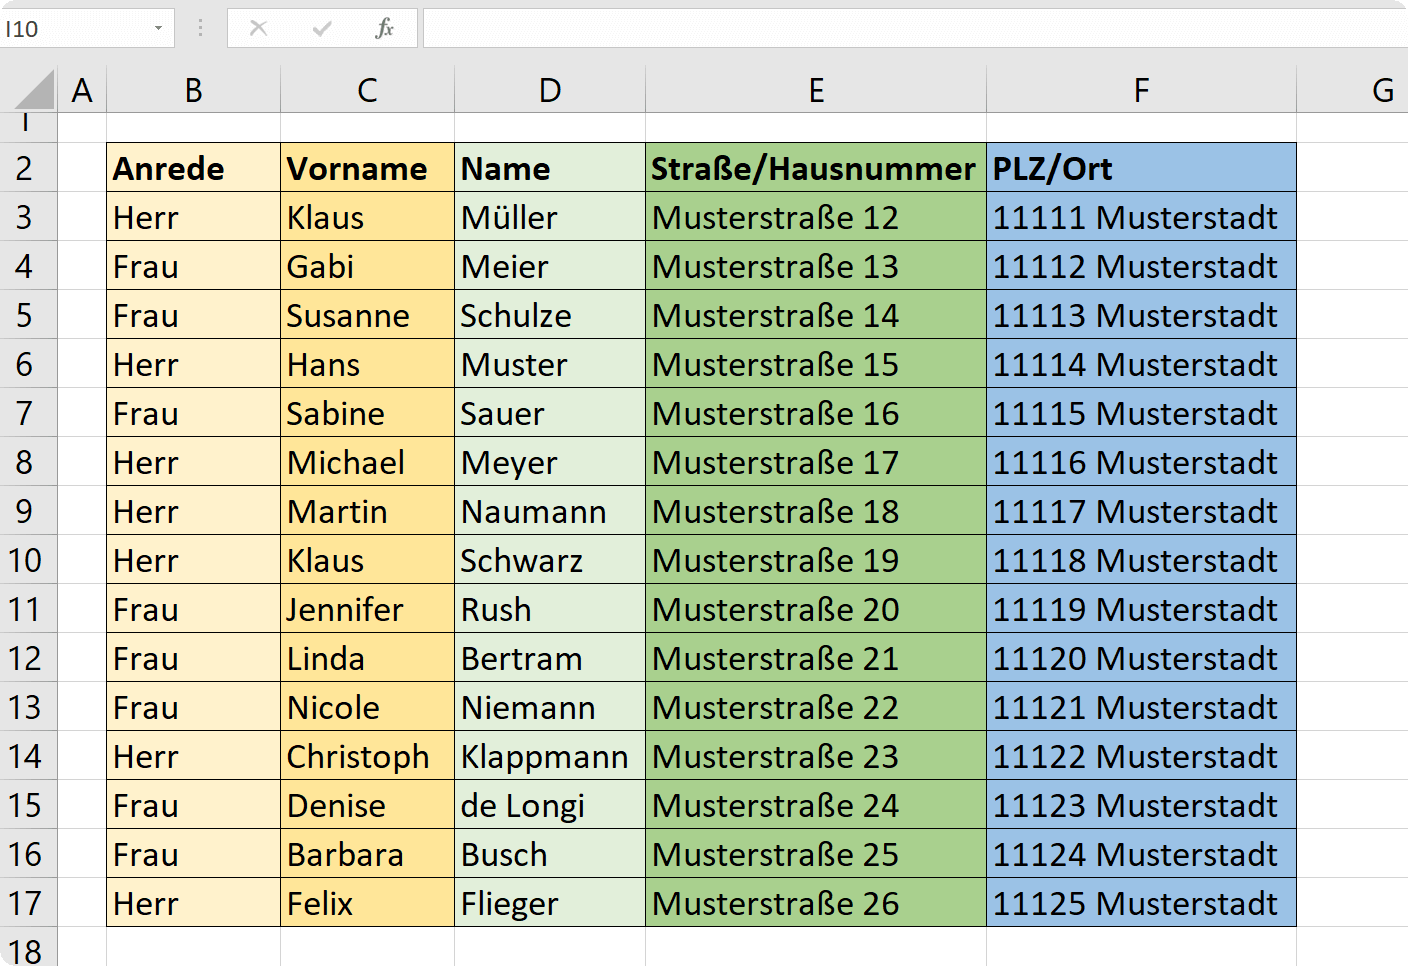
For our example, we just take an Excel list with fictitious names and addresses to illustrate. Here you can see how the whole thing should be organized.
Of course, they are not just set to the columns shown here, but you can add as many others as you like. These will be available later in the selection of merge fields.
See picture: (click to enlarge)

If you also want to work with such an Excel list later, it is best to save it under a correspondingly clear name on your computer if you later need it again.
It certainly can not hurt to keep your contacts in a well-organized location.
In order for Word to be able to create form letters, it needs a data source / address list that can be accessed.
In this all necessary information like:
- salutation
- Name first Name
- House no.
- Postcode / town
be saved.
Basically, you can use almost any database where the contacts are reasonably organized. This can be an Excel list, or an Access database, or even your Outlook contact list. If you have not prepared yet, you can set it up under Word, and then save it later as an Access file.
See picture:
Important:
The main thing about the database is that it has a clean structure. What does that mean in columns and lines already mentioned above? Information is organized.
For our example, we just take an Excel list with fictitious names and addresses to illustrate. Here you can see how the whole thing should be organized.
Of course, they are not just set to the columns shown here, but you can add as many others as you like. These will be available later in the selection of merge fields.
See picture:
If you also want to work with such an Excel list later, it is best to save it under a correspondingly clear name on your computer if you later need it again.
It certainly can not hurt to keep your contacts in a well-organized location.
2. Insert the merge fields in the recipient field
2. Insert the merge fields in the recipient field
Now that we have completed a data source, we can already start creating our form letter.
So that the address field sits where it is supposed to sit, and later (for the mailing) fits into an envelope with a viewing window, we set the margins in the layout as follows:
- Above: 4.5 cm
- Left: 2.5 cm
- Right: 2.5 cm
- Below: 2.0 cm
- Gutter: 0.0 cm
- Gutter position: left
- Orientation: Portrait
Note:
On the topic “Letter templates” we also have a separate article that you can view here >>>
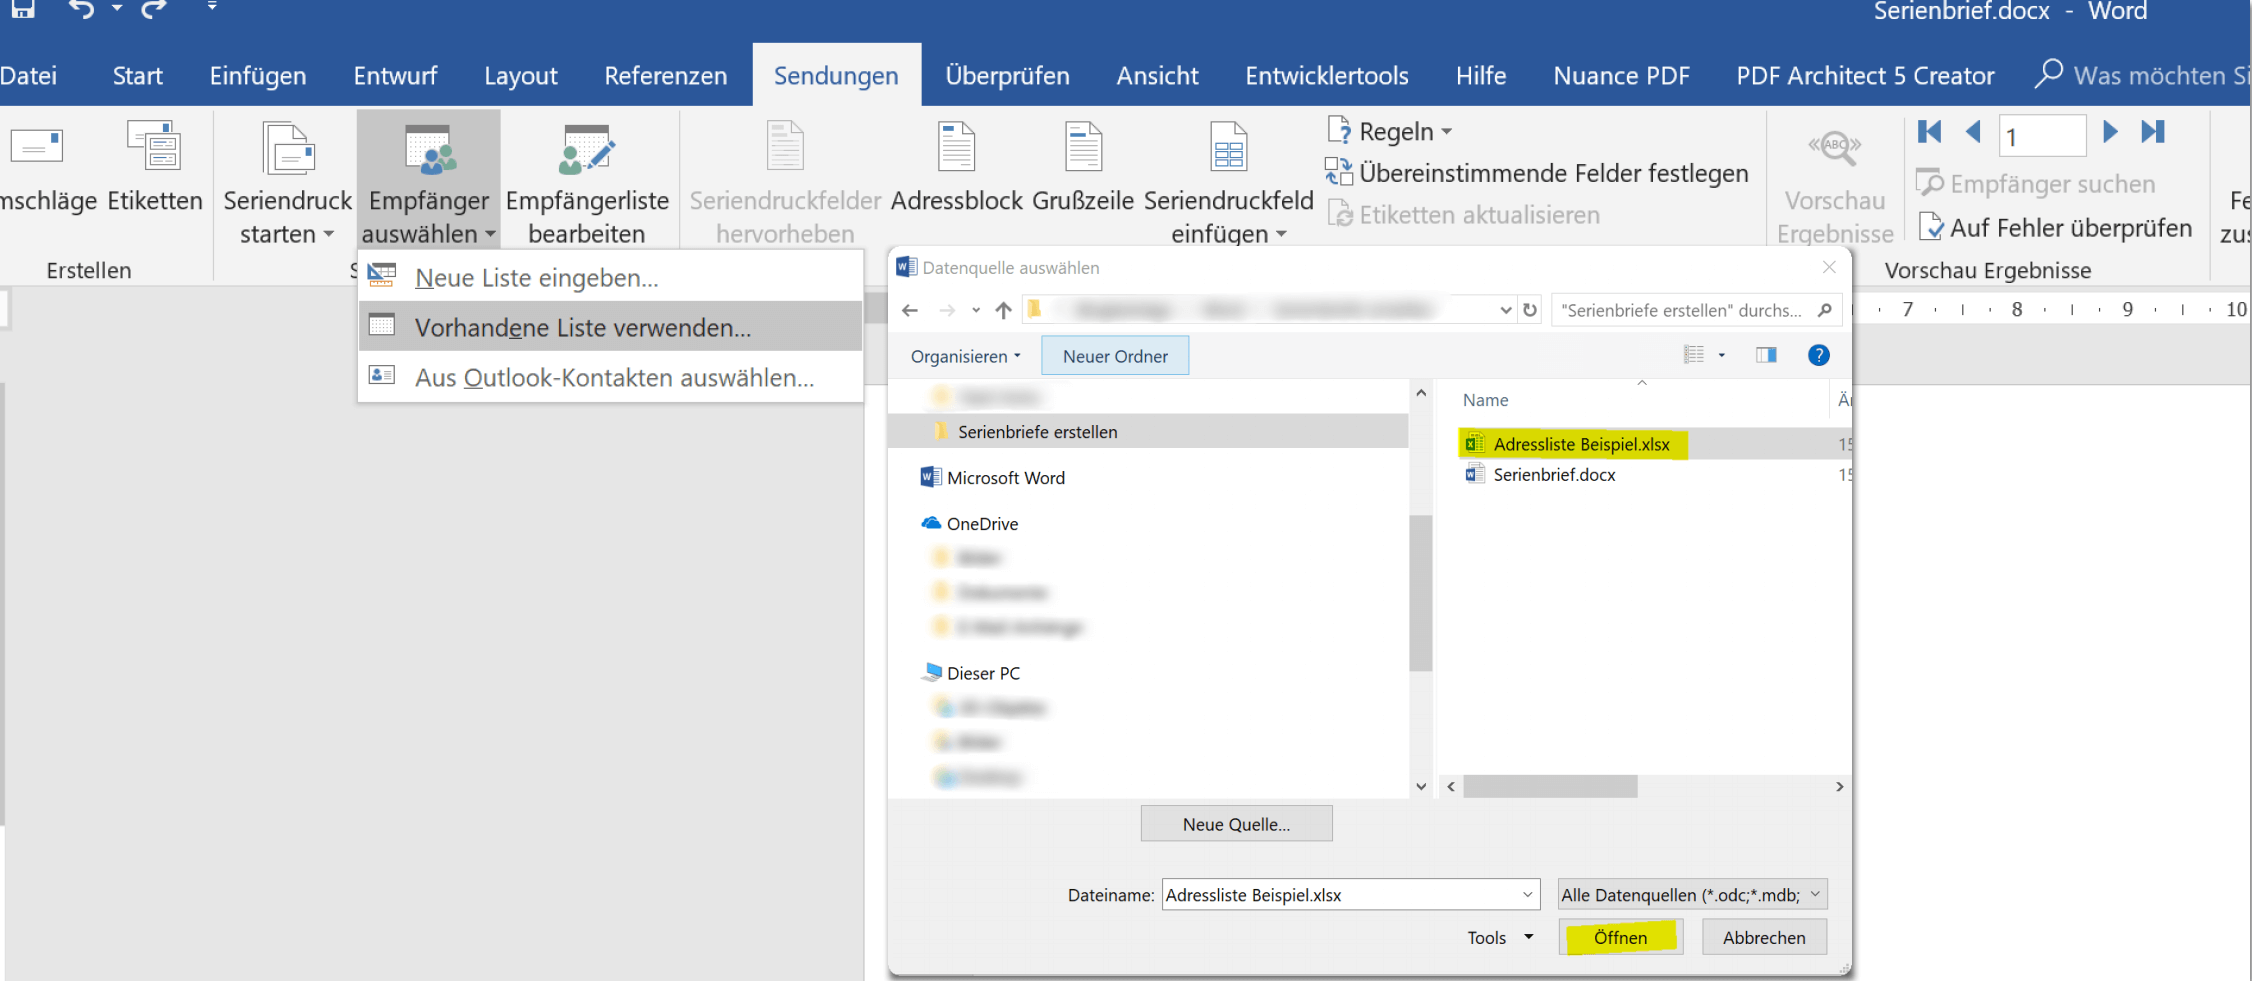
First, we’ll set the previously created data source.
To do this we go to the “Shipments” tab and select “Recipient” and then “Use Existing List” again. In the following dialog window, simply select your created list, and then confirm in the second window that our columns have headers.
See picture: (click to enlarge)
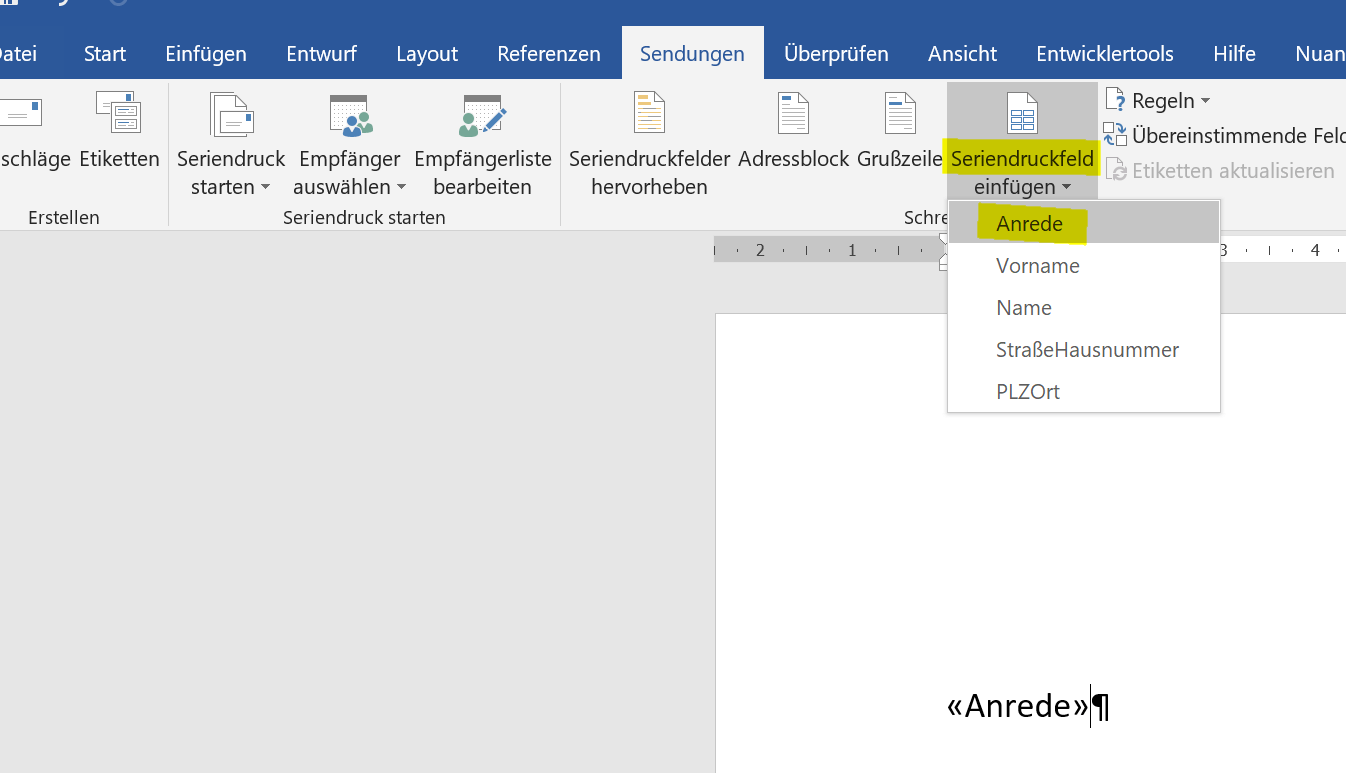
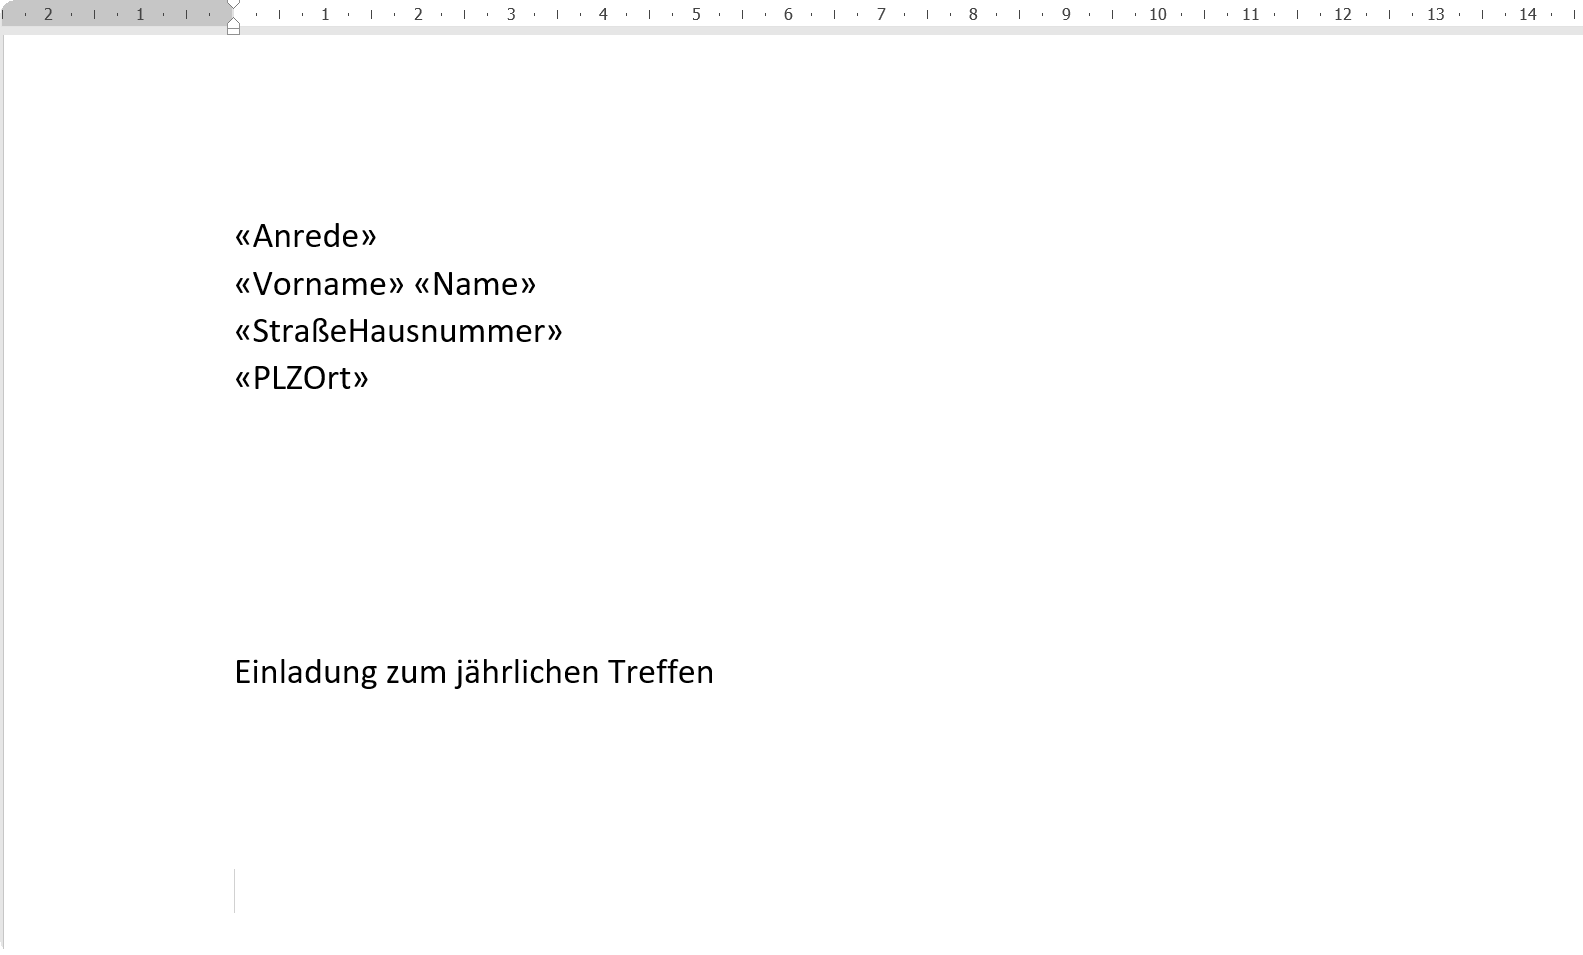
As a next step, we will insert our merge fields, starting with the field “Salutation”, and then below accordingly:
- first name
- Surname
- Street, house number
- Postcode / town
For this we go again in the tab “shipments” on “merge field insert” and select there “salutation” from.
Here you can also immediately see which merge fields are available. Namely exactly which of the column headings of our data source are the same.
See picture: (click to enlarge)
When the recipient field is finished, the placeholders of our column headers will be everywhere, and Word will automatically fill them with the corresponding entries.
See picture: (click to enlarge)
Now that we have completed a data source, we can already start creating our form letter.
So that the address field sits where it is supposed to sit, and later (for the mailing) fits into an envelope with a viewing window, we set the margins in the layout as follows:
- Above: 4.5 cm
- Left: 2.5 cm
- Right: 2.5 cm
- Below: 2.0 cm
- Gutter: 0.0 cm
- Gutter position: left
- Orientation: Portrait
Note:
On the topic “Letter templates” we also have a separate article that you can view here >>>
First, we’ll set the previously created data source.
To do this we go to the “Shipments” tab and select “Recipient” and then “Use Existing List” again. In the following dialog window, simply select your created list, and then confirm in the second window that our columns have headers.
See picture:
As a next step, we will insert our merge fields, starting with the field “Salutation”, and then below accordingly:
- first name
- Surname
- Street, house number
- Postcode / town
For this we go again in the tab “shipments” on “merge field insert” and select there “salutation” from.
Here you can also immediately see which merge fields are available. Namely exactly which of the column headings of our data source are the same.
See picture:
When the recipient field is finished, the placeholders of our column headers will be everywhere, and Word will automatically fill them with the corresponding entries.
See picture:
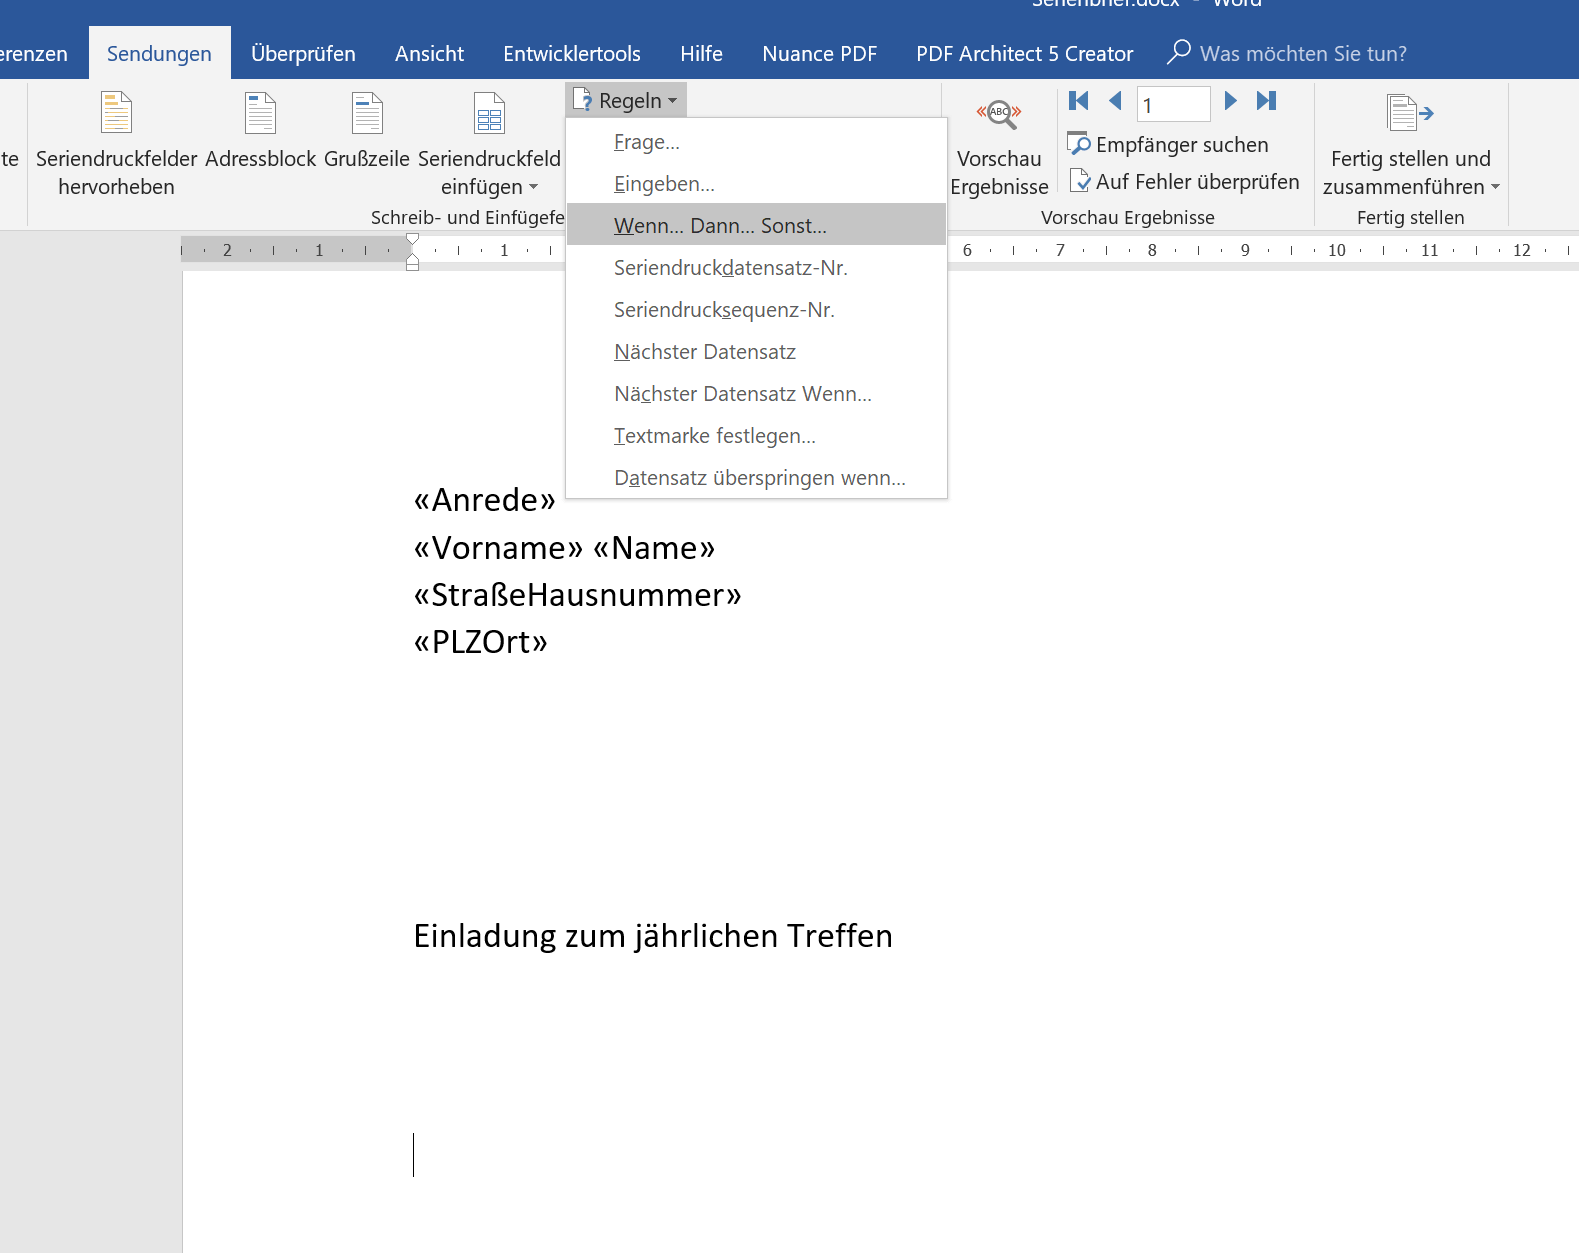
3. Set rules for salutation
3. Set rules for salutation
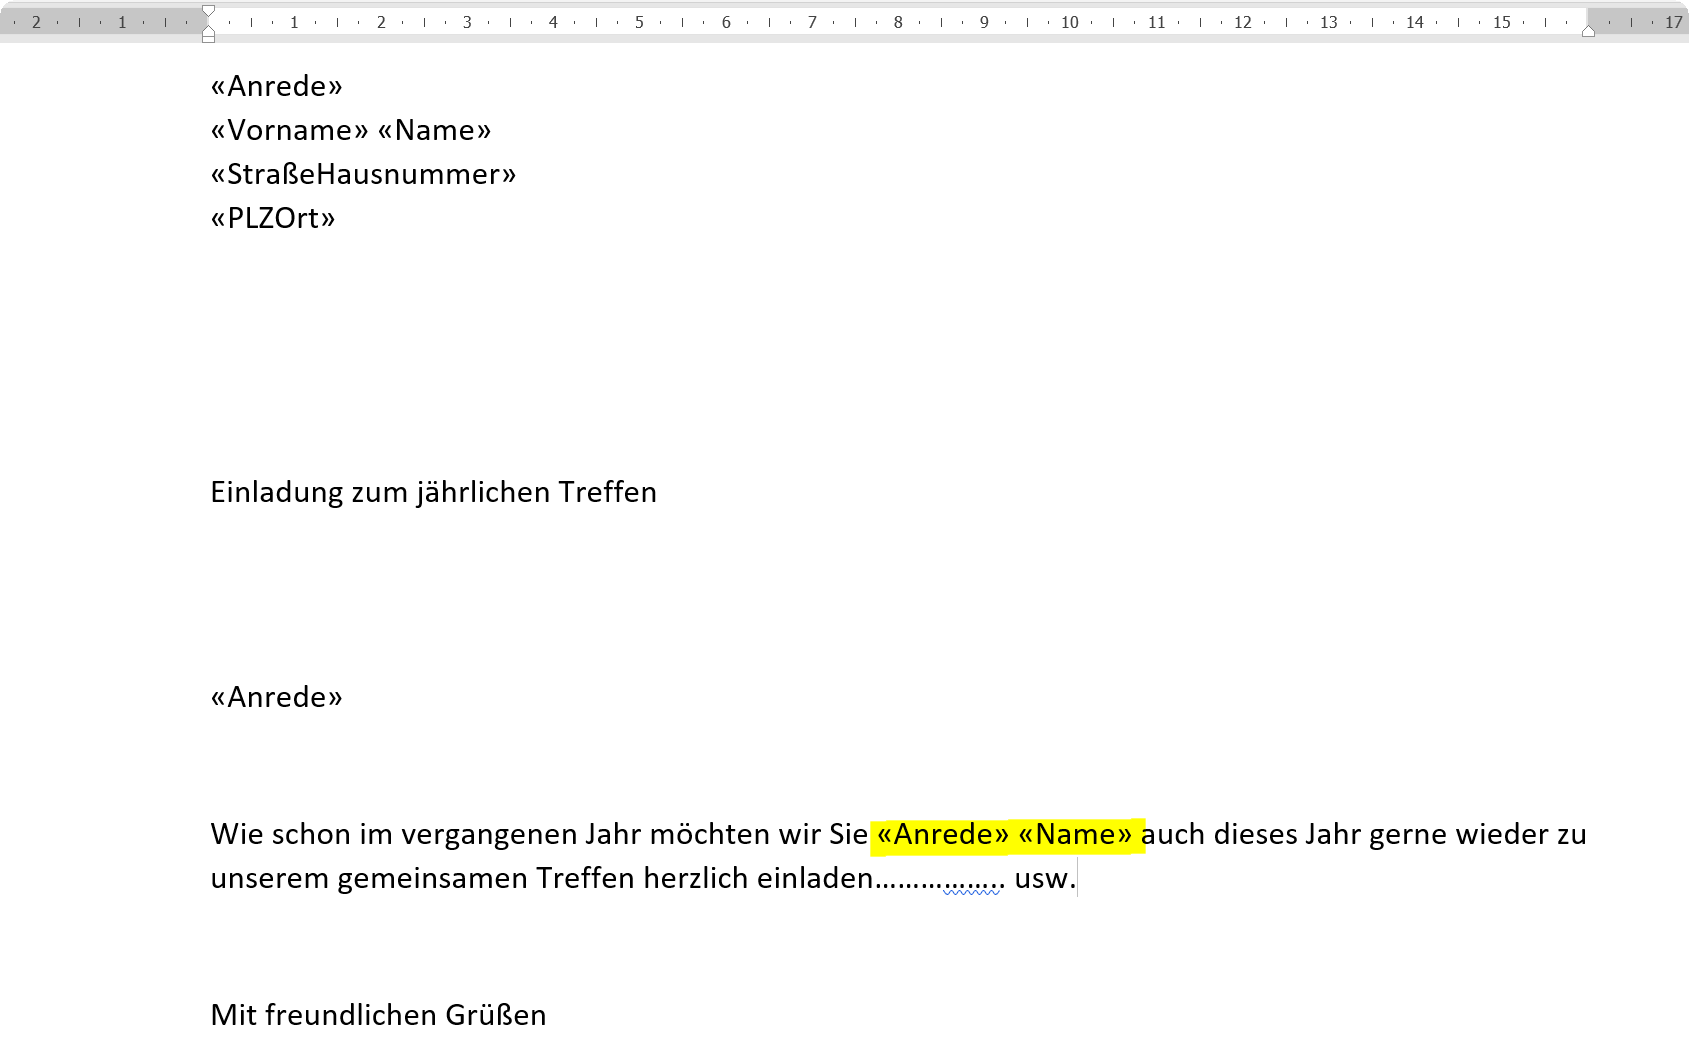
After we have inserted our letterhead with the appropriate merge fields and the subject, now comes the point where the salutation is concerned.
Now you could just type in “Dear Sir / Madam”, but that looks rather unprofessional and is also impersonal. The problem now emerging is “How should Word know who man and who is a woman” and then adjust the salutation accordingly?
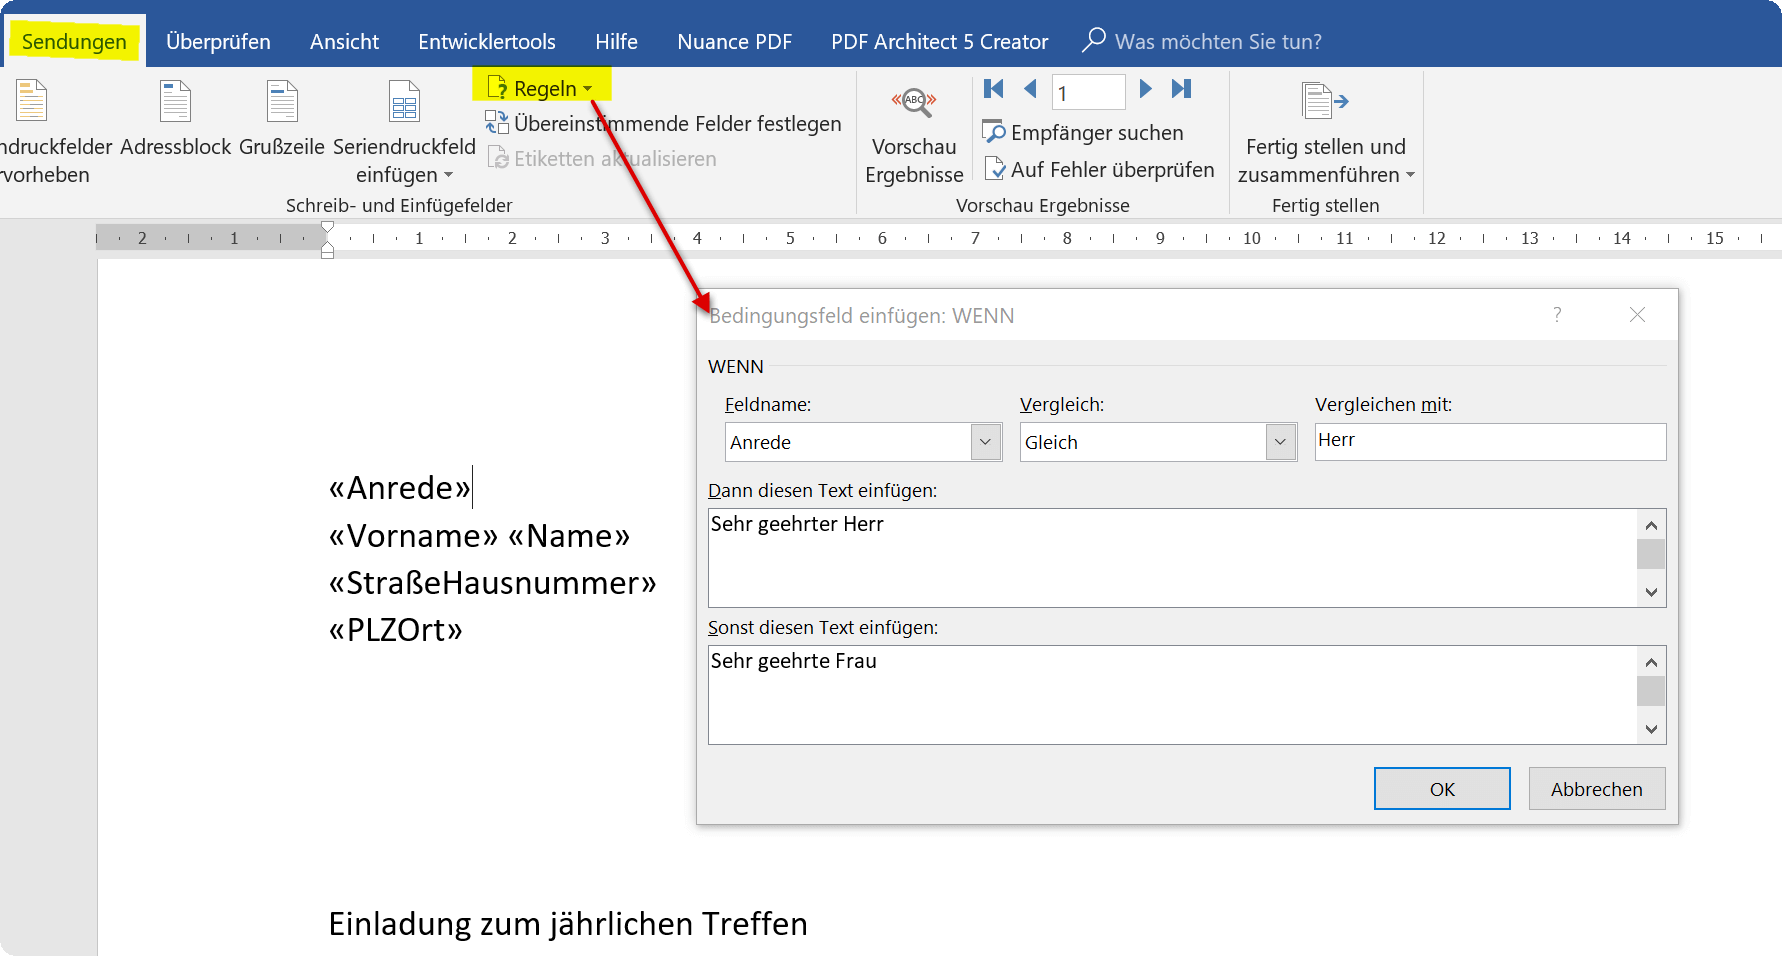
The solution is that we set rules for it. We do this (similar to Excel) with a “if – then – else” rule.
To do this, we go back to the “Shipments” tab and click on “Rules” and select “If … Then … Otherwise …”.
Here we can say: IF ANREDE = Mr. / THEN = Dear Mr. / OTHERS = Dear Mrs.
Of course, you can also extend this, which is especially useful if there is no specific contact person and, for example, you address an organization or a company.
Then you could set an additional rule that says: IF ANREDE = empty / THEN = Dear Sir or Madam, or IF ANREDE = Company / THEN = Ladies and Gentlemen. And the ELSE rule just leave blank.
So here you do not just have to rely on one single rule, you can set several.
See picture: (click to enlarge)
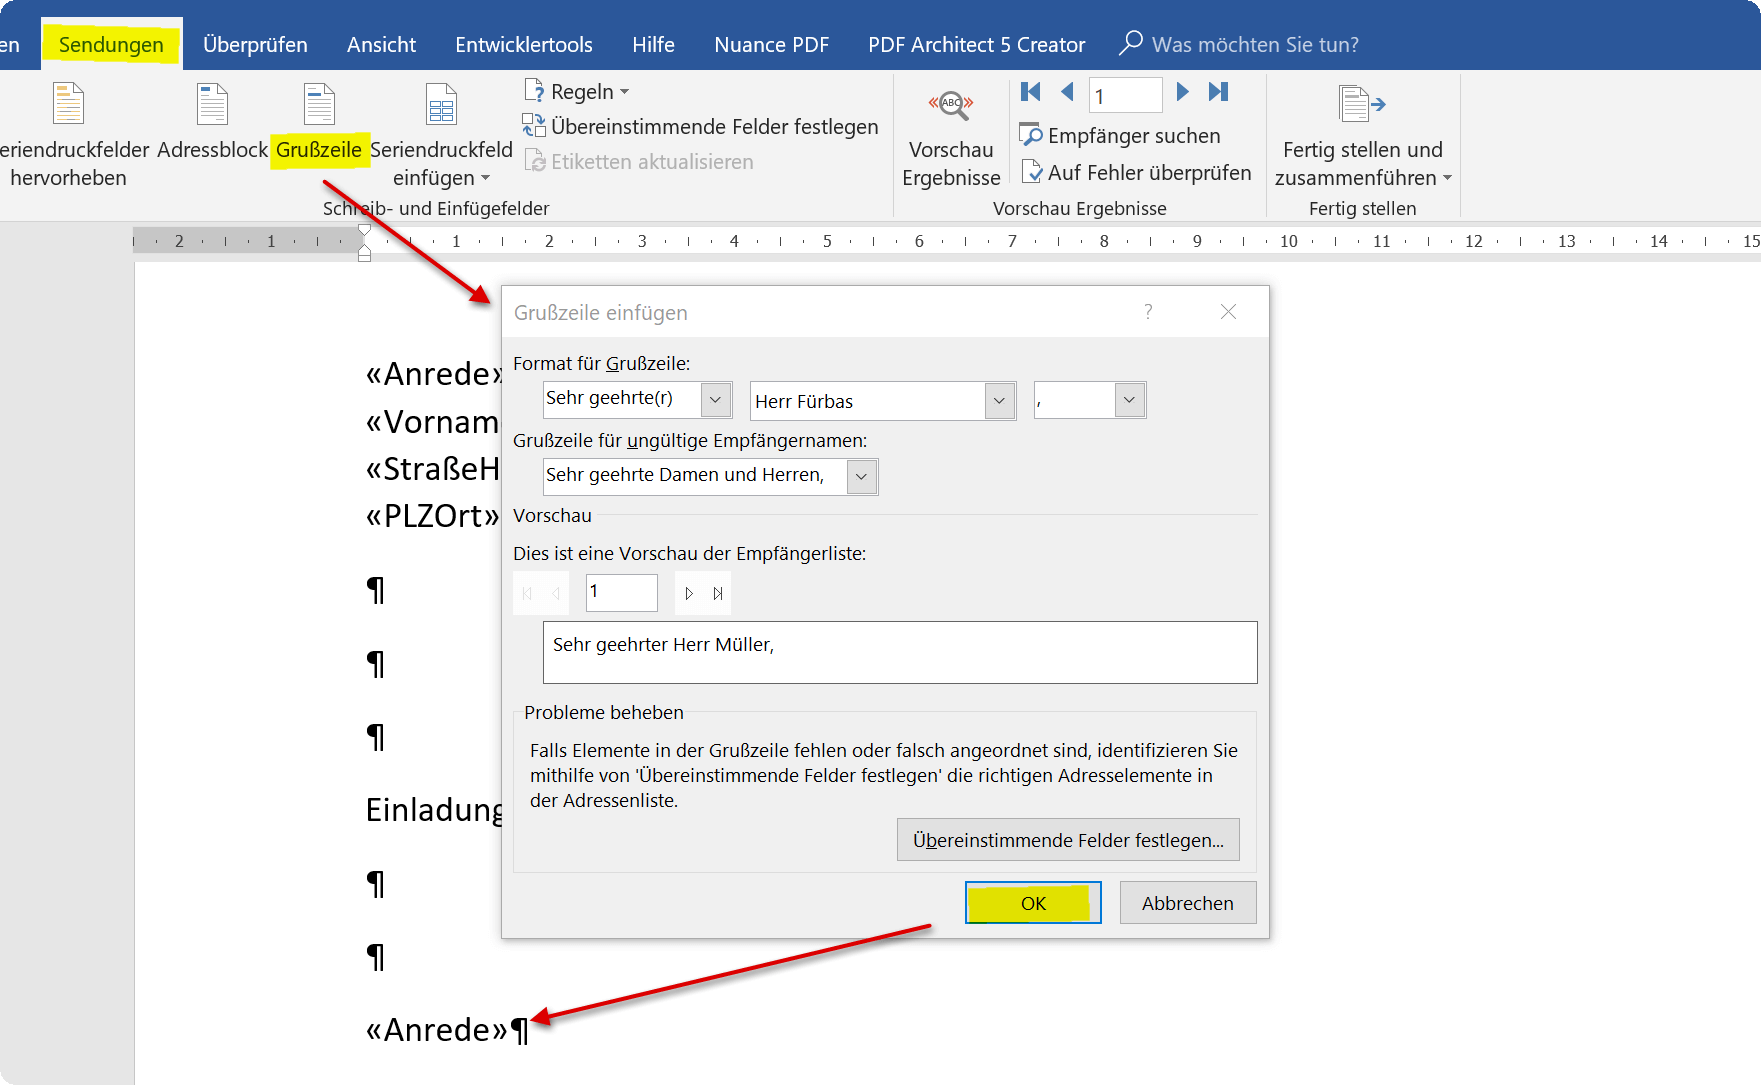
Now that the rule is set, we can position our cursor in the line where the salutation should be, and insert a greeting line.
Again, go back to the tab “Shipments” then “Greeting Line” and confirm with “OK”. You also have the possibility to check a preview of the respective salutation to see if the rule has been set correctly.
Of course, you can also use the merge fields everywhere in the flowing text to give the whole an even more personal touch. So is also gladly worked in advertising letters, which the reader is repeatedly addressed by his name.
See picture: (click to enlarge)
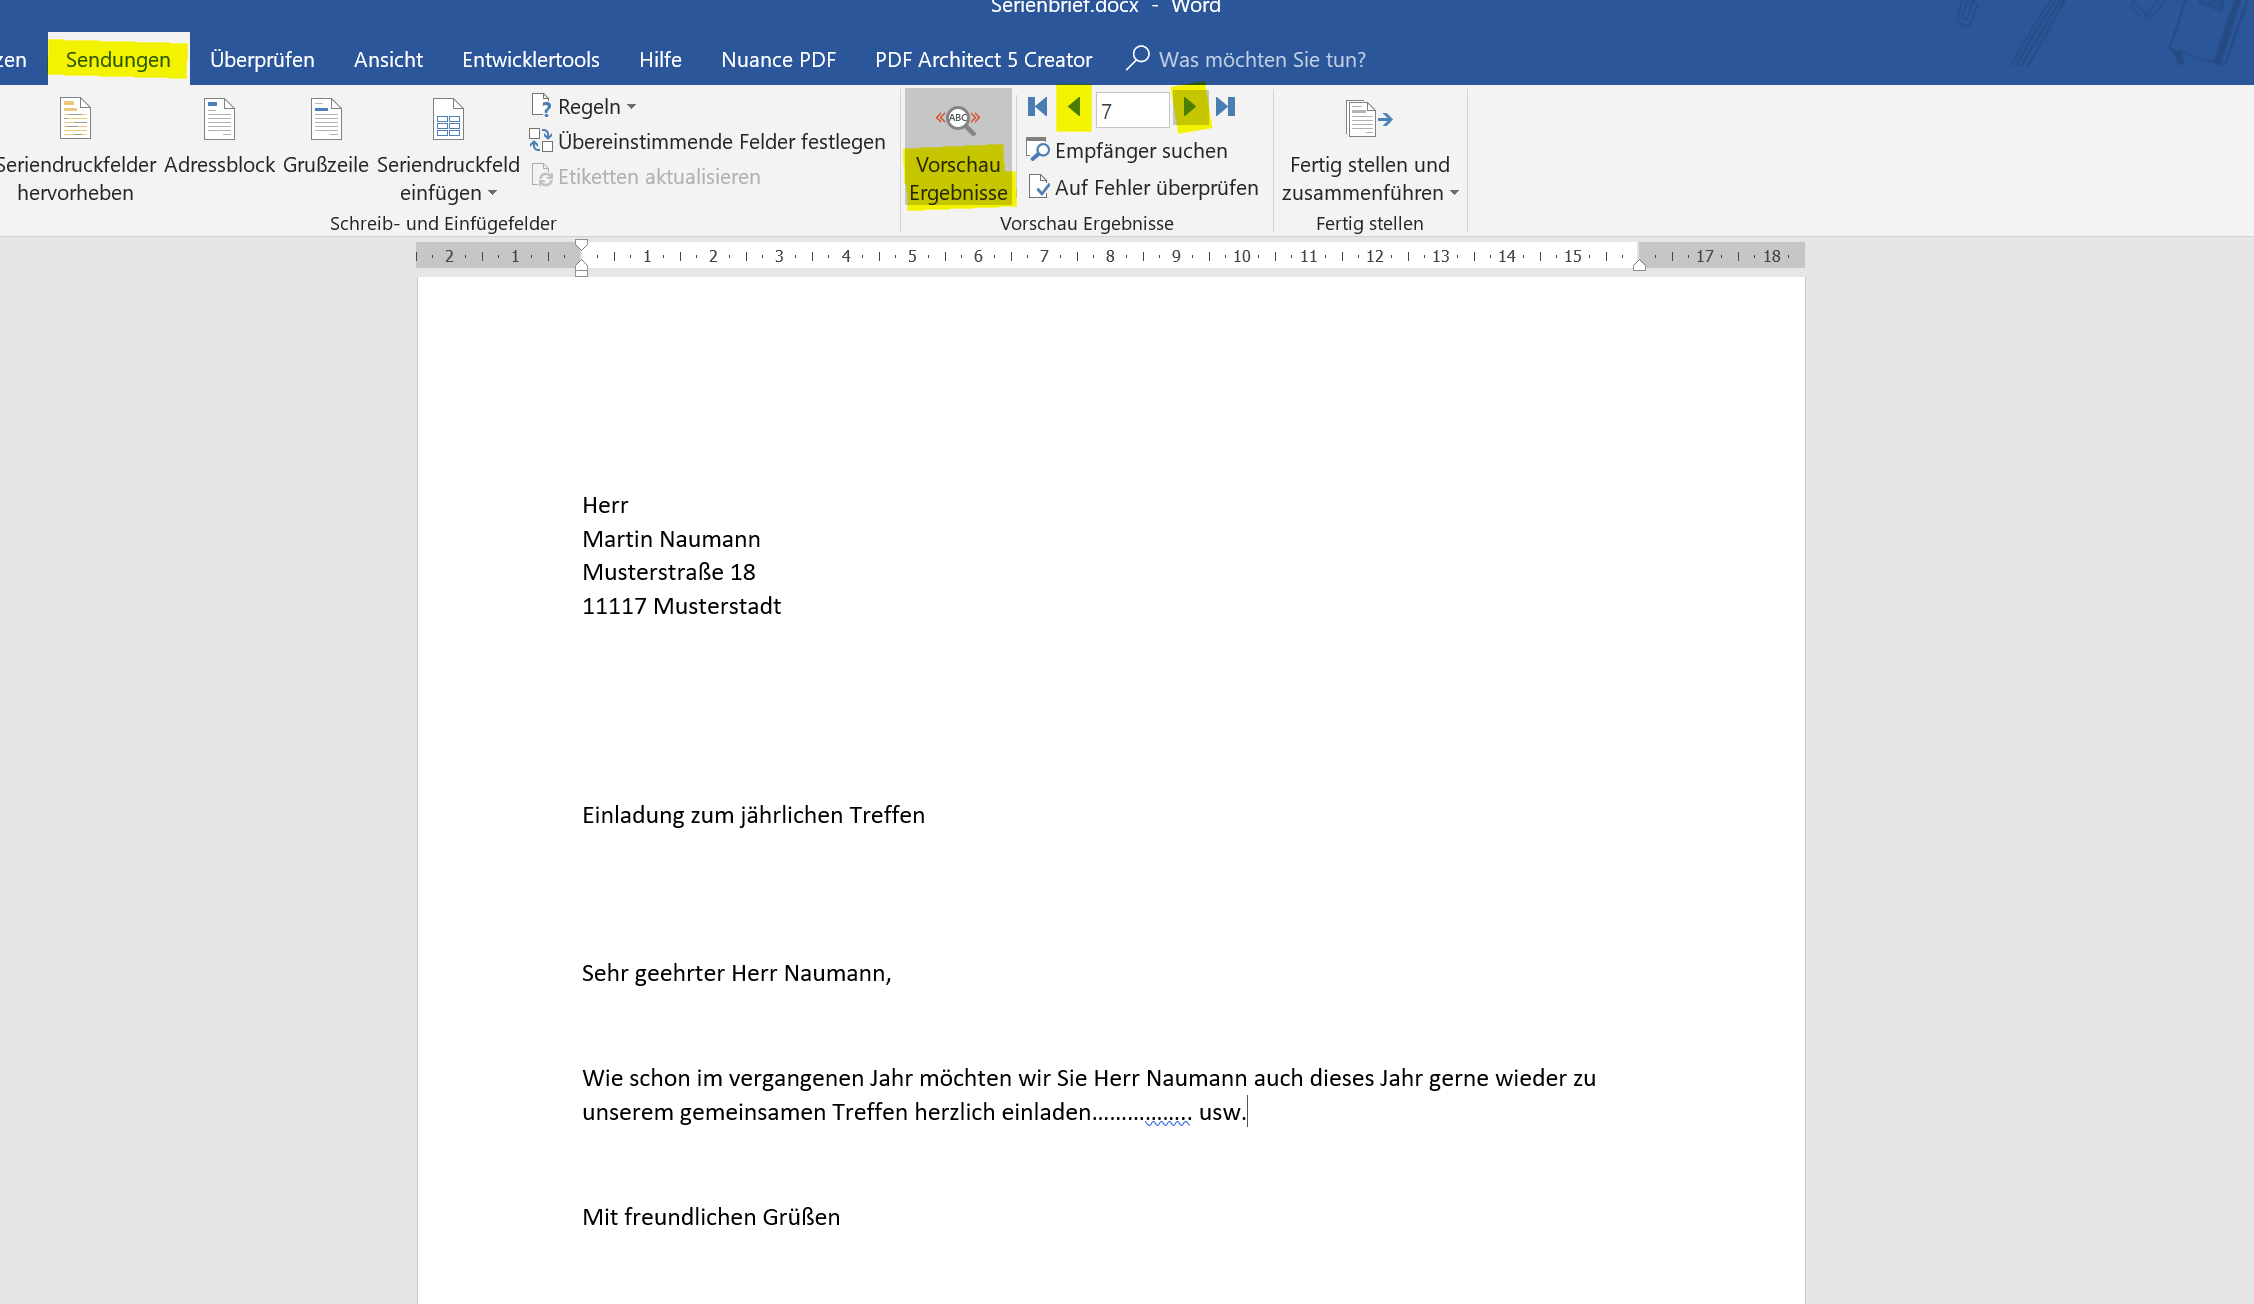
When you have finished your text, you can now get a preview before printing / shipping, to see if everything was done properly.
Of course, mistakes can have fatal consequences, especially with serial letters, and the iron can not be taken out of the fire as easily as if one made a mistake only with one recipient.
To see the preview go back to the tab “Shipments” and then to “Preview Results”.
Here you can comfortably switch through the receivers with the arrow keys.
See picture: (click to enlarge)
After we have inserted our letterhead with the appropriate merge fields and the subject, now comes the point where the salutation is concerned.
Now you could just type in “Dear Sir / Madam”, but that looks rather unprofessional and is also impersonal. The problem now emerging is “How should Word know who man and who is a woman” and then adjust the salutation accordingly?
The solution is that we set rules for it. We do this (similar to Excel) with a “if – then – else” rule.
To do this, we go back to the “Shipments” tab and click on “Rules” and select “If … Then … Otherwise …”.
Here we can say: IF ANREDE = Mr. / THEN = Dear Mr. / OTHERS = Dear Mrs.
Of course, you can also extend this, which is especially useful if there is no specific contact person and, for example, you address an organization or a company.
Then you could set an additional rule that says: IF ANREDE = empty / THEN = Dear Sir or Madam, or IF ANREDE = Company / THEN = Ladies and Gentlemen. And the ELSE rule just leave blank.
So here you do not just have to rely on one single rule, you can set several.
See picture:
Now that the rule is set, we can position our cursor in the line where the salutation should be, and insert a greeting line.
Again, go back to the tab “Shipments” then “Greeting Line” and confirm with “OK”. You also have the possibility to check a preview of the respective salutation to see if the rule has been set correctly.
Of course, you can also use the merge fields everywhere in the flowing text to give the whole an even more personal touch. So is also gladly worked in advertising letters, which the reader is repeatedly addressed by his name.
See picture:
When you have finished your text, you can now get a preview before printing / shipping, to see if everything was done properly.
Of course, mistakes can have fatal consequences, especially with serial letters, and the iron can not be taken out of the fire as easily as if one made a mistake only with one recipient.
To see the preview go back to the tab “Shipments” and then to “Preview Results”.
Here you can comfortably switch through the receivers with the arrow keys.
See picture:
4. Print a form letter for the mailing
4. Print a form letter for the mailing
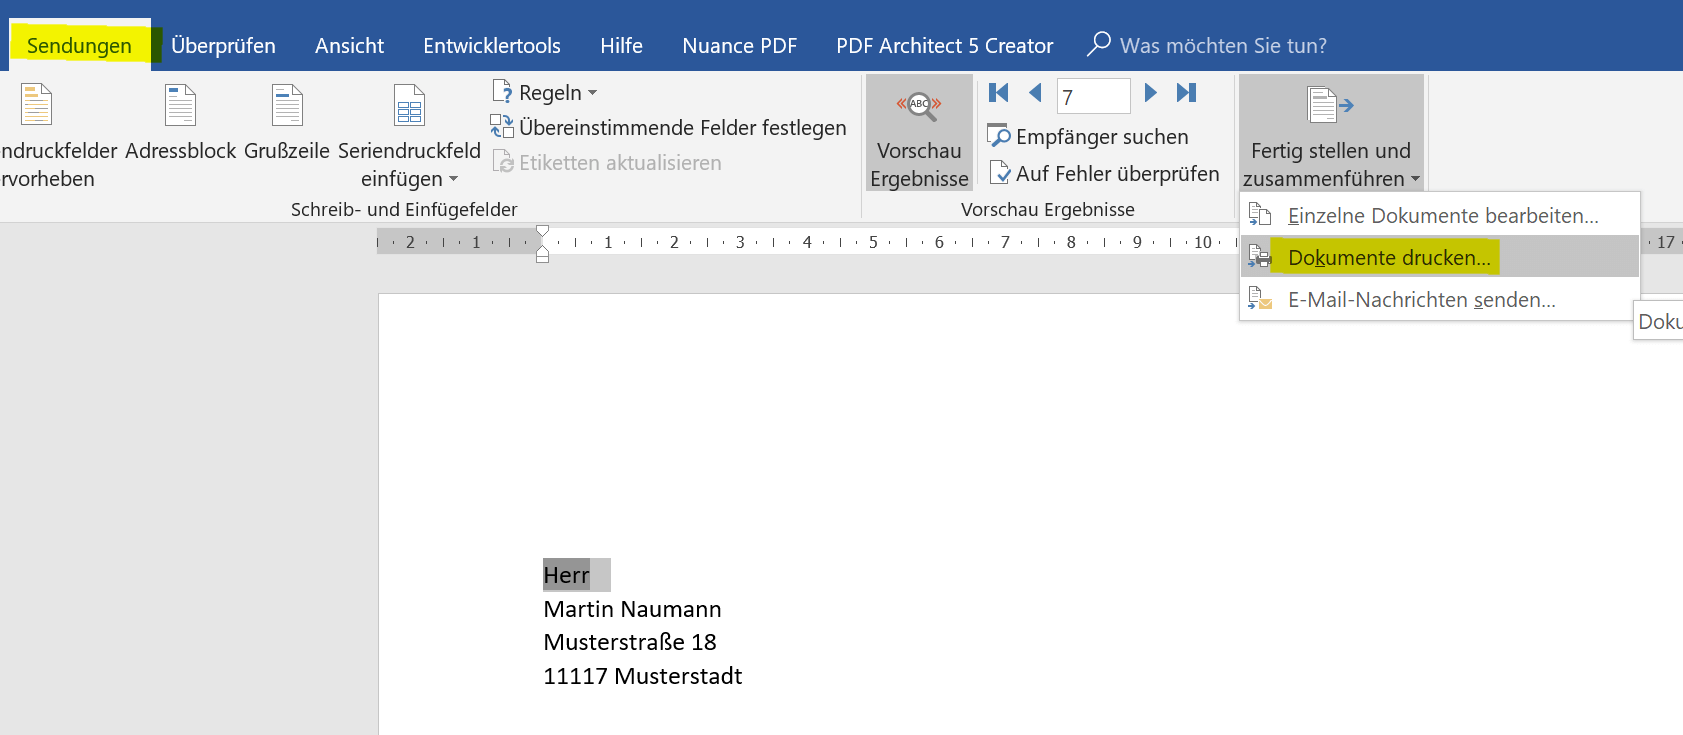
If you want to print out your form letter and send it by mail, go back to the tab “Shipments” – “Start Mail Merge” and select “Letters”.
Then continue in the column “Finish and merge” – “Print documents”
See picture: (click to enlarge)

If you want to print out your form letter and send it by mail, go back to the tab “Shipments” – “Start Mail Merge” and select “Letters”.
Then continue in the column “Finish and merge” – “Print documents”
See picture: (click to enlarge)
5. Send a form letter by e-mail
5. Send a form letter by e-mail
Of course it is most economical to send the form letter by e-mail.
However, here it is helpful to have an additional merge field inserted in our data source, in which the e-mail addresses are assigned to the respective recipients.
If you have not done this in advance, you can easily add a column to your e-mail address table later on. To have Word take over this field then do the following:
- Save serial letter
- Open data source
- Add a column with e-mail addresses
- Save and close the data source
When you reopen your form letter afterwards, the new mail merge field will be available with the email addresses.
Note:
You can not make any changes to the data source while the form letter is open. This can only be opened during read-only.
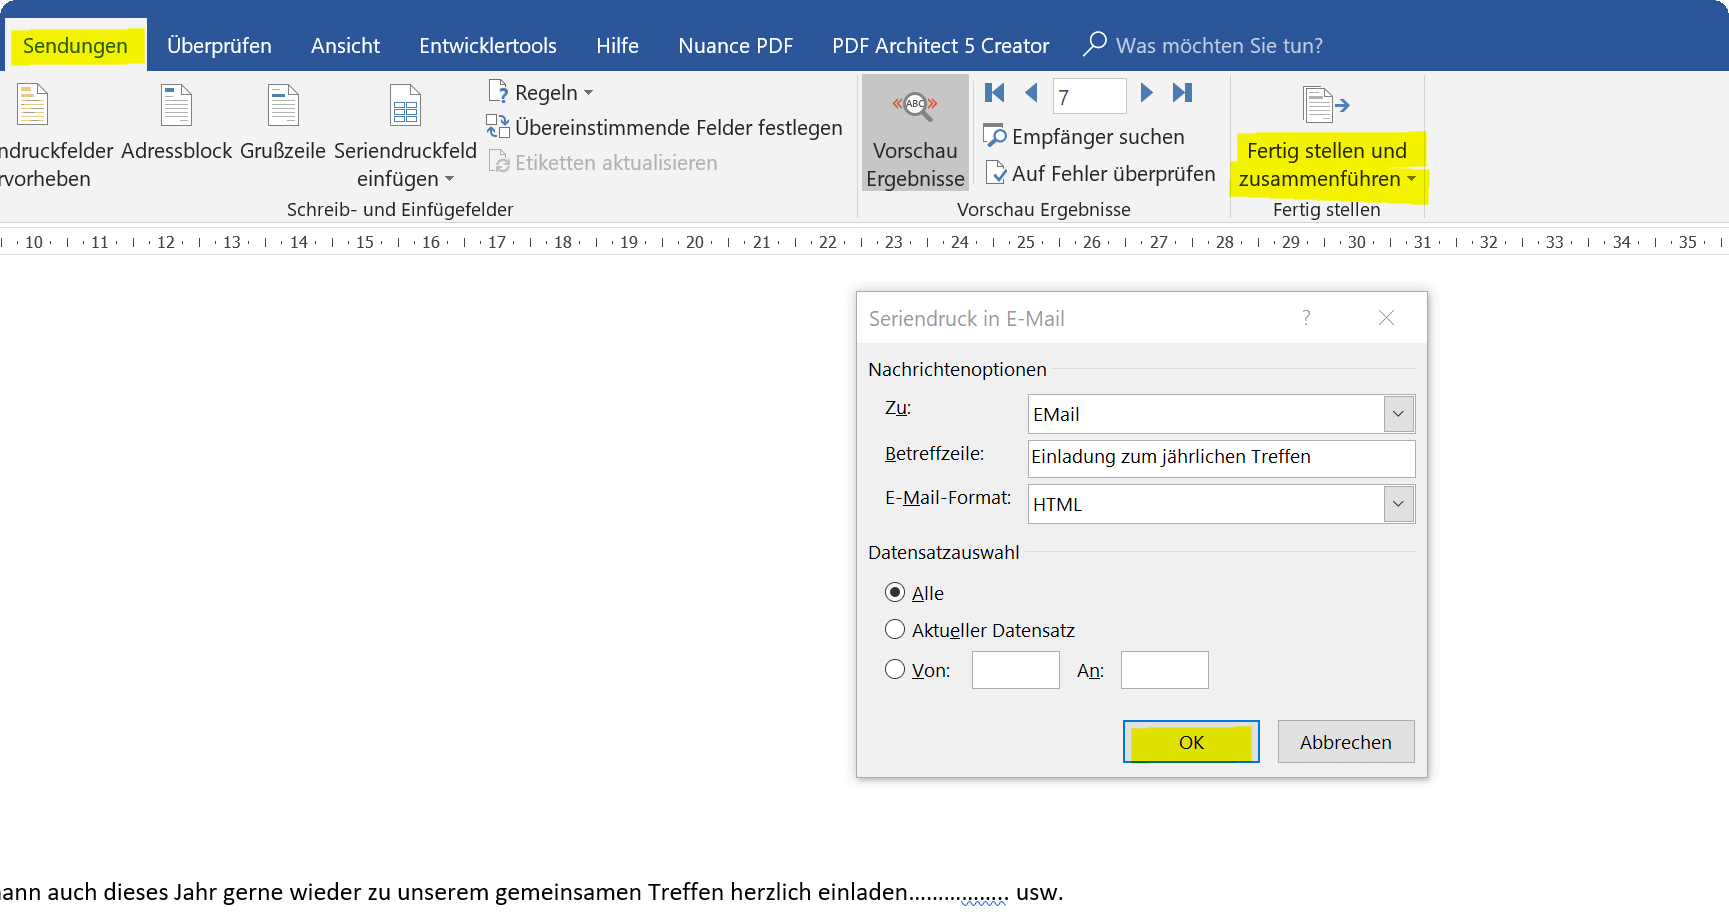
In order to start sending by e-mail, go back to “Shipments” – “E-mail messages” and then again “Finish and merge” – “Send e-mail messages”
In the next dialog box, select the mail merge field “E-Mail”, add the subject line and then have the option to send all or only select specific recipients.
See picture: (click to enlarge)
And that’s it.
As you have seen, you can use the mail merge feature to do a whole lot, not just reach multiple recipients quickly, but also give each letter a personal touch.
Of course it is most economical to send the form letter by e-mail.
However, here it is helpful to have an additional merge field inserted in our data source, in which the e-mail addresses are assigned to the respective recipients.
If you have not done this in advance, you can easily add a column to your e-mail address table later on. To have Word take over this field then do the following:
- Save serial letter
- Open data source
- Add a column with e-mail addresses
- Save and close the data source
When you reopen your form letter afterwards, the new mail merge field will be available with the email addresses.
Note:
You can not make any changes to the data source while the form letter is open. This can only be opened during read-only.
In order to start sending by e-mail, go back to “Shipments” – “E-mail messages” and then again “Finish and merge” – “Send e-mail messages”
In the next dialog box, select the mail merge field “E-Mail”, add the subject line and then have the option to send all or only select specific recipients.
See picture:
And that’s it.
As you have seen, you can use the mail merge feature to do a whole lot, not just reach multiple recipients quickly, but also give each letter a personal touch.
Popular Posts:

Ad-free home network: Install Pi-hole on Windows
Say goodbye to ads on smart TVs and in apps: Pi-hole software turns your Windows laptop into a network filter. This article explains step-by-step how to install it via Docker and configure the necessary DNS settings in your FRITZ!Box.

Vom Laptop zur Telefonzentrale: So tunest du deine FRITZ!Box zum Profi-Anrufserver
Mit einer FRITZ!Box und einem Laptop lässt sich eine professionelle Telefonzentrale bauen. Dieser Artikel zeigt Schritt für Schritt, wie man mit der Gratis-Software „Phoner“ zeitgesteuerte Ansagen schaltet und Anrufe aufzeichnet – inkl. wichtiger rechtlicher Hinweise (§ 201 StGB).

Warum dein Excel-Kurs Zeitverschwendung ist – was du wirklich lernen solltest!
Hand aufs Herz: Wann hast du zuletzt eine komplexe Excel-Formel ohne Googeln getippt? Eben. KI schreibt heute den Code für dich. Erfahre, warum klassische Excel-Trainings veraltet sind und welche 3 modernen Skills deinen Marktwert im Büro jetzt massiv steigern.

Cybersicherheit: Die 3 größten Fehler, die 90% aller Mitarbeiter machen
Hacker brauchen keine Codes, sie brauchen nur einen unaufmerksamen Mitarbeiter. Von Passwort-Recycling bis zum gefährlichen Klick: Wir zeigen die drei häufigsten Fehler im Büroalltag und geben praktische Tipps, wie Sie zur menschlichen Firewall werden.

So sieht das wirklich perfekte Homeoffice-Setup für 2026 aus
Ihr Homeoffice ist veraltet? Steigern Sie 2026 Produktivität & Gesundheit. Unser Guide zeigt das perfekte Setup: von ergonomischen Stühlen und 4K-Webcams bis zu Mesh-WLAN und Kabelmanagement. So investieren Sie in Ihre Karriere.

Internet, Telefon & TV: Die besten Komplettpakete
Internet, TV & Telefon aus einer Hand? Wir vergleichen die Komplettpakete von Telekom, Vodafone, O2 & 1&1. Wer punktet bei Speed, TV-Komfort (MagentaTV vs. GigaTV) und Preis? So finden Sie das beste Triple-Play-Angebot für Ihre Adresse.
Offers 2024: Word & Excel Templates


Popular Posts:
Ad-free home network: Install Pi-hole on Windows
Say goodbye to ads on smart TVs and in apps: Pi-hole software turns your Windows laptop into a network filter. This article explains step-by-step how to install it via Docker and configure the necessary DNS settings in your FRITZ!Box.
Vom Laptop zur Telefonzentrale: So tunest du deine FRITZ!Box zum Profi-Anrufserver
Mit einer FRITZ!Box und einem Laptop lässt sich eine professionelle Telefonzentrale bauen. Dieser Artikel zeigt Schritt für Schritt, wie man mit der Gratis-Software „Phoner“ zeitgesteuerte Ansagen schaltet und Anrufe aufzeichnet – inkl. wichtiger rechtlicher Hinweise (§ 201 StGB).
Warum dein Excel-Kurs Zeitverschwendung ist – was du wirklich lernen solltest!
Hand aufs Herz: Wann hast du zuletzt eine komplexe Excel-Formel ohne Googeln getippt? Eben. KI schreibt heute den Code für dich. Erfahre, warum klassische Excel-Trainings veraltet sind und welche 3 modernen Skills deinen Marktwert im Büro jetzt massiv steigern.
Cybersicherheit: Die 3 größten Fehler, die 90% aller Mitarbeiter machen
Hacker brauchen keine Codes, sie brauchen nur einen unaufmerksamen Mitarbeiter. Von Passwort-Recycling bis zum gefährlichen Klick: Wir zeigen die drei häufigsten Fehler im Büroalltag und geben praktische Tipps, wie Sie zur menschlichen Firewall werden.
So sieht das wirklich perfekte Homeoffice-Setup für 2026 aus
Ihr Homeoffice ist veraltet? Steigern Sie 2026 Produktivität & Gesundheit. Unser Guide zeigt das perfekte Setup: von ergonomischen Stühlen und 4K-Webcams bis zu Mesh-WLAN und Kabelmanagement. So investieren Sie in Ihre Karriere.
Internet, Telefon & TV: Die besten Komplettpakete
Internet, TV & Telefon aus einer Hand? Wir vergleichen die Komplettpakete von Telekom, Vodafone, O2 & 1&1. Wer punktet bei Speed, TV-Komfort (MagentaTV vs. GigaTV) und Preis? So finden Sie das beste Triple-Play-Angebot für Ihre Adresse.
Offers 2024: Word & Excel Templates