Edit Windows context menu – remove entries – add entries
When you install new software, if you are lucky you will be asked whether you want the standard installation (which is of course recommended) or the custom installation. Often the installation variant recommended by the software is then chosen because users believe there are complex choices to be made with which in the end one is not sure which is the right one.
But the opposite is the case, because in the vast majority of cases additional (unwanted) software is installed with the standard installation, and context menu entries are added that were also not wanted. Such bad habits can be found especially with freeware software. The reason for this lies in the fact that free programs are cross-financed by other manufacturers via additional software.

The problem that can arise now is that the context menu in Windows adds up over time and becomes more and more confusing. Of course, this does not happen all the time because the context menu is context-sensitive, which means that the menu entries always change depending on the selected screen areas / files. But then at some point the meaning of the context menu in Windows is lost. Because it should offer the possibility to quickly provide suitable functions for the selected area, and not to be overloaded.
If you do not want these entries, the only thing left to do is uninstall the software in question. But with a little know-how it can be done differently as we would like to describe with this little tutorial.
Edit Windows context menu – remove entries – add entries
When you install new software, if you are lucky you will be asked whether you want the standard installation (which is of course recommended) or the custom installation. Often the installation variant recommended by the software is then chosen because users believe there are complex choices to be made with which in the end one is not sure which is the right one.
But the opposite is the case, because in the vast majority of cases additional (unwanted) software is installed with the standard installation, and context menu entries are added that were also not wanted. Such bad habits can be found especially with freeware software. The reason for this lies in the fact that free programs are cross-financed by other manufacturers via additional software.
The problem that can arise now is that the context menu in Windows adds up over time and becomes more and more confusing. Of course, this does not happen all the time because the context menu is context-sensitive, which means that the menu entries always change depending on the selected screen areas / files. But then at some point the meaning of the context menu in Windows is lost. Because it should offer the possibility to quickly provide suitable functions for the selected area, and not to be overloaded.
If you do not want these entries, the only thing left to do is uninstall the software in question. But with a little know-how it can be done differently as we would like to describe with this little tutorial.
1. Software tools for the Windows context menu
1. Software tools for the Windows context menu
The simplest solution for those who do not want to work in the Windows 10 registry is to simply use a tool.
The following tools are available for this, among others:

These tools mentioned here actually all offer both a free basic version as well as a paid version with an extended range of functions, and should offer more than enough options for most users to customize the Windows 10 context menu, and also to make more in-depth settings in Windows 10 which would otherwise only be possible with detailed knowledge.
The simplest solution for those who do not want to work in the Windows 10 registry is to simply use a tool.
The following tools are available for this, among others:
These tools mentioned here actually all offer both a free basic version as well as a paid version with an extended range of functions, and should offer more than enough options for most users to customize the Windows 10 context menu, and also to make more in-depth settings in Windows 10 which would otherwise only be possible with detailed knowledge.
2. Adjust the context menu via the Windows registry
2. Adjust the context menu via the Windows registry
What we showed in the first step is a variant of eliminating the side effects (undesired context menu entries) of a software with another software.
However, if you want to lend a hand yourself, you can also do this in Windows directly via the registry.
To do this, proceed as follows:
Use the key combination “Windows key +” R ” to open the Windows command prompt and then enter “regedit “.
Next, select the entry “HKEY_CLASSES_ROOT / Directory / Background / shell” in the folder structure shown.
Note: You do not have to search your way through the endlessly long list, but simply search for the entry in the registry using the key combination “CTRL + F”.
See fig. (Click to enlarge)
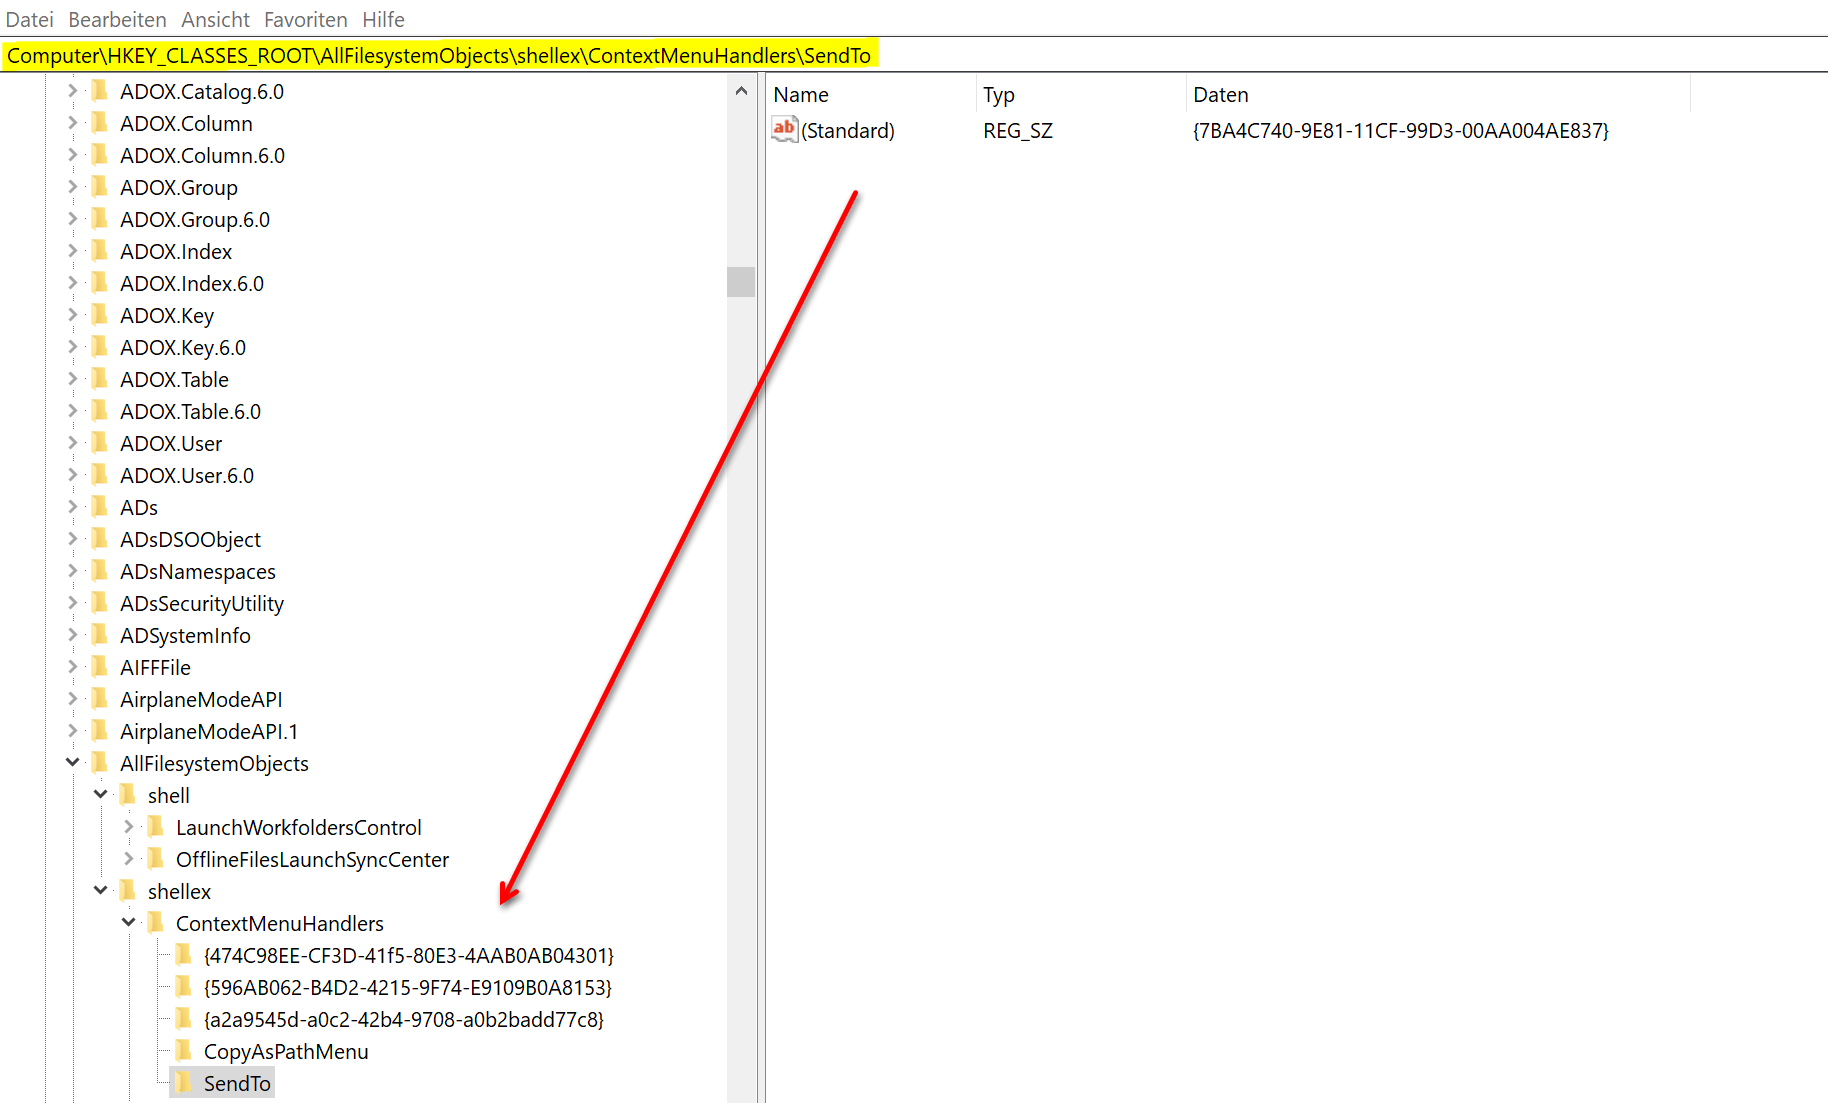
Your context menu entries are now located at this point. Unfortunately, these cannot be clearly assigned based on their name. But that would be too good to be true that something is easy.
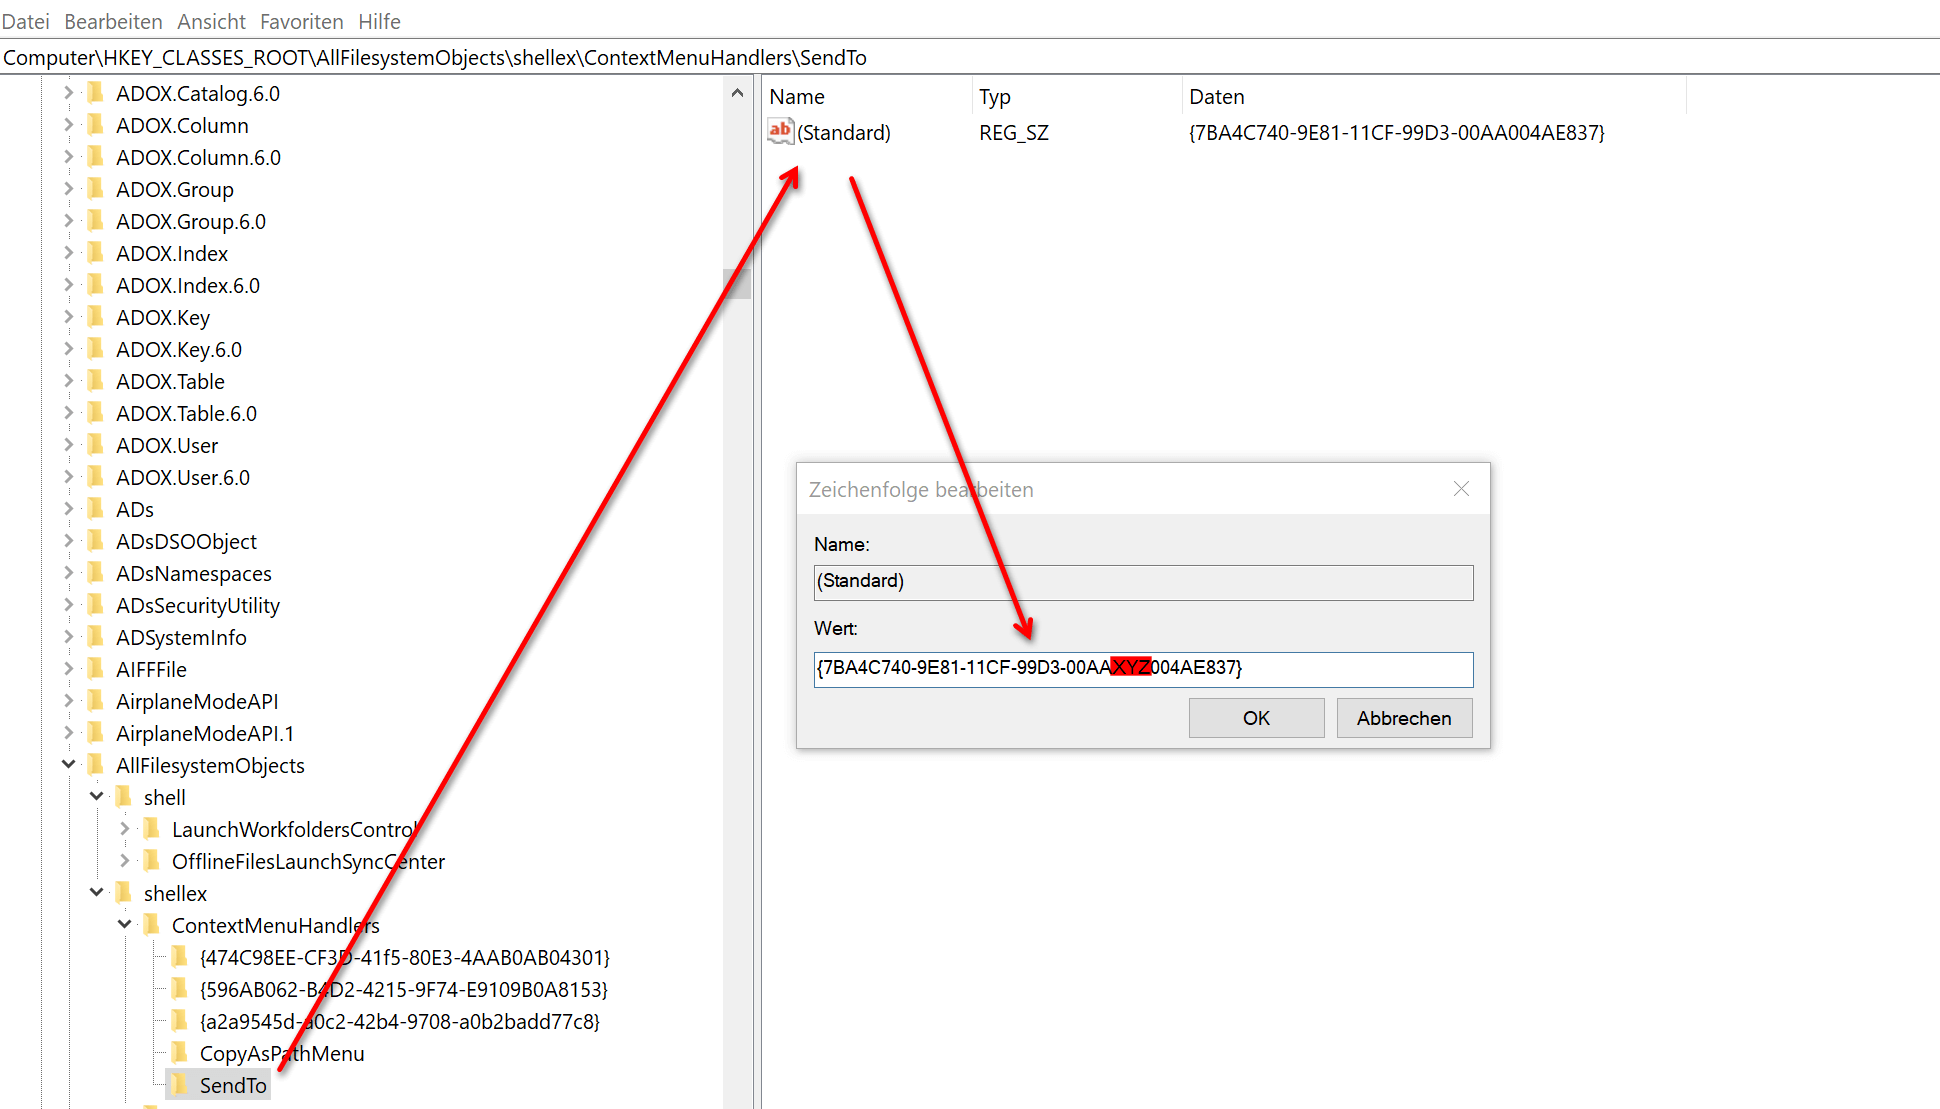
So you have to work your way through the individual entries, change the entries there, and then look at the effect using the context menu. To edit, open the desired folder and double-click the file it contains. You will then see the name (usually only standard is here) and the value specified in encrypted form for the context menu entry. If you change this at any point and add a character string (e.g. XYZ), you will make the entry invalid and it will no longer be displayed in the context menu later.
See fig. (Click to enlarge)
The context menu entries that you want to delete are located in the following keys:
HKEY_CLASSES_ROOT \ * \ shellex \ ContextMenuHandlers
HKEY_CLASSES_ROOT \ AllFileSystemObjects \ shell
HKEY_CLASSES_ROOT \ AllFileSystemObjects \ shellex \ ContextMenuHandlers
HKEY_CLASSES_ROOT \ Folder \ shell
HKEY_CLASSES_ROOT \ Folder \ shellex \ ContextMenuHandlers
HKEY_CLASSES_ROOT \ Directory \ shell
The procedure here is the same as in the preceding example for the “Send to” entry.
This form of editing the Windows 10 context menu is more for enthusiasts, but also offers the benefit of learning a little more about how Windows 10 works and where functions for everyday tasks are stored. Most users are probably better off with the tools currently available for editing the context menu, as they usually offer a lot of other options for customizing Windows 10.
What we showed in the first step is a variant of eliminating the side effects (undesired context menu entries) of a software with another software.
However, if you want to lend a hand yourself, you can also do this in Windows directly via the registry.
To do this, proceed as follows:
Use the key combination “Windows key +” R ” to open the Windows command prompt and then enter “regedit “.
Next, select the entry “HKEY_CLASSES_ROOT / Directory / Background / shell” in the folder structure shown.
Note: You do not have to search your way through the endlessly long list, but simply search for the entry in the registry using the key combination “CTRL + F”.
See fig. (Click to enlarge)
Your context menu entries are now located at this point. Unfortunately, these cannot be clearly assigned based on their name. But that would be too good to be true that something is easy.
So you have to work your way through the individual entries, change the entries there, and then look at the effect using the context menu. To edit, open the desired folder and double-click the file it contains. You will then see the name (usually only standard is here) and the value specified in encrypted form for the context menu entry. If you change this at any point and add a character string (e.g. XYZ), you will make the entry invalid and it will no longer be displayed in the context menu later.
See fig. (Click to enlarge)
The context menu entries that you want to delete are located in the following keys:
HKEY_CLASSES_ROOT \ * \ shellex \ ContextMenuHandlers
HKEY_CLASSES_ROOT \ AllFileSystemObjects \ shell
HKEY_CLASSES_ROOT \ AllFileSystemObjects \ shellex \ ContextMenuHandlers
HKEY_CLASSES_ROOT \ Folder \ shell
HKEY_CLASSES_ROOT \ Folder \ shellex \ ContextMenuHandlers
HKEY_CLASSES_ROOT \ Directory \ shell
The procedure here is the same as in the preceding example for the “Send to” entry.
This form of editing the Windows 10 context menu is more for enthusiasts, but also offers the benefit of learning a little more about how Windows 10 works and where functions for everyday tasks are stored. Most users are probably better off with the tools currently available for editing the context menu, as they usually offer a lot of other options for customizing Windows 10.
Popular Posts:

So sieht das wirklich perfekte Homeoffice-Setup für 2026 aus
Ihr Homeoffice ist veraltet? Steigern Sie 2026 Produktivität & Gesundheit. Unser Guide zeigt das perfekte Setup: von ergonomischen Stühlen und 4K-Webcams bis zu Mesh-WLAN und Kabelmanagement. So investieren Sie in Ihre Karriere.

Internet, Telefon & TV: Die besten Komplettpakete
Internet, TV & Telefon aus einer Hand? Wir vergleichen die Komplettpakete von Telekom, Vodafone, O2 & 1&1. Wer punktet bei Speed, TV-Komfort (MagentaTV vs. GigaTV) und Preis? So finden Sie das beste Triple-Play-Angebot für Ihre Adresse.

5 Anzeichen, dass dein Chef dich im Homeoffice digital überwacht
Nur weil du im Homeoffice bist, heißt das nicht, dass dir niemand zusieht. "Bossware" ist auf dem Vormarsch. Wir zeigen 5 subtile Anzeichen für digitale Überwachung – von "Teams-Status"-Kult bis zu verdächtigen IT-Tools. So erkennst du die Warnsignale und schützt deine Karriere.

Schluss mit dem Tool-Chaos: 5 Apps, die Euer Office wirklich produktiver machen
Schluss mit digitaler Reibung: Diese 5 Apps machen Ihr Büro wirklich produktiver. Entdecken Sie, wie Asana, Loom, Notion, Zapier und Slack die Effizienz steigern, Meetings reduzieren und Ihr Team smarter vernetzen – wenn man sie richtig einsetzt.

AI in everyday office life: Your new invisible colleague
AI won't replace you – but those who use it will have a competitive edge. Make AI your co-pilot in the office! We'll show you four concrete hacks for faster emails, better meeting notes, and solved Excel problems. Get started today, no IT degree required.

Fünf vor Zwölf: Wie Sie erkennen, dass Sie kurz vor dem Burnout stehen
Erschöpfung ist normal, doch wenn das Wochenende keine Erholung mehr bringt und Zynismus die Motivation ersetzt, stehen Sie kurz vor dem Burnout. Erfahren Sie, welche 7 Warnsignale Sie niemals ignorieren dürfen und warum es jetzt lebenswichtig ist, die Notbremse zu ziehen
Offers 2024: Word & Excel Templates


Popular Posts:
So sieht das wirklich perfekte Homeoffice-Setup für 2026 aus
Ihr Homeoffice ist veraltet? Steigern Sie 2026 Produktivität & Gesundheit. Unser Guide zeigt das perfekte Setup: von ergonomischen Stühlen und 4K-Webcams bis zu Mesh-WLAN und Kabelmanagement. So investieren Sie in Ihre Karriere.
Internet, Telefon & TV: Die besten Komplettpakete
Internet, TV & Telefon aus einer Hand? Wir vergleichen die Komplettpakete von Telekom, Vodafone, O2 & 1&1. Wer punktet bei Speed, TV-Komfort (MagentaTV vs. GigaTV) und Preis? So finden Sie das beste Triple-Play-Angebot für Ihre Adresse.
5 Anzeichen, dass dein Chef dich im Homeoffice digital überwacht
Nur weil du im Homeoffice bist, heißt das nicht, dass dir niemand zusieht. "Bossware" ist auf dem Vormarsch. Wir zeigen 5 subtile Anzeichen für digitale Überwachung – von "Teams-Status"-Kult bis zu verdächtigen IT-Tools. So erkennst du die Warnsignale und schützt deine Karriere.
Schluss mit dem Tool-Chaos: 5 Apps, die Euer Office wirklich produktiver machen
Schluss mit digitaler Reibung: Diese 5 Apps machen Ihr Büro wirklich produktiver. Entdecken Sie, wie Asana, Loom, Notion, Zapier und Slack die Effizienz steigern, Meetings reduzieren und Ihr Team smarter vernetzen – wenn man sie richtig einsetzt.
AI in everyday office life: Your new invisible colleague
AI won't replace you – but those who use it will have a competitive edge. Make AI your co-pilot in the office! We'll show you four concrete hacks for faster emails, better meeting notes, and solved Excel problems. Get started today, no IT degree required.
Fünf vor Zwölf: Wie Sie erkennen, dass Sie kurz vor dem Burnout stehen
Erschöpfung ist normal, doch wenn das Wochenende keine Erholung mehr bringt und Zynismus die Motivation ersetzt, stehen Sie kurz vor dem Burnout. Erfahren Sie, welche 7 Warnsignale Sie niemals ignorieren dürfen und warum es jetzt lebenswichtig ist, die Notbremse zu ziehen
Offers 2024: Word & Excel Templates