How to expand the fonts in WordPress
With WordPress you can create your own blog relatively comfortably and quickly. And even more so, the popular open source software has evolved into a solid content management system (CMS) in recent years that is finding more and more followers.
But of course, with the proliferation, the demands of users on such software grow.
The number of available fonts, and above all their customization options are a bit meager in our view, and so surely some people here wish for a little more choice.
The solution is as usual in WordPress in the appropriate plugin.
1. Install Easy Google fonts
1. Install Easy Google fonts
First we install the plugin Easy Google Fonts.
You can do this either in our description via the interface in WordPress, or you can download the plugin separately here and then install it externally.
Go to the backend of your page in the left menu bar to the point: Plugins – Install
See picture: (click to enlarge)
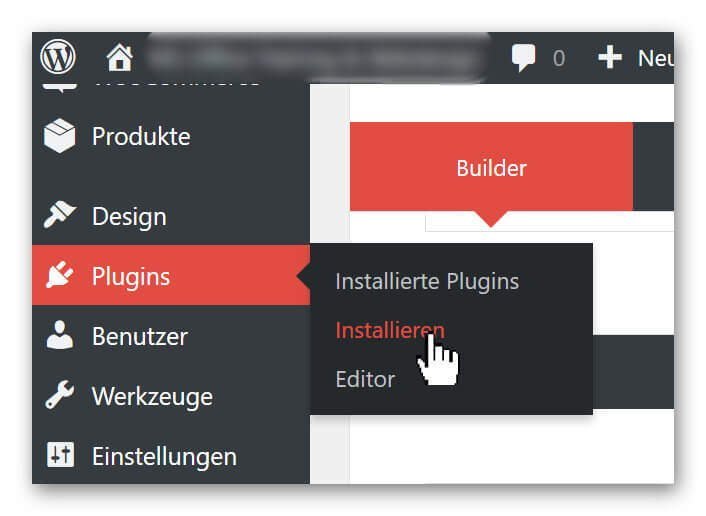
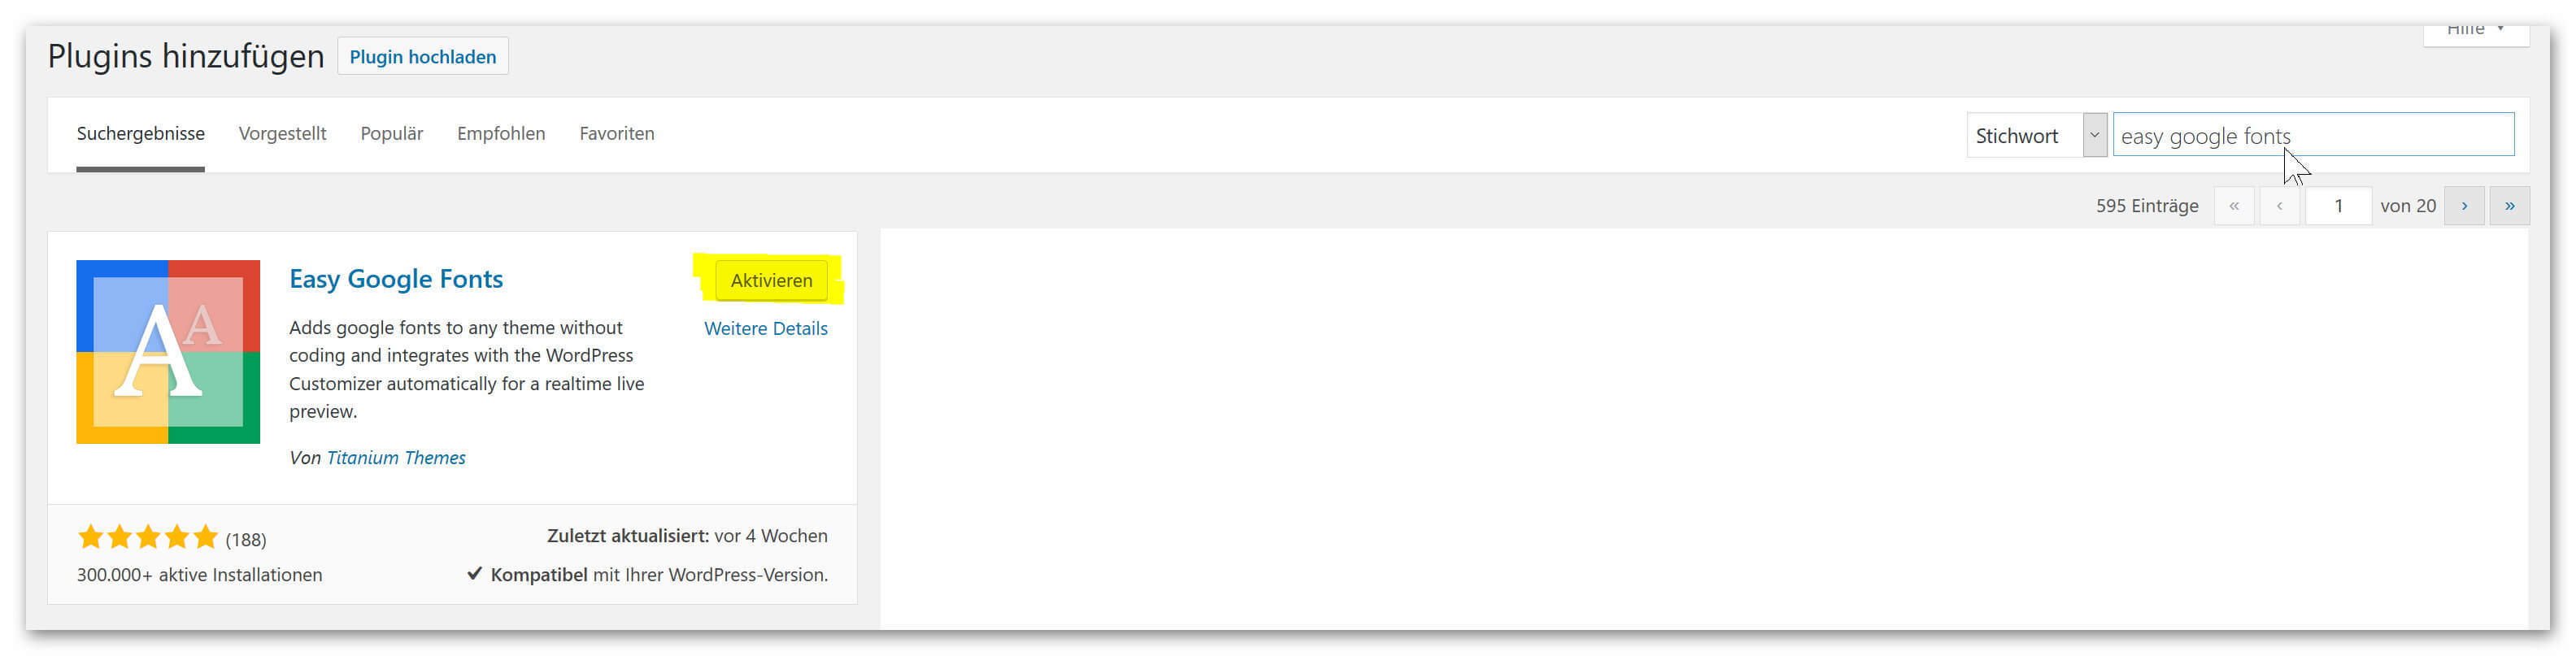
Here you have the option of either uploading plugins that can not be found via the search directly from your hard disk, or simply using the search function to simply search for the plugin.
Simply enter: Easy Google Fonts in the search field, and the desired plug-in will appear in the selection, where you can then simply install it via the corresponding button and finally activate it.
See picture: (click to enlarge)

First we install the plugin Easy Google Fonts.
You can do this either in our description via the interface in WordPress, or you can download the plugin separately here and then install it externally.
Go to the backend of your page in the left menu bar to the point: Plugins – Install
See picture:

Here you have the option of either uploading plugins that can not be found via the search directly from your hard disk, or simply using the search function to simply search for the plugin.
Simply enter: Easy Google Fonts in the search field, and the desired plug-in will appear in the selection, where you can then simply install it via the corresponding button and finally activate it.
See picture:

2. Set Font Control Name
2. Set Font Control Name
Since you have the possibility to create several font groups with Easy Google fonts, we first have to define a group and name it after the installation.
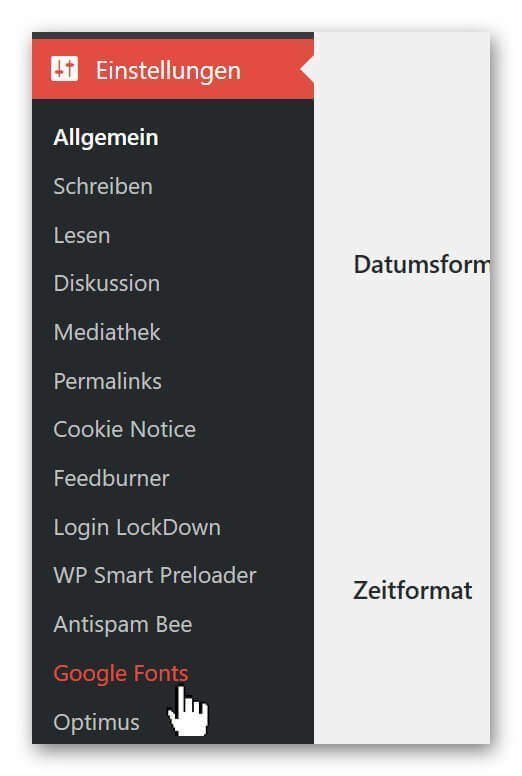
To do this, go to the back of your page again in the menu bar on the left: Settings – Google Fonts
See picture: (click to enlarge)
And assign a name under the tab: Edit Font Controls of the font group.
See picture: (click to enlarge)

Now we have created the basis to edit our font group freely.
Since you have the possibility to create several font groups with Easy Google fonts, we first have to define a group and name it after the installation.
To do this, go to the back of your page again in the menu bar on the left: Settings – Google Fonts
See picture:
And assign a name under the tab: Edit Font Controls of the font group.
See picture:

3. Edit and assign fonts
3. Edit and assign fonts
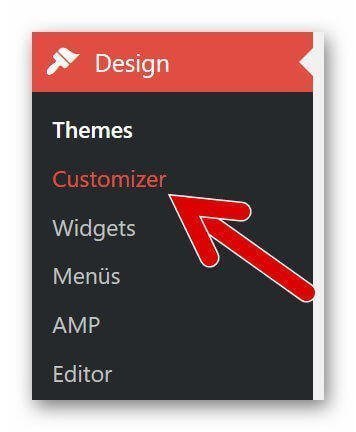
In order to be able to assign and edit our fonts to the individual types of headings (H1 – H6) as well as to the paragraphs, we have to select again in the backend of our page in the left menu bar under: Design – Customizer.
See picture: (click to enlarge)
There you go under: Typography on Default Typography
See picture (click to enlarge)

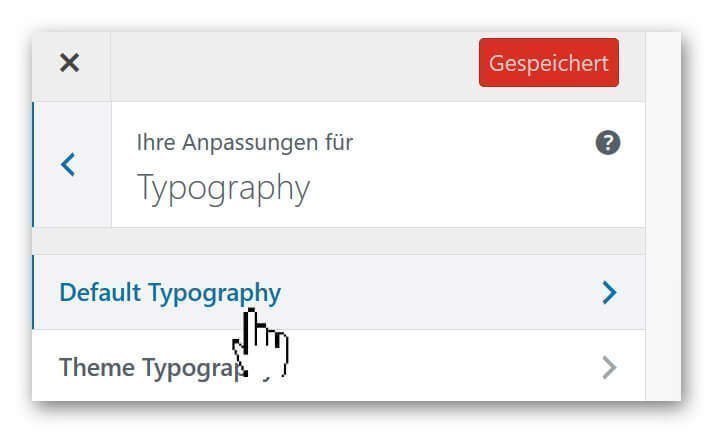
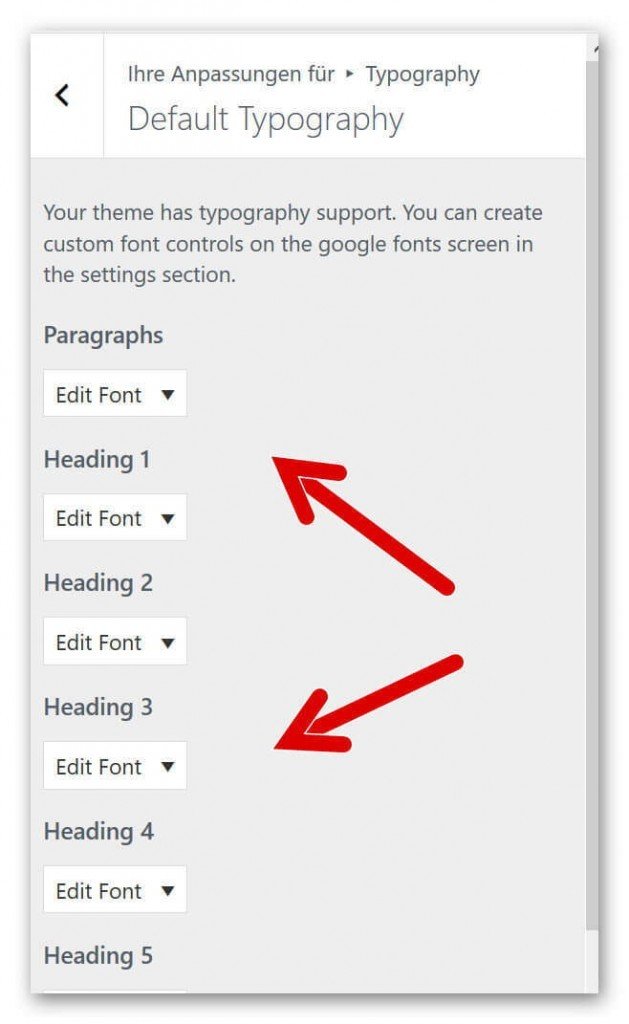
and then you are right in the settings area of Easy Google Fonts where all available header types and other fonts are displayed.
See picture (click to enlarge)
In order to be able to assign and edit our fonts to the individual types of headings (H1 – H6) as well as to the paragraphs, we have to select again in the backend of our page in the left menu bar under: Design – Customizer.
See picture:
There you go under: Typography on Default Typography
See picture:


and then you are right in the settings area of Easy Google Fonts where all available header types and other fonts are displayed.
See picture:

4. Adjust size, colors and distances
4. Adjust size, colors and distances
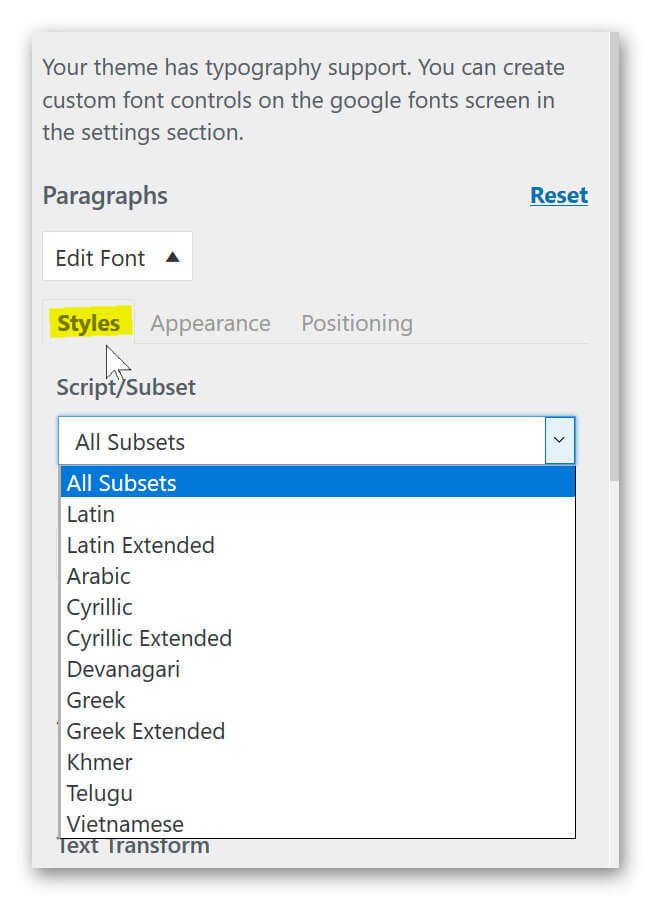
There are hardly any options that you will miss with this really fantastic plugin.
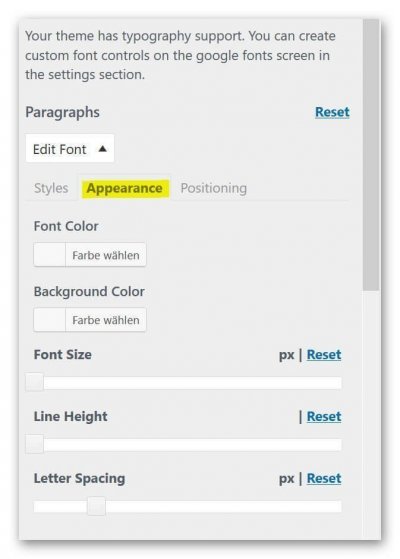
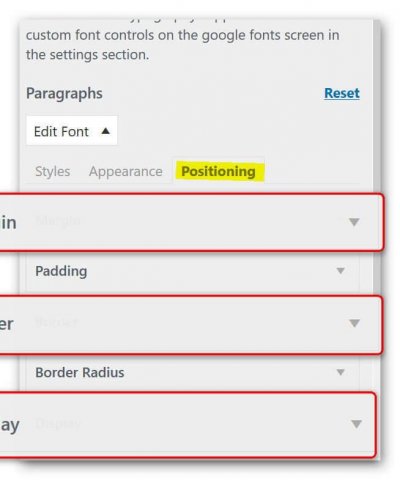
Not only do we have the ability to customize the font (for example, Times New Roman, Antic Slab, etc.), but we can also set the color, spacing, height, positioning, and more for each type of font.
See picture: (click to enlarge)
There are hardly any options that you will miss with this really fantastic plugin.
Not only do we have the ability to customize the font (for example, Times New Roman, Antic Slab, etc.), but we can also set the color, spacing, height, positioning, and more for each type of font.
See picture:


Popular Posts:

So sieht das wirklich perfekte Homeoffice-Setup für 2026 aus
Ihr Homeoffice ist veraltet? Steigern Sie 2026 Produktivität & Gesundheit. Unser Guide zeigt das perfekte Setup: von ergonomischen Stühlen und 4K-Webcams bis zu Mesh-WLAN und Kabelmanagement. So investieren Sie in Ihre Karriere.

Internet, Telefon & TV: Die besten Komplettpakete
Internet, TV & Telefon aus einer Hand? Wir vergleichen die Komplettpakete von Telekom, Vodafone, O2 & 1&1. Wer punktet bei Speed, TV-Komfort (MagentaTV vs. GigaTV) und Preis? So finden Sie das beste Triple-Play-Angebot für Ihre Adresse.

5 Anzeichen, dass dein Chef dich im Homeoffice digital überwacht
Nur weil du im Homeoffice bist, heißt das nicht, dass dir niemand zusieht. "Bossware" ist auf dem Vormarsch. Wir zeigen 5 subtile Anzeichen für digitale Überwachung – von "Teams-Status"-Kult bis zu verdächtigen IT-Tools. So erkennst du die Warnsignale und schützt deine Karriere.

Schluss mit dem Tool-Chaos: 5 Apps, die Euer Office wirklich produktiver machen
Schluss mit digitaler Reibung: Diese 5 Apps machen Ihr Büro wirklich produktiver. Entdecken Sie, wie Asana, Loom, Notion, Zapier und Slack die Effizienz steigern, Meetings reduzieren und Ihr Team smarter vernetzen – wenn man sie richtig einsetzt.

AI in everyday office life: Your new invisible colleague
AI won't replace you – but those who use it will have a competitive edge. Make AI your co-pilot in the office! We'll show you four concrete hacks for faster emails, better meeting notes, and solved Excel problems. Get started today, no IT degree required.

Fünf vor Zwölf: Wie Sie erkennen, dass Sie kurz vor dem Burnout stehen
Erschöpfung ist normal, doch wenn das Wochenende keine Erholung mehr bringt und Zynismus die Motivation ersetzt, stehen Sie kurz vor dem Burnout. Erfahren Sie, welche 7 Warnsignale Sie niemals ignorieren dürfen und warum es jetzt lebenswichtig ist, die Notbremse zu ziehen
Offers 2024: Word & Excel Templates


Popular Posts:
So sieht das wirklich perfekte Homeoffice-Setup für 2026 aus
Ihr Homeoffice ist veraltet? Steigern Sie 2026 Produktivität & Gesundheit. Unser Guide zeigt das perfekte Setup: von ergonomischen Stühlen und 4K-Webcams bis zu Mesh-WLAN und Kabelmanagement. So investieren Sie in Ihre Karriere.
Internet, Telefon & TV: Die besten Komplettpakete
Internet, TV & Telefon aus einer Hand? Wir vergleichen die Komplettpakete von Telekom, Vodafone, O2 & 1&1. Wer punktet bei Speed, TV-Komfort (MagentaTV vs. GigaTV) und Preis? So finden Sie das beste Triple-Play-Angebot für Ihre Adresse.
5 Anzeichen, dass dein Chef dich im Homeoffice digital überwacht
Nur weil du im Homeoffice bist, heißt das nicht, dass dir niemand zusieht. "Bossware" ist auf dem Vormarsch. Wir zeigen 5 subtile Anzeichen für digitale Überwachung – von "Teams-Status"-Kult bis zu verdächtigen IT-Tools. So erkennst du die Warnsignale und schützt deine Karriere.
Schluss mit dem Tool-Chaos: 5 Apps, die Euer Office wirklich produktiver machen
Schluss mit digitaler Reibung: Diese 5 Apps machen Ihr Büro wirklich produktiver. Entdecken Sie, wie Asana, Loom, Notion, Zapier und Slack die Effizienz steigern, Meetings reduzieren und Ihr Team smarter vernetzen – wenn man sie richtig einsetzt.
AI in everyday office life: Your new invisible colleague
AI won't replace you – but those who use it will have a competitive edge. Make AI your co-pilot in the office! We'll show you four concrete hacks for faster emails, better meeting notes, and solved Excel problems. Get started today, no IT degree required.
Fünf vor Zwölf: Wie Sie erkennen, dass Sie kurz vor dem Burnout stehen
Erschöpfung ist normal, doch wenn das Wochenende keine Erholung mehr bringt und Zynismus die Motivation ersetzt, stehen Sie kurz vor dem Burnout. Erfahren Sie, welche 7 Warnsignale Sie niemals ignorieren dürfen und warum es jetzt lebenswichtig ist, die Notbremse zu ziehen
Offers 2024: Word & Excel Templates