Use macros correctly in Excel
Almost everyone has heard of the term “macro” in the context of Excel, and perhaps has shied away from it because it sounds like a rather complicated affair for which you have to deal with Excel programming.
But this feature has never been met before, as it has to be activated in the developer tools.
But do not worry, because neither the menu item Developer Tools, nor the creation of macros with which you can record workflows, and later with keyboard shortcuts, or play back button must be a book with seven seals.
How it is done in Excel 2016 is explained in our article.
1. Enable developer tools in Excel
1. Enable developer tools in Excel
In our little example we have created 2 dynamic tables with which we want to work.
The goal will be to transfer the data entered in the first table into the second table by means of a button, and then continue to update it.
If you have not already done so, you will first need to unlock the developer tools to get the function of the macros. To enable Developer Tools, go to the tab:
“File” – “Options” – “Customize Ribbon”
and put the appropriate hook there.
Then, by default, you’ve enabled your new additional Developer Tools tab in Excel.
See picture: (click to enlarge)

In our little example we have created 2 dynamic tables with which we want to work.
The goal will be to transfer the data entered in the first table into the second table by means of a button, and then continue to update it.
If you have not already done so, you will first need to unlock the developer tools to get the function of the macros. To enable Developer Tools, go to the tab:
“File” – “Options” – “Customize Ribbon”
and put the appropriate hook there.
Then, by default, you’ve enabled your new additional Developer Tools tab in Excel.
See picture:

2. Record macro in Excel
2. Record macro in Excel
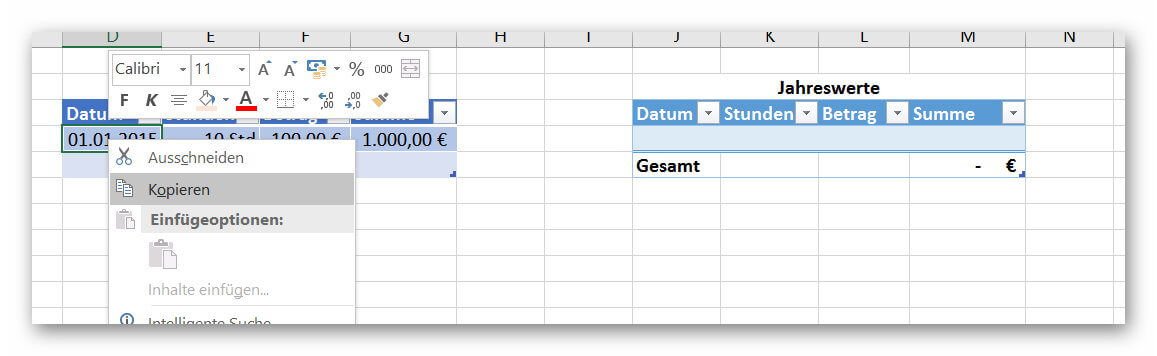
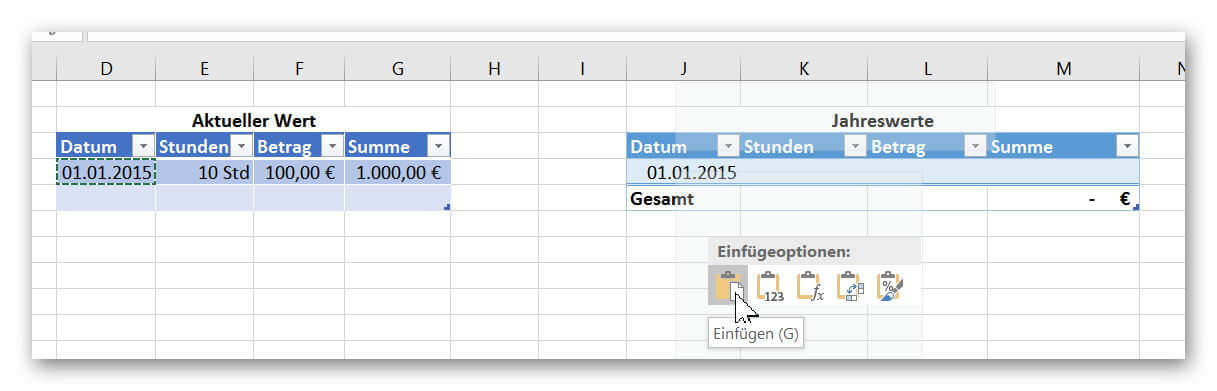
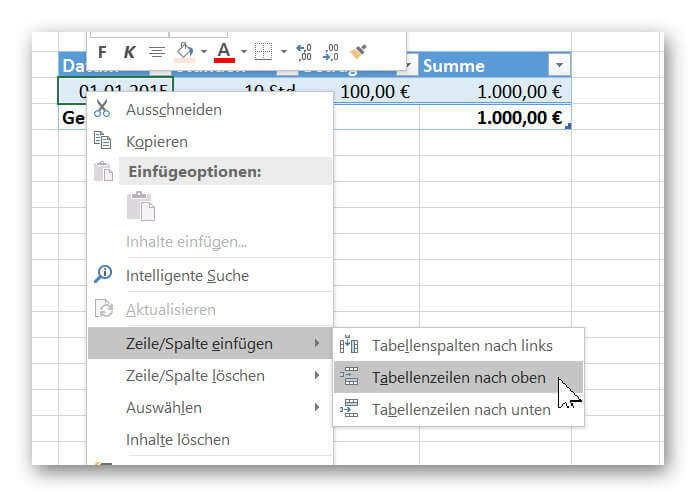
As already said, the goal is to transfer and update data from one table to another via a button.
For this we have to think carefully about our work steps.
We will copy the entries in the first table step by step during the recording, insert them into the second table accordingly, and finally insert a new line to make room for the next entry.
Because we want to create an updating table.
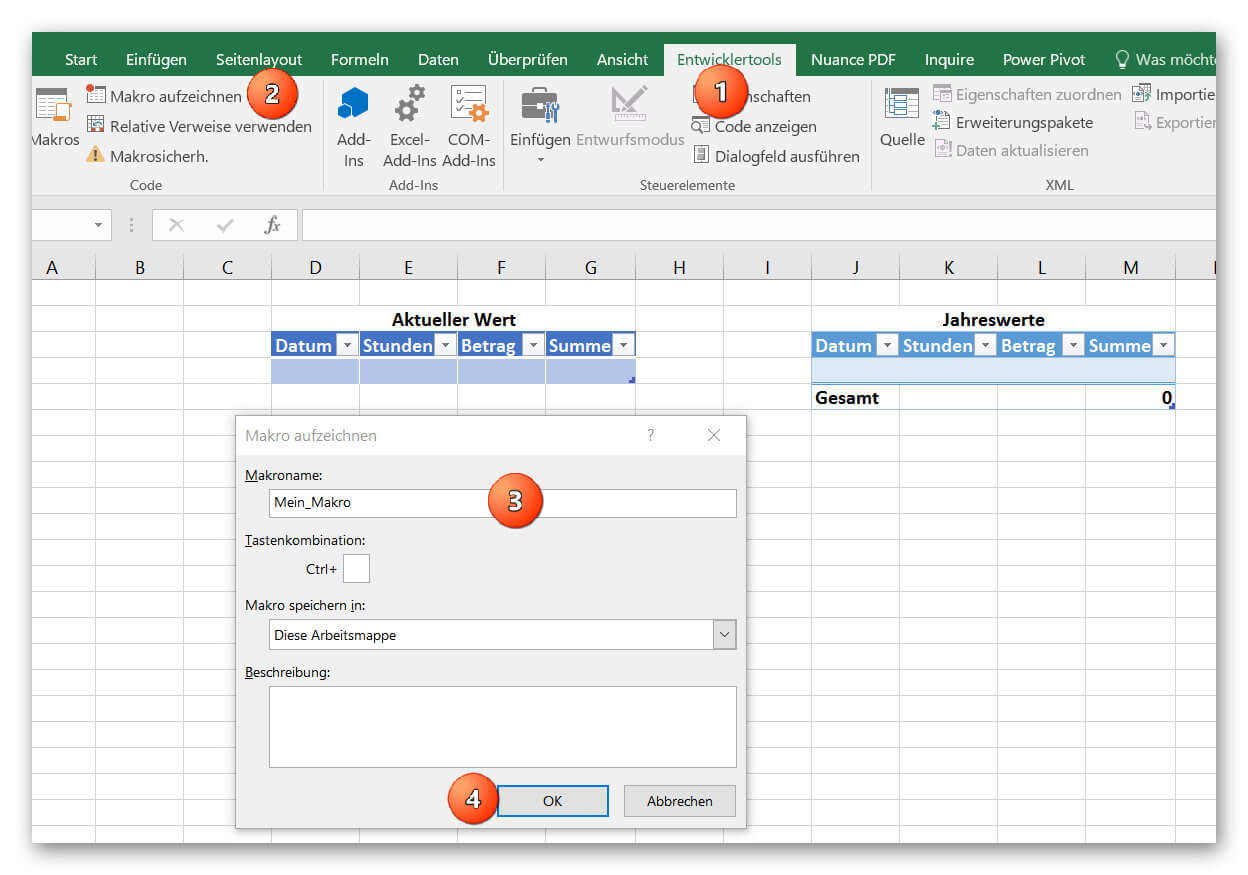
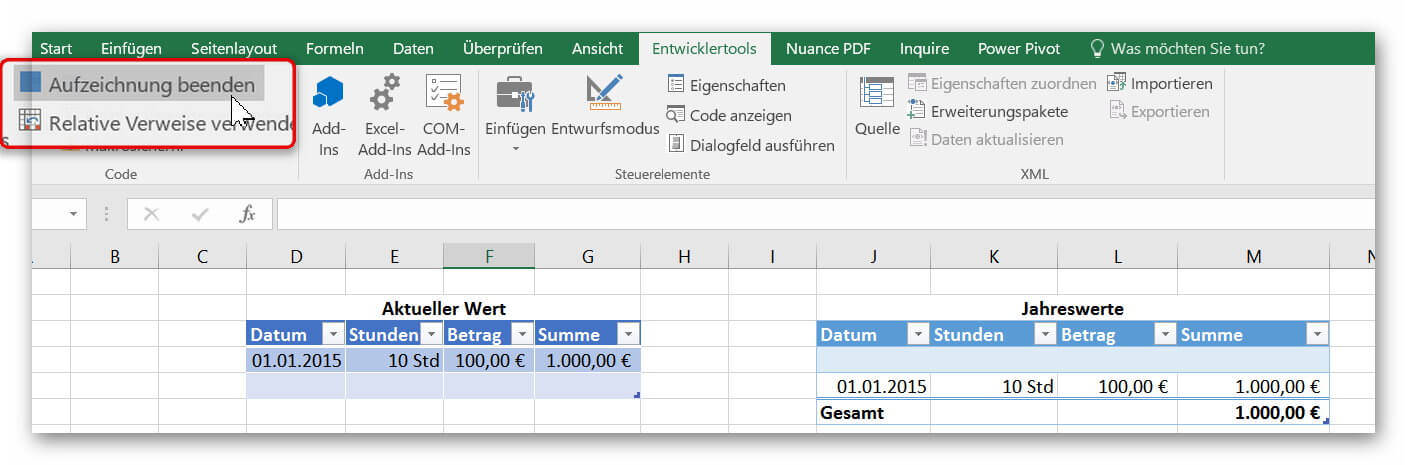
First click on “Record Macro” in the tab “Developer Tools”.
In the next window, give the macro a name, and make sure that there are no spaces. So if you use two or more words (as in our example), you must separate them with a band or underscore.
After clicking on “OK”, the recording starts, and we perform exactly the steps that are to be executed automatically at the push of a button.
When we have completed all the steps, we finish the recording in the register:
“Developer Tools” – “Stop Recording”
See picture: (click to enlarge)

As already said, the goal is to transfer and update data from one table to another via a button.
For this we have to think carefully about our work steps.
We will copy the entries in the first table step by step during the recording, insert them into the second table accordingly, and finally insert a new line to make room for the next entry.
Because we want to create an updating table.
First click on “Record Macro” in the tab “Developer Tools”.
In the next window, give the macro a name, and make sure that there are no spaces. So if you use two or more words (as in our example), you must separate them with a band or underscore.
After clicking on “OK”, the recording starts, and we perform exactly the steps that are to be executed automatically at the push of a button.
When we have completed all the steps, we finish the recording in the register:
“Developer Tools” – “Stop Recording”
See picture:
3. Insert buttons in Excel
3. Insert buttons in Excel
Of course, we would have been able to set a keyboard shortcut to create our macro in this way. But since we like it firstly comfortable, and secondly probably after some time of non-use anyway no one has noted the shortcut, we will use a button for this purpose.
It’s always there, and it just looks fancier.
To add a button, click on the tab:
“Developer Tools” on “Paste”
and find out there the element “button” out.
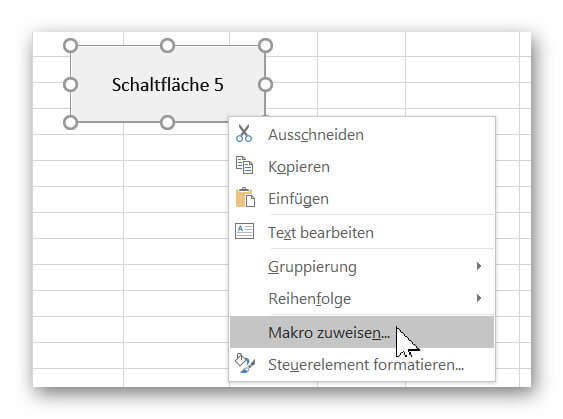
In order for our created button to execute our macro, we have to assign the corresponding macro to it.
To do this, right-click on the button, select “Assign Macro” and select the macro from your list (if you have created several macros).
Of course, you can also assign a unique name to the button by right-clicking on “Edit Name”.
See picture: (click to enlarge)

You can now transfer all entries from one list to another at the touch of a button.
As you have seen, the process is far less complicated than it first appeared. Of course, you can use the macro function in Excel to automate significantly more complex processes, which is why you are welcome to be creative at this point.
And always remember: Excel does not bite ;)
Of course, we would have been able to set a keyboard shortcut to create our macro in this way. But since we like it firstly comfortable, and secondly probably after some time of non-use anyway no one has noted the shortcut, we will use a button for this purpose.
It’s always there, and it just looks fancier.
To add a button, click on the tab:
“Developer Tools” on “Paste”
and find out there the element “button” out.
In order for our created button to execute our macro, we have to assign the corresponding macro to it.
To do this, right-click on the button, select “Assign Macro” and select the macro from your list (if you have created several macros).
Of course, you can also assign a unique name to the button by right-clicking on “Edit Name”.
See picture: (click to enlarge)
You can now transfer all entries from one list to another at the touch of a button.
As you have seen, the process is far less complicated than it first appeared. Of course, you can use the macro function in Excel to automate significantly more complex processes, which is why you are welcome to be creative at this point.
And always remember: Excel does not bite ;)
Popular Posts:

The “Zero Inbox” method with Outlook: How to permanently get your mailbox under control.
Caught red-handed? Your Outlook inbox has 1000+ emails? That's pure stress. Stop the email deluge with the "Zero Inbox" method. We'll show you how to clean up your inbox and regain control using Quick Steps and rules.

5 simple security rules against phishing and spam that everyone should know
Deceptively authentic emails from your bank, DHL, or PayPal? That's phishing! Data theft and viruses are a daily threat. We'll show you 5 simple rules (2FA, password managers, etc.) to protect yourself immediately and effectively and help you spot scammers.

The 5 best tips for a clean folder structure on your PC and in the cloud
Say goodbye to file chaos! "Offer_final_v2.docx" is a thing of the past. Learn 5 simple tips for a perfect folder structure on your PC and in the cloud (OneDrive). With proper file naming and archive rules, you'll find everything instantly.

Never do the same thing again: How to record a macro in Excel
Tired of repetitive tasks in Excel? Learn how to create your first personal "magic button" with the macro recorder. Automate formatting and save hours – no programming required! Click here for easy instructions.

IMAP vs. Local Folders: The secret to your Outlook structure and why it matters
Do you know the difference between IMAP and local folders in Outlook? Incorrect use can lead to data loss! We'll explain simply what belongs where, how to clean up your mailbox, and how to archive emails securely and for the long term.

Der ultimative Effizienz-Boost: Wie Excel, Word und Outlook für Sie zusammenarbeiten
Schluss mit manuellem Kopieren! Lernen Sie, wie Sie Excel-Listen, Word-Vorlagen & Outlook verbinden, um personalisierte Serien-E-Mails automatisch zu versenden. Sparen Sie Zeit, vermeiden Sie Fehler und steigern Sie Ihre Effizienz. Hier geht's zur einfachen Anleitung!
Offers 2024: Word & Excel Templates


Popular Posts:
The “Zero Inbox” method with Outlook: How to permanently get your mailbox under control.
Caught red-handed? Your Outlook inbox has 1000+ emails? That's pure stress. Stop the email deluge with the "Zero Inbox" method. We'll show you how to clean up your inbox and regain control using Quick Steps and rules.
5 simple security rules against phishing and spam that everyone should know
Deceptively authentic emails from your bank, DHL, or PayPal? That's phishing! Data theft and viruses are a daily threat. We'll show you 5 simple rules (2FA, password managers, etc.) to protect yourself immediately and effectively and help you spot scammers.
The 5 best tips for a clean folder structure on your PC and in the cloud
Say goodbye to file chaos! "Offer_final_v2.docx" is a thing of the past. Learn 5 simple tips for a perfect folder structure on your PC and in the cloud (OneDrive). With proper file naming and archive rules, you'll find everything instantly.
Never do the same thing again: How to record a macro in Excel
Tired of repetitive tasks in Excel? Learn how to create your first personal "magic button" with the macro recorder. Automate formatting and save hours – no programming required! Click here for easy instructions.
IMAP vs. Local Folders: The secret to your Outlook structure and why it matters
Do you know the difference between IMAP and local folders in Outlook? Incorrect use can lead to data loss! We'll explain simply what belongs where, how to clean up your mailbox, and how to archive emails securely and for the long term.
Der ultimative Effizienz-Boost: Wie Excel, Word und Outlook für Sie zusammenarbeiten
Schluss mit manuellem Kopieren! Lernen Sie, wie Sie Excel-Listen, Word-Vorlagen & Outlook verbinden, um personalisierte Serien-E-Mails automatisch zu versenden. Sparen Sie Zeit, vermeiden Sie Fehler und steigern Sie Ihre Effizienz. Hier geht's zur einfachen Anleitung!
Offers 2024: Word & Excel Templates