Save Emails and contacts as pst file in Outlook
You probably also know the problem that not only your Outlook mailbox gets more and more full with time, but also the contact list. Of course, it would be very annoying if all your e-mails and contacts were lost due to a system error or a hard drive failure. Because many of these e-mails and contacts are very important, and not so easy to get back.
Read our article on how to create a backup of your contacts and emails in Microsoft Outlook.
1. Open import / export assistant
1. Open import / export assistant
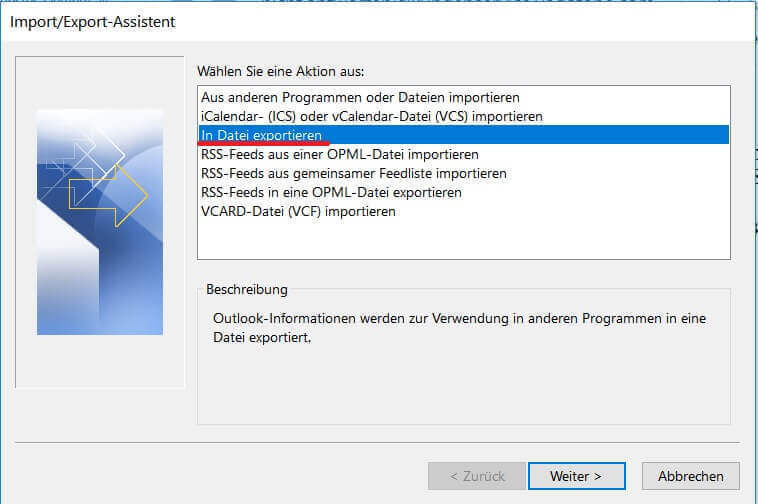
The first thing you need to do in Outlook is to open the Import / Export Wizard.
- To do this, go to “File” / “Open and Export”.
- Then on “Import-Export”.
- And here you select the item “Export to file”.
See picture (click to enlarge)
The first thing you need to do in Outlook is to open the Import / Export Wizard.
- To do this, go to “File” / “Open and Export”.
- Then on “Import-Export”.
- And here you select the item “Export to file”.
See picture (click to enlarge)
2. Select file type
2. Select file type
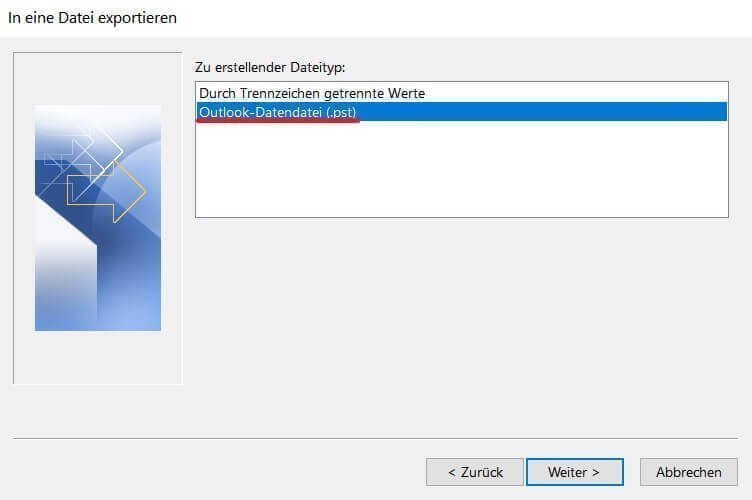
Since we want to create a backup that we can later integrate again into Outlook, we select here the item “Outlook data file (pst)”.
By the way:
The abbreviation “pst” stands for “Personal Store”
See picture (click to enlarge)

Since we want to create a backup that we can later integrate again into Outlook, we select here the item “Outlook data file (pst)”.
By the way:
The abbreviation “pst” stands for “Personal Store”
See picture (click to enlarge)
3. Select folders to backup
3. Select folders to backup
In the next step, we are asked to select the folders to be backed up, such as Inbox, Outbox, Contacts, and so on.
We recommend to include all folders
As a result, you have created a complete backup of all emails and contacts as a traceable snapshot.
See picture (click to enlarge)

In the next step, we are asked to select the folders to be backed up, such as Inbox, Outbox, Contacts, and so on.
We recommend to include all folders
As a result, you have created a complete backup of all emails and contacts as a traceable snapshot.
See picture (click to enlarge)
4. Select location for backup
4. Select location for backup
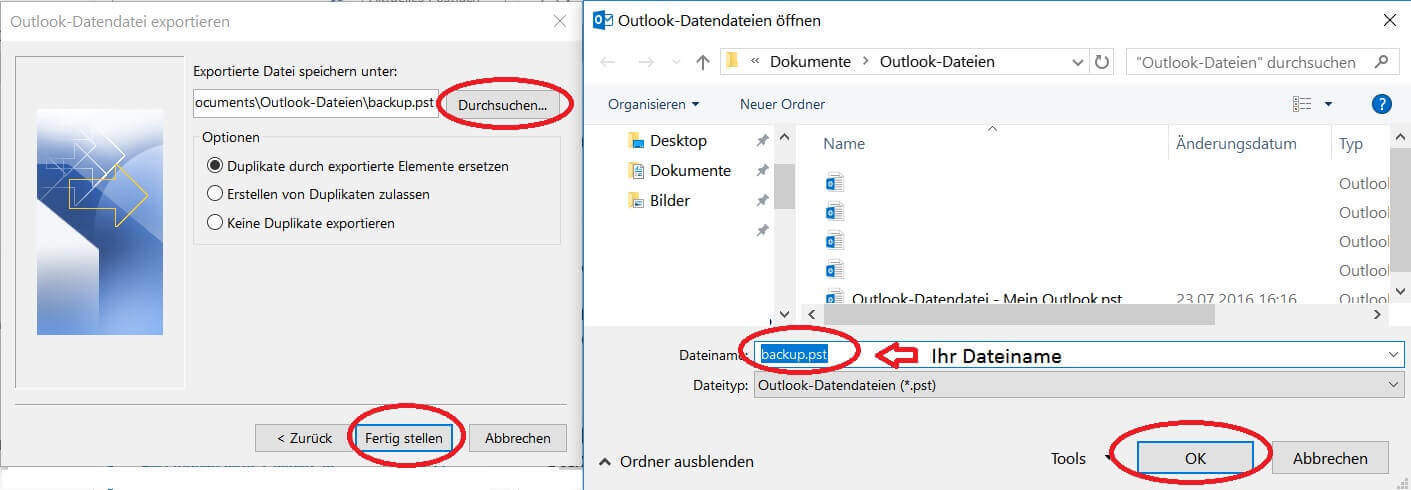
Next, you need to specify a location for your backup file, and also assign a file name (which always ends with “.pst”!).
By default, these backups are always under “Documents / Outlook Files”
We also recommend assigning a filename that you can track after a longer period of time, so that you will not have to identify the file later in the explorer simply based on the creation date
See picture (click to enlarge)
Depending on the size of your e-mail inbox and the speed of your hard drive, the backup process can now take a few seconds to a few minutes.
You will then receive no further message about the successful backup, but see this only because the “hourglass” icon (instead of mouse pointer) disappears again.
Your saved file can now be found at:
C: / User / YOUR USERNAME / Documents / Outlook files
See picture (click to enlarge)
5. Insert PST file into Outlook
5. Insert PST file into Outlook
Ideally, we will never need the backup, but just in case they have it ready.
And now we want to reinsert them after “for example reinstalling Outlook”.
To do this, open the Import / Export Wizard again in Outlook and select:
“Import from other programs or files”.
See picture (click to enlarge)
In the following dialog boxes, select the desired file for the backup import.
Again, this process may take some time depending on the file size.
See picture (click to enlarge)
Note:
After the backup was created, you have restored all e-mail and contacts, but not your own e-mail accounts, and Outlook settings. We will discuss this topic at a later date.
Popular Posts:

Die Renaissance des Büros: Warum Präsenz manchmal unschlagbar ist
Homeoffice bietet Fokus, doch das Büro bleibt als sozialer Anker unverzichtbar. Spontane Innovation, direktes Voneinander-Lernen und echtes Wir-Gefühl sind digital kaum zu ersetzen. Lesen Sie, warum Präsenz oft besser ist und wie die ideale Mischung für moderne Teams aussieht.

New Work & Moderne Karriere: Warum die Karriereleiter ausgedient hat
Die klassische Karriereleiter hat ausgedient. New Work fordert ein neues Denken: Skills statt Titel, Netzwerk statt Hierarchie. Erfahre, warum das "Karriere-Klettergerüst" deine neue Realität ist und wie du dich mit 4 konkreten Schritten zukunftssicher aufstellst.

Die Homeoffice-Falle: Warum unsichtbare Arbeit deine Beförderung gefährdet
Produktiv im Homeoffice, doch befördert wird der Kollege im Büro? Willkommen in der Homeoffice-Falle. "Proximity Bias" lässt deine Leistung oft unsichtbar werden. Lerne 4 Strategien, wie du auch remote sichtbar bleibst und deine Karriere sicherst – ganz ohne Wichtigtuerei.

Microsoft Loop in Teams: The revolution of your notes?
What exactly are these Loop components in Microsoft Teams? We'll show you how these "living mini-documents" can accelerate your teamwork. From dynamic agendas to shared, real-time checklists – discover practical use cases for your everyday work.

Career booster 2026: These Microsoft Office skills will take you further!
A new year, new career opportunities! But which Office skills will really be in demand in 2026? "Skilled use" is no longer enough. We'll show you today's must-haves – like advanced Excel, using AI in the office, and relevant certifications for your resume.

Why Zero Trust doesn’t work without identity protection!
Zero Trust means: Trust no one, verify everyone. Identity protection is at the heart of this modern security model. Learn how IAM, MFA, Conditional Access, and the principle of least privilege effectively protect your business when the old network perimeter is gone.
Offers 2024: Word & Excel Templates


Popular Posts:
Die Renaissance des Büros: Warum Präsenz manchmal unschlagbar ist
Homeoffice bietet Fokus, doch das Büro bleibt als sozialer Anker unverzichtbar. Spontane Innovation, direktes Voneinander-Lernen und echtes Wir-Gefühl sind digital kaum zu ersetzen. Lesen Sie, warum Präsenz oft besser ist und wie die ideale Mischung für moderne Teams aussieht.
New Work & Moderne Karriere: Warum die Karriereleiter ausgedient hat
Die klassische Karriereleiter hat ausgedient. New Work fordert ein neues Denken: Skills statt Titel, Netzwerk statt Hierarchie. Erfahre, warum das "Karriere-Klettergerüst" deine neue Realität ist und wie du dich mit 4 konkreten Schritten zukunftssicher aufstellst.
Die Homeoffice-Falle: Warum unsichtbare Arbeit deine Beförderung gefährdet
Produktiv im Homeoffice, doch befördert wird der Kollege im Büro? Willkommen in der Homeoffice-Falle. "Proximity Bias" lässt deine Leistung oft unsichtbar werden. Lerne 4 Strategien, wie du auch remote sichtbar bleibst und deine Karriere sicherst – ganz ohne Wichtigtuerei.
Microsoft Loop in Teams: The revolution of your notes?
What exactly are these Loop components in Microsoft Teams? We'll show you how these "living mini-documents" can accelerate your teamwork. From dynamic agendas to shared, real-time checklists – discover practical use cases for your everyday work.
Career booster 2026: These Microsoft Office skills will take you further!
A new year, new career opportunities! But which Office skills will really be in demand in 2026? "Skilled use" is no longer enough. We'll show you today's must-haves – like advanced Excel, using AI in the office, and relevant certifications for your resume.
Why Zero Trust doesn’t work without identity protection!
Zero Trust means: Trust no one, verify everyone. Identity protection is at the heart of this modern security model. Learn how IAM, MFA, Conditional Access, and the principle of least privilege effectively protect your business when the old network perimeter is gone.
Offers 2024: Word & Excel Templates