Create flyers and business cards with Word
If you take the step into self-employment, or are organizer of events, you will not miss flyers and business cards.
Because even though they only have a response rate of 1% – 3% on average, they are part of the overall concept for public relations as well as online marketing.
Of course, you have the option of designing your flyers online with appropriate tools, but they are usually bound to given layouts and other restrictions.
It’s just as easy with Word, which can mean far more than just word processing.
How to design attractive flyers with Word 2016 can be read in our article.
1. Set the appropriate format
1. Set the appropriate format
For our flyer, we must first decide which format this should have.
In our example, we just take a very common size with DIN Lang (105mm x 210mm).
Furthermore, this should of course be two-sided in the pressure.
And now it starts:
- Open a new blank Word document
- In the Layout tab – Borders – Custom margins
- In the next window in the Page margins tab, set 0.5cm in all directions
- In the Paper tab, select Custom Size and set the Width to 10.9cm and the height at 21.4cm
- Confirm your entries with Ok
See picture: (click to enlarge)

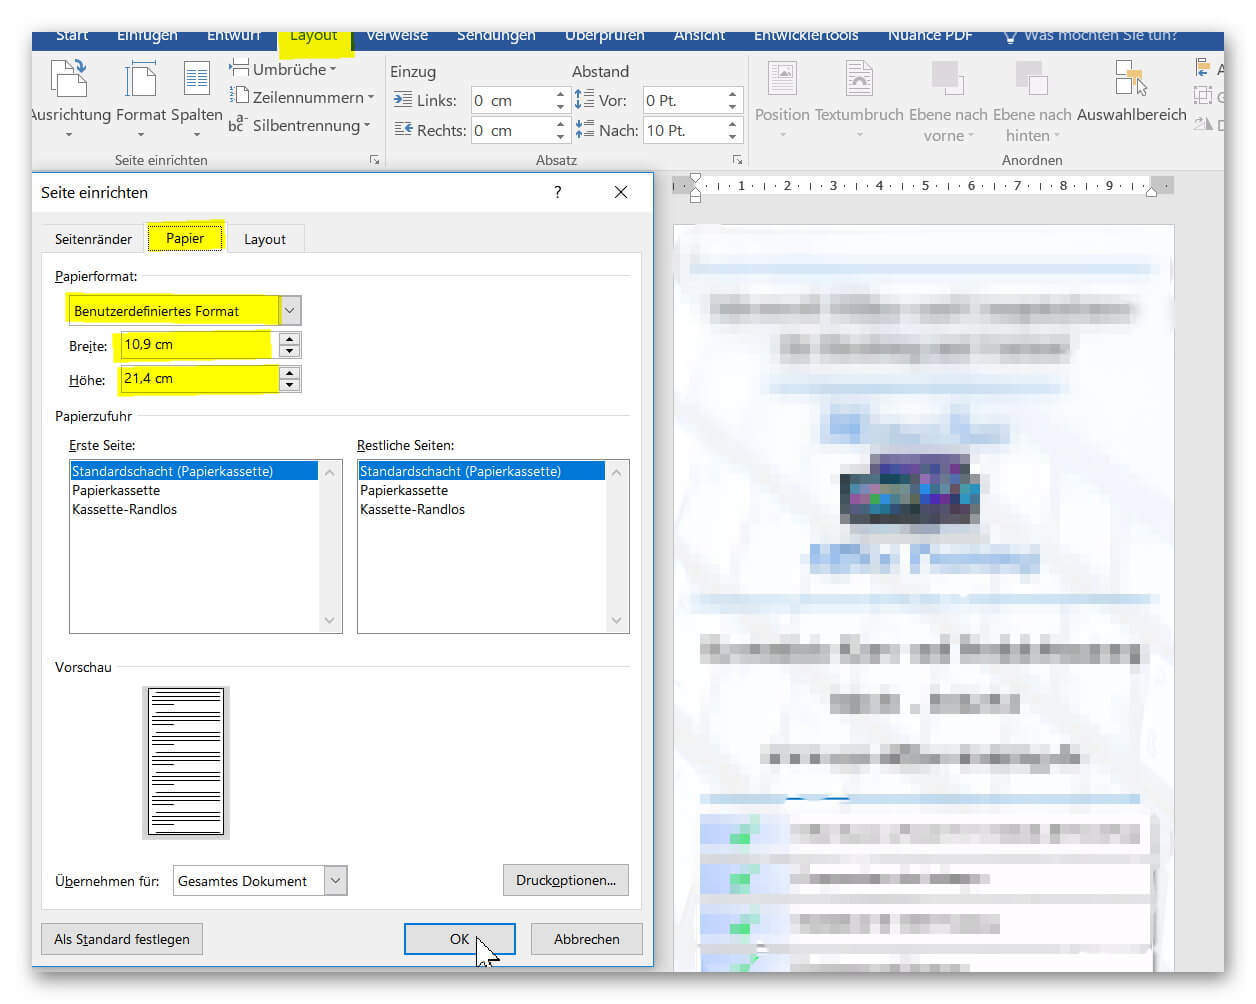
Now we’ve already laid the foundation for the first page of our flyer where we can start building.
For the reverse side, you can either create a new page in the existing document, or you simply save the existing document, then copy it and save it under a new name (for example, back flyer). Then you would have separated both documents cleanly.
For later printing we need anyway 2 PDF or image files that we can upload, so the separation makes sense here.
For our flyer, we must first decide which format this should have.
In our example, we just take a very common size with DIN Lang (105mm x 210mm).
Furthermore, this should of course be two-sided in the pressure.
And now it starts:
- Open a new blank Word document
- In the Layout tab – Borders – Custom margins
- In the next window in the Page margins tab, set 0.5cm in all directions
- In the Paper tab, select Custom Size and set the Width to 10.9cm and the height at 21.4cm
- Confirm your entries with Ok
See picture:
Now we’ve already laid the foundation for the first page of our flyer where we can start building.
For the reverse side, you can either create a new page in the existing document, or you simply save the existing document, then copy it and save it under a new name (for example, back flyer). Then you would have separated both documents cleanly.
For later printing we need anyway 2 PDF or image files that we can upload, so the separation makes sense here.
2. Set the background color of the page
2. Set the background color of the page
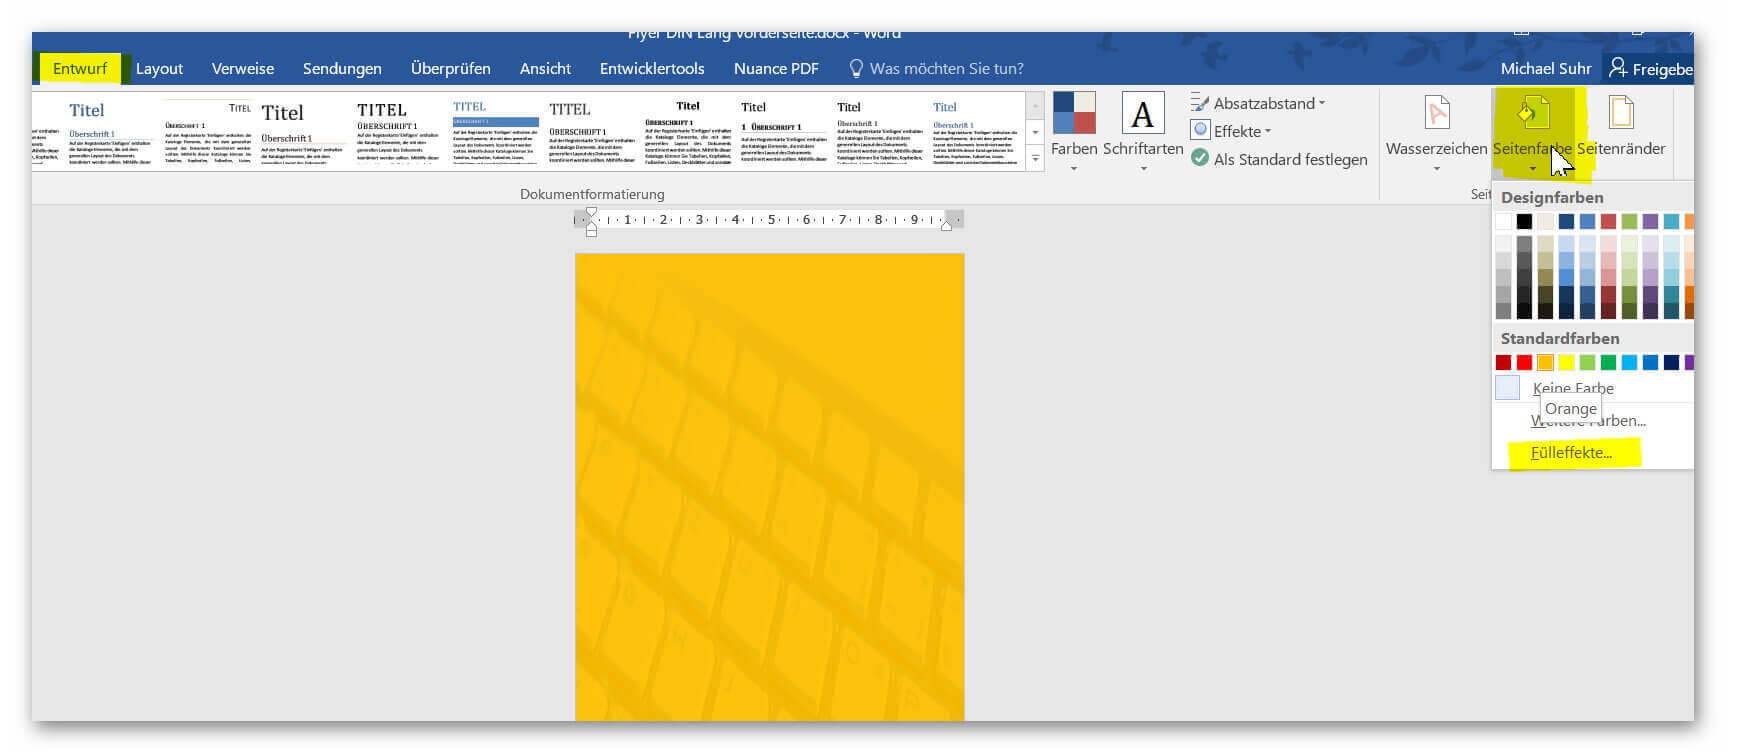
If you want to have a different base color than the standard white, then this is quite simple as follows:
- On the Design tab
- In the right area on page color
- Select the appropriate color
See picture: (click to enlarge)

If you want to have a different base color than the standard white, then this is quite simple as follows:
- On the Design tab
- In the right area on page color
- Select the appropriate color
See picture:
3. Pattern or picture as page background
3. Pattern or picture as page background
Of course, you can also choose a gradient or an image instead of a background color.
To do this, proceed as follows:
- In the Design tab
- On the right side on side color and then fill effects
- There you can choose a color gradient, pattern or image as background
See picture: (click to enlarge)
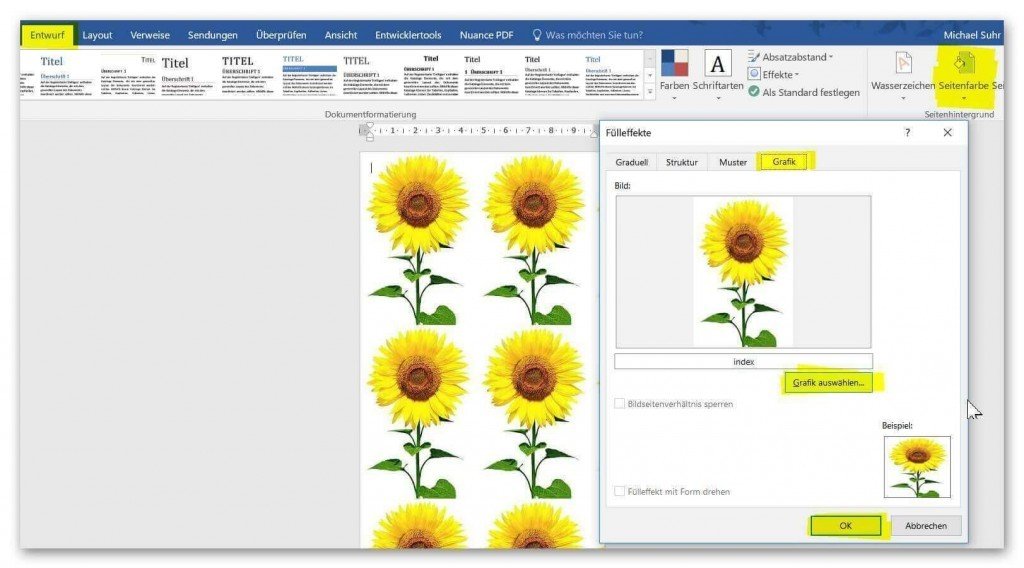
Depending on what image you have selected here, you may have the problem of what you see in the image above. Namely that the graphic is represented as often as possible by Word on the document.
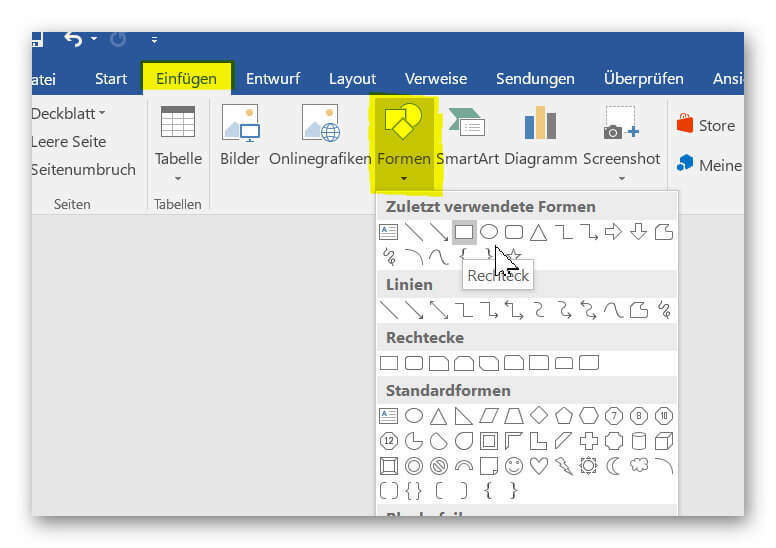
But if we prefer to show our sunflower photo stretched as background this is not a problem. For this we simply work with forms that we can also format arbitrarily.
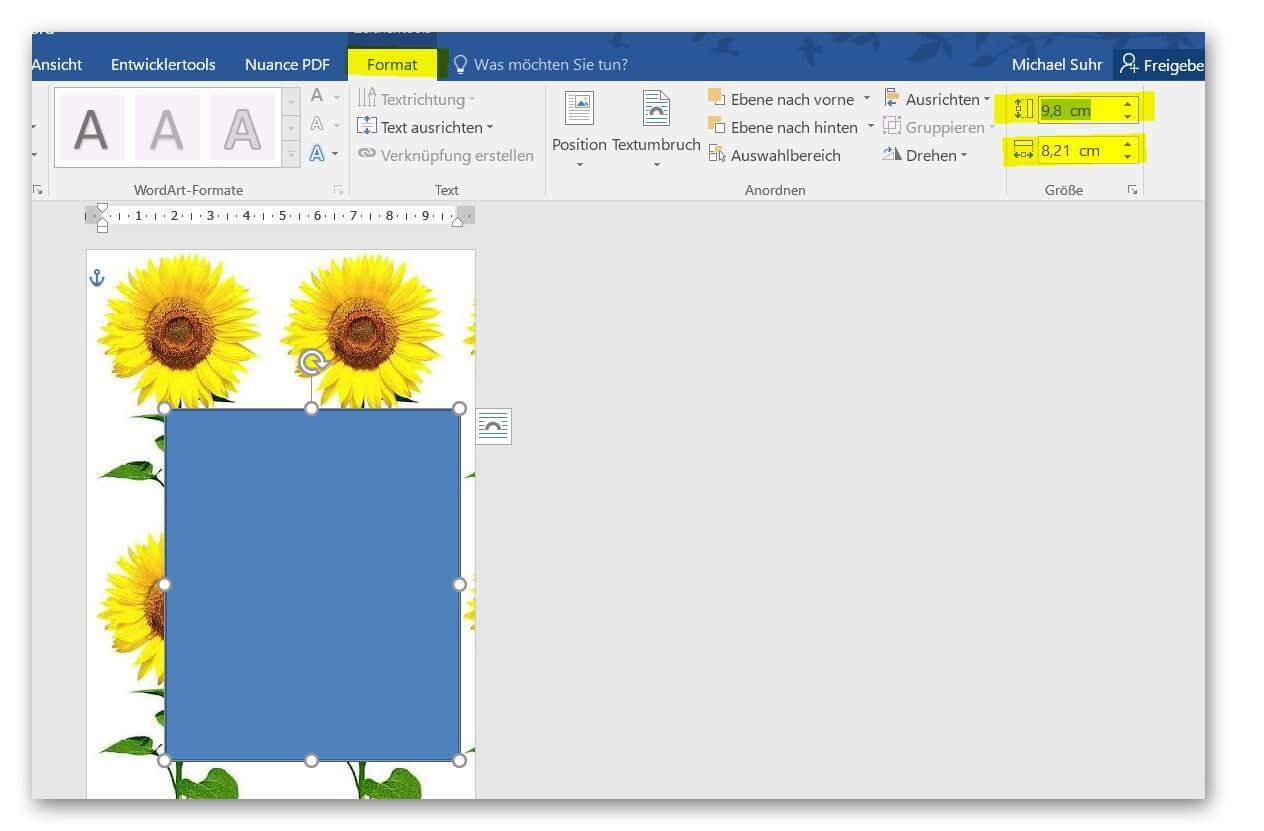
- To do this, go to Forms in the Insert tab
- Select rectangle
- Draw a shape of any size in your document
- Then use the Drawing Tools tab and then Format on the right to set exactly the dimensions of the document in cm
See picture: (click to enlarge)
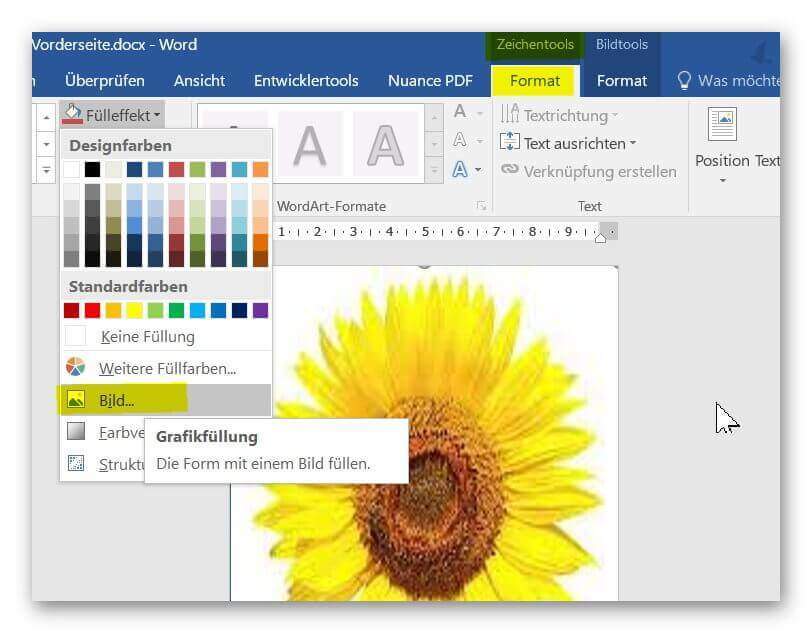
Next we format our form as follows:
- Click in the form to mark it as an active element
- On the Drawing Tools tab, click Format
- Under Shape Types, choose Fill Effect and choose Image
- Under Shape Contour do not select a contour (optional)
See picture: (click to enlarge)
Now we have practically (as with a graphics program) two levels superimposed, and can now work on this too.
In the design process of your flyer or business cards, you will usually have much more than just one level.
Of course, you can also choose a gradient or an image instead of a background color.
To do this, proceed as follows:
- In the Design tab
- On the right side on side color and then fill effects
- There you can choose a color gradient, pattern or image as background
See picture:
Depending on what image you have selected here, you may have the problem of what you see in the image above. Namely that the graphic is represented as often as possible by Word on the document.
But if we prefer to show our sunflower photo stretched as background this is not a problem. For this we simply work with forms that we can also format arbitrarily.
- To do this, go to Forms in the Insert tab
- Select rectangle
- Draw a shape of any size in your document
- Then use the Drawing Tools tab and then Format on the right to set exactly the dimensions of the document in cm
See picture:
Next we format our form as follows:
- Click in the form to mark it as an active element
- On the Drawing Tools tab, click Format
- Under Shape Types, choose Fill Effect and choose Image
- Under Shape Contour do not select a contour (optional)
See picture:
Now we have practically (as with a graphics program) two levels superimposed, and can now work on this too.
In the design process of your flyer or business cards, you will usually have much more than just one level.
4. Image editing in Word
4. Image editing in Word
Now that we have successfully set our image as a background, we can of course also change this a bit, for example by fading it a bit, or changing the basic hue or something else.
Because ultimately it is “only” a background on which even the actual content should be pure.
For editing, proceed as follows:
- Click in the image to mark it as an active element
- Select the Picture Tools – Format tab
- On the left, under Adjust – Corrections for image correction options
See picture: (click to enlarge)

Here you can let off steam to your heart’s content, and try out all sorts of image customization Word offers.
Now that we have successfully set our image as a background, we can of course also change this a bit, for example by fading it a bit, or changing the basic hue or something else.
Because ultimately it is “only” a background on which even the actual content should be pure.
For editing, proceed as follows:
- Click in the image to mark it as an active element
- Select the Picture Tools – Format tab
- On the left, under Adjust – Corrections for image correction options
See picture:

Here you can let off steam to your heart’s content, and try out all sorts of image customization Word offers.
5. Multicolored page background in word
5. Multicolored page background in word
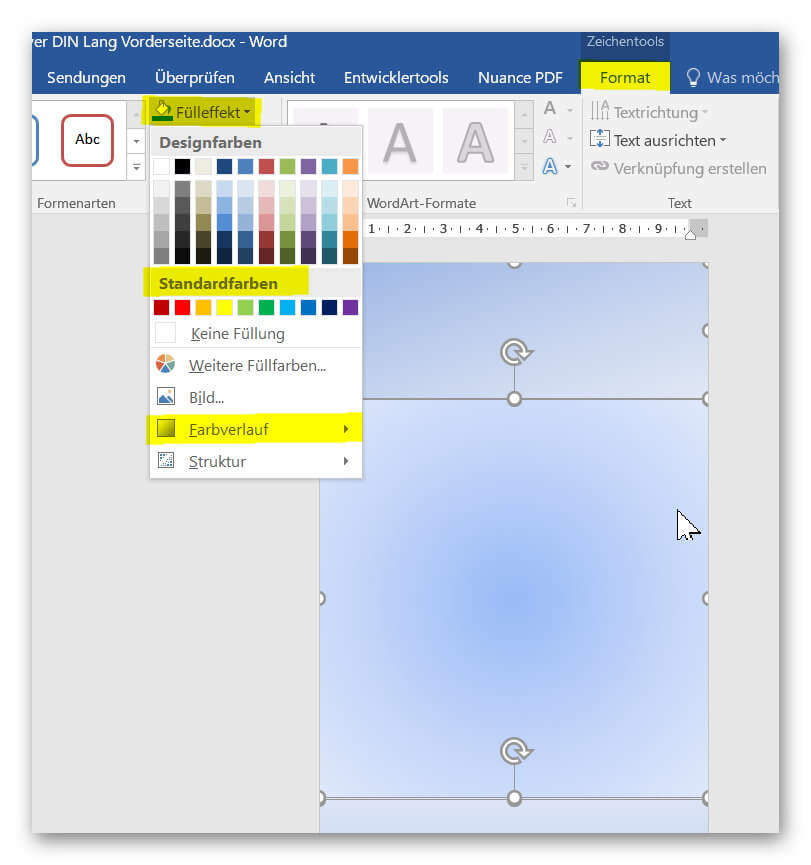
If you want to make your background multicolored, on the one hand you have the possibility to select any color gradient, and also to customize it.
But you can also re-work with shapes, giving the shape a background color or gradient. Here, too, there are no limits to creative freedom.
See picture: (click to enlarge)
6. Work with text fields
6. Work with text fields
Now that we have created our foundation with background image or color, and other graphics, it is of course also a message in written word to communicate.
Now it is, however, at the latest from the time we started to provide our document with forms, it has lost its function for the field of pure word processing.
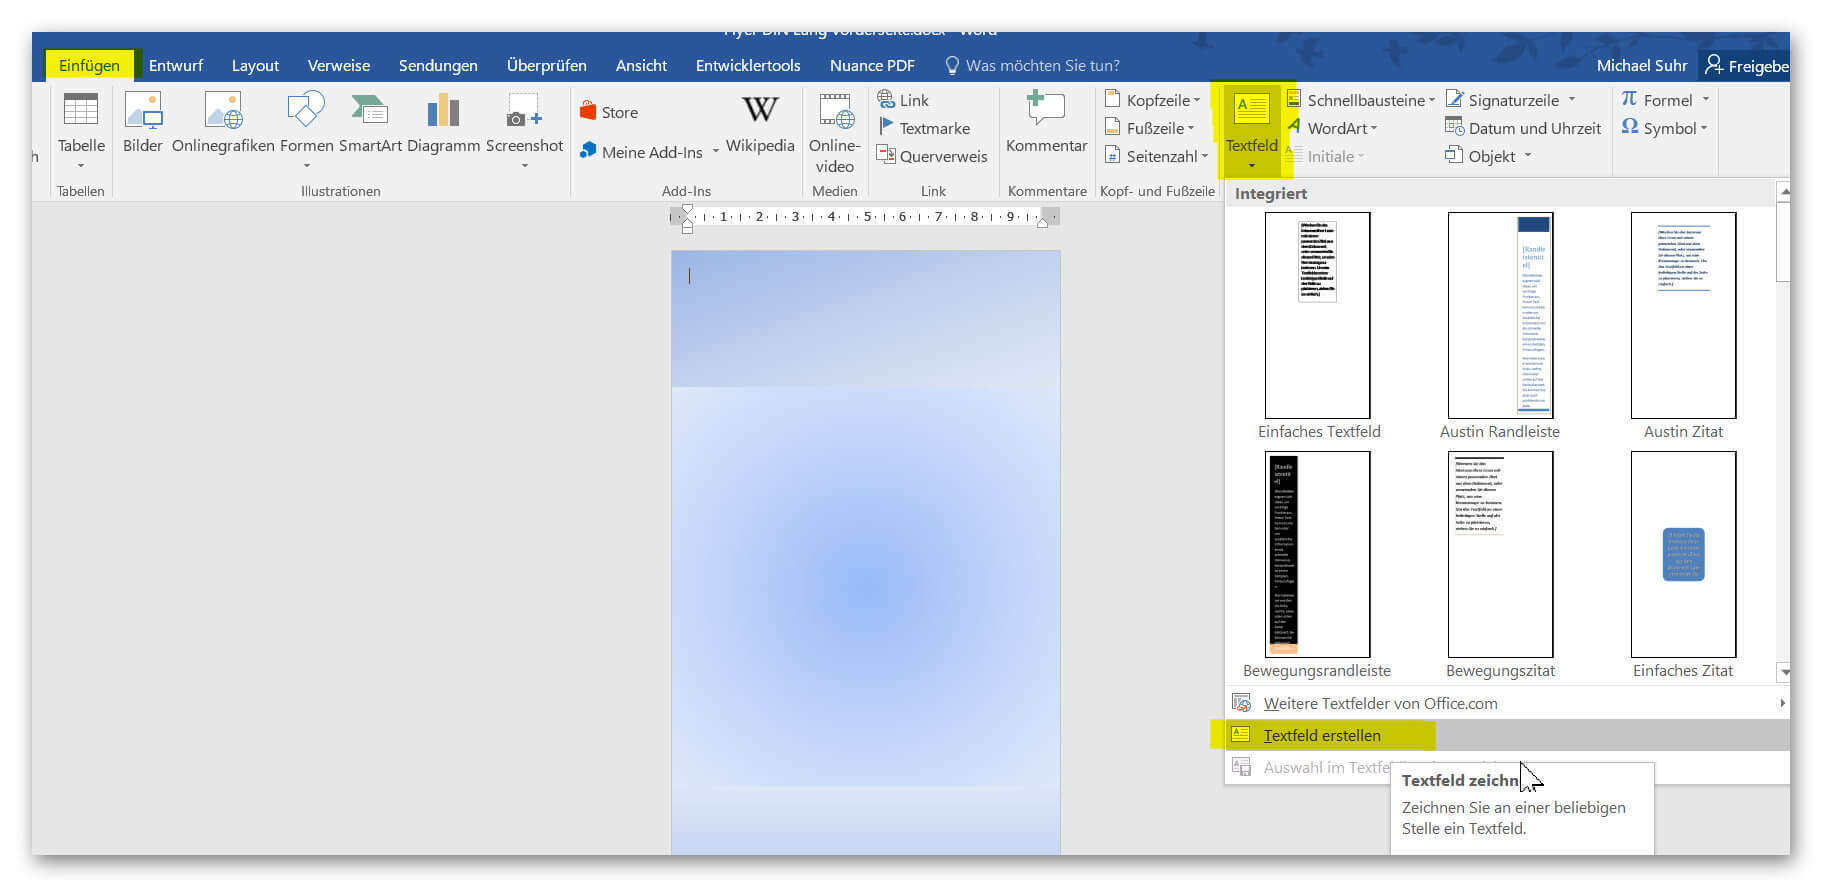
In order to insert texts we could insert text into the already existing forms, or (recommended variant) we simply create another layer with text fields in our flyer.
To do this, we proceed as follows:
- Click on the Insert tab
- In the right pane, then create text box and text box (With the given text fields we can usually do nothing for our purpose.)
See picture: (click to enlarge)
Here we can now use the mouse with a text field in any size, and this at any time over drag on the corners adjust.
Typically, the newly created text box has a white background, and you can already paste your text in the default font setting.
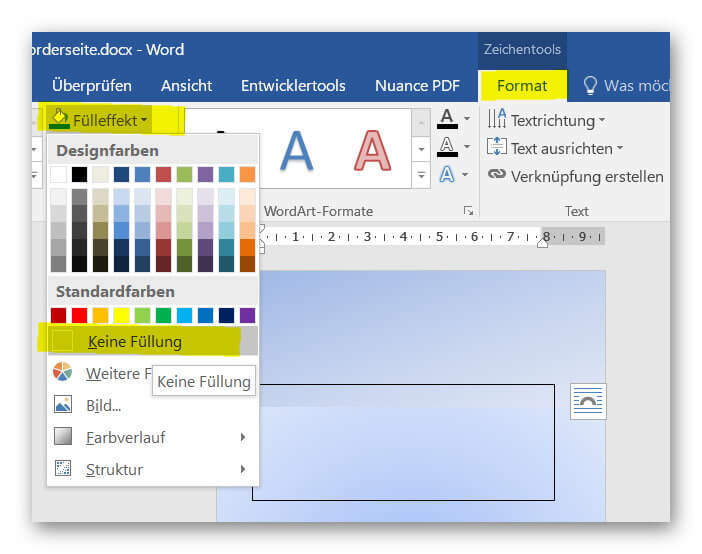
Of course, this can easily be changed as follows:
- Mark text field as active element by mouse click
- On the Drawing Tools – Format – Shapes Types tab – select Fill Effect
- Set the desired background (for example also transparent without background color)
See picture: (click to enlarge)

By using text fields instead of the text fill of the existing graphics you have the advantage that all elements in your flyer are cleanly separated from each other, and can also be edited independently.
Now that we have created our foundation with background image or color, and other graphics, it is of course also a message in written word to communicate.
Now it is, however, at the latest from the time we started to provide our document with forms, it has lost its function for the field of pure word processing.
In order to insert texts we could insert text into the already existing forms, or (recommended variant) we simply create another layer with text fields in our flyer.
To do this, we proceed as follows:
- Click on the Insert tab
- In the right pane, then create text box and text box (With the given text fields we can usually do nothing for our purpose.)
See picture: (click to enlarge)
Here we can now use the mouse with a text field in any size, and this at any time over drag on the corners adjust.
Typically, the newly created text box has a white background, and you can already paste your text in the default font setting.
Of course, this can easily be changed as follows:
- Mark text field as active element by mouse click
- On the Drawing Tools – Format – Shapes Types tab – select Fill Effect
- Set the desired background (for example also transparent without background color)
See picture: (click to enlarge)
By using text fields instead of the text fill of the existing graphics you have the advantage that all elements in your flyer are cleanly separated from each other, and can also be edited independently.
7. Design texts with Word Art
7. Design texts with Word Art
In the next step, of course, we want to make our text a little more artistic, because a flyer is not a doctoral thesis, but is also meant to express emotions and awaken in the viewer.
Now we can either simply choose one of the many different fonts via the Start tab and adjust them in color and size, or we use the Word Art function, which gives us templates for artistically designed fonts, and these as well Graphics of your choice (eg with shadows, color gradients, etc.) can adjust.
- To do this, select the text in your text box
- And in the Format tab, select Word Art Formats
See picture: (click to enlarge)
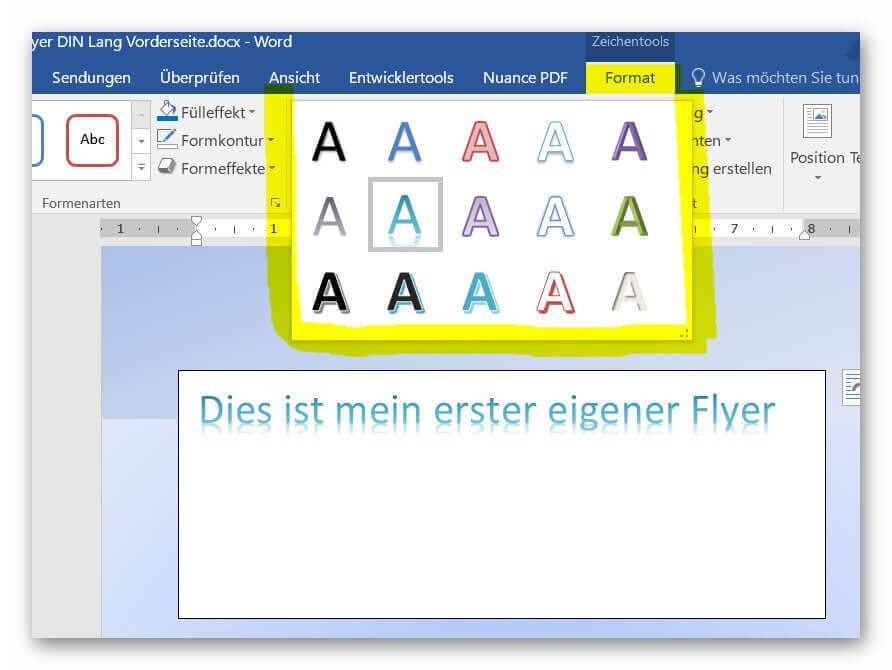
You can now adjust these again using the editing options (directly to the right of the Word Art formats).
In the next step, of course, we want to make our text a little more artistic, because a flyer is not a doctoral thesis, but is also meant to express emotions and awaken in the viewer.
Now we can either simply choose one of the many different fonts via the Start tab and adjust them in color and size, or we use the Word Art function, which gives us templates for artistically designed fonts, and these as well Graphics of your choice (eg with shadows, color gradients, etc.) can adjust.
- To do this, select the text in your text box
- And in the Format tab, select Word Art Formats
See picture: (click to enlarge)
You can now adjust these again using the editing options (directly to the right of the Word Art formats).
8. Save Word as a PDF or image
8. Save Word as a PDF or image
In the last step after the flyer with front and back has been designed, of course, the question still arises as we bring it to paper now.
The question of whether to print a flyer or to print it yourself is not really necessary, as you can never produce such a mass-printing matter with your home hardware in terms of quality and above all cost.
We recommend saving the document either as a PDF or as a graphic, and then uploading and commissioning it with a corresponding service.
Popular Posts:

5 simple security rules against phishing and spam that everyone should know
Deceptively authentic emails from your bank, DHL, or PayPal? That's phishing! Data theft and viruses are a daily threat. We'll show you 5 simple rules (2FA, password managers, etc.) to protect yourself immediately and effectively and help you spot scammers.

The 5 best tips for a clean folder structure on your PC and in the cloud
Say goodbye to file chaos! "Offer_final_v2.docx" is a thing of the past. Learn 5 simple tips for a perfect folder structure on your PC and in the cloud (OneDrive). With proper file naming and archive rules, you'll find everything instantly.

Never do the same thing again: How to record a macro in Excel
Tired of repetitive tasks in Excel? Learn how to create your first personal "magic button" with the macro recorder. Automate formatting and save hours – no programming required! Click here for easy instructions.

IMAP vs. Local Folders: The secret to your Outlook structure and why it matters
Do you know the difference between IMAP and local folders in Outlook? Incorrect use can lead to data loss! We'll explain simply what belongs where, how to clean up your mailbox, and how to archive emails securely and for the long term.

Der ultimative Effizienz-Boost: Wie Excel, Word und Outlook für Sie zusammenarbeiten
Schluss mit manuellem Kopieren! Lernen Sie, wie Sie Excel-Listen, Word-Vorlagen & Outlook verbinden, um personalisierte Serien-E-Mails automatisch zu versenden. Sparen Sie Zeit, vermeiden Sie Fehler und steigern Sie Ihre Effizienz. Hier geht's zur einfachen Anleitung!

Agentic AI: The next quantum leap in artificial intelligence?
Forget simple chatbots! Agentic AI is here: Autonomous AI that plans, learns, and solves complex tasks for you. Discover how AI agents will revolutionize the world of work and your everyday life. Are you ready for the future of artificial intelligence?
Offers 2024: Word & Excel Templates


Popular Posts:
5 simple security rules against phishing and spam that everyone should know
Deceptively authentic emails from your bank, DHL, or PayPal? That's phishing! Data theft and viruses are a daily threat. We'll show you 5 simple rules (2FA, password managers, etc.) to protect yourself immediately and effectively and help you spot scammers.
The 5 best tips for a clean folder structure on your PC and in the cloud
Say goodbye to file chaos! "Offer_final_v2.docx" is a thing of the past. Learn 5 simple tips for a perfect folder structure on your PC and in the cloud (OneDrive). With proper file naming and archive rules, you'll find everything instantly.
Never do the same thing again: How to record a macro in Excel
Tired of repetitive tasks in Excel? Learn how to create your first personal "magic button" with the macro recorder. Automate formatting and save hours – no programming required! Click here for easy instructions.
IMAP vs. Local Folders: The secret to your Outlook structure and why it matters
Do you know the difference between IMAP and local folders in Outlook? Incorrect use can lead to data loss! We'll explain simply what belongs where, how to clean up your mailbox, and how to archive emails securely and for the long term.
Der ultimative Effizienz-Boost: Wie Excel, Word und Outlook für Sie zusammenarbeiten
Schluss mit manuellem Kopieren! Lernen Sie, wie Sie Excel-Listen, Word-Vorlagen & Outlook verbinden, um personalisierte Serien-E-Mails automatisch zu versenden. Sparen Sie Zeit, vermeiden Sie Fehler und steigern Sie Ihre Effizienz. Hier geht's zur einfachen Anleitung!
Agentic AI: The next quantum leap in artificial intelligence?
Forget simple chatbots! Agentic AI is here: Autonomous AI that plans, learns, and solves complex tasks for you. Discover how AI agents will revolutionize the world of work and your everyday life. Are you ready for the future of artificial intelligence?
Offers 2024: Word & Excel Templates


