Insert controls and form fields in Word
With Microsoft Word you can not only comfortably create letters, lists and articles with tables of contents, but also go one step further, and Set up your own forms using controls.
But where are these controls, and how can you put them into your document?
Unfortunately, they are hidden by default and need to be unlocked first.
You can read in our article how to use controls in Word 2016 without frustration.
1. Enable controls in Word
1. Enable controls in Word
In the default installation of Word 2016, you will not initially have access to the controls, so we’ll need to enable their visibility first.
To do this, click on the tab in an open Word document:
- “File” – “Options” – “Tap Ribbon”.
- And put the hook there in “developer tools”.
See picture (click to enlarge)

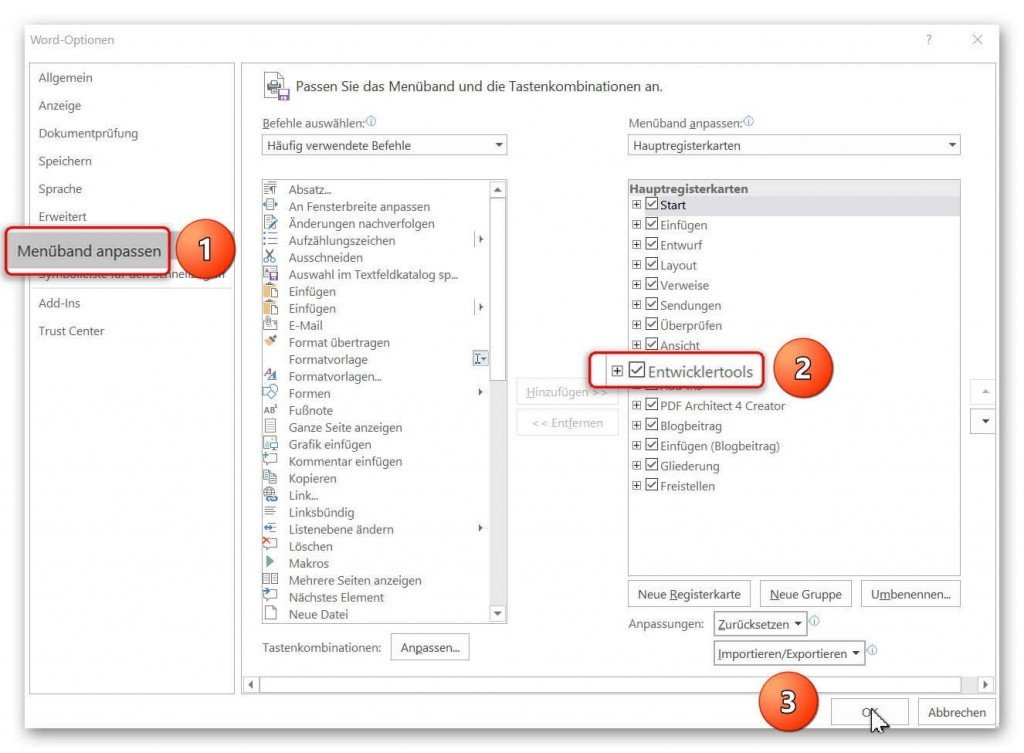
From now on, every Word document has the new Developer Tools tab, which gives you access to various controls.
In the default installation of Word 2016, you will not initially have access to the controls, so we’ll need to enable their visibility first.
To do this, click on the tab in an open Word document:
- “File” – “Options” – “Tap Ribbon”.
- And put the hook there in “developer tools”.
See picture (click to enlarge)
From now on, every Word document has the new Developer Tools tab, which gives you access to various controls.
2. Add control check box in Word
2. Add control check box in Word
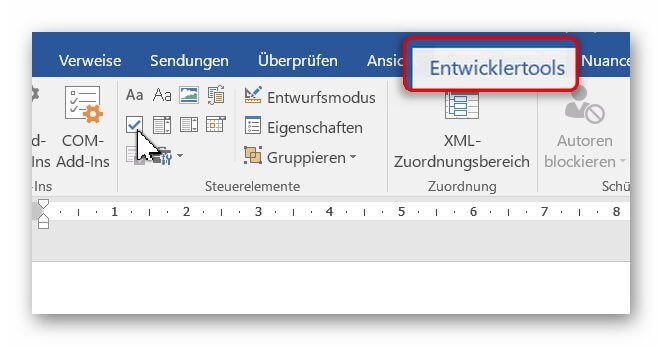
In our first example we would like to insert the classic “checkbox” in our document to create a form.
To do this, we first position the cursor at the desired position in the document, and then select the check box in the Developer tab.
See picture (click to enlarge)

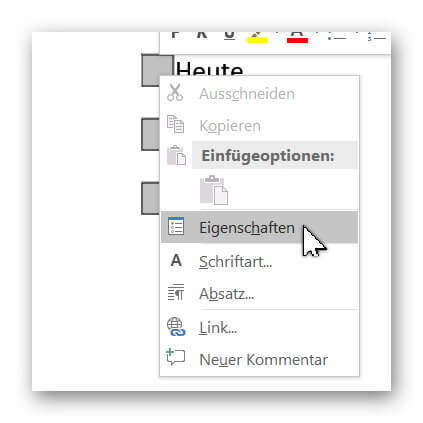
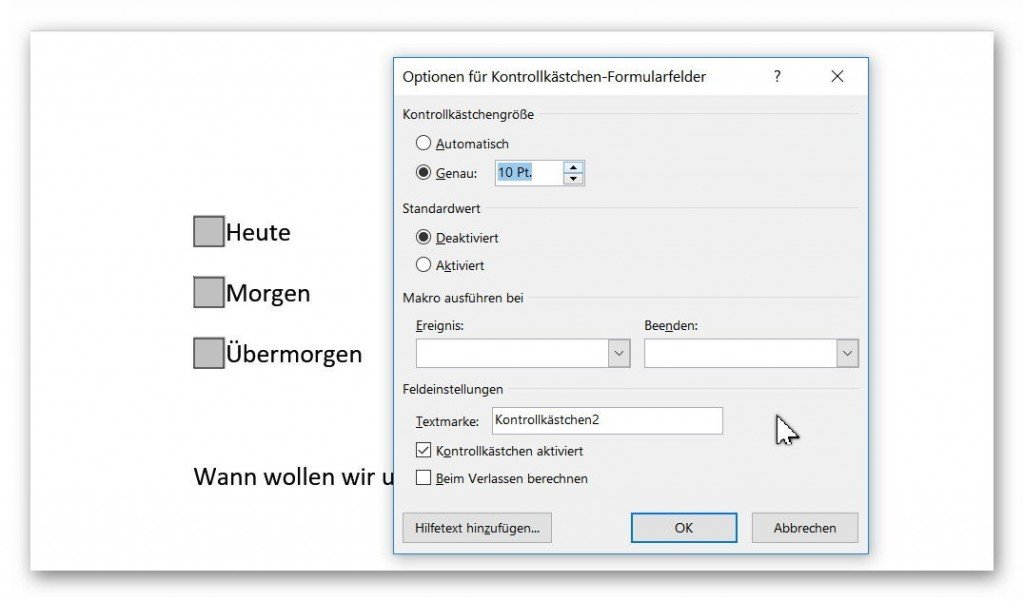
After we have positioned our check boxes, we can also adjust them a bit by clicking the right mouse button over the checkbox in the context menu on “Properties”, and there can make various settings, such as:
“activated by default”, “the size”, or even a “help text”,
which is automatically displayed as a completion help to the future user when pressing F1.
See picture (click to enlarge)
In our first example we would like to insert the classic “checkbox” in our document to create a form.
To do this, we first position the cursor at the desired position in the document, and then select the check box in the Developer tab.
See picture (click to enlarge)
After we have positioned our check boxes, we can also adjust them a bit by clicking the right mouse button over the checkbox in the context menu on “Properties”, and there can make various settings, such as:
“activated by default”, “the size”, or even a “help text”,
which is automatically displayed as a completion help to the future user when pressing F1.
See picture (click to enlarge)
3. Insert dropdown box in Word
3. Insert dropdown box in Word
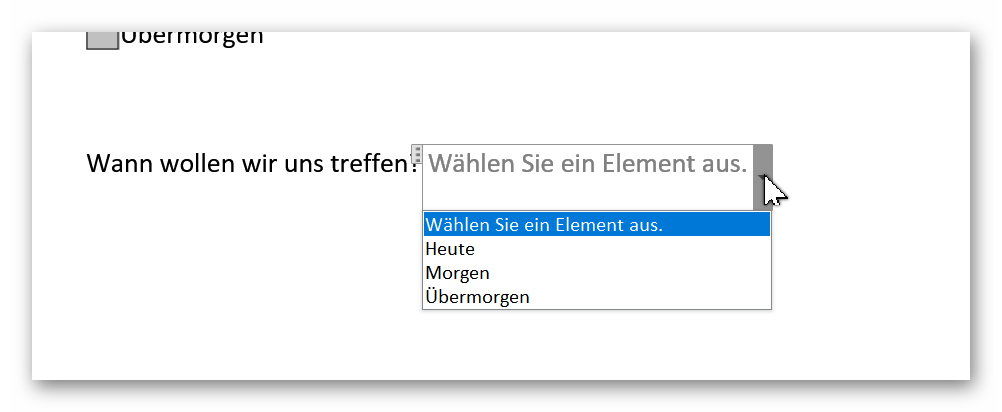
In our 2nd example we make it even more comfortable for the later user and offer a drop-down list to choose from.
This is especially useful when there are many selection points available, and you do not want to obstruct your document with check boxes.
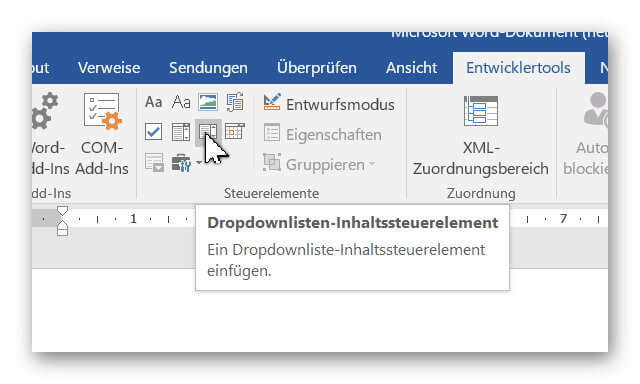
To do this, reposition the cursor at the desired position and select the “Drop-down list control” under the Developer tools.
See picture (click to enlarge)
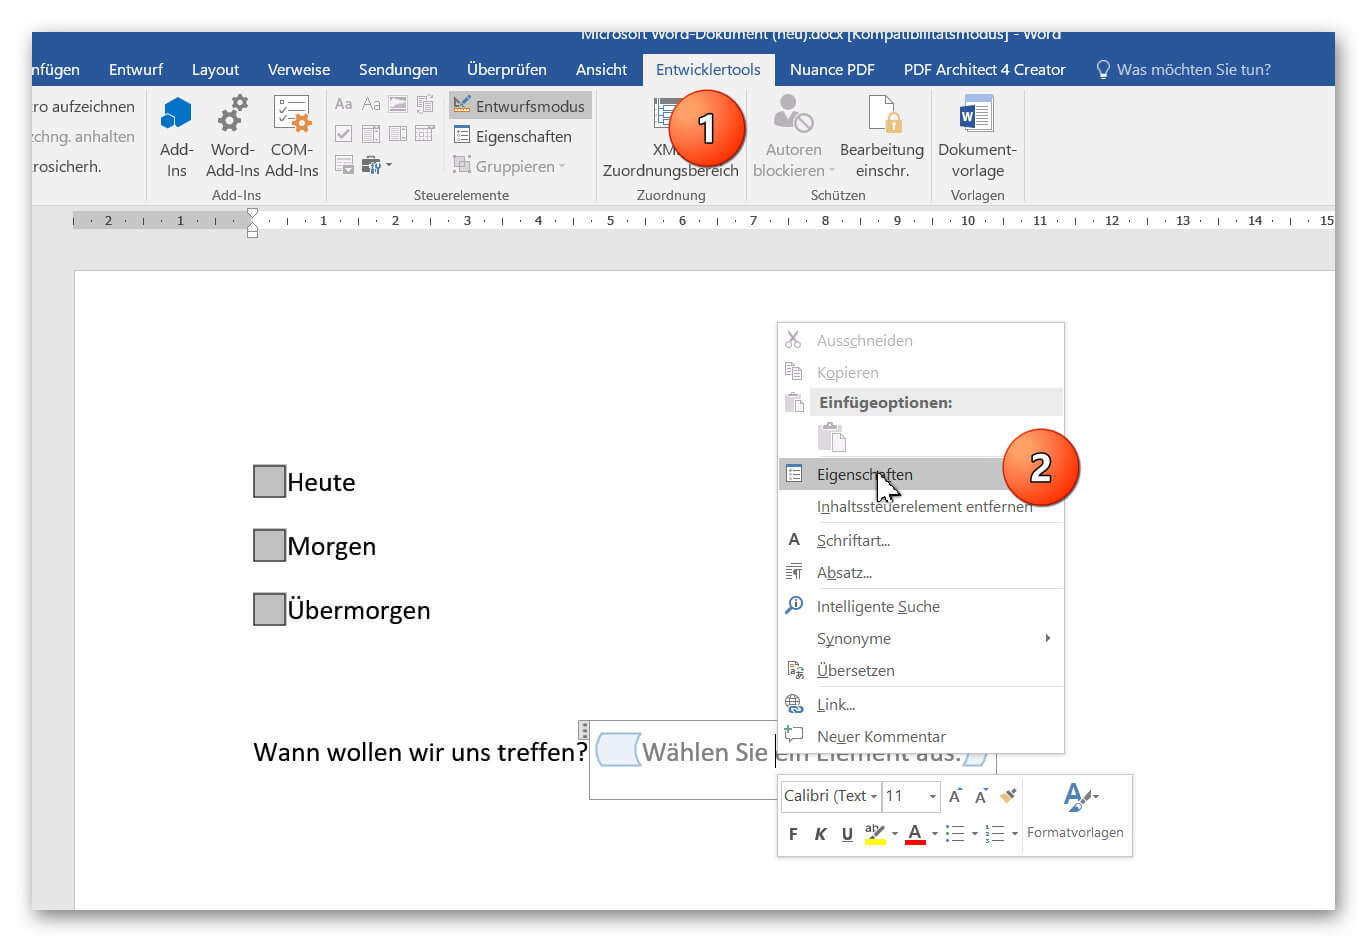
In order to populate our dropdown list with content from which to later select a user, we have to switch to “Design Mode”, and then right-click over the element in the context menu “Properties”.
See picture: (click to enlarge)
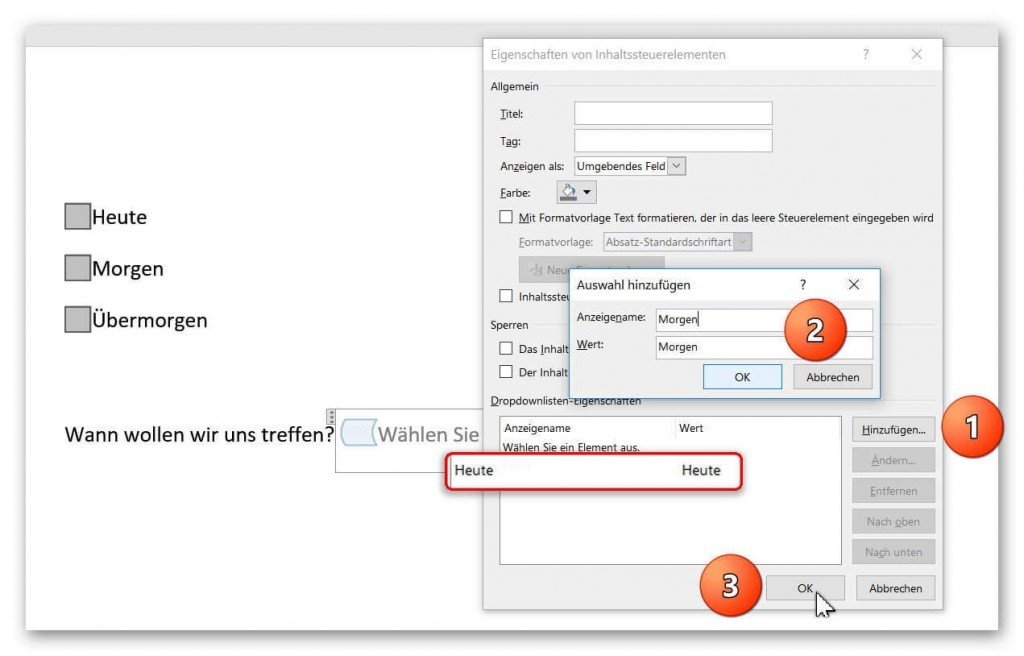
Here we can customize our dropdown box, and provide various choices as you wish.
Simply click on “Add” in the properties and enter the options you want to include later.
Finally, all you have to do is confirm with “Ok” and quit “Draft mode”.
See picture: (click to enlarge)
In our 2nd example we make it even more comfortable for the later user and offer a drop-down list to choose from.
This is especially useful when there are many selection points available, and you do not want to obstruct your document with check boxes.
To do this, reposition the cursor at the desired position and select the “Drop-down list control” under the Developer tools.
See picture (click to enlarge)
In order to populate our dropdown list with content from which to later select a user, we have to switch to “Design Mode”, and then right-click over the element in the context menu “Properties”.
See picture: (click to enlarge)
Here we can customize our dropdown box, and provide various choices as you wish.
Simply click on “Add” in the properties and enter the options you want to include later.
Finally, all you have to do is confirm with “Ok” and quit “Draft mode”.
See picture: (click to enlarge)
4. Activate Word processing protection
4. Activate Word processing protection
In order to finally receive a document in which our controls can take over their function (for example as a form), we have to activate processing protection as the final step.
Click on the tab:
- “Review” – “Restrict Editing”
- And there on “Processing restrictions (filling in forms)” – Apply protection now.
Note:
It is best to assign a password to prevent unauthorized editing of the form.
See picture:
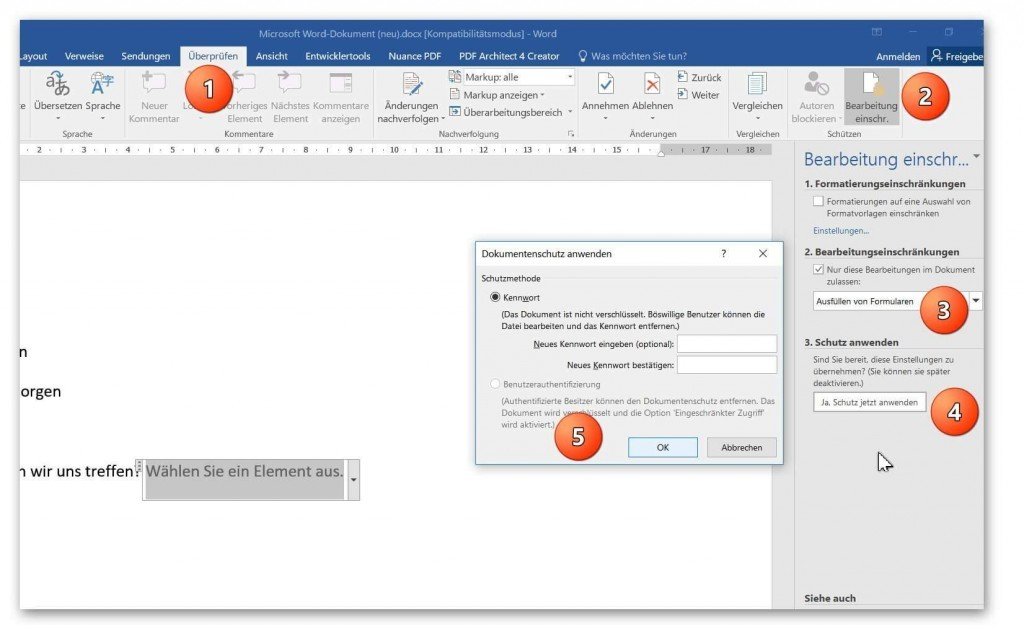
Then simply save the document as a normal Word file (docx).
When opening the file later, you can only fill in the form fields that you have set up for it.
In order to finally receive a document in which our controls can take over their function (for example as a form), we have to activate processing protection as the final step.
Click on the tab:
- “Review” – “Restrict Editing”
- And there on “Processing restrictions (filling in forms)” – Apply protection now.
Note:
It is best to assign a password to prevent unauthorized editing of the form.
See picture:
Then simply save the document as a normal Word file (docx).
When opening the file later, you can only fill in the form fields that you have set up for it.
Popular Posts:

Dynamic ranges in Excel: OFFSET function
The OFFSET function in Excel creates a flexible reference. Instead of fixing =SUM(B5:B7), the function finds the range itself, e.g., for the "last 3 months". Ideal for dynamic charts or dashboards that grow automatically.

Mastering the INDIRECT function in Excel
The INDIRECT function in Excel converts text into a real reference. Instead of manually typing =January!E10, use =INDIRECT(A2 & "!E10"), where A2 contains 'January'. This allows you to easily create dynamic summaries for multiple worksheets.

From assistant to agent: Microsoft’s Copilot
Copilot is growing up: Microsoft's AI is no longer an assistant, but a proactive agent. With "Vision," it sees your Windows desktop; in M365, it analyzes data as a "Researcher"; and in GitHub, it autonomously corrects code. The biggest update yet.

Windows 12: Where is it? The current status in October 2025
Everyone was waiting for Windows 12 in October 2025, but it didn't arrive. Instead, Microsoft is focusing on Windows 11 25H2 and "Copilot+ PC" features. We'll explain: Is Windows 12 canceled, postponed, or is it already available as an AI update for Windows 11?

Blocking websites on Windows using the hosts file
Want to block unwanted websites in Windows? You can do it without extra software using the hosts file. We'll show you how to edit the file as an administrator and redirect domains like example.de to 127.0.0.1. This will block them immediately in all browsers.

The “Zero Inbox” method with Outlook: How to permanently get your mailbox under control.
Caught red-handed? Your Outlook inbox has 1000+ emails? That's pure stress. Stop the email deluge with the "Zero Inbox" method. We'll show you how to clean up your inbox and regain control using Quick Steps and rules.
Offers 2024: Word & Excel Templates


Popular Posts:
Dynamic ranges in Excel: OFFSET function
The OFFSET function in Excel creates a flexible reference. Instead of fixing =SUM(B5:B7), the function finds the range itself, e.g., for the "last 3 months". Ideal for dynamic charts or dashboards that grow automatically.
Mastering the INDIRECT function in Excel
The INDIRECT function in Excel converts text into a real reference. Instead of manually typing =January!E10, use =INDIRECT(A2 & "!E10"), where A2 contains 'January'. This allows you to easily create dynamic summaries for multiple worksheets.
From assistant to agent: Microsoft’s Copilot
Copilot is growing up: Microsoft's AI is no longer an assistant, but a proactive agent. With "Vision," it sees your Windows desktop; in M365, it analyzes data as a "Researcher"; and in GitHub, it autonomously corrects code. The biggest update yet.
Windows 12: Where is it? The current status in October 2025
Everyone was waiting for Windows 12 in October 2025, but it didn't arrive. Instead, Microsoft is focusing on Windows 11 25H2 and "Copilot+ PC" features. We'll explain: Is Windows 12 canceled, postponed, or is it already available as an AI update for Windows 11?
Blocking websites on Windows using the hosts file
Want to block unwanted websites in Windows? You can do it without extra software using the hosts file. We'll show you how to edit the file as an administrator and redirect domains like example.de to 127.0.0.1. This will block them immediately in all browsers.
The “Zero Inbox” method with Outlook: How to permanently get your mailbox under control.
Caught red-handed? Your Outlook inbox has 1000+ emails? That's pure stress. Stop the email deluge with the "Zero Inbox" method. We'll show you how to clean up your inbox and regain control using Quick Steps and rules.
Offers 2024: Word & Excel Templates