Hide folders in Windows – Protect folders with password
Cyber security is also becoming increasingly important in the home. This tutorial is about encrypting files, hiding folders and password protecting folders in Windows. We’ll look at simply hiding and hiding folders in Windows, which doesn’t provide real security, but can provide a glimpse from unauthorized people.
Furthermore, it should also be about the encryption of files in Windows with on-board tools, and also where you can find your certificate files in Windows. Finally, let’s look at the options for password protecting folders in Windows.
Hide folders in Windows
Hide folders in Windows
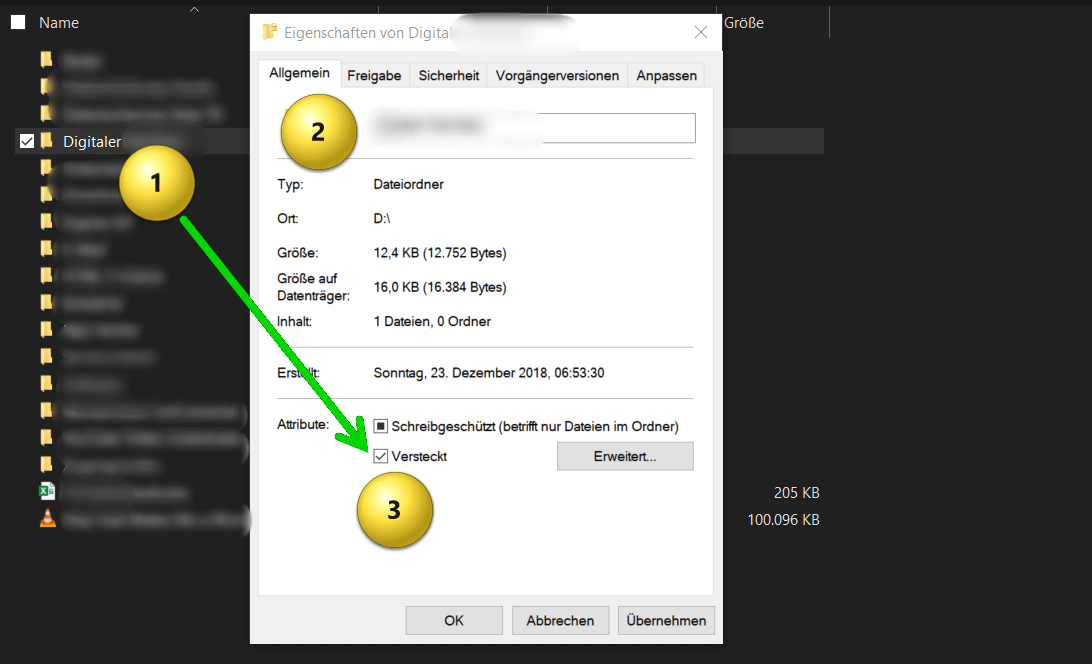
To hide folders in Windows, proceed as follows:
- Navigate to the folder you want to hide. You can do this in a number of ways, such as by opening File Explorer and navigating to the folder, or by typing the path directly in the address bar.
- Right-click the folder you want to hide and choose “Properties” from the context menu.
- In the folder’s properties, click the General tab to view the folder’s general properties.
- In the Attributes section you will see various options. Check the “Hidden” box to hide the folder. If you want, you can also check the “Read Only” box to protect the folder so that it cannot be accidentally deleted or modified.
- Then click “Apply” and “OK” to save the changes.
- The folder is now hidden. If you later want to show it again, you can do so by checking the “Show hidden files and folders” option in the folder options.
So you can see that it’s relatively easy to unhide hidden folders in Windows, which is why it’s also important to note that hiding a folder in Windows isn’t a security protection, as it’s relatively easy to unhide hidden files and folders. If you really want to secure a folder, you should instead use encryption techniques or other security measures to ensure that only authorized users can access it.
see fig. (click to enlarge)
Encrypt files in Windows
Encrypt files in Windows
In Windows there is an option to encrypt individual files or folders using the built-in encryption service called “Encrypting File System (EFS)”. Here are the steps to do this:
- Right-click the file or folder you want to encrypt.
- Select “Properties” from the drop down menu.
- Click on the “General” tab.
- Click on “Advanced“.
- Check the “Encrypt content to protect data” box.
- Click OK, then click Apply.
Windows will now automatically encrypt the file or folder. It will also create a certificate which you should save to ensure you can access it later.
However, it should be noted that EFS encryption only works on the same computer on which it was originally created. If you want to transfer the encrypted file or folder to another device, you need to export the certificate and import it on the other device to access the encrypted data.
After you encrypt a file or folder with EFS, a certificate is created that is used to decrypt the encrypted data. The certificate is automatically saved in the user certificate store.
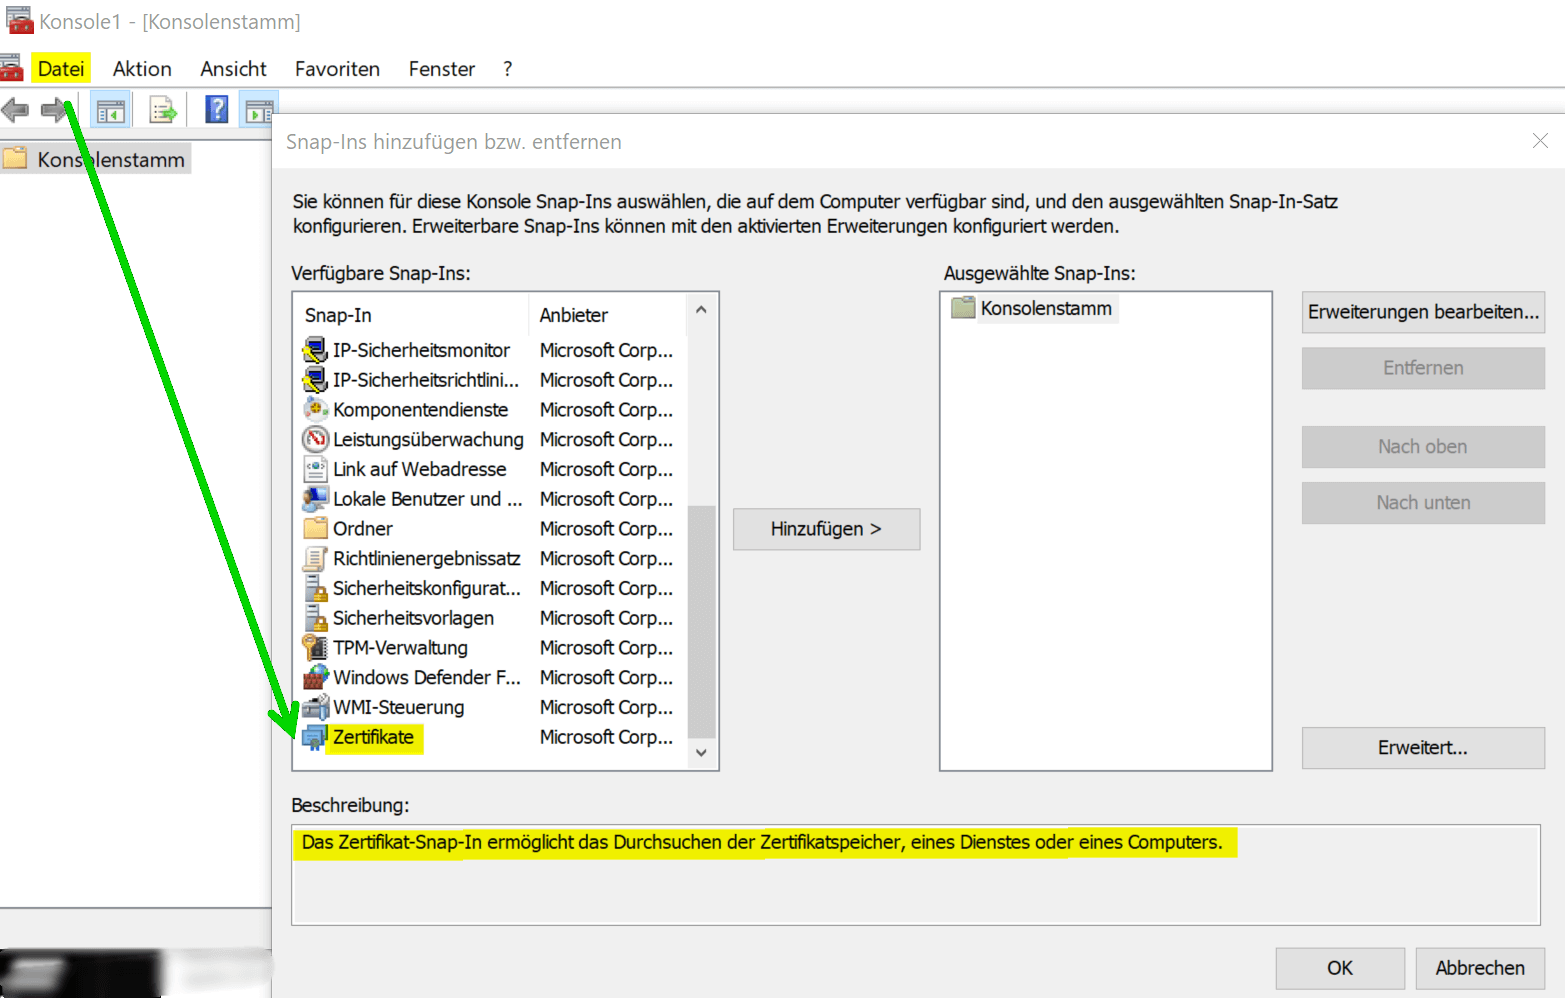
- To find the certificate, you can follow the steps below:
- Press Windows key + R to open the Run dialog.
- Enter “mmc” and click “OK“.
- On the File menu, click Add/Remove Snap-in.
- Select “Certificates” from the list of available snap-ins and click “Add“.
- Select “Computer account” and click “Next“.
- Select “Local Computer” and click “Finish“.
- Click OK to add the snap-in.
- Expand the Certificates (Local Computer) folder.
- Expand the Personal folder and click Certificates.
- Look for the certificate named “Encrypting File System” and click on it to select it.
The certificate is displayed in the details area. You can export the certificate to save it somewhere else or import it to another computer.
see fig. (click to enlarge)
In Windows there is an option to encrypt individual files or folders using the built-in encryption service called “Encrypting File System (EFS)”. Here are the steps to do this:
- Right-click the file or folder you want to encrypt.
- Select “Properties” from the drop down menu.
- Click on the “General” tab.
- Click on “Advanced“.
- Check the “Encrypt content to protect data” box.
- Click OK, then click Apply.
Windows will now automatically encrypt the file or folder. It will also create a certificate which you should save to ensure you can access it later.
However, it should be noted that EFS encryption only works on the same computer on which it was originally created. If you want to transfer the encrypted file or folder to another device, you need to export the certificate and import it on the other device to access the encrypted data.
After you encrypt a file or folder with EFS, a certificate is created that is used to decrypt the encrypted data. The certificate is automatically saved in the user certificate store.
- To find the certificate, you can follow the steps below:
- Press Windows key + R to open the Run dialog.
- Enter “mmc” and click “OK“.
- On the File menu, click Add/Remove Snap-in.
- Select “Certificates” from the list of available snap-ins and click “Add“.
- Select “Computer account” and click “Next“.
- Select “Local Computer” and click “Finish“.
- Click OK to add the snap-in.
- Expand the Certificates (Local Computer) folder.
- Expand the Personal folder and click Certificates.
- Look for the certificate named “Encrypting File System” and click on it to select it.
The certificate is displayed in the details area. You can export the certificate to save it somewhere else or import it to another computer.
see fig. (click to enlarge)
Folders in Windows with password protection
Folders in Windows with password protection
In Windows, unfortunately, there is still no native option to protect folders with a password. However, there are various third-party software that you can use to protect folders with a password. Below I will tell you how to password protect a folder using a third-party software:
- Download and install third-party folder password protection software on your computer. There are many different software options to choose from, such as Folder Guard, VeraCrypt, or Wise Folder Hider.
- Launch the installed software and navigate to the folder you want to protect.
- Choose the option to add a new password or change the password for the selected folder.
- Enter and confirm the desired password to protect the folder.
Restart the computer or close the software to ensure that the protected folder is no longer accessible unless you enter the correct password.
However, note that even third-party software has ways of getting around it, especially if someone has access to your computer. Therefore, you should also consider other security measures such as hiding files or encrypting folders to further protect your data.
There are several options for encrypting folders in Windows. Here are some of the most common software options:
- VeraCrypt – VeraCrypt is open source software for encrypting hard drives, partitions and folders. It offers strong encryption and is available for free.
- AxCrypt – AxCrypt is easy-to-use software that protects files and folders with AES encryption. It also offers optional cloud storage integration and comes in both free and paid versions.
- BitLocker – BitLocker is an integrated encryption software of Windows and offers strong encryption of hard disks, partitions and also folders. However, it is only available in the higher versions of Windows (Pro, Enterprise, Education).
- 7-Zip – 7-Zip is free, open source software that can be used to compress and encrypt files and folders. It offers AES 256-bit encryption and is easy to use.
- Folder Lock – Folder Lock is paid software that protects files and folders with 256-bit AES encryption. It also offers additional features like password manager, cloud backup and shredder to securely delete files.
These software options can help you make your folders and files in Windows more secure by using strong encryption. However, you should always ensure that you use strong passwords and keep your encryption keys safe to protect your data.
After you encrypt a file or folder with EFS, a certificate is created that is used to decrypt the encrypted data. The certificate is automatically saved in the user certificate store.
- To find the certificate, you can follow the steps below:
- Press Windows key + R to open the Run dialog.
- Enter “mmc” and click “OK“.
- On the File menu, click Add/Remove Snap-in.
- Select “Certificates” from the list of available snap-ins and click “Add“.
- Select “Computer account” and click “Next“.
- Select “Local Computer” and click “Finish“.
- Click OK to add the snap-in.
- Expand the Certificates (Local Computer) folder.
- Expand the Personal folder and click Certificates.
- Look for the certificate named “Encrypting File System” and click on it to select it.
The certificate is displayed in the details area. You can export the certificate to save it somewhere else or import it to another computer.
Popular Posts:

5 simple security rules against phishing and spam that everyone should know
Deceptively authentic emails from your bank, DHL, or PayPal? That's phishing! Data theft and viruses are a daily threat. We'll show you 5 simple rules (2FA, password managers, etc.) to protect yourself immediately and effectively and help you spot scammers.

The 5 best tips for a clean folder structure on your PC and in the cloud
Say goodbye to file chaos! "Offer_final_v2.docx" is a thing of the past. Learn 5 simple tips for a perfect folder structure on your PC and in the cloud (OneDrive). With proper file naming and archive rules, you'll find everything instantly.

Never do the same thing again: How to record a macro in Excel
Tired of repetitive tasks in Excel? Learn how to create your first personal "magic button" with the macro recorder. Automate formatting and save hours – no programming required! Click here for easy instructions.

IMAP vs. Local Folders: The secret to your Outlook structure and why it matters
Do you know the difference between IMAP and local folders in Outlook? Incorrect use can lead to data loss! We'll explain simply what belongs where, how to clean up your mailbox, and how to archive emails securely and for the long term.

Der ultimative Effizienz-Boost: Wie Excel, Word und Outlook für Sie zusammenarbeiten
Schluss mit manuellem Kopieren! Lernen Sie, wie Sie Excel-Listen, Word-Vorlagen & Outlook verbinden, um personalisierte Serien-E-Mails automatisch zu versenden. Sparen Sie Zeit, vermeiden Sie Fehler und steigern Sie Ihre Effizienz. Hier geht's zur einfachen Anleitung!

Agentic AI: The next quantum leap in artificial intelligence?
Forget simple chatbots! Agentic AI is here: Autonomous AI that plans, learns, and solves complex tasks for you. Discover how AI agents will revolutionize the world of work and your everyday life. Are you ready for the future of artificial intelligence?
Offers 2024: Word & Excel Templates


Popular Posts:
5 simple security rules against phishing and spam that everyone should know
Deceptively authentic emails from your bank, DHL, or PayPal? That's phishing! Data theft and viruses are a daily threat. We'll show you 5 simple rules (2FA, password managers, etc.) to protect yourself immediately and effectively and help you spot scammers.
The 5 best tips for a clean folder structure on your PC and in the cloud
Say goodbye to file chaos! "Offer_final_v2.docx" is a thing of the past. Learn 5 simple tips for a perfect folder structure on your PC and in the cloud (OneDrive). With proper file naming and archive rules, you'll find everything instantly.
Never do the same thing again: How to record a macro in Excel
Tired of repetitive tasks in Excel? Learn how to create your first personal "magic button" with the macro recorder. Automate formatting and save hours – no programming required! Click here for easy instructions.
IMAP vs. Local Folders: The secret to your Outlook structure and why it matters
Do you know the difference between IMAP and local folders in Outlook? Incorrect use can lead to data loss! We'll explain simply what belongs where, how to clean up your mailbox, and how to archive emails securely and for the long term.
Der ultimative Effizienz-Boost: Wie Excel, Word und Outlook für Sie zusammenarbeiten
Schluss mit manuellem Kopieren! Lernen Sie, wie Sie Excel-Listen, Word-Vorlagen & Outlook verbinden, um personalisierte Serien-E-Mails automatisch zu versenden. Sparen Sie Zeit, vermeiden Sie Fehler und steigern Sie Ihre Effizienz. Hier geht's zur einfachen Anleitung!
Agentic AI: The next quantum leap in artificial intelligence?
Forget simple chatbots! Agentic AI is here: Autonomous AI that plans, learns, and solves complex tasks for you. Discover how AI agents will revolutionize the world of work and your everyday life. Are you ready for the future of artificial intelligence?
Offers 2024: Word & Excel Templates