Hide folders in Windows – Protect folders with password
Cyber security is also becoming increasingly important in the home. This tutorial is about encrypting files, hiding folders and password protecting folders in Windows. We’ll look at simply hiding and hiding folders in Windows, which doesn’t provide real security, but can provide a glimpse from unauthorized people.
Furthermore, it should also be about the encryption of files in Windows with on-board tools, and also where you can find your certificate files in Windows. Finally, let’s look at the options for password protecting folders in Windows.
Hide folders in Windows
Hide folders in Windows
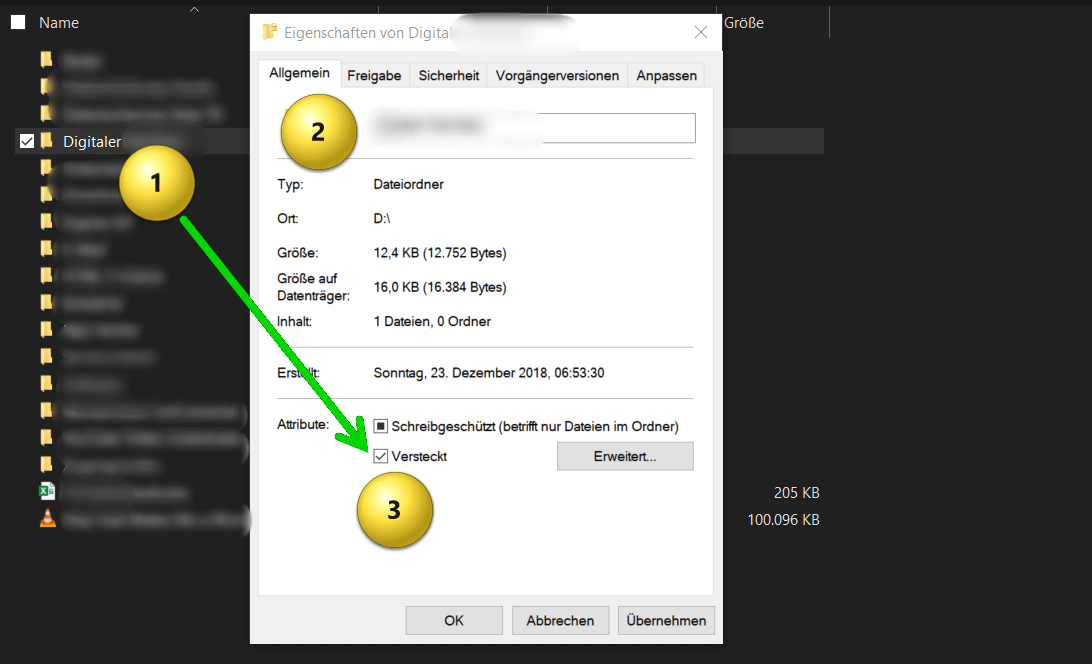
To hide folders in Windows, proceed as follows:
- Navigate to the folder you want to hide. You can do this in a number of ways, such as by opening File Explorer and navigating to the folder, or by typing the path directly in the address bar.
- Right-click the folder you want to hide and choose “Properties” from the context menu.
- In the folder’s properties, click the General tab to view the folder’s general properties.
- In the Attributes section you will see various options. Check the “Hidden” box to hide the folder. If you want, you can also check the “Read Only” box to protect the folder so that it cannot be accidentally deleted or modified.
- Then click “Apply” and “OK” to save the changes.
- The folder is now hidden. If you later want to show it again, you can do so by checking the “Show hidden files and folders” option in the folder options.
So you can see that it’s relatively easy to unhide hidden folders in Windows, which is why it’s also important to note that hiding a folder in Windows isn’t a security protection, as it’s relatively easy to unhide hidden files and folders. If you really want to secure a folder, you should instead use encryption techniques or other security measures to ensure that only authorized users can access it.
see fig. (click to enlarge)
Encrypt files in Windows
Encrypt files in Windows
In Windows there is an option to encrypt individual files or folders using the built-in encryption service called “Encrypting File System (EFS)”. Here are the steps to do this:
- Right-click the file or folder you want to encrypt.
- Select “Properties” from the drop down menu.
- Click on the “General” tab.
- Click on “Advanced“.
- Check the “Encrypt content to protect data” box.
- Click OK, then click Apply.
Windows will now automatically encrypt the file or folder. It will also create a certificate which you should save to ensure you can access it later.
However, it should be noted that EFS encryption only works on the same computer on which it was originally created. If you want to transfer the encrypted file or folder to another device, you need to export the certificate and import it on the other device to access the encrypted data.
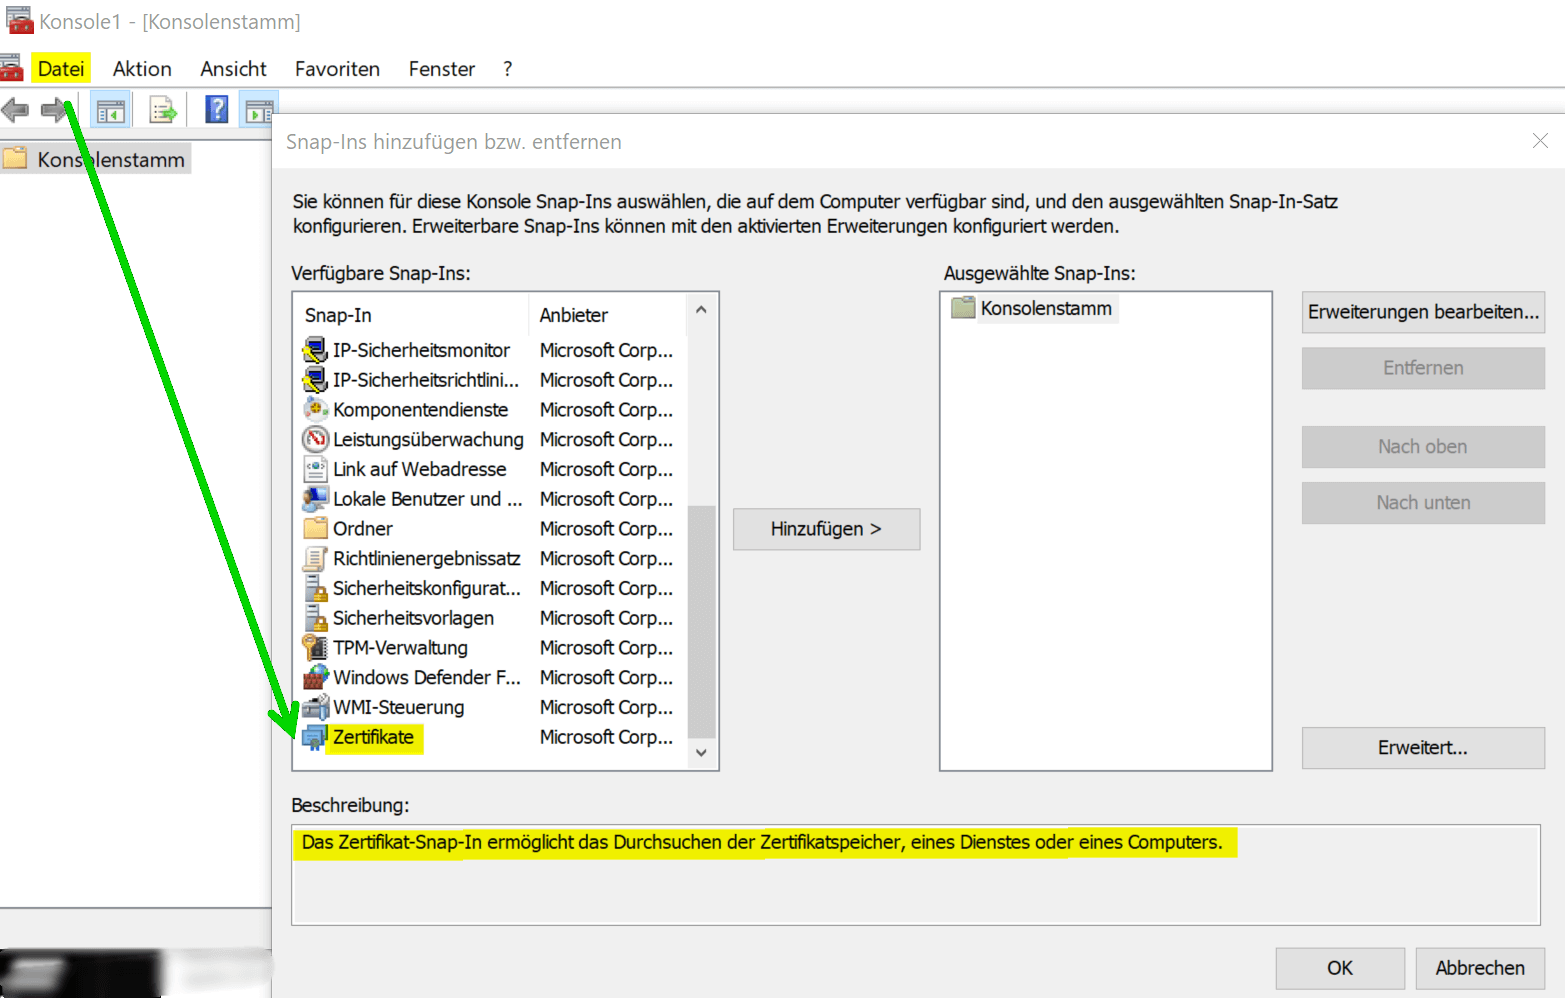
After you encrypt a file or folder with EFS, a certificate is created that is used to decrypt the encrypted data. The certificate is automatically saved in the user certificate store.
- To find the certificate, you can follow the steps below:
- Press Windows key + R to open the Run dialog.
- Enter “mmc” and click “OK“.
- On the File menu, click Add/Remove Snap-in.
- Select “Certificates” from the list of available snap-ins and click “Add“.
- Select “Computer account” and click “Next“.
- Select “Local Computer” and click “Finish“.
- Click OK to add the snap-in.
- Expand the Certificates (Local Computer) folder.
- Expand the Personal folder and click Certificates.
- Look for the certificate named “Encrypting File System” and click on it to select it.
The certificate is displayed in the details area. You can export the certificate to save it somewhere else or import it to another computer.
see fig. (click to enlarge)
In Windows there is an option to encrypt individual files or folders using the built-in encryption service called “Encrypting File System (EFS)”. Here are the steps to do this:
- Right-click the file or folder you want to encrypt.
- Select “Properties” from the drop down menu.
- Click on the “General” tab.
- Click on “Advanced“.
- Check the “Encrypt content to protect data” box.
- Click OK, then click Apply.
Windows will now automatically encrypt the file or folder. It will also create a certificate which you should save to ensure you can access it later.
However, it should be noted that EFS encryption only works on the same computer on which it was originally created. If you want to transfer the encrypted file or folder to another device, you need to export the certificate and import it on the other device to access the encrypted data.
After you encrypt a file or folder with EFS, a certificate is created that is used to decrypt the encrypted data. The certificate is automatically saved in the user certificate store.
- To find the certificate, you can follow the steps below:
- Press Windows key + R to open the Run dialog.
- Enter “mmc” and click “OK“.
- On the File menu, click Add/Remove Snap-in.
- Select “Certificates” from the list of available snap-ins and click “Add“.
- Select “Computer account” and click “Next“.
- Select “Local Computer” and click “Finish“.
- Click OK to add the snap-in.
- Expand the Certificates (Local Computer) folder.
- Expand the Personal folder and click Certificates.
- Look for the certificate named “Encrypting File System” and click on it to select it.
The certificate is displayed in the details area. You can export the certificate to save it somewhere else or import it to another computer.
see fig. (click to enlarge)
Folders in Windows with password protection
Folders in Windows with password protection
In Windows, unfortunately, there is still no native option to protect folders with a password. However, there are various third-party software that you can use to protect folders with a password. Below I will tell you how to password protect a folder using a third-party software:
- Download and install third-party folder password protection software on your computer. There are many different software options to choose from, such as Folder Guard, VeraCrypt, or Wise Folder Hider.
- Launch the installed software and navigate to the folder you want to protect.
- Choose the option to add a new password or change the password for the selected folder.
- Enter and confirm the desired password to protect the folder.
Restart the computer or close the software to ensure that the protected folder is no longer accessible unless you enter the correct password.
However, note that even third-party software has ways of getting around it, especially if someone has access to your computer. Therefore, you should also consider other security measures such as hiding files or encrypting folders to further protect your data.
There are several options for encrypting folders in Windows. Here are some of the most common software options:
- VeraCrypt – VeraCrypt is open source software for encrypting hard drives, partitions and folders. It offers strong encryption and is available for free.
- AxCrypt – AxCrypt is easy-to-use software that protects files and folders with AES encryption. It also offers optional cloud storage integration and comes in both free and paid versions.
- BitLocker – BitLocker is an integrated encryption software of Windows and offers strong encryption of hard disks, partitions and also folders. However, it is only available in the higher versions of Windows (Pro, Enterprise, Education).
- 7-Zip – 7-Zip is free, open source software that can be used to compress and encrypt files and folders. It offers AES 256-bit encryption and is easy to use.
- Folder Lock – Folder Lock is paid software that protects files and folders with 256-bit AES encryption. It also offers additional features like password manager, cloud backup and shredder to securely delete files.
These software options can help you make your folders and files in Windows more secure by using strong encryption. However, you should always ensure that you use strong passwords and keep your encryption keys safe to protect your data.
After you encrypt a file or folder with EFS, a certificate is created that is used to decrypt the encrypted data. The certificate is automatically saved in the user certificate store.
- To find the certificate, you can follow the steps below:
- Press Windows key + R to open the Run dialog.
- Enter “mmc” and click “OK“.
- On the File menu, click Add/Remove Snap-in.
- Select “Certificates” from the list of available snap-ins and click “Add“.
- Select “Computer account” and click “Next“.
- Select “Local Computer” and click “Finish“.
- Click OK to add the snap-in.
- Expand the Certificates (Local Computer) folder.
- Expand the Personal folder and click Certificates.
- Look for the certificate named “Encrypting File System” and click on it to select it.
The certificate is displayed in the details area. You can export the certificate to save it somewhere else or import it to another computer.
Popular Posts:

So sieht das wirklich perfekte Homeoffice-Setup für 2026 aus
Ihr Homeoffice ist veraltet? Steigern Sie 2026 Produktivität & Gesundheit. Unser Guide zeigt das perfekte Setup: von ergonomischen Stühlen und 4K-Webcams bis zu Mesh-WLAN und Kabelmanagement. So investieren Sie in Ihre Karriere.

Internet, Telefon & TV: Die besten Komplettpakete
Internet, TV & Telefon aus einer Hand? Wir vergleichen die Komplettpakete von Telekom, Vodafone, O2 & 1&1. Wer punktet bei Speed, TV-Komfort (MagentaTV vs. GigaTV) und Preis? So finden Sie das beste Triple-Play-Angebot für Ihre Adresse.

5 Anzeichen, dass dein Chef dich im Homeoffice digital überwacht
Nur weil du im Homeoffice bist, heißt das nicht, dass dir niemand zusieht. "Bossware" ist auf dem Vormarsch. Wir zeigen 5 subtile Anzeichen für digitale Überwachung – von "Teams-Status"-Kult bis zu verdächtigen IT-Tools. So erkennst du die Warnsignale und schützt deine Karriere.

Schluss mit dem Tool-Chaos: 5 Apps, die Euer Office wirklich produktiver machen
Schluss mit digitaler Reibung: Diese 5 Apps machen Ihr Büro wirklich produktiver. Entdecken Sie, wie Asana, Loom, Notion, Zapier und Slack die Effizienz steigern, Meetings reduzieren und Ihr Team smarter vernetzen – wenn man sie richtig einsetzt.

AI in everyday office life: Your new invisible colleague
AI won't replace you – but those who use it will have a competitive edge. Make AI your co-pilot in the office! We'll show you four concrete hacks for faster emails, better meeting notes, and solved Excel problems. Get started today, no IT degree required.

Fünf vor Zwölf: Wie Sie erkennen, dass Sie kurz vor dem Burnout stehen
Erschöpfung ist normal, doch wenn das Wochenende keine Erholung mehr bringt und Zynismus die Motivation ersetzt, stehen Sie kurz vor dem Burnout. Erfahren Sie, welche 7 Warnsignale Sie niemals ignorieren dürfen und warum es jetzt lebenswichtig ist, die Notbremse zu ziehen
Offers 2024: Word & Excel Templates


Popular Posts:
So sieht das wirklich perfekte Homeoffice-Setup für 2026 aus
Ihr Homeoffice ist veraltet? Steigern Sie 2026 Produktivität & Gesundheit. Unser Guide zeigt das perfekte Setup: von ergonomischen Stühlen und 4K-Webcams bis zu Mesh-WLAN und Kabelmanagement. So investieren Sie in Ihre Karriere.
Internet, Telefon & TV: Die besten Komplettpakete
Internet, TV & Telefon aus einer Hand? Wir vergleichen die Komplettpakete von Telekom, Vodafone, O2 & 1&1. Wer punktet bei Speed, TV-Komfort (MagentaTV vs. GigaTV) und Preis? So finden Sie das beste Triple-Play-Angebot für Ihre Adresse.
5 Anzeichen, dass dein Chef dich im Homeoffice digital überwacht
Nur weil du im Homeoffice bist, heißt das nicht, dass dir niemand zusieht. "Bossware" ist auf dem Vormarsch. Wir zeigen 5 subtile Anzeichen für digitale Überwachung – von "Teams-Status"-Kult bis zu verdächtigen IT-Tools. So erkennst du die Warnsignale und schützt deine Karriere.
Schluss mit dem Tool-Chaos: 5 Apps, die Euer Office wirklich produktiver machen
Schluss mit digitaler Reibung: Diese 5 Apps machen Ihr Büro wirklich produktiver. Entdecken Sie, wie Asana, Loom, Notion, Zapier und Slack die Effizienz steigern, Meetings reduzieren und Ihr Team smarter vernetzen – wenn man sie richtig einsetzt.
AI in everyday office life: Your new invisible colleague
AI won't replace you – but those who use it will have a competitive edge. Make AI your co-pilot in the office! We'll show you four concrete hacks for faster emails, better meeting notes, and solved Excel problems. Get started today, no IT degree required.
Fünf vor Zwölf: Wie Sie erkennen, dass Sie kurz vor dem Burnout stehen
Erschöpfung ist normal, doch wenn das Wochenende keine Erholung mehr bringt und Zynismus die Motivation ersetzt, stehen Sie kurz vor dem Burnout. Erfahren Sie, welche 7 Warnsignale Sie niemals ignorieren dürfen und warum es jetzt lebenswichtig ist, die Notbremse zu ziehen
Offers 2024: Word & Excel Templates