Our 10 best tips and shortcuts for Outlook
Anyone who works frequently with Outlook knows how to appreciate the software. Because you have significantly more options here than with most other e-mail programs. In this article, we have selected what we consider to be the 10 most important and best tips and shortcuts that you may not have known about. This makes everyday work with Outlook much more efficient once you get used to using these tools.


Keyboard shortcuts in Outlook
Keyboard shortcuts in Outlook
Please note that these key combinations refer to the Windows version of Outlook and may be different in other versions of Outlook or in other operating systems.
Please note that these key combinations refer to the Windows version of Outlook and may be different in other versions of Outlook or in other operating systems.
Follow-up in Outlook
Follow-up in Outlook
The follow-up feature in Outlook allows you to be reminded of important emails and tasks. It can be used to remind you to reply to emails, to see if an email you’ve sent has been read or replied to, and to create and manage tasks right from your inbox.
Email tracking:
- To remind you of an email, open the email and click the “Follow Up” button on the menu bar. Choose one of the follow-up date options or click “Custom” to set a specific date and time.
- To track an email you sent, when composing the email, click the Options tab, then click Tracking Options. Check the “Request a Read Receipt” or “Request a
- Return Receipt” box.
Task Tracking:
- To create a task from an email, drag the email to your Tasks folder or click the “Follow Up” button and choose “Add Task“.
- In the task window, you can set a due date, add a reminder, and enter notes. Click “Save & Close” when done.
- You can find your tasks in your tasks folder and in the to-do bar on the right side of your inbox. You can click on a task to open and edit it, and mark it as complete by clicking the checkbox next to its name.
The tracking feature can be of great help to ensure that no important emails or tasks are overlooked and to keep your inbox organized.
Conversational mode in Outlook
Conversational mode in Outlook
Conversation mode in Outlook is a useful feature that helps keep the inbox organized and clutter free. It groups all emails that belong to a specific topic or thread together, making them easier to track. To enable and use conversational mode in Outlook:
Activation of conversation mode:
- On the Outlook menu bar, click the View tab.
- In the “View” menu, check the “Show as Conversations” box.
- A dialog box will open asking if you want to apply this setting to this specific folder or to all folders. Make your selection and click OK.
Working with conversation mode:
- After turning on conversation mode, you will see in your inbox that emails with the same subject are grouped in a collapsible thread.
- Click the arrow icon to the left of the conversation subject to collapse or expand the entire conversation.
- When you open an email from within the conversation, you’ll see arrows at the top and bottom of the message that you can use to navigate through the conversation.
- In the Home tab, you can clean up the conversation to remove redundant messages or ignore the entire conversation to automatically delete future messages with the same subject.
- In the View menu, you can click Conversation Settings to set more conversation mode options, such as: B. whether to show messages in other folders in the conversation and whether to always show messages with the most recent message at the top.
Conversational mode can be a tremendous help in keeping track of complex email chains, especially in multi-stakeholder discussions.
Share calendar in Outlook
Share calendar in Outlook
Sharing your calendar in Microsoft Outlook is a great coordination and collaboration tool.
Share calendars in Outlook for desktop:
- Open Outlook and go to the calendar view by clicking the calendar icon at the bottom of the navigation bar.
- Right-click the calendar you want to share and choose Share > Email Calendar.
- In the new window, select the level of detail you want to share. You can choose to share availability only, limited details, or full details.
- Enter the email addresses of the people you want to share the calendar with and click Send.
Share calendars in Outlook.com (Outlook Web App):
- Click the calendar icon at the bottom left of the view.
- Right-click the calendar you want to share and select “Share Calendar“.
- Enter the email address of the person you want to share your calendar with and choose what permissions you want that person to have.
- Click “Share“.
Please note that in both cases you can control the permissions that the recipients have. You can allow them to only see when you’re busy, see specific event details, or edit your calendar entirely. Also note that certain features may require specific Outlook versions or subscription levels.
Scheduling emails in Outlook
Scheduling emails in Outlook
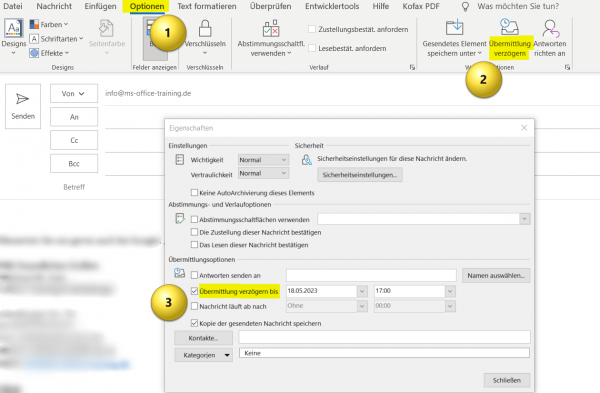
In Microsoft Outlook, you can schedule emails to be sent at a specific time in the future. Here’s how to create a scheduled email in Outlook for Windows:
- Open Outlook and create a new email by clicking “New Email” or pressing Ctrl + Shift + M on your keyboard.
- Enter the necessary information for your email, including recipient, subject, and email body.
- Click the Options tab on the menu bar.
- Click Delay Delivery in the More Options group.
- In the Properties dialog box, under Delivery Options, select the Delay Delivery Until check box and select the date and time for the message to be delivered.
- Click “Close” to close the dialog box.
- Click Send to save and schedule the email.
- The e-mail remains in the “Outbox” folder until the selected time for delivery. If you are using a local installation of Outlook, make sure your computer and Outlook are active at this time.
see fig. (click to enlarge)
For Outlook on the web (Outlook.com or Outlook on Office 365), scheduled email delivery works even when you’re not online, because at that point the Exchange Server does it for you.
Task management in Outlook
Task management in Outlook
Microsoft Outlook offers a comprehensive system for managing tasks. We explain how you can use task management in Outlook with the following basic steps:
Create task:
- Click the task icon at the bottom of the navigation bar (it looks like a checklist).
- Click “New Task” in the task view or press Ctrl + Shift + K on your keyboard.
- Enter a subject for the task, set a start date, due date and status. You can also set a priority and enter more details in the note field.
Manage Tasks:
- Your tasks are listed in the task view. Incomplete tasks are sorted by due date, with the most urgent tasks at the top.
- You can mark tasks as “Completed” by clicking the small box to the left of the task name. Completed tasks are displayed at the bottom of the list.
- You can edit tasks by double-clicking them and changing the details.
- You can delete tasks by selecting them and pressing the Delete key on your keyboard or by clicking “Delete” in the menu bar.
Delegate tasks:
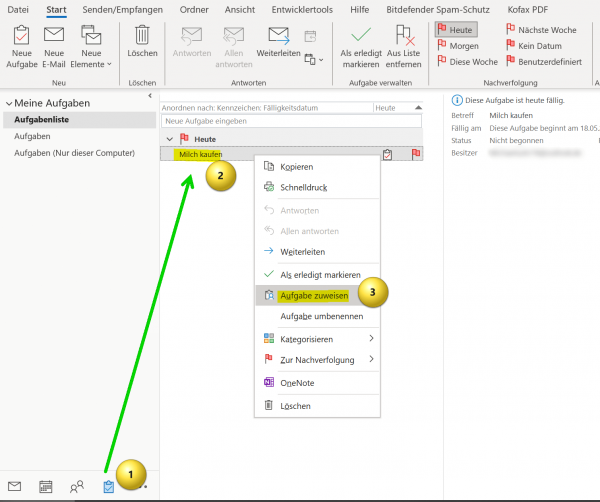
- You can delegate a task to someone else by clicking “Delegate Task” in the menu bar or by pressing Ctrl + Alt + F on your keyboard.
- Enter the name of the person you want to delegate the task to and click Submit. The person receives an email with the task and can accept or reject it.
Set reminders:
- When creating or editing a task, you can set a reminder to remind you of the task at a specific time.
- You can also add the reminder later by right-clicking on the task and selecting “Reminder“.
Outlook tasks can also be integrated with other features of Outlook, such as calendar and email. For example, you can turn an email into a task by dragging it into the Tasks folder. You can also view tasks on your calendar by turning on “To-Do Bar” in the calendar options.
see fig. (click to enlarge)
Quick Steps in Outlook
Quick Steps in Outlook
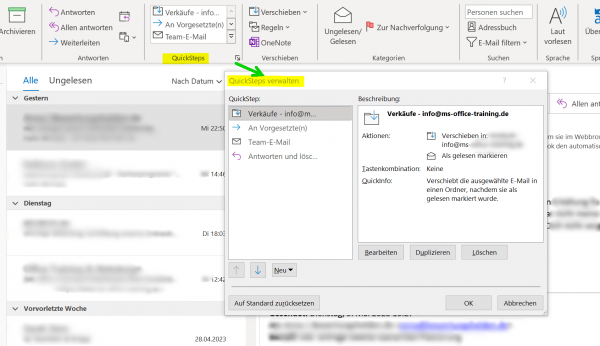
Quick Steps in Outlook allow you to apply multiple actions to emails at once that you perform frequently. You can use preset Quick Steps or create your own. You can use Quick Steps in Outlook with the following steps:
Using Quick Steps:
- Go to your inbox and select an email.
- Go to the “Home” tab in the menu bar and locate the Quick Steps group.
- Select one of the preset Quick Steps. Some commonly used Quick Steps are Forward to Manager, Move to Folder, and Mark Complete.
Creating a new Quick Step:
- In the Quick Steps group, click Create New.
- Enter a name for the new Quick Step.
- Under “Choose an action” choose the action you want to take. If you want to perform multiple actions, click Add Action.
- Optionally, you can also add a keyboard shortcut and tooltip text.
- Click “Finish” to create the new Quick Step.
Editing or deleting a Quick Step:
- Right-click a Quick Step and choose Edit or Delete.
- When you edit a Quick Step, you can change its actions, shortcut keys, and tooltip text.
- Deleting a Quick Step permanently removes it from the list.
see fig. (click to enlarge)
Quick Steps can be a huge time saver, especially if you perform frequently repeated tasks. It’s a good idea to take some time to set up Quick Steps that fit the way you work.
Rules in Outlook
Rules in Outlook
With the rules function of Outlook you can automatically manage and sort your e-mails. For example, you can create a rule that moves all emails from a specific sender to a specific folder. We have written a separate article on the subject of “Rules in Outlook” which you can find here >>>
With the rules function of Outlook you can automatically manage and sort your e-mails. For example, you can create a rule that moves all emails from a specific sender to a specific folder. We have written a separate article on the subject of “Rules in Outlook” which you can find here >>>
Search function in Outlook
Search function in Outlook
The search function in Microsoft Outlook is a very powerful tool that allows you to quickly find specific emails, appointments, contacts and other items. To do this, proceed as follows:
Simple search:
- In the search box at the top of the Outlook window, type a word or phrase you want to search for and press Enter.
- Outlook searches the current folder and displays all items that match the search criteria.
Advanced Search:
- Click the search box and then click the Search Tools tab on the menu bar.
- Click on “Search Tools” and then on “Advanced Search“.
- The Advanced Search dialog allows you to enter more specific search criteria, such as searching only in specific fields, searching for
- Items created within a specific date range or searching for items that have specific categories.
Search Folder:
- Search folders are a special type of folder that automatically includes all items that match specific search criteria. For example, you can create a search folder for all unread emails, or for all emails that contain a specific term.
- To create a new search folder, right-click “Search Folder” in the folder list and select “New Search Folder“. Select the criteria you want and click OK.
Search Operators:
- You can use search operators to refine your search. For example:
- AND (e.g., cat AND dog) finds items that contain both terms.
- OR (e.g., cat OR dog) finds items that contain either of the terms.
- NOT (e.g., cat NOT dog) finds items that contain the first term but not the second.
- Quotation marks (e.g., “cat dog”) finds items that contain that exact phrase.
- Parentheses can be used to control the order of operators (e.g., (cat OR dog) AND mouse).
The search feature in Outlook can save you a lot of time by helping you find exactly what you’re looking for, even in a large mailbox or calendar. It’s worth spending a little time to learn how to use them effectively.
Out of office message in Outlook
Out of office message in Outlook
If you’re on vacation or unavailable, you can set up an automatic out-of-office message to be sent automatically to people who email you. We have created a separate article on this topic, which you can find here >>>
If you’re on vacation or unavailable, you can set up an automatic out-of-office message to be sent automatically to people who email you. We have created a separate article on this topic, which you can find here >>>
Popular Posts:
With the webcam to your dream job: Preparation for the video job interview!
Streamline your video interview with our tips on technique, setting, dress, body language and preparation. It's not quite success from the sofa, but this is where you can prove your professionalism.
IT security: The deceptive appearance of digital security
In a digitized world, IT security is an important factor. But technology alone is not enough. A holistic strategy is needed that also takes into account the human component.
Import Stock Quotes into Excel – Tutorial
Importing stock quotes into Excel is not that difficult. And you can do a lot with it. We show you how to do it directly without Office 365.
Create Excel Budget Book – with Statistics – Tutorial
Create your own Excel budget book with a graphical dashboard, statistics, trends and data cut-off. A lot is possible with pivot tables and pivot charts.
Excel random number generator – With Analysis function
You can create random numbers in Excel using a function. But there are more possibilities with the analysis function in Excel.
Excel Database with Input Form and Search Function
So erstellen Sie eine Datenbank mit Eingabemaske und Suchfunktion OHNE VBA KENNTNISSE in Excel ganz einfach. Durch eine gut versteckte Funktion in Excel geht es recht einfach.

